2006 SUBARU IMPREZA ECO mode
[x] Cancel search: ECO modePage 228 of 365

8
Driving tips
New vehicle break-in driving the first 1,000
miles (1,600 km) .................................. ............ 8-2
Fuel economy hints ................................ ........... 8-2
Engine exhaust gas (Carbon monoxide) ......... 8-2
Catalytic converter ............................... .............. 8-3
Periodic inspections .............................. ............ 8-4
Driving in foreign countries ...................... ........ 8-4
Driving tips for AWD vehicles ..................... ...... 8-5
Off road driving .................................. ................ 8-6
All AWD models except OUTBACK SPORT and vehicles with 17 inch tires ....................... ............ 8-6
OUTBACK SPORT ..................................... ............. 8-6
Winter driving .................................... ................. 8-8
Operation during cold weather ..................... ......... 8-8
Driving on snowy and icy roads .................... ........ 8-9
Corrosion protection .............................. ................ 8-10
Snow tires ........................................ ....................... 8-10
Tire chains ....................................... ........................ 8-11
Rocking the vehicle ............................... ................. 8-12
Loading your vehicle .............................. ........... 8-12
Vehicle capacity weight ........................... .............. 8-13
GVWR and GAWR (Gross Vehicle Weight Rating and Gross Axle Weight Rating) ..................... ...... 8-14
Roof rail and crossbar (if equipped) .............. ....... 8-14
Trailer hitch (if equipped) ....................... ........... 8-17
Connecting a trailer .............................. .................. 8-17
When you do not tow a trailer ..................... .......... 8-19Trailer towing ....................................
.................. 8-19
Warranties and maintenance ........................ ......... 8-19
Maximum load limits ............................... ............... 8-20
Trailer hitches ................................... ...................... 8-23
Connecting a trailer .............................. .................. 8-24
Trailer towing tips ............................... .................... 8-25
Page 237 of 365
8-10 Driving tips
Wiper operation when snowing
Before driving in cold weather, make sure
the wiper blades are not frozen to the
windshield or rear window. If the wiper
blades are frozen to the windshield or rear
window, use the defroster with the airflow
control dial in the position and the
temperature control dial set for maximum
warmth until the wiper blades are com-
pletely thawed out. If your vehicle is
equipped with a wiper deicer, it is helpful
to thaw the windshield wiper blades. To
thaw out the rear wiper blade, use the rear
window defogger.
When driving in snow, if frozen snow
starts to stick on the surface of the wind-
shield despite wiper operation, use the de-
froster with the airflow control dial in
and the temperature control dial
set for maximum warmth. After the wind-
shield gets warmed enough to melt the
frozen snow on it, wash it away using the windshield washer.
Snow stuck on the wiper arm prevents the
wiper from working effectively. If snow is
stuck on the wiper arm, pull off the road to
a safe place, then remove it. If you stop
the vehicle at road side, use the hazard
warning flasher to alert other drivers.
We recommend use of non-freezing type
wiper blades (winter blades) during the
seasons you could have snow and sub-
zero temperatures. Blades of this type
give superior wiping performance in
snowy conditions. Be sure to use blades
that are suitable for your vehicle.
NOTE
When the season requiring non-freez-
ing type wiper blades is over, replace
them with standard wiper blades.
Corrosion protection
Refer to the
Corrosion protection section
(chapter 10).
Snow tires
All models except WRX-STIAvoid prolonged continuous driving
in snowstorms. Snow will enter the
engine s intake system and may
hinder the air flow, which could re-
sult in engine shutdown or even
breakdown.
During high-speed driving, non-
freezing type wiper blades may not
perform as well as standard wiper
blades. If this happens, reduce the
vehicle speed.
When replacing original tires with
winter (snow) tires, make sure you
use only the same size, construc-
tion and load range as the original
tires listed on the tire placard. Us-
ing other sizes and construction
may affect speedometer/odome-
ter calibration and clearance be-
tween the body and tires. It also
may be dangerous and lead to
loss of vehicle control.
You must install four winter tires
that are of the same size, con-
struction, brand, and load range.
Mixing other sizes or construc-
tions may result in severe me-
chanical damage to the drive train
of your vehicle and may affect
ride, handling, braking and speed-
ometer/odometer calibration. It
also may be dangerous and lead
to loss of vehicle control.
Page 275 of 365
10-2 Appearance care
Appearance careExterior care
Washing
NOTE
When having your vehicle washed in
an automatic car wash, make sure be-
forehand that the car wash is of suit-
able type.
The best way to preserve your vehicle s
beauty is frequent washing. Wash the ve-
hicle at least once a month to avoid con-
tamination by road grime.
Wash dirt off with a wet sponge and plenty
of lukewarm or cold water. Do not wash
the vehicle with hot water and in direct
sunlight.
Salt, chemicals, insects, tar, soot, tree
sap, and bird droppings should be washed
off by using a light detergent, as required.
If you use a light detergent, make certain
that it is a neutral detergent. Do not use
strong soap or chemical detergents. All
cleaning agents should be promptly
flushed from the surface and not allowed
to dry there. Rinse the vehicle thoroughly
When washing the vehicle, the
brakes may get wet. As a result,
the brake stopping distance will
be longer. To dry the brakes, drive
the vehicle at a safe speed while
lightly pressing the brake pedal to
heat up the brakes.
Do not wash the engine compart-
ment and area adjacent to it. If wa-
ter enters the engine air intake,
electrical parts or the power steer-
ing fluid reservoir, it will cause en-
gine trouble or faulty power steer-
ing respectively.
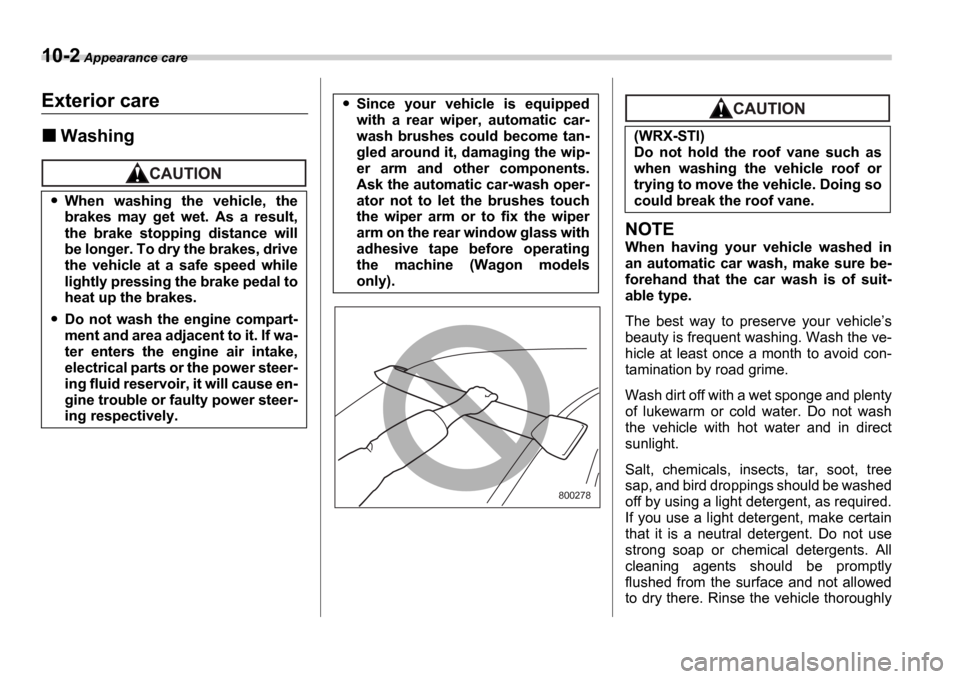
Since your vehicle is equipped
with a rear wiper, automatic car-
wash brushes could become tan-
gled around it, damaging the wip-
er arm and other components.
Ask the automatic car-wash oper-
ator not to let the brushes touch
the wiper arm or to fix the wiper
arm on the rear window glass with
adhesive tape before operating
the machine (Wagon models
only).
800278
(WRX-STI)
Do not hold the roof vane such as
when washing the vehicle roof or
trying to move the vehicle. Doing so
could break the roof vane.
Page 280 of 365

11
Maintenance and service
Maintenance schedule ....................................... 11-3
Maintenance precautions ........................... ....... 11-3
Before checking or servicing in the engine compartment ....................................... ................. 11-4
When you do checking or servicing in the engine
compartment while the engine is running ......... 11 -4
Engine hood ....................................... ................ 11-4
Engine compartment overview ....................... .. 11-6
Non-turbo models .................................. ................. 11-6
Turbo models ...................................... .................... 11-7
Engine oil ........................................ .................... 11-8
Checking the oil level ............................ ................. 11-8
Changing the oil and oil filter ................... ............. 11-8
Recommended grade and viscosity ................... .. 11-10
Recommended grade and viscosity under severe driving conditions ......................... ........... 11-11
Synthetic oil ..................................... ....................... 11-11
Cooling system .................................... .............. 11-12
Cooling fan, hose and connections ................. ..... 11-12
Engine coolant .................................... .................... 11-12
Air cleaner element ............................... ............. 11-15
Replacing the air cleaner element ................. ........ 11-15
Spark plugs ....................................... .................. 11-17
Recommended spark plugs ........................... ........ 11-17
Drive belts ....................................... .................... 11-18
Manual transmission oil ........................... ......... 11-18
Checking the oil level ............................ ................. 11-18
Recommended grade and viscosity ................... .. 11-19Automatic transmission fluid ......................
...... 11-20
Checking the fluid level .......................... ................ 11-20
Recommended fluid ................................. .............. 11-21
Front differential gear oil (AT vehicles) ......... ... 11-21
Checking the oil level ............................ ................. 11-21
Recommended grade and viscosity ................... .. 11-22
Rear differential gear oil ........................ ............ 11-22
Checking the gear oil level ....................... ............. 11-22
Recommended grade and viscosity ................... .. 11-23
Power steering fluid .............................. ............. 11-24
Checking the fluid level .......................... ................ 11-24
Recommended fluid ................................. .............. 11-24
Brake fluid ....................................... .................... 11-25
Checking the fluid level .......................... ................ 11-25
Recommended brake fluid ........................... .......... 11-25
Clutch fluid (MT vehicles) ........................ .......... 11-26
Checking the fluid level .......................... ................ 11-26
Recommended clutch fluid .......................... .......... 11-26
Brake booster ..................................... ................ 11-27
Brake pedal ....................................... .................. 11-27
Checking the brake pedal free play ................ ...... 11-27
Checking the brake pedal reserve distance ......... 11-27
Clutch pedal (MT vehicles) ........................ ........ 11-28
Checking the clutch function ...................... .......... 11-28
Checking the clutch pedal free play ............... ...... 11-28
Replacement of brake pad and lining ............... 11-28
Breaking-in of new brake pads and linings ......... . 11-29
Parking brake stroke .............................. ............ 11-29
Page 294 of 365
Maintenance and service 11-15
CONTINUED
en firmly. At this time, make sure that the
rubber gasket in the radiator cap is cor-
rectly in place.
8. Start and run the engine for more than
five minutes at 2,000 to 3,000 rpm.
9. Stop the engine and wait until the cool-
ant cools down (122 to 140
F [50 to
60 C]). If there is any loss of coolant, add
coolant to the radiator s filler neck and to
the reserve tank s FULL level.
10.Put the radiator cap and reservoir cap
back on and tighten firmly.
Air cleaner element
The air cleaner element functions as a fil-
ter screen. When the element is perforat-
ed or removed, engine wear will be exces-
sive and engine life shortened.
The air cleaner element is a viscous type.
It is unnecessary to clean or wash the ele-
ment.
Replacing the air cleaner ele-
ment
Replace the air cleaner element according
to the maintenance schedule in the War-
ranty and Maintenance Booklet . Under
extremely dusty conditions, replace it
more frequently. It is recommended that
you always use genuine SUBARU parts.
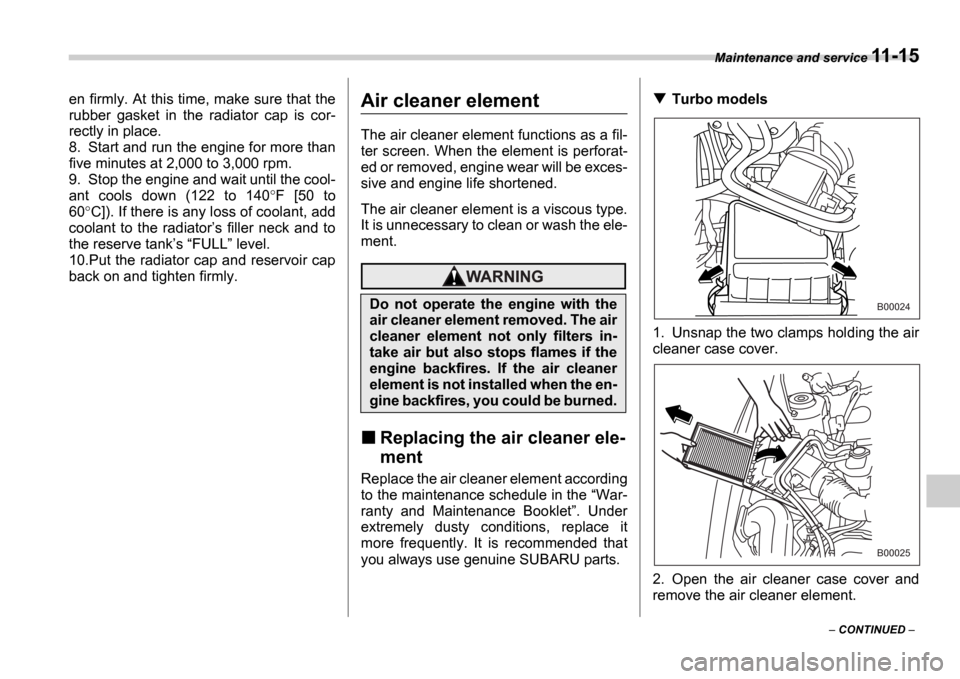
Turbo models
1. Unsnap the two clamps holding the air
cleaner case cover.
2. Open the air cleaner case cover and
remove the air cleaner element.
Do not operate the engine with the
air cleaner element removed. The air
cleaner element not only filters in-
take air but also stops flames if the
engine backfires. If the air cleaner
element is not installed when the en-
gine backfires, you could be burned.B00024
B00025
Page 296 of 365
Maintenance and service 11-17
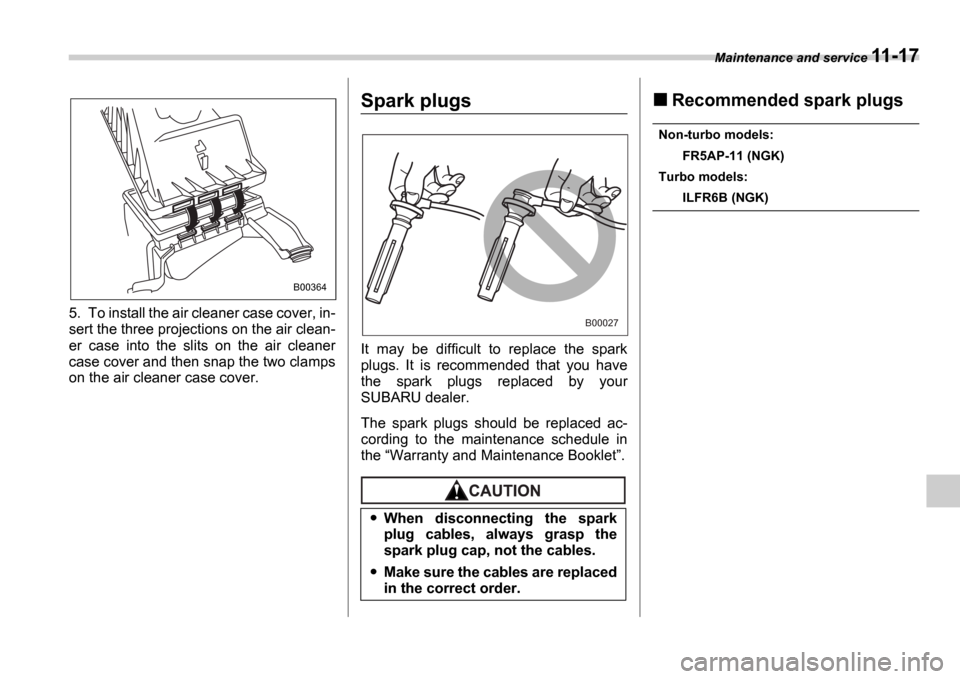
5. To install the air cleaner case cover, in-
sert the three projections on the air clean-
er case into the slits on the air cleaner
case cover and then snap the two clamps
on the air cleaner case cover.
Spark plugs
It may be difficult to replace the spark
plugs. It is recommended that you have
the spark plugs replaced by your
SUBARU dealer.
The spark plugs should be replaced ac-
cording to the maintenance schedule in
the Warranty and Maintenance Booklet .
Recommended spark plugs
Non-turbo models:
FR5AP-11 (NGK)
Turbo models:
ILFR6B (NGK)
B00364
When disconnecting the spark
plug cables, always grasp the
spark plug cap, not the cables.
Make sure the cables are replaced
in the correct order.
B00027
Page 298 of 365
Maintenance and service 11-19
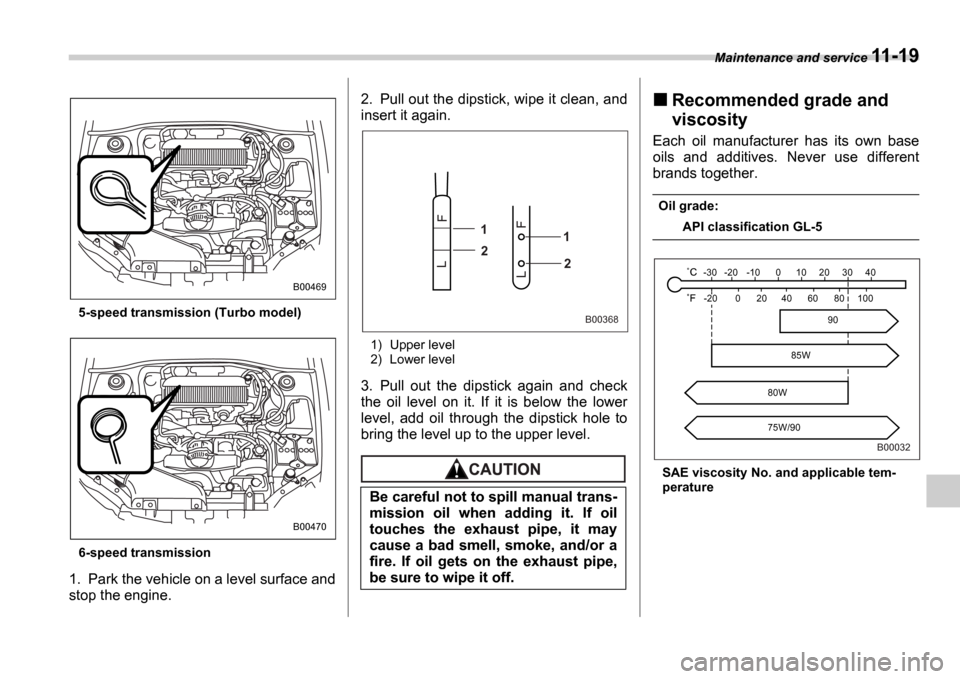
5-speed transmission (Turbo model)
6-speed transmission
1. Park the vehicle on a level surface and
stop the engine. 2. Pull out the dipstick, wipe it clean, and
insert it again.
1) Upper level
2) Lower level
3. Pull out the dipstick again and check
the oil level on it. If it is below the lower
level, add oil through the dipstick hole to
bring the level up to the upper level.
Recommended grade and
viscosity
Each oil manufacturer has its own base
oils and additives. Never use different
brands together.
Oil grade:
API classification GL-5
SAE viscosity No. and applicable tem-
perature
B00469
B00470
Be careful not to spill manual trans-
mission oil when adding it. If oil
touches the exhaust pipe, it may
cause a bad smell, smoke, and/or a
fire. If oil gets on the exhaust pipe,
be sure to wipe it off.
L F
F
L1
2 1
2
B00368
-30 -20 -10 0 10 20 30 40-20 0 60 20
80W
75W/90 80 100
40
85W 90
B00032
Page 325 of 365
11-46 Maintenance and service
Headlights (Except WRX-STI)
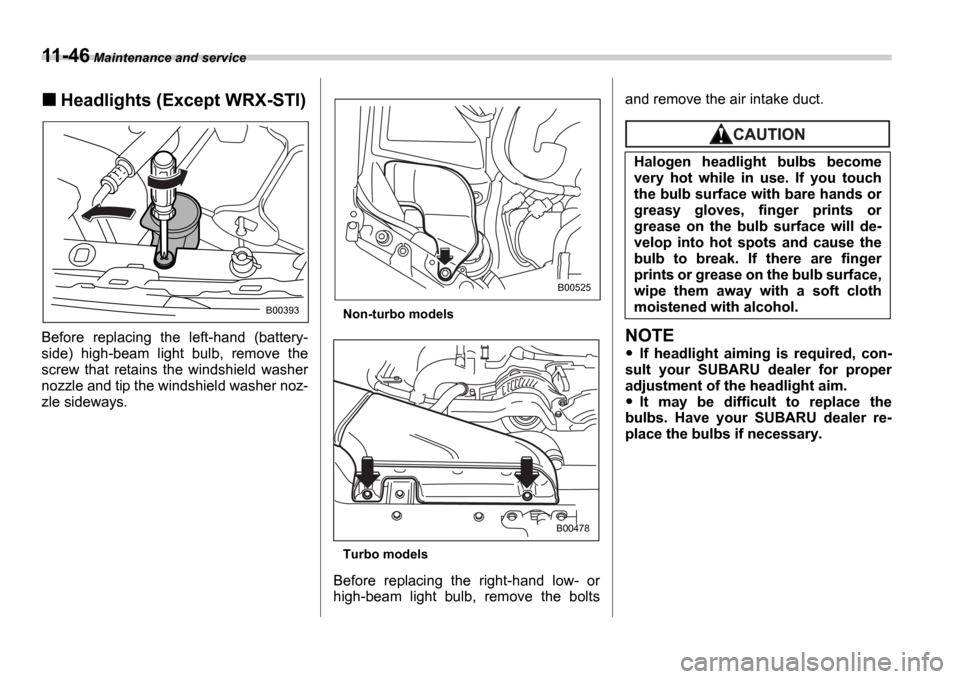
Before replacing the left-hand (battery-
side) high-beam light bulb, remove the
screw that retains the windshield washer
nozzle and tip the windshield washer noz-
zle sideways.
Non-turbo models
Turbo models
Before replacing the right-hand low- or
high-beam light bulb, remove the bolts and remove the air intake duct.
NOTE
If headlight aiming is required, con-
sult your SUBARU dealer for proper
adjustment of the headlight aim.
It may be difficult to replace the
bulbs. Have your SUBARU dealer re-
place the bulbs if necessary.
B00393
B00525
B00478
Halogen headlight bulbs become
very hot while in use. If you touch
the bulb surface with bare hands or
greasy gloves, finger prints or
grease on the bulb surface will de-
velop into hot spots and cause the
bulb to break. If there are finger
prints or grease on the bulb surface,
wipe them away with a soft cloth
moistened with alcohol.