2006 SUBARU IMPREZA Neutral position
[x] Cancel search: Neutral positionPage 137 of 365
3-24 Instruments and controls
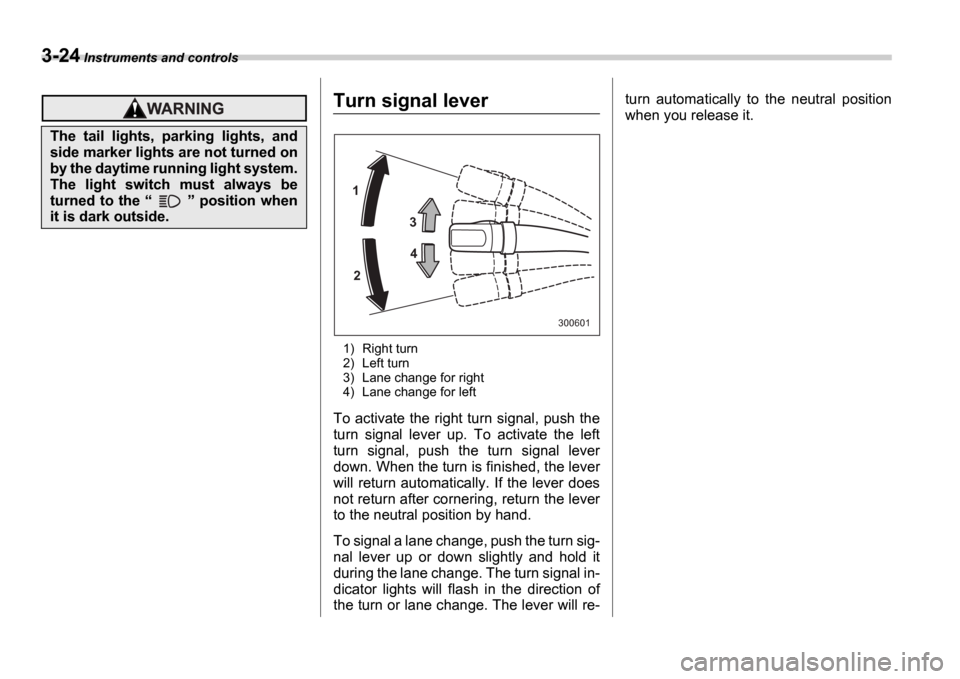
Turn signal lever
1) Right turn
2) Left turn
3) Lane change for right
4) Lane change for left
To activate the right turn signal, push the
turn signal lever up. To activate the left
turn signal, push the turn signal lever
down. When the turn is finished, the lever
will return automatically. If the lever does
not return after cornering, return the lever
to the neutral position by hand.
To signal a lane change, push the turn sig-
nal lever up or down slightly and hold it
during the lane change. The turn signal in-
dicator lights will flash in the direction of
the turn or lane change. The lever will re- turn automatically to the neutral position
when you release it.
The tail lights, parking lights, and
side marker lights are not turned on
by the daytime running light system.
The light switch must always be
turned to the
position when
it is dark outside.
1
2 3
4
300601
Page 140 of 365
Instruments and controls 3-27
CONTINUED
NOTE
The wiper operates only when the ig-
nition switch is in the ON or ACC
position.
Clean your wiper blades and window
glass periodically with a washer solu-
tion to prevent streaking, and to re-
move accumulations of road salt or
road film. Keep the washer button de-
pressed at least for 1 second so that
washer solution will be sprinkled all
over the windshield or rear window.
Grease, wax, insects or other materi-
al on the windshield or the wiper blade results in jerky wiper operation and
streaking on the glass. If you cannot
remove those streaks after operating
the washer or if the wiper operation is
jerky, clean the outer surface of the
windshield or rear window and the wip-
er blades using a sponge or soft cloth
with a neutral detergent or mild-abra-
sive cleaner. After cleaning, rinse the
window glass and wiper blades with
clean water. The glass is clean if no
beads form on the glass when you
rinse with water.
If you cannot eliminate the streaking
even after following this procedure, re-
place the wiper blades with new ones.
Refer to the Replacement of wiper
blades section (chapter 11) for re-
placement instructions.
Windshield wiper and washer
switches
Windshield wipers
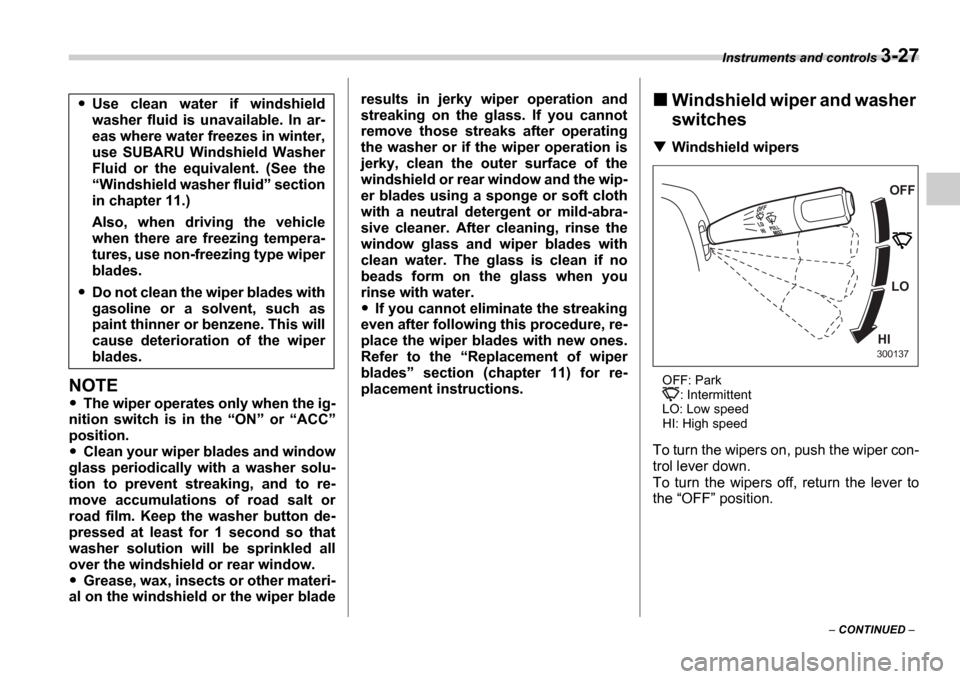
OFF: Park : Intermittent
LO: Low speed
HI: High speed
To turn the wipers on, push the wiper con-
trol lever down.
To turn the wipers off, return the lever to
the OFF position.
Use clean water if windshield
washer fluid is unavailable. In ar-
eas where water freezes in winter,
use SUBARU Windshield Washer
Fluid or the equivalent. (See the Windshield washer fluid section
in chapter 11.)
Also, when driving the vehicle
when there are freezing tempera-
tures, use non-freezing type wiper
blades.
Do not clean the wiper blades with
gasoline or a solvent, such as
paint thinner or benzene. This will
cause deterioration of the wiper
blades.
OFF
LO
HI
300137
Page 204 of 365
Starting and operating 7-7
CONTINUED
Starting the engine
Manual transmission vehicle
1. Apply the parking brake.
2. Turn off unnecessary lights and acces-
sories.
3. Press the clutch pedal to the floor and
shift the shift lever into neutral. Hold the
clutch pedal to the floor while starting the
engine.
The starter motor will only operate when
the clutch pedal is pressed fully to the
floor.
4. Turn the ignition switch to the ON po-
sition and check the operation of the warn-
ing and indicator lights. Refer to the Warning and indicator lights section
(chapter 3).
5. Turn the ignition switch to the START
position without depressing the accelera-
tor pedal. Release the key immediately af-
ter the engine has started. If the engine does not start, try the follow-
ing.
1) Turn the ignition switch to the OFF
position and wait for at least 10 sec-
onds. After checking that the parking
brake is firmly set, turn the ignition
switch to the START position while de-
pressing the accelerator pedal slightly
(approximately a quarter of the full
stroke). Release the accelerator pedal
as soon as the engine starts.
2) If this fails to start the engine, turn the
ignition switch back to the OFF posi-
tion and wait for at least 10 seconds.
Then fully depress the accelerator ped-
al and turn the ignition switch to the START position. If the engine starts,
quickly release the accelerator pedal.
3) If this fails to start the engine, turn the
ignition switch again to the OFF posi-
tion. After waiting for 10 seconds or
longer, turn the ignition switch to the START position without depressing
the accelerator pedal.
4) If the engine still refuses to start, con-
tact your nearest SUBARU dealer for
assistance.
6. Confirm that all warning and indicator
lights have gone off after the engine has
started. The fuel injection system auto-
matically lowers the idle speed as the en-
gine warms up.
NOTE
The engine may be difficult to start
when the battery has been disconnect-
ed and reconnected (for maintenance
or other purposes). This difficulty is
caused by the electronically controlled
throttle s self-diagnosis function. To
overcome it, keep the ignition switch in
the ON position for approximately 10
seconds before starting the engine.
Automatic transmission vehi-
cle
1. Apply the parking brake.
2. Turn off unnecessary lights and acces-
sories.
3. Shift the selector lever to the P or N
position (preferably P position).
The starter motor will only operate when
the select lever is at the P or N position.
4. Turn the ignition switch to the ON po-
sition and check the operation of the warn-
ing and indicator lights. Refer to the Warning and indicator lights section
(chapter 3).
5. Turn the ignition switch to the START
position without depressing the accelera-
tor pedal. Release the key immediately af-
ter the engine has started.
If the engine does not start, try the follow-
Do not operate the starter motor
continuously for more than ten sec-
onds. If the engine fails to start after
operating the starter for five to ten
seconds, wait for ten seconds or
more before trying again.
Page 206 of 365
Starting and operating 7-9
CONTINUED
Manual transmission 6
speeds (WRX-STI)
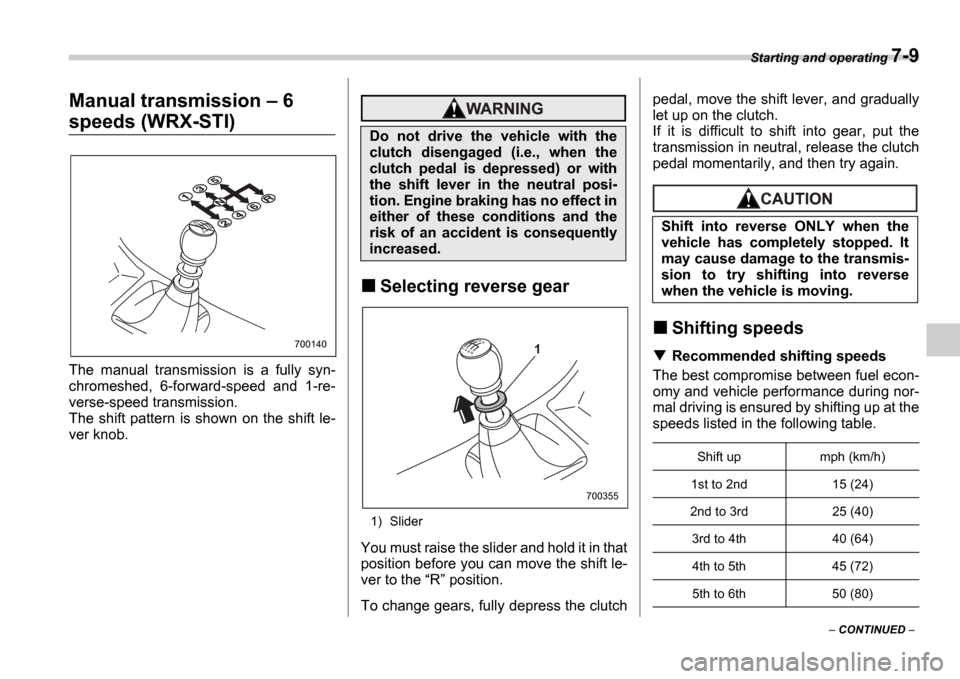
The manual transmission is a fully syn-
chromeshed, 6-forward-speed and 1-re-
verse-speed transmission.
The shift pattern is shown on the shift le-
ver knob.
Selecting reverse gear
1) Slider
You must raise the slider and hold it in that
position before you can move the shift le-
ver to the R position.
To change gears, fully depress the clutch pedal, move the shift lever, and gradually
let up on the clutch.
If it is difficult to shift into gear, put the
transmission in neutral, release the clutch
pedal momentarily, and then try again.
Shifting speeds
Recommended shifting speeds
The best compromise between fuel econ-
omy and vehicle performance during nor-
mal driving is ensured by shifting up at the
speeds listed in the following table.
700140
Do not drive the vehicle with the
clutch disengaged (i.e., when the
clutch pedal is depressed) or with
the shift lever in the neutral posi-
tion. Engine braking has no effect in
either of these conditions and the
risk of an accident is consequently
increased.
1
700355
Shift into reverse ONLY when the
vehicle has completely stopped. It
may cause damage to the transmis-
sion to try shifting into reverse
when the vehicle is moving.
Shift up mph (km/h)
1st to 2nd 15 (24)
2nd to 3rd 25 (40) 3rd to 4th 40 (64)
4th to 5th 45 (72)
5th to 6th 50 (80)
Page 208 of 365
Starting and operating 7-11
CONTINUED
Manual transmission 5
speeds (except WRX-STI)
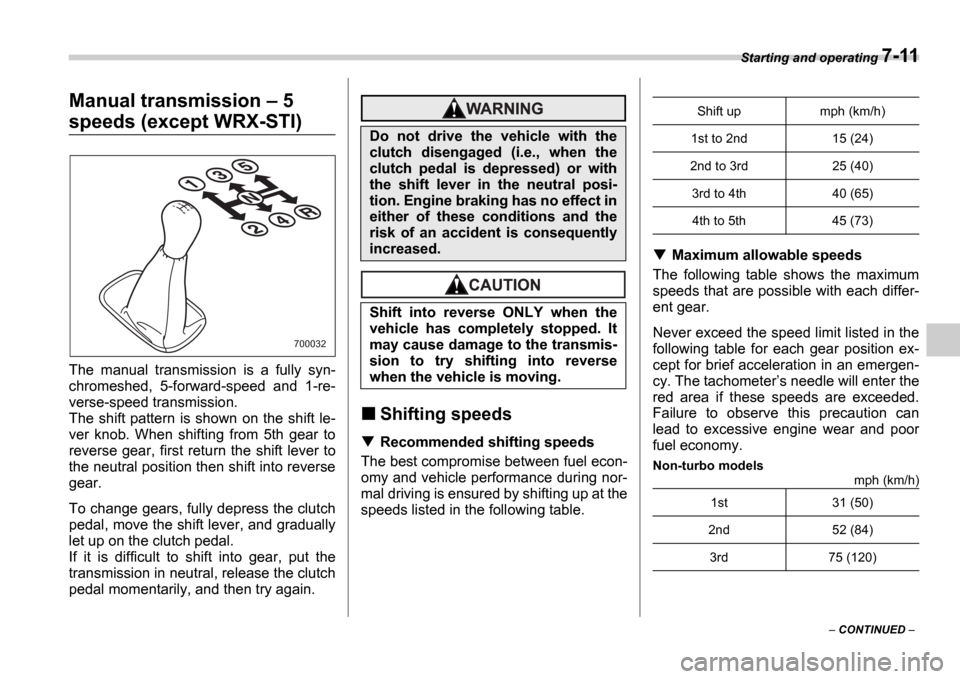
The manual transmission is a fully syn-
chromeshed, 5-forward-speed and 1-re-
verse-speed transmission.
The shift pattern is shown on the shift le-
ver knob. When shifting from 5th gear to
reverse gear, first return the shift lever to
the neutral position then shift into reverse
gear.
To change gears, fully depress the clutch
pedal, move the shift lever, and gradually
let up on the clutch pedal.
If it is difficult to shift into gear, put the
transmission in neutral, release the clutch
pedal momentarily, and then try again.
Shifting speeds
Recommended shifting speeds
The best compromise between fuel econ-
omy and vehicle performance during nor-
mal driving is ensured by shifting up at the
speeds listed in the following table.
Maximum allowable speeds
The following table shows the maximum
speeds that are possible with each differ-
ent gear.
Never exceed the speed limit listed in the
following table for each gear position ex-
cept for brief acceleration in an emergen-
cy. The tachometer s needle will enter the
red area if these speeds are exceeded.
Failure to observe this precaution can
lead to excessive engine wear and poor
fuel economy.
Non-turbo models mph (km/h)
700032
Do not drive the vehicle with the
clutch disengaged (i.e., when the
clutch pedal is depressed) or with
the shift lever in the neutral posi-
tion. Engine braking has no effect in
either of these conditions and the
risk of an accident is consequently
increased.
Shift into reverse ONLY when the
vehicle has completely stopped. It
may cause damage to the transmis-
sion to try shifting into reverse
when the vehicle is moving.
Shift up mph (km/h)
1st to 2nd 15 (24)
2nd to 3rd 25 (40) 3rd to 4th 40 (65)4th to 5th 45 (73)
1st 31 (50)
2nd 52 (84)
3rd 75 (120)
Page 214 of 365
Starting and operating 7-17
CONTINUED
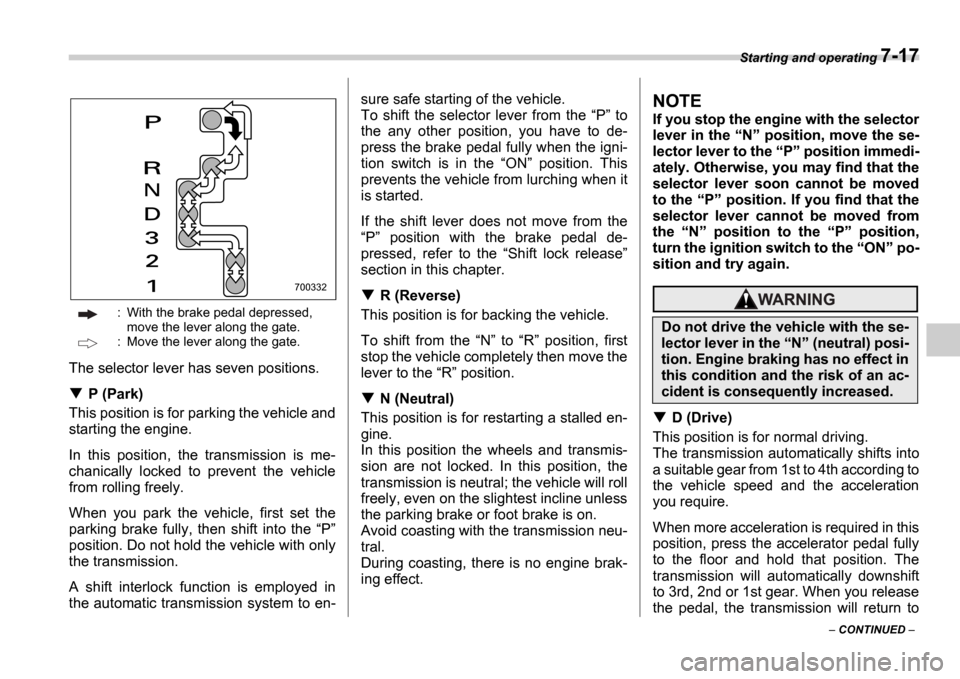
: With the brake pedal depressed,
move the lever along the gate.
: Move the lever along the gate.
The selector lever has seven positions.
P (Park)
This position is for parking the vehicle and
starting the engine.
In this position, the transmission is me-
chanically locked to prevent the vehicle
from rolling freely.
When you park the vehicle, first set the
parking brake fully, then shift into the P
position. Do not hold the vehicle with only
the transmission.
A shift interlock function is employed in
the automatic transmission system to en- sure safe starting of the vehicle.
To shift the selector lever from the
P to
the any other position, you have to de-
press the brake pedal fully when the igni-
tion switch is in the ON position. This
prevents the vehicle from lurching when it
is started.
If the shift lever does not move from the P position with the brake pedal de-
pressed, refer to the Shift lock release
section in this chapter.
R (Reverse)
This position is for backing the vehicle.
To shift from the N to R position, first
stop the vehicle completely then move the
lever to the R position.
N (Neutral)
This position is for restarting a stalled en-
gine.
In this position the wheels and transmis-
sion are not locked. In this position, the
transmission is neutral; the vehicle will roll
freely, even on the slightest incline unless
the parking brake or foot brake is on.
Avoid coasting with the transmission neu-
tral.
During coasting, there is no engine brak-
ing effect.
NOTE
If you stop the engine with the selector
lever in the N position, move the se-
lector lever to the P position immedi-
ately. Otherwise, you may find that the
selector lever soon cannot be moved
to the P position. If you find that the
selector lever cannot be moved from
the N position to the P position,
turn the ignition switch to the ON po-
sition and try again.
D (Drive)
This position is for normal driving.
The transmission automatically shifts into
a suitable gear from 1st to 4th according to
the vehicle speed and the acceleration
you require.
When more acceleration is required in this
position, press the accelerator pedal fully
to the floor and hold that position. The
transmission will automatically downshift
to 3rd, 2nd or 1st gear. When you release
the pedal, the transmission will return to
700332
Do not drive the vehicle with the se-
lector lever in the N (neutral) posi-
tion. Engine braking has no effect in
this condition and the risk of an ac-
cident is consequently increased.
Page 225 of 365
7-28 Starting and operating
The vehicle will maintain the desired
speed.
Vehicle speed can be temporarily in-
creased while driving with the cruise con-
trol activated. Simply depress the acceler-
ator pedal to accelerate the vehicle. When
the accelerator pedal is released, the ve-
hicle will return to and maintain the previ-
ous cruising speed.
To temporarily cancel the
cruise control
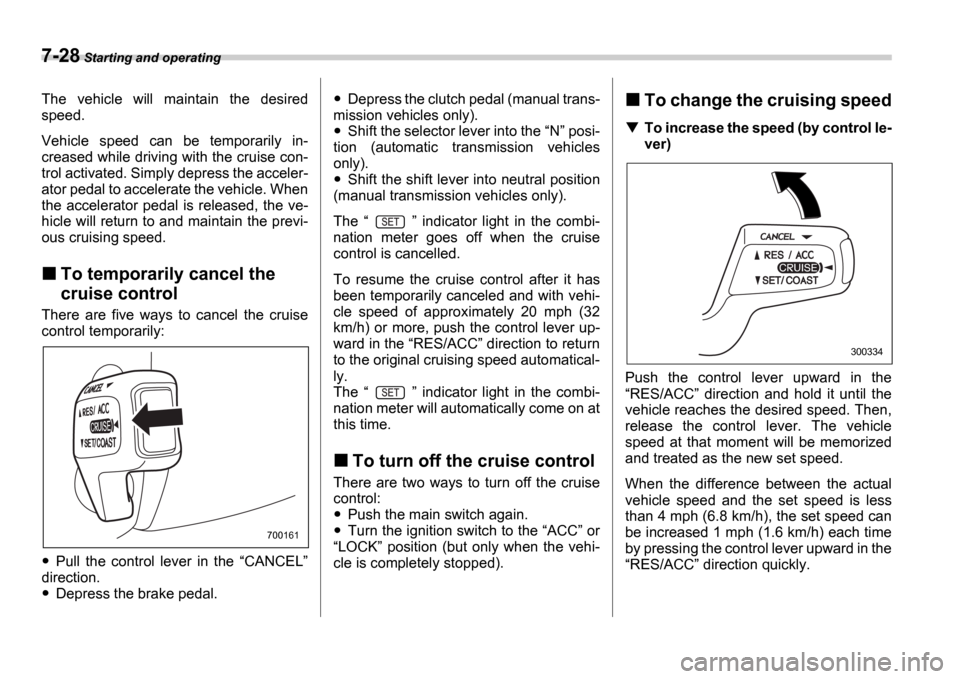
There are five ways to cancel the cruise
control temporarily:
Pull the control lever in the CANCEL
direction.
Depress the brake pedal.
Depress the clutch pedal (manual trans-
mission vehicles only).
Shift the selector lever into the N posi-
tion (automatic transmission vehicles
only).
Shift the shift lever into neutral position
(manual transmission vehicles only).
The indicator light in the combi-
nation meter goes off when the cruise
control is cancelled.
To resume the cruise control after it has
been temporarily canceled and with vehi-
cle speed of approximately 20 mph (32
km/h) or more, push the control lever up-
ward in the RES/ACC direction to return
to the original cruising speed automatical-
ly.
The indicator light in the combi-
nation meter will automatically come on at
this time.
To turn off the cruise control
There are two ways to turn off the cruise
control:
Push the main switch again.
Turn the ignition switch to the ACC or
LOCK position (but only when the vehi-
cle is completely stopped).
To change the cruising speed
To increase the speed (by control le-
ver)
Push the control lever upward in the RES/ACC direction and hold it until the
vehicle reaches the desired speed. Then,
release the control lever. The vehicle
speed at that moment will be memorized
and treated as the new set speed.
When the difference between the actual
vehicle speed and the set speed is less
than 4 mph (6.8 km/h), the set speed can
be increased 1 mph (1.6 km/h) each time
by pressing the control lever upward in the RES/ACC direction quickly.
700161
300334
Page 269 of 365
9-14 In case of emergency
or 1st for manual transmission vehicles.
2. Pull up the parking brake lever firmly.
3. Secure the vehicle onto the carrier
properly with safety chains. Each safety
chain should be equally tightened and
care must be taken not to pull the chains
so tightly that the suspension bottoms out.
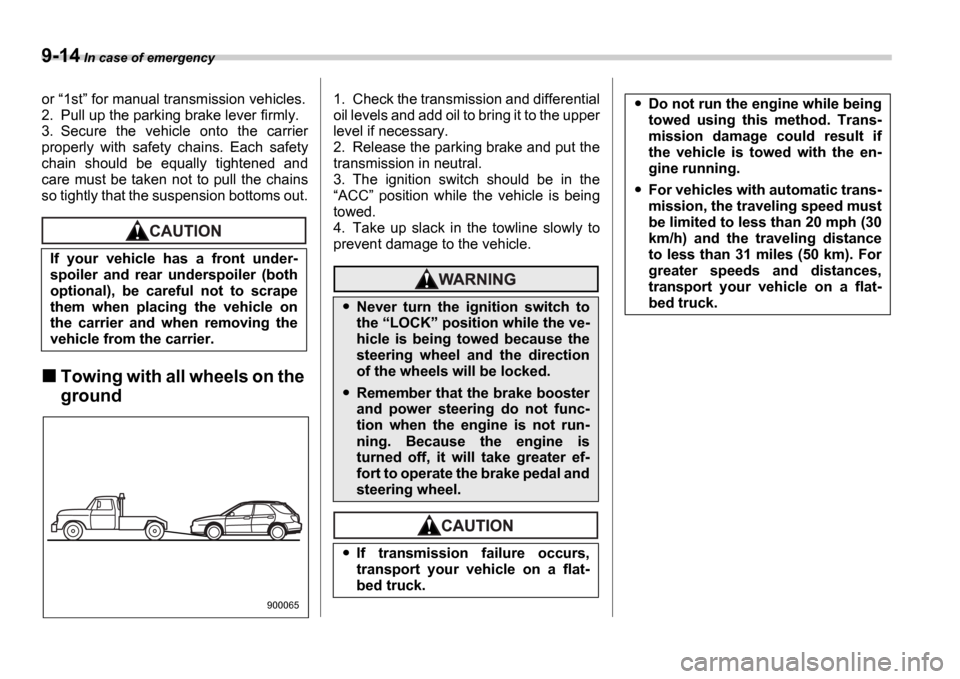
Towing with all wheels on the
ground
1. Check the transmission and differential
oil levels and add oil to bring it to the upper
level if necessary.
2. Release the parking brake and put the
transmission in neutral.
3. The ignition switch should be in the ACC position while the vehicle is being
towed.
4. Take up slack in the towline slowly to
prevent damage to the vehicle.
If your vehicle has a front under-
spoiler and rear underspoiler (both
optional), be careful not to scrape
them when placing the vehicle on
the carrier and when removing the
vehicle from the carrier.
900065
Never turn the ignition switch to
the LOCK position while the ve-
hicle is being towed because the
steering wheel and the direction
of the wheels will be locked.
Remember that the brake booster
and power steering do not func-
tion when the engine is not run-
ning. Because the engine is
turned off, it will take greater ef-
fort to operate the brake pedal and
steering wheel.
If transmission failure occurs,
transport your vehicle on a flat-
bed truck.
Do not run the engine while being
towed using this method. Trans-
mission damage could result if
the vehicle is towed with the en-
gine running.
For vehicles with automatic trans-
mission, the traveling speed must
be limited to less than 20 mph (30
km/h) and the traveling distance
to less than 31 miles (50 km). For
greater speeds and distances,
transport your vehicle on a flat-
bed truck.