2006 SUBARU IMPREZA mirror
[x] Cancel search: mirrorPage 186 of 365
6
Interior equipment
Interior light ........................................................ 6-2
Dome light ........................................ ....................... 6-2
Cargo area light (if equipped) .................... ............ 6-2
Map light (if equipped) ........................... ............ 6-2
Sun visors ........................................ ................... 6-3
Vanity mirror (if equipped) ....................... .............. 6-3
Storage compartments .............................. ........ 6-4
Glove box ......................................... ....................... 6-4
Center console .................................... .................... 6-4
Coin tray ......................................... ......................... 6-4
Cup holder ........................................ .................. 6-5
Front passenger s cup holder ............................... 6-5
Rear passenger s cup holder ................................ 6-5
Accessory power outlet (if equipped) .............. 6-5
Cigarette lighter socket .......................... ........... 6-6
Use with a cigarette lighter ...................... .............. 6-7
Using as an accessory power outlet ................ ..... 6-7
Ashtray ........................................... ..................... 6-8
Floor mat (if equipped) ........................... ........... 6-9
Coat hook ......................................... ................... 6-9
Cargo area cover (Wagon if equipped) ......... 6-10
Using the cover ................................... .................... 6-10
To remove the cover ............................... ............... 6-10
Stowage of the cover .............................. ............... 6-10
To install the cover housing ...................... ............ 6-11
Cargo tie-down hooks (Wagon if equipped) .................................... 6 -11Cargo area bars ...................................
............... 6-12
Under-floor storage compartment (if equipped) ..................................... ................ 6-12
Page 188 of 365
Interior equipment 6-3
To turn on the map light, push the switch.
To turn it off, push the switch again.
When leaving the vehicle, make sure the
light is turned off to avoid battery dis-
charge.Sun visors
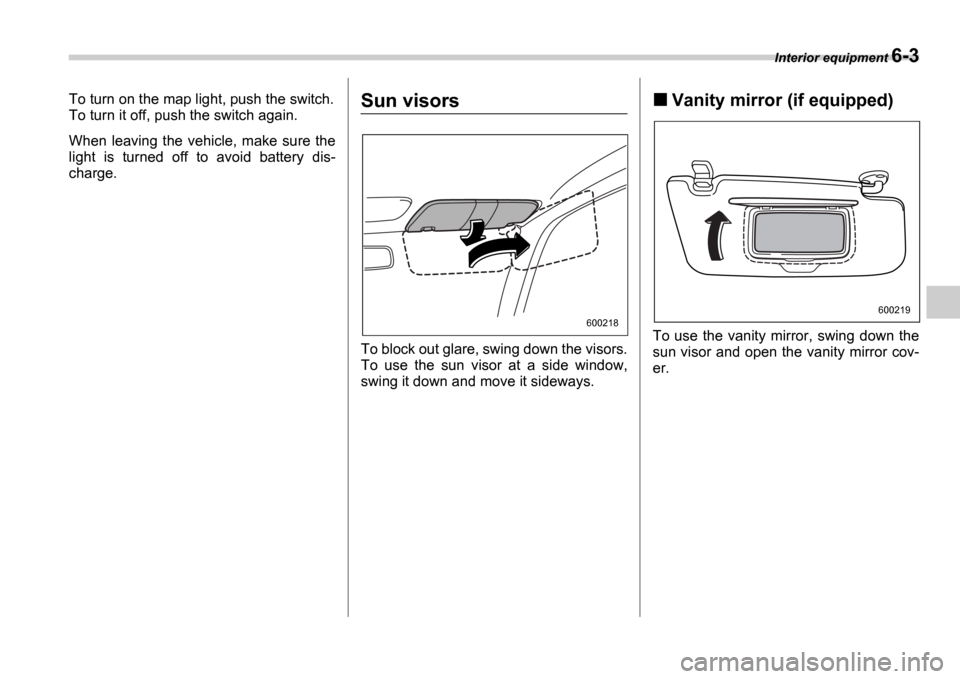
To block out glare, swing down the visors.
To use the sun visor at a side window,
swing it down and move it sideways.
Vanity mirror (if equipped)
To use the vanity mirror, swing down the
sun visor and open the vanity mirror cov-
er.
600218
600219
Page 203 of 365
7-6 Starting and operating
The EPA has issued regulations for in-
specting the On-Board Diagnostic (OBD)
system as part of the state emissions in-
spection. The OBD system is designed to
detect engine and transmission problems
that might cause vehicle emissions to ex-
ceed allowable limits. These inspections
apply to all 1996 model year and newer
passenger cars and light trucks. Over 30
states plus the District of Columbia have
implemented the OBD system inspection.
The inspection of the OBD system con-
sists of a visual operational check of the CHECK ENGINE warning light/malfunc-
tion indicator lamp (MIL) and an examina-
tion of the OBD system with an electronic
scan tool while the engine is running.
A vehicle passes the OBD system in-
spection if proper the CHECK ENGINE
warning light/MIL illumination is observed,
there is no stored diagnostic trouble
codes, and the OBD system readiness
monitors are complete.
A vehicle fails the OBD inspection if the
CHECK ENGINE warning light/MIL is
not properly operating or there is one or
more diagnostic trouble codes stored in
vehicle s computer with the CHECK EN-
GINE warning light/MIL illuminated.
A state emission inspection may reject
(not pass or fail) a vehicle if the number of
OBD system readiness monitors Not
Ready is greater than one. Under this
condition, the vehicle operator should be
instructed to drive his/her vehicle for a few
days to set the monitors and return for an
emission re-inspection.
Owners of rejected or failing vehicles
should contact their Subaru Dealer for
service.
Preparing to drive
You should perform the following checks
and adjustments every day before you
start driving.
1. Check that all windows, mirrors, and
lights are clean and unobstructed.
2. Check the appearance and condition of
the tires. Also check tires for proper infla-
tion.
3. Look under the vehicle for any sign of
leaks.
4. Check that the hood, trunk (Sedan)
and rear gate (Wagon) are fully closed.
5. Check the adjustment of the seat.
6. Check the adjustment of the inside and
outside mirrors.
7. Fasten your seatbelt. Check that your
passengers have fastened their seatbelts.
8. Check the operation of the warning and
indicator lights when the ignition switch is
turned to the ON position.
9. Check the gauges, indicator and warn-
ing lights after starting the engine.
NOTE
Engine oil, engine coolant, brake fluid,
washer fluid and other fluid levels
should be checked daily, weekly or at
fuel stops.
Resultant vehicle damage due to im-
proper testing is not covered under
the SUBARU Limited Warranty and
is the responsibility of the state in-
spection program or its contractors
or licensees.
Page 252 of 365
Driving tips 8-25
CONTINUED
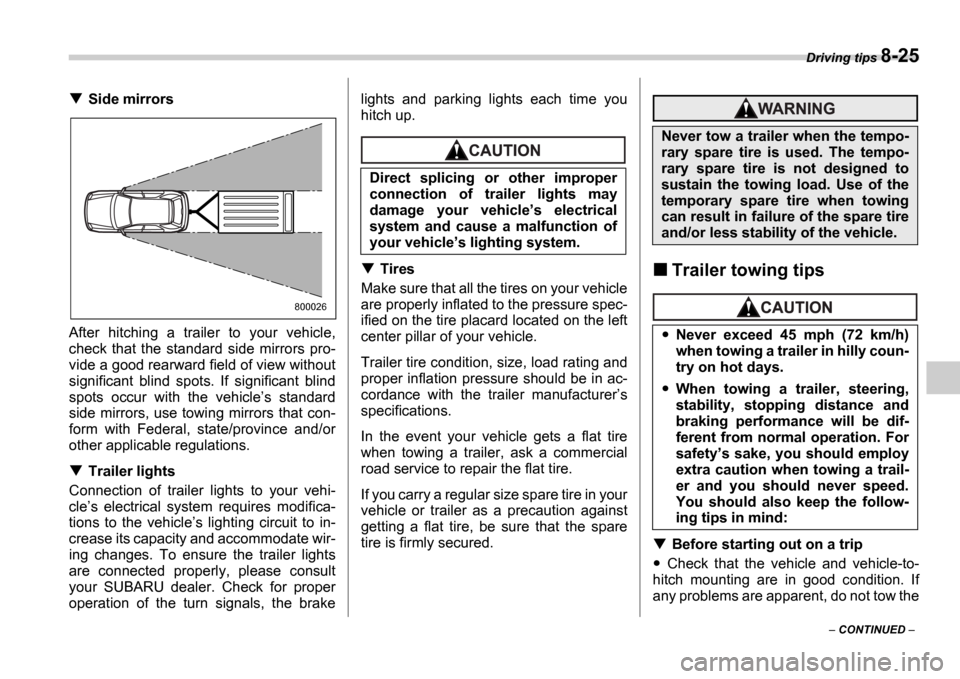
Side mirrors
After hitching a trailer to your vehicle,
check that the standard side mirrors pro-
vide a good rearward field of view without
significant blind spots. If significant blind
spots occur with the vehicle s standard
side mirrors, use towing mirrors that con-
form with Federal, state/province and/or
other applicable regulations.
Trailer lights
Connection of trailer lights to your vehi-
cle s electrical system requires modifica-
tions to the vehicle s lighting circuit to in-
crease its capacity and accommodate wir-
ing changes. To ensure the trailer lights
are connected properly, please consult
your SUBARU dealer. Check for proper
operation of the turn signals, the brake lights and parking lights each time you
hitch up.
Tires
Make sure that all the tires on your vehicle
are properly inflated to the pressure spec-
ified on the tire placard located on the left
center pillar of your vehicle.
Trailer tire condition, size, load rating and
proper inflation pressure should be in ac-
cordance with the trailer manufacturer s
specifications.
In the event your vehicle gets a flat tire
when towing a trailer, ask a commercial
road service to repair the flat tire.
If you carry a regular size spare tire in your
vehicle or trailer as a precaution against
getting a flat tire, be sure that the spare
tire is firmly secured.Trailer towing tips
Before starting out on a trip
Check that the vehicle and vehicle-to-
hitch mounting are in good condition. If
any problems are apparent, do not tow the
800026
Direct splicing or other improper
connection of trailer lights may
damage your vehicle s electrical
system and cause a malfunction of
your vehicle s lighting system.
Never tow a trailer when the tempo-
rary spare tire is used. The tempo-
rary spare tire is not designed to
sustain the towing load. Use of the
temporary spare tire when towing
can result in failure of the spare tire
and/or less stability of the vehicle.
Never exceed 45 mph (72 km/h)
when towing a trailer in hilly coun-
try on hot days.
When towing a trailer, steering,
stability, stopping distance and
braking performance will be dif-
ferent from normal operation. For
safety s sake, you should employ
extra caution when towing a trail-
er and you should never speed.
You should also keep the follow-
ing tips in mind:
Page 253 of 365
8-26 Driving tips
trailer.
Check that the vehicle sits horizontally
with the trailer attached. If the vehicle is
tipped sharply up at the front and down at
the rear, check the total trailer weight,
GVW, GAWs and tongue load again, then
confirm that the load and its distribution
are acceptable.
Check that the tire pressures are cor-
rect.
Check that the vehicle and trailer are
connected properly. Confirm that the trailer tongue is connected prop-
erly to the hitch ball. the trailer lights connector is connect-
ed properly and trailer s brake lights illu-
minate when the vehicle s brake pedal
is pressed, and that the trailer s turn sig-
nal lights flash when the vehicle s turn
signal lever is operated. the safety chains are connected prop-
erly. all cargo in the trailer is secured safe-
ty in position. the side mirrors provide a good rear-
ward field of view without a significant
blind spot.
Sufficient time should be taken to learn
the feel of the vehicle/trailer combination
before starting out on a trip. In an area free
of traffic, practice turning, stopping and
backing up.
Driving with a trailer
You should allow for considerably more
stopping distance when towing a trailer.
Avoid sudden braking because it may re-
sult in skidding or jackknifing and loss of
control.
Avoid abrupt starts and sudden acceler-
ations. If your vehicle has a manual trans-
mission, always start out in first gear and
release the clutch at moderate engine rev-
olution.
Avoid uneven steering, sharp turns and
rapid lane changes.
Slow down before turning. Make a long-
er than normal turning radius because the
trailer wheels will be closer than the vehi-
cle wheels to the inside of the turn. In a
tight turn, the trailer could hit your vehicle.
Crosswinds will adversely affect the
handling of your vehicle and trailer, caus-
ing sway. Crosswinds can be due to
weather conditions or the passing of large
tracks or buses. If swaying occurs, firmly
grip the steering wheel and slow down im-
mediately but gradually.
When passing other vehicles, consider-
able distance is required because of the
added weight and length caused by at-
taching the trailer to your vehicle.
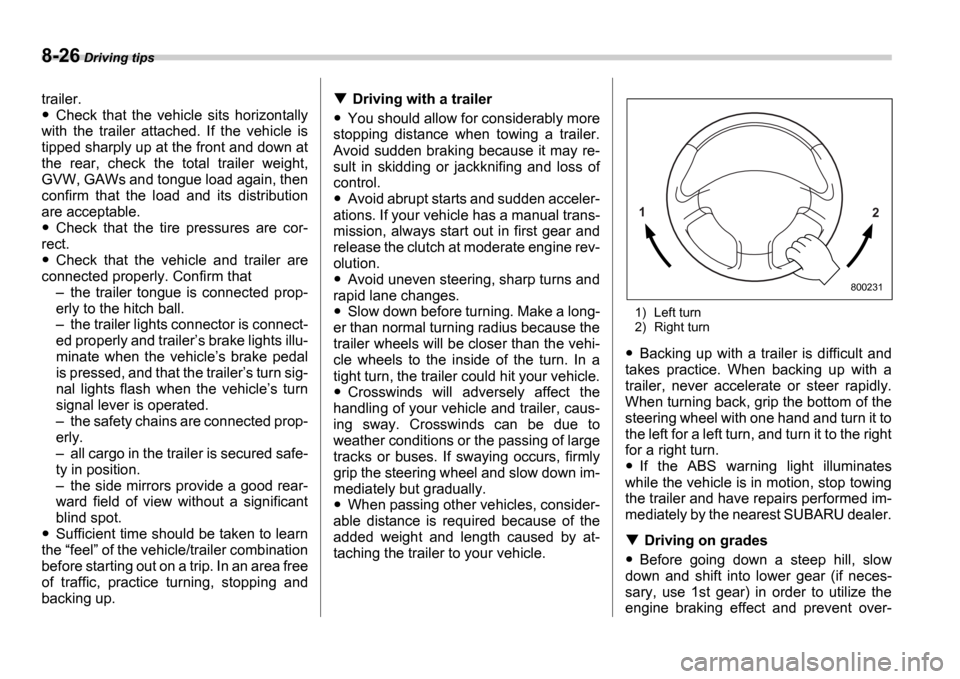
1) Left turn
2) Right turn
Backing up with a trailer is difficult and
takes practice. When backing up with a
trailer, never accelerate or steer rapidly.
When turning back, grip the bottom of the
steering wheel with one hand and turn it to
the left for a left turn, and turn it to the right
for a right turn.
If the ABS warning light illuminates
while the vehicle is in motion, stop towing
the trailer and have repairs performed im-
mediately by the nearest SUBARU dealer.
Driving on grades
Before going down a steep hill, slow
down and shift into lower gear (if neces-
sary, use 1st gear) in order to utilize the
engine braking effect and prevent over-
1 2
800231
Page 337 of 365
12-6 Specifications
Fuses and circuits
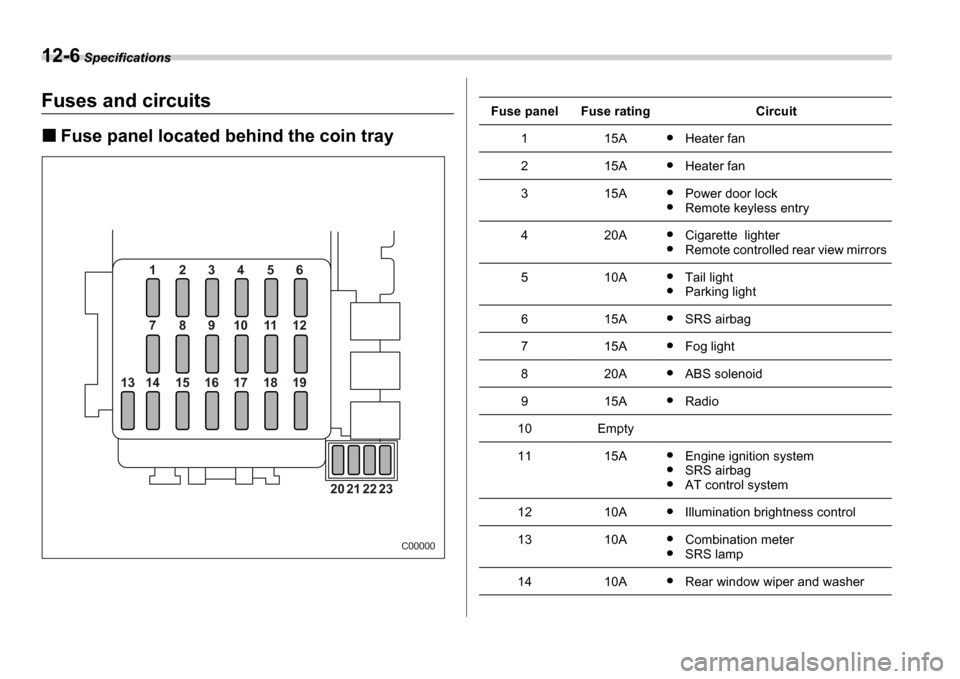
Fuse panel located behind the coin tray
1 2 3 4 5 6
7 8 9 10 11 12
14
13 15 16 17 18 19
20 21 22 23
C00000
Fuse panelFuse ratingCircuit
115AHeater fan
215AHeater fan
315APower door lock
Remote keyless entry
420ACigarette lighter
Remote controlled rear view mirrors
510ATail light
Parking light
615ASRS airbag
715AFog light
820AABS solenoid
915ARadio
10Empty
1115AEngine ignition system
SRS airbag
AT control system
1210AIllumination brightness control
1310ACombination meter
SRS lamp
1410ARear window wiper and washer
Page 338 of 365
Specifications 12-7
CONTINUED
1530AWindshield wiper and washer
1620ABrake light
1715AAir conditioner
1815ABackup light
Cruise control
1920AMirror heater
20Empty
2115AIgnition coil (Non-turbo model only)
2210AABS ignition
2320AAccessory power outlet (cargo)
Seat heater
Fuse panelFuse ratingCircuit
Page 357 of 365
14-2 Index
A
ABS (Anti-lock Brake System) .......................... ................ 7-22
Warning light ..................................... .................. 3-17, 7-23
Accessories ........................................... .................. 5-2, 11-43
Accessory power outlet ................................. .............. 6-5, 6-7
Active head restraint ............................... ............................ 1-4
Air cleaner element ................................ ........................ 11-15
Air conditioner operation ......................... ........................... 4-7
Air filtration system ............................... ............................ 4-12
Air flow selection .................................. .............................. 4-2
Alarm system ........................................ ............................ 2-13
All-Wheel Drive warning light (AWD AT vehicles) ..... ....... 3-19
Aluminum wheels .................................... ....................... 11-35
Antenna system ...................................... ........................... 5-2
Anti-lock Brake System (ABS) .......................... ................ 7-22
Arming the system ................................... ......................... 2-14
Armrest ............................................ ................................... 1-7
Ashtray ............................................. .................................. 6-8
AT OIL TEMPerature warning light .................. ................ 3-17
Audio set .......................................... .................................. 5-3
Auto-dimming mirror/compass .......................... ............... 3-32
Automatic climate control system ........................ ............... 4-7
Automatic transmission ............................... ..................... 7-16
Capacities .......................................... .......................... 12-4
Fluid ............................................. .............................. 11-20
Selector lever ...................................... ......................... 7-16
Shift lock release ................................... ...................... 7-19
Temperature warning light ......................... .................. 3-17
Automatic/Emergency Locking Retractor (A/ELR) ........... 1-11
B
Battery ............................................ ................................ 11-40 Jump starting .......................................
.......................... 9-9
Replacement (Remote keyless entry system) ............... 2-9
Brake Booster ............................................ .......................... 11-27
Fluid ............................................. .............................. 11-25
Pad and lining .................................... ........................ 11-28
Pedal ............................................. ............................. 11-27
Brake pedal Free play .......................................... .......................... 11-27
Reserve distance ...................................... ................. 11-27
Brake system ......................................... ........................... 7-21
Warning light ..................................... ........................... 3-18
Braking ............................................ ................................. 7-21
Breaking-in of new brake pads and linings ............ .... 11-29
Tips ............................................... ............................... 7-21
Bulb Chart ............................................. ............................... 12-9
Replacing ......................................... .......................... 11-44
C
Capacities .......................................... ............................... 12-4
Cargo Area bars .......................................... ........................... 6-12
Area cover .......................................... ......................... 6-10
Area light ........................................ ..................... 6-2, 11-50
Tie-down hooks ...................................... ..................... 6-11
Catalytic converter ................................... ........................... 8-3
Center Console ............................................ .............................. 6-4
Ventilators ........................................ .............................. 4-3
Changing Flat tire ......................................... .................................. 9-4