2006 SUBARU IMPREZA engine
[x] Cancel search: enginePage 253 of 365
8-26 Driving tips
trailer.
Check that the vehicle sits horizontally
with the trailer attached. If the vehicle is
tipped sharply up at the front and down at
the rear, check the total trailer weight,
GVW, GAWs and tongue load again, then
confirm that the load and its distribution
are acceptable.
Check that the tire pressures are cor-
rect.
Check that the vehicle and trailer are
connected properly. Confirm that the trailer tongue is connected prop-
erly to the hitch ball. the trailer lights connector is connect-
ed properly and trailer s brake lights illu-
minate when the vehicle s brake pedal
is pressed, and that the trailer s turn sig-
nal lights flash when the vehicle s turn
signal lever is operated. the safety chains are connected prop-
erly. all cargo in the trailer is secured safe-
ty in position. the side mirrors provide a good rear-
ward field of view without a significant
blind spot.
Sufficient time should be taken to learn
the feel of the vehicle/trailer combination
before starting out on a trip. In an area free
of traffic, practice turning, stopping and
backing up.
Driving with a trailer
You should allow for considerably more
stopping distance when towing a trailer.
Avoid sudden braking because it may re-
sult in skidding or jackknifing and loss of
control.
Avoid abrupt starts and sudden acceler-
ations. If your vehicle has a manual trans-
mission, always start out in first gear and
release the clutch at moderate engine rev-
olution.
Avoid uneven steering, sharp turns and
rapid lane changes.
Slow down before turning. Make a long-
er than normal turning radius because the
trailer wheels will be closer than the vehi-
cle wheels to the inside of the turn. In a
tight turn, the trailer could hit your vehicle.
Crosswinds will adversely affect the
handling of your vehicle and trailer, caus-
ing sway. Crosswinds can be due to
weather conditions or the passing of large
tracks or buses. If swaying occurs, firmly
grip the steering wheel and slow down im-
mediately but gradually.
When passing other vehicles, consider-
able distance is required because of the
added weight and length caused by at-
taching the trailer to your vehicle.
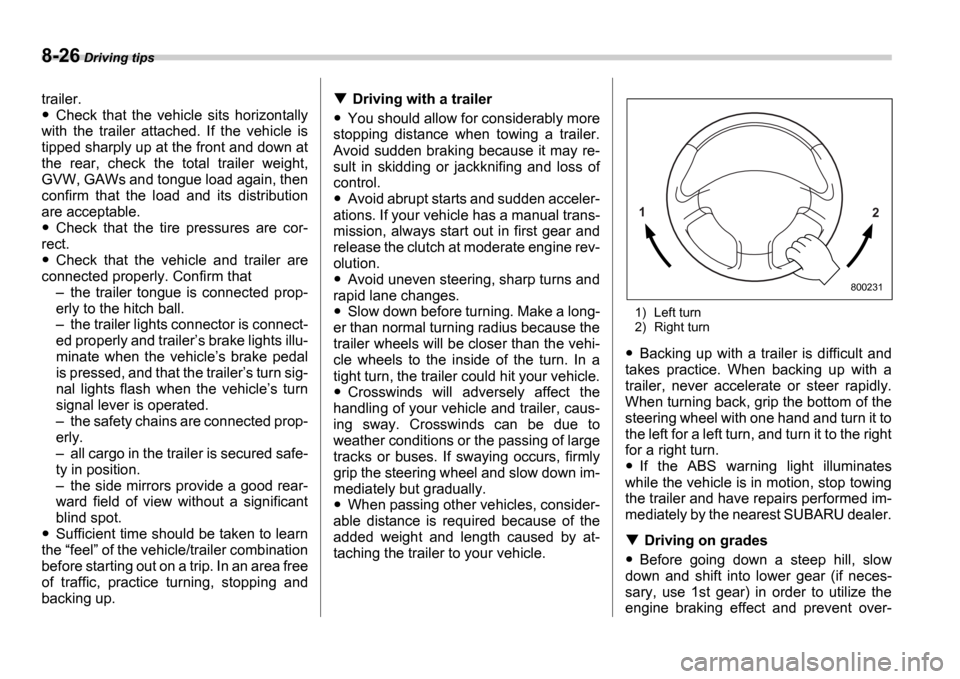
1) Left turn
2) Right turn
Backing up with a trailer is difficult and
takes practice. When backing up with a
trailer, never accelerate or steer rapidly.
When turning back, grip the bottom of the
steering wheel with one hand and turn it to
the left for a left turn, and turn it to the right
for a right turn.
If the ABS warning light illuminates
while the vehicle is in motion, stop towing
the trailer and have repairs performed im-
mediately by the nearest SUBARU dealer.
Driving on grades
Before going down a steep hill, slow
down and shift into lower gear (if neces-
sary, use 1st gear) in order to utilize the
engine braking effect and prevent over-
1 2
800231
Page 254 of 365

Driving tips 8-27
heating of your vehicle s brakes. Do not
make sudden downshifts.
When driving uphill in hot weather, the
air conditioner may turn off automatically
to protect the engine from overheating.
When driving uphill in hot weather, pay
attention to the water temperature gauge
pointer (for all vehicles) and AT OIL TEMP
warning light (for AT vehicles) since the
engine and transmission are relatively
prone to overheating under these condi-
tions. If the water temperature gauge
pointer approaches the OVERHEAT zone
or the AT OIL TEMP warning light illumi-
nates, immediately switch off the air con-
ditioner and stop the vehicle at the nearest
safe place. Refer to the Engine overheat-
ing section in chapter 9, and Warning
and indicator lights section in chapter 3.
If your vehicle has an automatic trans-
mission, avoid using the accelerator pedal
to stay stationary on an uphill slope in-
stead of using the parking brake or foot
brake. That may cause the transmission
fluid to overheat.
If your vehicle has an automatic trans-
mission, place the selector lever as fol-
lows:
Uphill slopes: D position
Downhill slopes: A low-speed gear posi-
tion to use engine braking
Parking on a grade
Always block the wheels under both vehi-
cle and trailer when parking. Apply the
parking brake firmly. You should not park
on a hill or slope. But if parking on a hill or
slope cannot be avoided, you should take
the following steps:
1. Apply the brakes and hold the pedal
down.
2. Have someone place wheel blocks un-
der both the vehicle and trailer wheels.
3. When the wheel blocks are in place, re-
lease the regular brakes slowly until the
blocks absorb the load.
4. Apply the regular brakes and then ap-
ply the parking brake; slowly release the
regular brakes.
5. Shift into 1st or reverse gear (manual
transmission) or P (automatic transmis-
sion) and shut off the engine.
Page 256 of 365

9
In case of emergency
If you park your vehicle in case of an emergency ......................................... .............. 9-2
Temporary spare tire .............................. ............ 9-2
Flat tires ........................................ ...................... 9-4
Changing a flat tire .............................. ................... 9-4
Jump starting ..................................... ................. 9-9
How to jump start ................................. .................. 9-9
Engine overheating ................................ ............ 9-11
If steam is coming from the engine compartment ....................................... .................. 9-11
If no steam is coming from the engine
compartment ....................................... .................. 9-11
Towing ............................................ ..................... 9-11
Towing and tie-down hooks ......................... ......... 9-12
Using a flat-bed truck ............................ ................. 9-13
Towing with all wheels on the ground .............. .... 9-14
Rear gate if the rear gate cannot be
unlocked .......................................... ................ 9-15
Moonroof if the moonroof cannot be
closed ............................................ ................... 9-15
Maintenance tools ................................. ............. 9-16
Jack and jack handle .............................. ................ 9-16
Page 258 of 365

In case of emergency 9-3
1) Tread wear indicator bar
2) Indicator location mark
When the wear indicator appears on the
tread, replace the tire.
The temporary spare tire must be used
only on a rear wheel. If a front wheel tire
gets punctured, replace the wheel with a
rear wheel and install the temporary spare
tire in place of the removed rear wheel.
1) Spare fuse
2) FWD connector
NOTE
(If your vehicle is AWD with automatic
transmission, except Turbo models)
Before driving your vehicle with the
temporary spare tire, put a spare fuse
inside the FWD connector in the main
fuse box located in the engine com-
partment and confirm that the Front-
wheel drive warning light AWD in the
combination meter comes on. The All-
Wheel Drive capability of the vehicle
has now deactivated. After re-installing
the conventional tire, remove the spare
fuse from the FWD connector in order
to reactivate All-Wheel Drive.
900231
1
22 1
900266
Never tow a trailer when the tempo-
rary spare tire is used. The tempo-
rary spare tire is not designed to
sustain the towing load. Use of the
temporary spare tire when towing
can result in failure of the spare tire
and/or less stability of the vehicle
and may lead to an accident.
Never use any temporary spare tire
other than the original. Using other
sizes may result in severe mechani-
cal damage to the drive train of your
vehicle.
Page 259 of 365
9-4 In case of emergency
Flat tires
If you have a flat tire while driving, never
brake suddenly; keep driving straight
ahead while gradually reducing speed.
Then slowly pull off the road to a safe
place.
Changing a flat tire1. Park on a hard, level surface, whenev-
er possible, then stop the engine.
2. Set the parking brake securely and
shift a manual transmission vehicle in re-
verse or an automatic transmission vehi-
cle in the P (Park) position.
3. Turn on the hazard warning flasher and
have everyone get out of the vehicle.
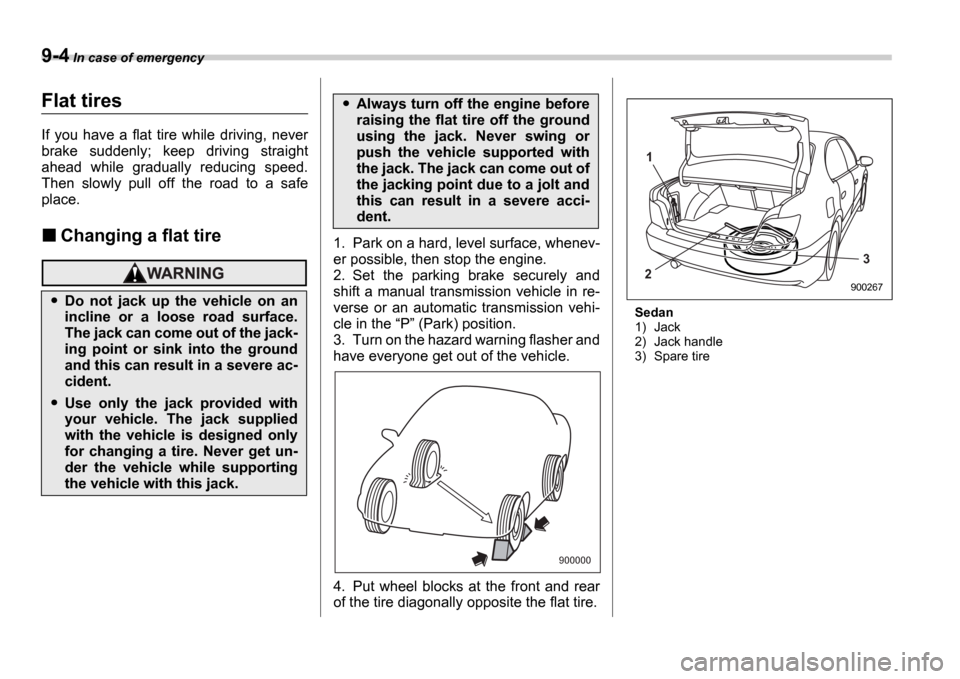
4. Put wheel blocks at the front and rear
of the tire diagonally opposite the flat tire.
Sedan
1) Jack
2) Jack handle
3) Spare tireDo not jack up the vehicle on an
incline or a loose road surface.
The jack can come out of the jack-
ing point or sink into the ground
and this can result in a severe ac-
cident.
Use only the jack provided with
your vehicle. The jack supplied
with the vehicle is designed only
for changing a tire. Never get un-
der the vehicle while supporting
the vehicle with this jack.
Always turn off the engine before
raising the flat tire off the ground
using the jack. Never swing or
push the vehicle supported with
the jack. The jack can come out of
the jacking point due to a jolt and
this can result in a severe acci-
dent.
900000
1
2 3
900267
Page 264 of 365
In case of emergency 9-9
CONTINUED
Jump starting
When your vehicle does not start due to a
run down (discharged) battery, the vehicle
may be jump started by connecting your
battery to another battery (called the
booster battery) with jumper cables.
How to jump start
1. Make sure the booster battery is 12 volts and the negative terminal is ground-
ed.
2. If the booster battery is in another vehi-
cle, do not let the two vehicles touch.
3. Turn off all unnecessary lights and ac-
cessories.
4. Connect the jumper cables exactly in
the sequence illustrated.
Battery fluid is SULFURIC ACID.
Do not let it come in contact with
the hooks, skin, clothing or the
vehicle.
If battery fluid gets on you, thor-
oughly flush the exposed area
with water immediately. Get medi-
cal help if the fluid has entered
your hooks.
If battery fluid is accidentally
swallowed, immediately drink a
large amount of milk or water, and
obtain immediate medical help.
Keep everyone including children
away from the battery.
The gas generated by a battery ex-
plodes if a flame or spark is
brought near it. Do not smoke or
light a match while jump starting.
Never attempt jump starting if the
discharged battery is frozen. It
could cause the battery to burst or
explode.
Whenever working on or around a
battery, always wear suitable-
hookprotectors, and remove met-
al objects such as rings, bands or
other metal jewelry.
Be sure the jumper cables and
clamps on them do not have loose
or missing insulation.
Do not jump start unless cables in
suitable condition are available.
A running engine can be danger-
ous. Keep your fingers, hands,
clothing, hair and tools away from
the cooling fan, belts and any oth-
er moving engine parts. Remov-
ing rings, watches and ties is ad-
visable.
Jump starting is dangerous if it
done incorrectly. If you are unsure
about the proper procedure for
jump starting, consult a compe-
tent mechanic.
Page 265 of 365
9-10 In case of emergency
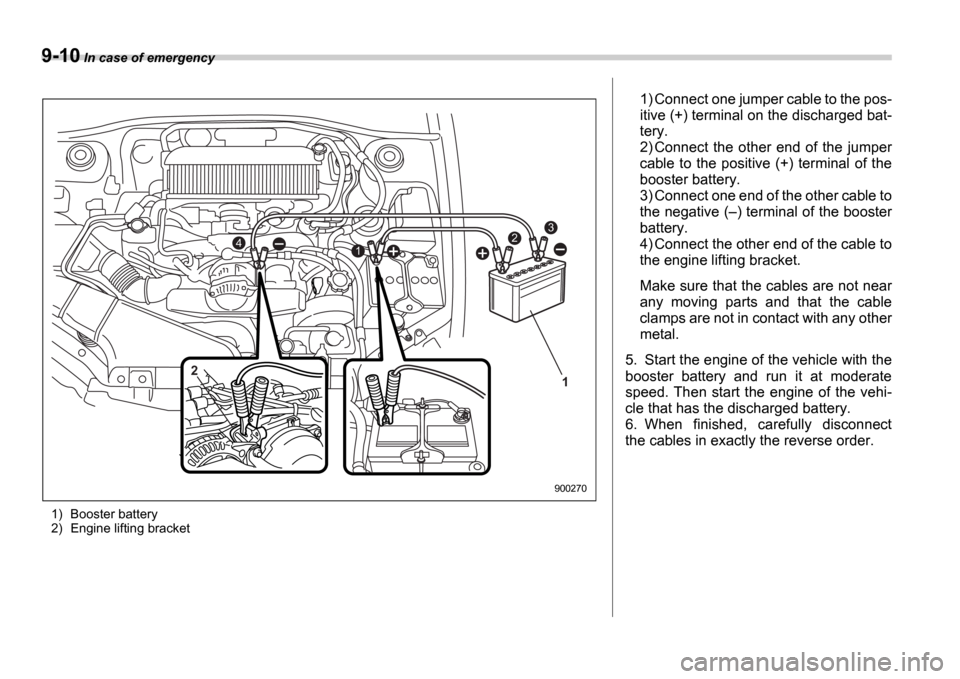
1) Booster battery
2) Engine lifting bracket
3
421
1
2
900270
1) Connect one jumper cable to the pos-
itive (+) terminal on the discharged bat-
tery.
2) Connect the other end of the jumper
cable to the positive (+) terminal of the
booster battery.
3) Connect one end of the other cable to
the negative (
) terminal of the booster
battery.
4) Connect the other end of the cable to
the engine lifting bracket.
Make sure that the cables are not near
any moving parts and that the cable
clamps are not in contact with any other
metal.
5. Start the engine of the vehicle with the
booster battery and run it at moderate
speed. Then start the engine of the vehi-
cle that has the discharged battery.
6. When finished, carefully disconnect
the cables in exactly the reverse order.
Page 266 of 365
In case of emergency 9-11
CONTINUED
Engine overheating
If the engine overheats, safely pull off the
road and stop the vehicle in a safe place.
If steam is coming from the
engine compartment
Turn off the engine and get everyone
away from the vehicle until it cools down.
If no steam is coming from
the engine compartment
1. Keep the engine running at idling
speed.
2. Open the hood to ventilate the engine
compartment.
Confirm that the cooling fan is turning. If
the fan is not turning, immediately turn off the engine and contact your authorized
dealer for repair.
3. After the engine coolant temperature
has dropped, turn off the engine.
If the temperature gauge stays at the
overheated zone, turn off the engine.
4. After the engine has fully cooled down,
check the coolant level in the reserve
tank.
If the coolant level is below the
LOW
mark, add coolant up to the FULL mark.
5. If there is no coolant in the reserve
tank, add coolant to the reserve tank.
Then remove the radiator cap and fill the
radiator with coolant.
If you remove the radiator cap from a hot
radiator, first wrap a thick cloth around the
radiator cap, then turn the cap counter-
clockwise slowly without pressing down
until it stops. Release the pressure from
the radiator. After the pressure has been
fully released, remove the cap by pressing
down and turning it.
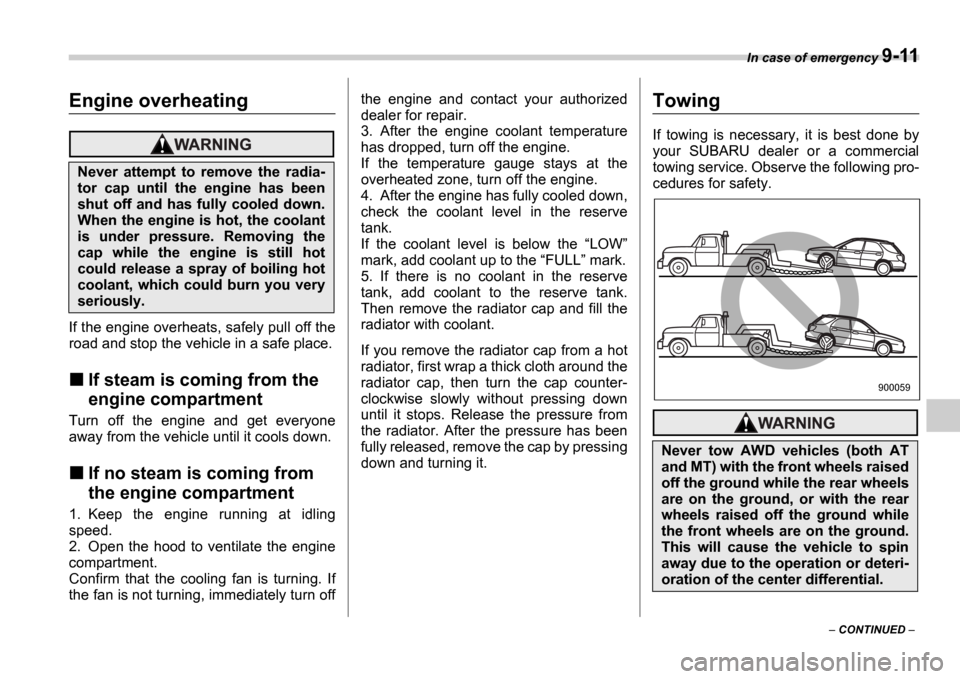
Towing
If towing is necessary, it is best done by
your SUBARU dealer or a commercial
towing service. Observe the following pro-
cedures for safety.
Never attempt to remove the radia-
tor cap until the engine has been
shut off and has fully cooled down.
When the engine is hot, the coolant
is under pressure. Removing the
cap while the engine is still hot
could release a spray of boiling hot
coolant, which could burn you very
seriously.
Never tow AWD vehicles (both AT
and MT) with the front wheels raised
off the ground while the rear wheels
are on the ground, or with the rear
wheels raised off the ground while
the front wheels are on the ground.
This will cause the vehicle to spin
away due to the operation or deteri-
oration of the center differential.
900059