2006 SUBARU IMPREZA engine
[x] Cancel search: enginePage 299 of 365
11-20 Maintenance and service
Automatic transmission fluid
Checking the fluid level
The automatic transmission fluid expands
largely as its temperature rises; the fluid
level differs according to fluid tempera-
ture. Therefore, there are two different
scales for checking the level of hot fluid
and cold fluid on the dipstick.
Though the fluid level can be checked
without warming up the fluid on theCOLD range, we recommend checking
the fluid level when the fluid is at operating
temperature.
Checking the fluid level when the
fluid is hot
1. Drive the vehicle several miles to raise
the temperature of the transmission fluid
up to normal operating temperature; 158
to 176 F (70 to 80 C) is normal.
2. Park the vehicle on a level surface and
set the parking brake.
3. First shift the selector lever in each po-
sition. Then shift it in the P position, and
run the engine at idling speed.
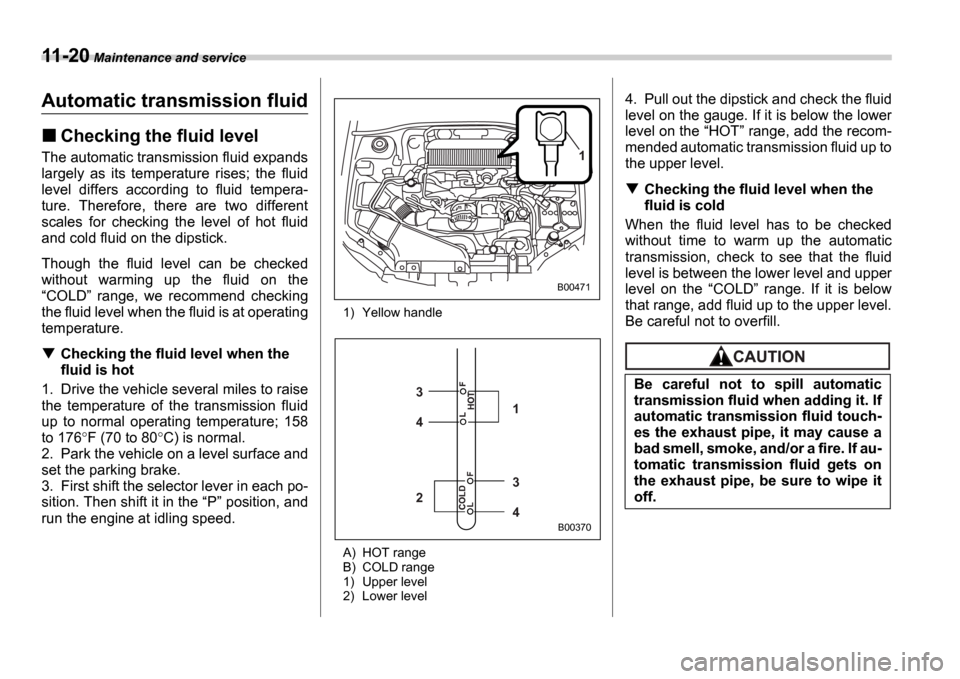
1) Yellow handle
A) HOT range
B) COLD range
1) Upper level
2) Lower level
4. Pull out the dipstick and check the fluid
level on the gauge. If it is below the lower
level on the HOT range, add the recom-
mended automatic transmission fluid up to
the upper level.
Checking the fluid level when the
fluid is cold
When the fluid level has to be checked
without time to warm up the automatic
transmission, check to see that the fluid
level is between the lower level and upper
level on the COLD range. If it is below
that range, add fluid up to the upper level.
Be careful not to overfill.
1
B00471
3 4
34 2
1
B00370
Be careful not to spill automatic
transmission fluid when adding it. If
automatic transmission fluid touch-
es the exhaust pipe, it may cause a
bad smell, smoke, and/or a fire. If au-
tomatic transmission fluid gets on
the exhaust pipe, be sure to wipe it
off.
Page 300 of 365
Maintenance and service 11-21
CONTINUED
Recommended fluid
Use one of the following types of automat-
ic transmission fluid.
Genuine Subaru Automatic Transmis-
sion Fluid Type-HP
IDEMITSU ATF HP
Castrol Transmax J
Pennzoil ATF-J*
* Available only in the USA (except
Alaska and Hawaii)
NOTE
Using any non-specified type of auto-
matic transmission fluid could result in
damage inside the transmission. When
replacing the automatic transmission
fluid, be sure to use a fluid of the types
specified above.
Front differential gear oil (AT
vehicles)
Checking the oil level
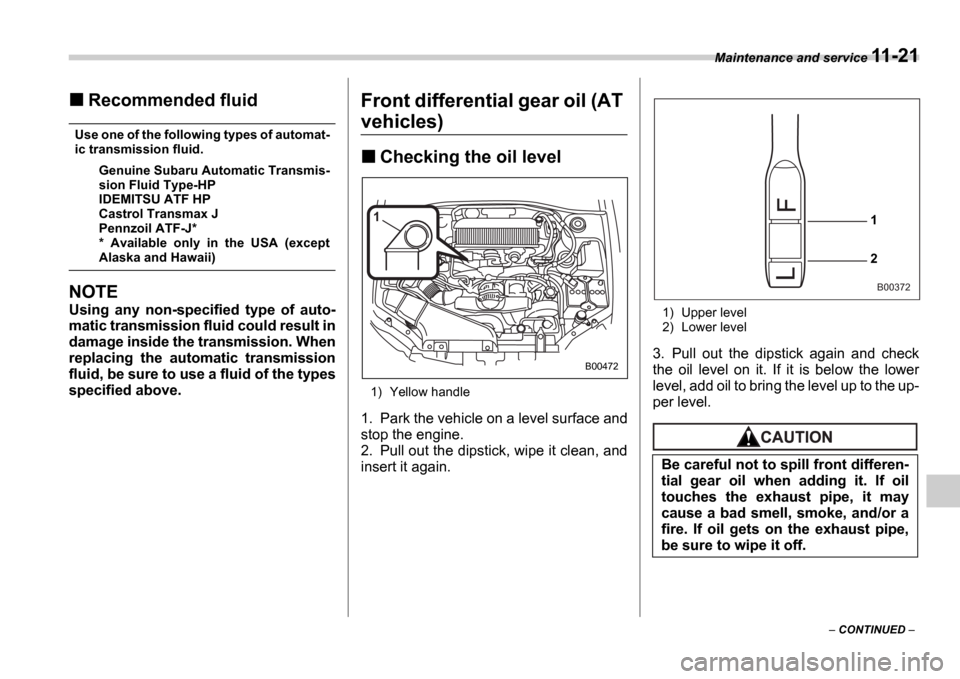
1) Yellow handle
1. Park the vehicle on a level surface and
stop the engine.
2. Pull out the dipstick, wipe it clean, and
insert it again.
1) Upper level
2) Lower level
3. Pull out the dipstick again and check
the oil level on it. If it is below the lower
level, add oil to bring the level up to the up-
per level.
1
B00472
Be careful not to spill front differen-
tial gear oil when adding it. If oil
touches the exhaust pipe, it may
cause a bad smell, smoke, and/or a
fire. If oil gets on the exhaust pipe,
be sure to wipe it off.
1 2
B00372
Page 303 of 365
11-24 Maintenance and service
Power steering fluid
Checking the fluid level
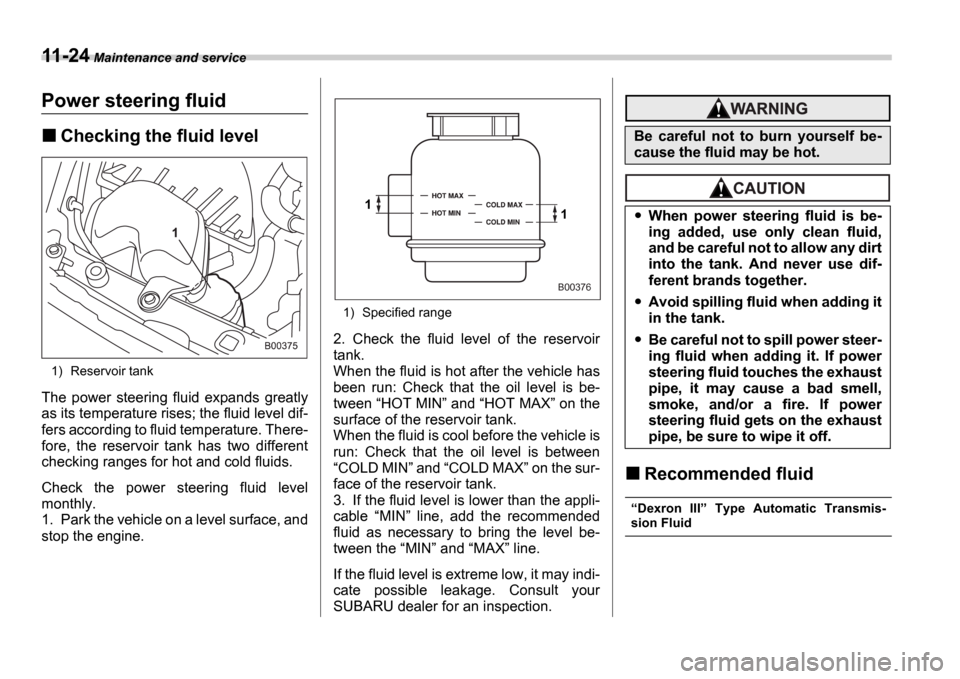
1) Reservoir tank
The power steering fluid expands greatly
as its temperature rises; the fluid level dif-
fers according to fluid temperature. There-
fore, the reservoir tank has two different
checking ranges for hot and cold fluids.
Check the power steering fluid level
monthly.
1. Park the vehicle on a level surface, and
stop the engine.
1) Specified range
2. Check the fluid level of the reservoir
tank.
When the fluid is hot after the vehicle has
been run: Check that the oil level is be-
tween HOT MIN and HOT MAX on the
surface of the reservoir tank.
When the fluid is cool before the vehicle is
run: Check that the oil level is between COLD MIN and COLD MAX on the sur-
face of the reservoir tank.
3. If the fluid level is lower than the appli-
cable MIN line, add the recommended
fluid as necessary to bring the level be-
tween the MIN and MAX line.
If the fluid level is extreme low, it may indi-
cate possible leakage. Consult your
SUBARU dealer for an inspection.
Recommended fluid
Dexron III Type Automatic Transmis-
sion Fluid
1
1
B00376
Be careful not to burn yourself be-
cause the fluid may be hot.
When power steering fluid is be-
ing added, use only clean fluid,
and be careful not to allow any dirt
into the tank. And never use dif-
ferent brands together.
Avoid spilling fluid when adding it
in the tank.
Be careful not to spill power steer-
ing fluid when adding it. If power
steering fluid touches the exhaust
pipe, it may cause a bad smell,
smoke, and/or a fire. If power
steering fluid gets on the exhaust
pipe, be sure to wipe it off.
Page 306 of 365
Maintenance and service 11-27
Brake booster
If the brake booster does not operate as
described in the following, have it checked
by your SUBARU dealer.
1. With the engine off, depress the brake
pedal several times, applying the same
pedal force each time. The distance the
pedal travels should not vary.
2. With the brake pedal depressed, start
the engine. The pedal should move slight-
ly down to the floor.
3. With the brake pedal depressed, stop
the engine and keep the pedal depressed
for 30 seconds. The pedal height should
not change.
4. Start the engine again and run for ap-
proximately one minute then turn it off.
Depress the brake pedal several times to
check the brake booster. The brake boost-
er operates properly if the pedal stroke de-
creases with each depression.
Brake pedal
Check the brake pedal free play and re-
serve distance according to the mainte-
nance schedule in the Warranty and
Maintenance Booklet .
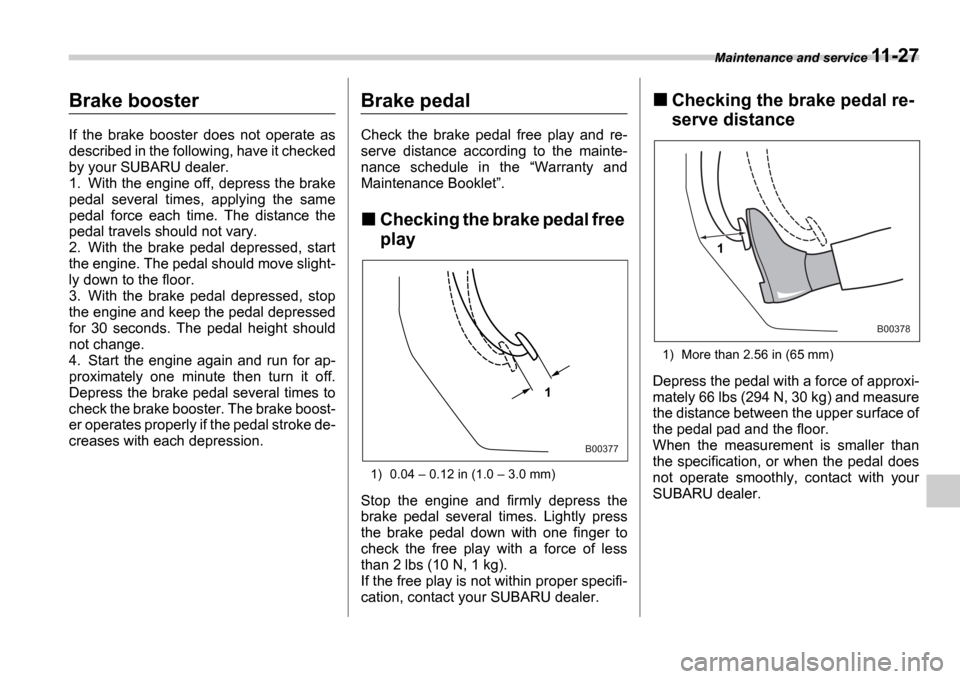
Checking the brake pedal free
play
1) 0.04 0.12 in (1.0 3.0 mm)
Stop the engine and firmly depress the
brake pedal several times. Lightly press
the brake pedal down with one finger to
check the free play with a force of less
than 2 lbs (10 N, 1 kg).
If the free play is not within proper specifi-
cation, contact your SUBARU dealer.
Checking the brake pedal re-
serve distance
1) More than 2.56 in (65 mm)
Depress the pedal with a force of approxi-
mately 66 lbs (294 N, 30 kg) and measure
the distance between the upper surface of
the pedal pad and the floor.
When the measurement is smaller than
the specification, or when the pedal does
not operate smoothly, contact with your
SUBARU dealer.1
B00377
1
B00378
Page 307 of 365
11-28 Maintenance and service
Clutch pedal (MT vehicles)
Check the clutch pedal free play and re-
serve distance according to the mainte-
nance schedule in the Warranty and
Maintenance Booklet .
Checking the clutch function
Check the clutch engagement and disen-
gagement.
1. With the engine idling, check that there
are no abnormal noises when the clutch
pedal is depressed, and that shifting into
1st or reverse feels smooth.
2. Start the vehicle by releasing the pedal
slowly to check that the engine and trans-
mission smoothly couple without any sign
of slippage.
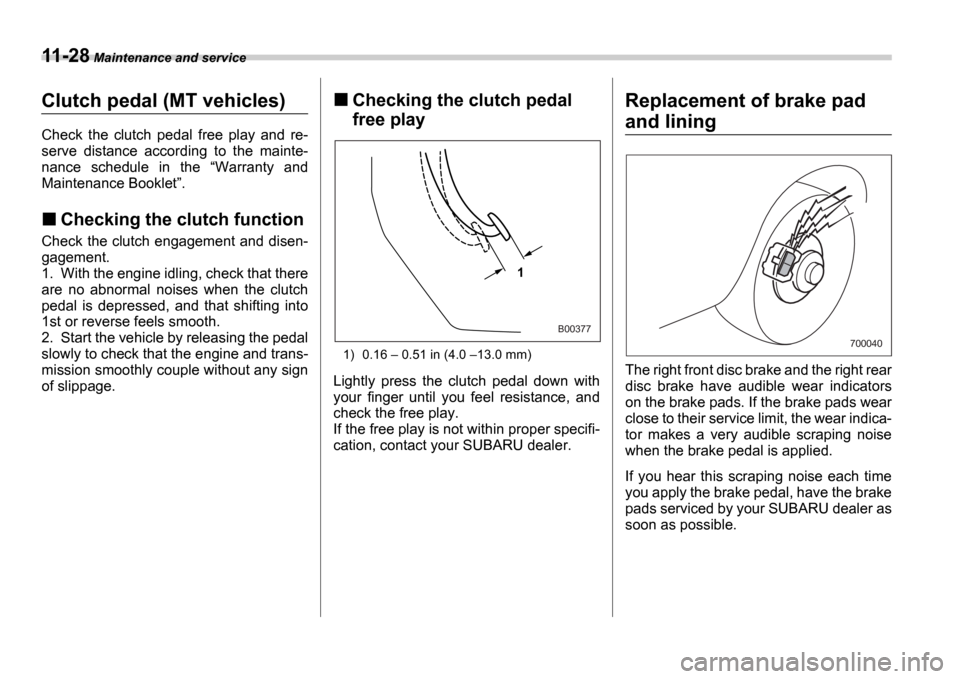
Checking the clutch pedal
free play
1) 0.16 0.51 in (4.0 13.0 mm)
Lightly press the clutch pedal down with
your finger until you feel resistance, and
check the free play.
If the free play is not within proper specifi-
cation, contact your SUBARU dealer.
Replacement of brake pad
and lining
The right front disc brake and the right rear
disc brake have audible wear indicators
on the brake pads. If the brake pads wear
close to their service limit, the wear indica-
tor makes a very audible scraping noise
when the brake pedal is applied.
If you hear this scraping noise each time
you apply the brake pedal, have the brake
pads serviced by your SUBARU dealer as
soon as possible.
1
B00377
700040
Page 315 of 365
11-36 Maintenance and service
Windshield washer fluid
If you spray washer fluid on the windshield
but the supply of washer fluid appears to
diminish, check the level of washer fluid in
the tank.
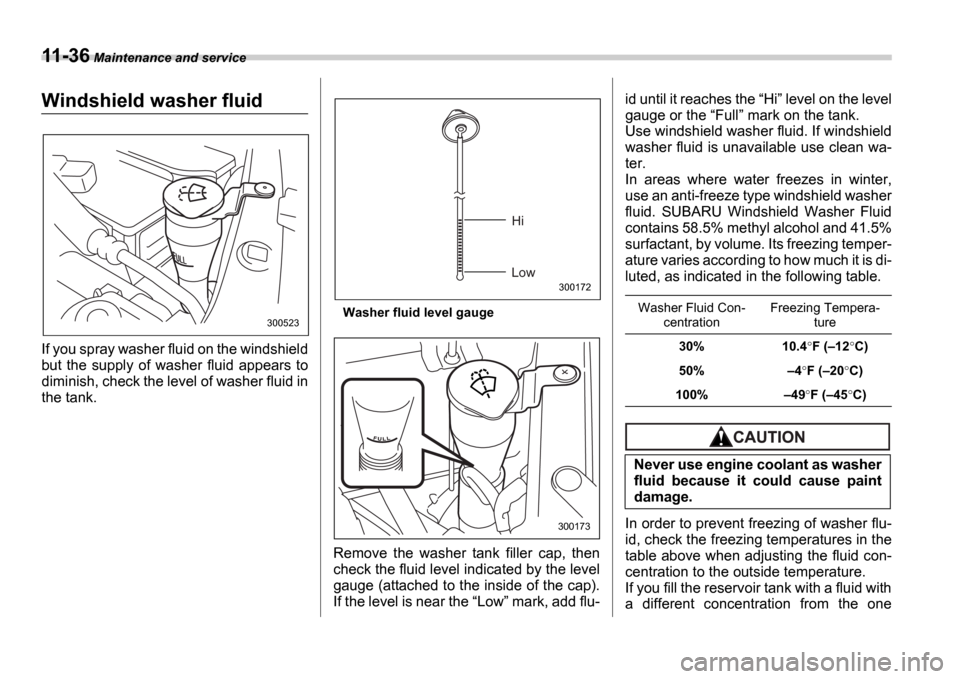
Washer fluid level gauge
Remove the washer tank filler cap, then
check the fluid level indicated by the level
gauge (attached to the inside of the cap).
If the level is near the Low mark, add flu- id until it reaches the
Hi level on the level
gauge or the Full mark on the tank.
Use windshield washer fluid. If windshield
washer fluid is unavailable use clean wa-
ter.
In areas where water freezes in winter,
use an anti-freeze type windshield washer
fluid. SUBARU Windshield Washer Fluid
contains 58.5% methyl alcohol and 41.5%
surfactant, by volume. Its freezing temper-
ature varies according to how much it is di-
luted, as indicated in the following table.
In order to prevent freezing of washer flu-
id, check the freezing temperatures in the
table above when adjusting the fluid con-
centration to the outside temperature.
If you fill the reservoir tank with a fluid with
a different concentration from the one
300523
Hi
Low
300172
300173
Washer Fluid Con- centration Freezing Tempera-
ture
30% 10.4 F ( 12 C)
50% 4F ( 20 C)
100% 49 F ( 45 C)
Never use engine coolant as washer
fluid because it could cause paint
damage.
Page 321 of 365

11-42 Maintenance and service
To remove the coin tray, open the cover
and pull the coin tray out.
The other one is housed in the engine
compartment.1) Fuse puller
2) Spare fuse
The spare fuses are stored in the main
fuse box cover in the engine compart-
ment. The fuse puller is stored in the main fuse
box in the engine compartment.1) Good
2) Blown
If any lights, accessories or other electri-
cal controls do not operate, inspect the
corresponding fuse. If a fuse has blown,
replace it.
1. Turn the ignition switch to the
LOCK
position and turn off all electrical accesso-
ries.
2. Remove the cover.
3. Determine which fuse may be blown.
The back side of each fuse box cover and
the Fuses and circuits section in chapter
12 in this manual show the circuit for each
fuse.
B00173
B00463
B00476
B00477
1 2
B00338
Page 332 of 365

12
Specifications
Specifications ..................................................... 12-2
Dimensions ........................................ ..................... 12-2
Engine ............................................ .......................... 12-3
Electrical system ................................. ................... 12-3
Capacities ........................................ ........................ 12-4
Tires ............................................. ............................ 12-4
Wheel alignment ................................... .................. 12-5
Fuses and circuits ................................ .............. 12-6
Fuse panel located behind the coin tray .......... ... 12-6
Fuse panel located in the engine compartment ....................................... .................. 12-8
Bulb chart ........................................ .................... 12-9
Vehicle identification ............................ ............. 12-10