2006 PONTIAC GRAND PRIX dic controls
[x] Cancel search: dic controlsPage 194 of 472
This message will display while the ignition is in RUN. A
chime will sound for two seconds when this message
is displayed. Press the set/reset button to acknowledge
this message and to clear it from the screen.
This message will continue to display for three seconds
if it has not been acknowledged when the engine is
turned off. It will also re-display for three seconds if the
message has been acknowledged, but the condition
still exists when the engine is turned off.
If the condition still exists, the message will re-appear
when the engine is turned on.
CRUISE SET
This symbol comes
on with the CRUISE
SET message.
This message and symbol come on brie�y whenever
the cruise control is set. The cruise control light on the
instrument panel cluster will also come on whencruise control is set. SeeCruise Control Light on
page 3-51. CRUISE SET will also appear brie�y in the
Head-Up Display (HUD), if your vehicle has this feature.
This message will display when the ignition is in RUN.
SeeCruise Control on page 3-11for more information.
This message does not need to be acknowledged.
DELAYED LOCKING
This message comes on when the doors of the vehicle
are closed and the delayed locking feature has been
programmed through the DIC. See “Delayed Locking” in
the options menu underDIC Controls and Displays
(Base Level DIC) on page 3-52orDIC Controls
and Displays (Uplevel DIC with Trip Computer) on
page 3-60for more information.
This message will appear when the ignition is in OFF. A
chime will sound for two seconds when this message
is displayed.
This message cannot be acknowledged.
3-76
Page 196 of 472
This message will display only while the ignition is in
RUN. A chime will sound continuously when this
message is displayed. Press the set/reset button to
acknowledge this message and to clear it from
the screen.
This message will continue to display if it has not been
acknowledged when the engine is turned off. It will
also re-display for three seconds if the message has
been acknowledged, but the condition still exists
when the engine is turned off.
If the condition still exists, the message will re-appear
when the engine is turned on.
HOT ENGINE OIL. REDUCE SPEED
On some vehicles, this warning message comes on
when the vehicle’s engine oil is above the proper engine
operating temperature. Reduce the speed of the
vehicle. If the warning message continues to display,
have the vehicle serviced by your GM dealer as soon as
possible. A chime will sound continuously when this
message is displayed. Press the set/reset button
to acknowledge this warning message. This clears it
from the screen.
If the condition still exists, the message will re-appear
when the engine is turned on.
HOT TRANS FLUID
This symbol comes on with
the HOT TRANS FLUID
warning message.
This warning message will appear when the transaxle
�uid in the vehicle is too hot. Stop the vehicle and allow
it to idle until it cools down. If the warning message
continues to display, have the vehicle serviced by your
GM dealer as soon as possible.
If the vehicle has the Uplevel Trip Computer DIC, you
can determine the actual temperature of the transaxle
�uid using the vehicle’s gages button. SeeDIC Controls
and Displays (Base Level DIC) on page 3-52orDIC
Controls and Displays (Uplevel DIC with Trip Computer)
on page 3-60for more information.
This message will display while the ignition is in RUN. A
chime will sound for two seconds when this message
is displayed. Press the set/reset button to acknowledge
this message and to clear it from the screen.
3-78
Page 203 of 472
See “REMOTE START” underDIC Controls and
Displays (Base Level DIC) on page 3-52orDIC Controls
and Displays (Uplevel DIC with Trip Computer) on
page 3-60and “Remote Vehicle Start” underRemote
Keyless Entry System Operation on page 2-4for
more information.
RIGHT FRONT TURN LAMP OUT
This warning message will come on when the vehicle’s
right front turn signal needs to be replaced. See
Front Turn Signal, Parking and Fog Lamps on page 5-56
for bulb replacement procedures.
This message will display only while the ignition is in
RUN. A chime will sound for two seconds while
this message is displayed. Press the set/reset button
to acknowledge this message and to clear it from
the screen.
This message will continue to display if it has not been
acknowledged when the engine is turned off. It will
also re-display for three seconds if the message has
been acknowledged, but the condition still exists
when the engine is turned off.
If the condition still exists, the message will re-appear
when the engine is turned on.
RIGHT REAR TURN LAMP OUT
This warning message will come on when the vehicle’s
right rear turn signal needs to be replaced. See
Taillamps, Turn Signal, and Stoplamps on page 5-57for
bulb replacement procedures.
This message will display only while the ignition is in
RUN. A chime will sound for two seconds while
this message is displayed. Press the set/reset button
to acknowledge this message and to clear it from
the screen.
This message will continue to display if it has not been
acknowledged when the engine is turned off. It will
also re-display for three seconds if the message has
been acknowledged, but the condition still exists
when the engine is turned off.
If the condition still exists, the message will re-appear
when the engine is turned on.
3-85
Page 217 of 472
Setting the Tone
(Bass/Midrange/Treble)
TONE:Press and release this button until BASS, MID,
or TREB appears on the display. The SELECT LED
indicator will light to show that the tone control can be
adjusted. Turn the SELECT knob to increase or to
decrease. If a station is weak or noisy, decrease
the treble.
To return all of the tone controls to the middle position,
press and hold the TONE button until FLAT appears
on the display
EQ (Equalizer):Press this button to select customized
equalization settings.
Up to six customized equalization settings, can be
programmed, by performing the following steps:
1. Turn the radio on.
2. Use the TONE button and the SELECT knob to
create the equalization.
3. Press and hold the EQ button for two seconds.
SELECT EQ # will appear on the display and the
EQ symbol will �ash.
4. Press EQ or turn the SELECT knob to select the
EQ number.5. Press and hold the EQ button or push the SELECT
knob to store the equalization setting and the
number. EQ SAVED will appear on the display and
you will hear a beep.
6. Repeat the steps for the other EQ settings
and numbers.
EQ 5 has been programmed at the factory for use with
talk radio, but it can be preset to a different tone.
Adjusting the Speakers (Balance/Fade)
BAL (Balance):To adjust the balance between the
right and the left speakers, press and release this button
until BAL appears on the display. The SELECT LED
indicator will light to show that the speakers can
be adjusted. Turn the SELECT knob to move the sound
toward the right or the left speakers.
FADE:To adjust the fade between the front and the
rear speakers, press and release this button until FADE
appears on the display. The SELECT LED indicator
will light to show that the speakers can be adjusted. Turn
the SELECT knob to move the sound toward the front
or the rear speakers.
Pressing and holding the BAL FADE button for
two seconds will return all speaker settings to the
middle position.
3-99
Page 228 of 472
Pressing and holding the TONE button until FLAT
appears on the display will return all of the tone controls
to the middle position.
EQ (Equalizer):Press this button to select customized
bass, midrange, and treble equalization settings.
Up to six customized equalization settings, can be
programmed on the six numbered pushbuttons,
by performing the following steps:
1. Turn the radio on.
2. Use the TONE button and the SELECT knob to
create the desired equalization.
3. Press and hold the EQ button for two seconds.
SELECT EQ # will appear on the display and the
EQ symbol will �ash.
4. Press EQ or turn the SELECT knob to select the
desired EQ number.
5. Press and hold the EQ button or push the SELECT
knob to store the equalization setting and the
number. You will hear a beep and EQ SAVED will
appear on the display.
6. Repeat the steps for the other EQ settings and
numbers.
EQ 5 has been programmed at the factory for use with
talk radio, but it can be set to a different tone.Adjusting the Speakers (Balance/Fade)
BAL (Balance):To adjust the balance between the
right and the left speakers, press and release this button
until BAL appears on the display. The SELECT LED
indicator will light to show that the speakers can
be adjusted. Turn the SELECT knob to move the sound
toward the right or the left speakers.
FADE:To adjust the fade between the front and the
rear speakers, press and release this button until FADE
appears on the display. The SELECT LED indicator
will light to show that the speakers can be adjusted. Turn
the SELECT knob to move the sound toward the front
or the rear speakers.
Pressing and holding the BAL FADE button for
two seconds will return all speaker settings to the
middle position.
3-110
Page 257 of 472

Navigation/Radio System
Your vehicle may have a navigation radio system.
The navigation system has built-in features intended to
minimize driver distraction. Technology alone, no
matter how advanced, can never replace your own
judgment. See the navigation system manual for some
tips to help you reduce distractions while driving.
Theft-Deterrent Feature
THEFTLOCK®is designed to discourage theft of
your vehicle’s radio. The feature works automatically
by learning a portion of the Vehicle Identi�cation
Number (VIN). If the radio is moved to a different
vehicle, it will not operate and LOCKED will appear
on the display.
When the radio and vehicle are turned off, the blinking
red light indicates that THEFTLOCK
®is armed.
With THEFTLOCK
®activated, the radio will not
operate if stolen.
Audio Steering Wheel Controls
If your vehicle has this feature, some audio controls
can be adjusted at the steering wheel. They include
the following:
wtux(Seek):Press the up or the down arrow
to go to the next or previous station and stay there.
To scan stations, press and hold either arrow for
two seconds until FREQUENCY SCAN appears on the
display. The radio will go to a station, play for a few
seconds, then go to the next station. Press either arrow
again to stop scanning.
The sound will mute while seeking or scanning. The
radio will only seek or scan stations with a strong signal
that are in the selected band.
3-139
Page 375 of 472
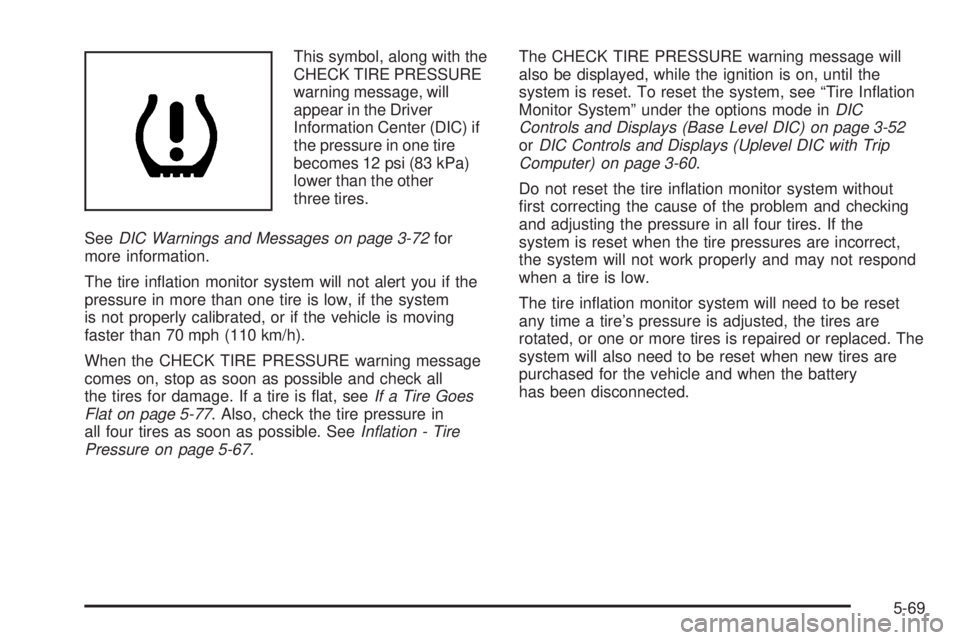
This symbol, along with the
CHECK TIRE PRESSURE
warning message, will
appear in the Driver
Information Center (DIC) if
the pressure in one tire
becomes 12 psi (83 kPa)
lower than the other
three tires.
SeeDIC Warnings and Messages on page 3-72for
more information.
The tire in�ation monitor system will not alert you if the
pressure in more than one tire is low, if the system
is not properly calibrated, or if the vehicle is moving
faster than 70 mph (110 km/h).
When the CHECK TIRE PRESSURE warning message
comes on, stop as soon as possible and check all
the tires for damage. If a tire is �at, seeIf a Tire Goes
Flat on page 5-77. Also, check the tire pressure in
all four tires as soon as possible. SeeIn�ation - Tire
Pressure on page 5-67.The CHECK TIRE PRESSURE warning message will
also be displayed, while the ignition is on, until the
system is reset. To reset the system, see “Tire In�ation
Monitor System” under the options mode inDIC
Controls and Displays (Base Level DIC) on page 3-52
orDIC Controls and Displays (Uplevel DIC with Trip
Computer) on page 3-60.
Do not reset the tire in�ation monitor system without
�rst correcting the cause of the problem and checking
and adjusting the pressure in all four tires. If the
system is reset when the tire pressures are incorrect,
the system will not work properly and may not respond
when a tire is low.
The tire in�ation monitor system will need to be reset
any time a tire’s pressure is adjusted, the tires are
rotated, or one or more tires is repaired or replaced. The
system will also need to be reset when new tires are
purchased for the vehicle and when the battery
has been disconnected.
5-69
Page 419 of 472
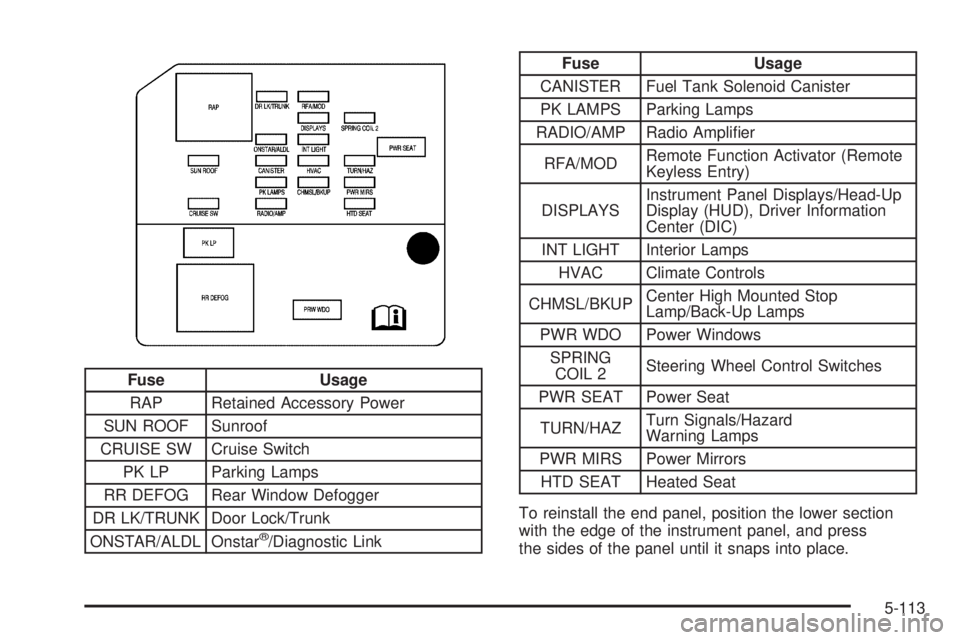
Fuse Usage
RAP Retained Accessory Power
SUN ROOF Sunroof
CRUISE SW Cruise Switch
PK LP Parking Lamps
RR DEFOG Rear Window Defogger
DR LK/TRUNK Door Lock/Trunk
ONSTAR/ALDL Onstar
®/Diagnostic Link
Fuse Usage
CANISTER Fuel Tank Solenoid Canister
PK LAMPS Parking Lamps
RADIO/AMP Radio Ampli�er
RFA/MODRemote Function Activator (Remote
Keyless Entry)
DISPLAYSInstrument Panel Displays/Head-Up
Display (HUD), Driver Information
Center (DIC)
INT LIGHT Interior Lamps
HVAC Climate Controls
CHMSL/BKUPCenter High Mounted Stop
Lamp/Back-Up Lamps
PWR WDO Power Windows
SPRING
COIL 2Steering Wheel Control Switches
PWR SEAT Power Seat
TURN/HAZTurn Signals/Hazard
Warning Lamps
PWR MIRS Power Mirrors
HTD SEAT Heated Seat
To reinstall the end panel, position the lower section
with the edge of the instrument panel, and press
the sides of the panel until it snaps into place.
5-113