2006 PONTIAC GRAND PRIX reset
[x] Cancel search: resetPage 81 of 472

2. Remove the old battery and replace it with the new
one. Make sure the positive side (+) of the battery
faces up. Use one three-volt, CR2032 battery,
or equivalent type.
3. Put the two halves back together. Make sure the
cover is on tight so water will not get inside the
transmitter.
4. Test the operation of the transmitter with
the vehicle.
Remote Vehicle Start
Your vehicle may have a remote start feature. This
feature allows you to start the engine from outside the
vehicle. It may also start the vehicle’s heating or air
conditioning systems and rear window defogger. When
the remote start system is active, the climate control
system will heat or cool the inside of the vehicle based
on the outside temperature. The rear window defogger
will be turned on by the climate control system when it is
heating the inside of the vehicle. Normal operation of
the system will return after the key is turned to RUN.
Laws in some communities may restrict the use of
remote starters. For example, some laws may require a
person using remote start to have the vehicle in view
when doing so. Check local regulations for any
requirements on remote starting of vehicles.Do not use the remote start feature if your vehicle is low
on fuel. Your vehicle may run out of fuel.
The remote start feature provides two separate starts
per ignition cycle, each with 10 minutes of engine
running time.
The remote start system needs to be reset after your
vehicle’s engine is started two times using the
transmitter’s remote start button. The remote start
system is reset by inserting the vehicle’s key into the
ignition switch and turning to RUN. SeeIgnition
Positions on page 2-22for information regarding the
ignition positions on your vehicle.
Your remote keyless entry transmitter with the
remote start button provides an increased range of
operation. You can start your vehicle from approximately
492 feet (150 m) away. However, the range may be
less while the vehicle is running, and as a result
you may need to be closer to your vehicle to turn it off
than you were to turn it on.
There are other conditions which can affect the
performance of the transmitter, seeRemote Keyless
Entry System on page 2-3for additional information.
2-7
Page 82 of 472
/(Remote Start):If your vehicle has the remote
vehicle start feature, the keyless entry transmitter will
have a button with this symbol on it.
To start the vehicle using the remote start feature, do
the following:
1. Aim the transmitter at the vehicle.
2. Press and release the transmitter’s lock button,
then immediately press and hold the transmitter’s
remote start button for 4 seconds or until the
vehicle’s turn signal lamps �ash. The vehicle’s doors
will be locked.
3. When the vehicle starts, the parking lamps will turn
on and remain on while the engine is running, and
the DIC will display REMOTE START ACTIVE
PRESS HAZARD SWITCH TO CANCEL.
The engine will shut off automatically after
10 minutes, unless a time extension has been done
or the vehicle’s key is inserted into the ignition
switch and turned to RUN.
If you enter the vehicle after a remote start, and the
engine is still running, insert the key into the
ignition switch and turn to RUN to drive the vehicle.4. To manually shut off a remote start, do any of the
following. The parking lamps will turn off.
Aim the remote keyless entry transmitter at the
vehicle, and press the remote start button.
Turn on the hazard warning �ashers.
Turn the ignition switch to RUN and then to OFF.
Your vehicle’s engine can be started two times using the
transmitter’s remote start feature. If only one remote
start procedure has been done, since last driving
the vehicle, or resetting the remote start system, the
engine may be started again remotely by following the
remote start procedure a second time.
If the remote start procedure is used again before
the �rst 10 minute time frame has ended, the �rst
10 minutes will immediately expire and the second
10 minute time frame will start.
2-8
Page 133 of 472
Exterior Lamps
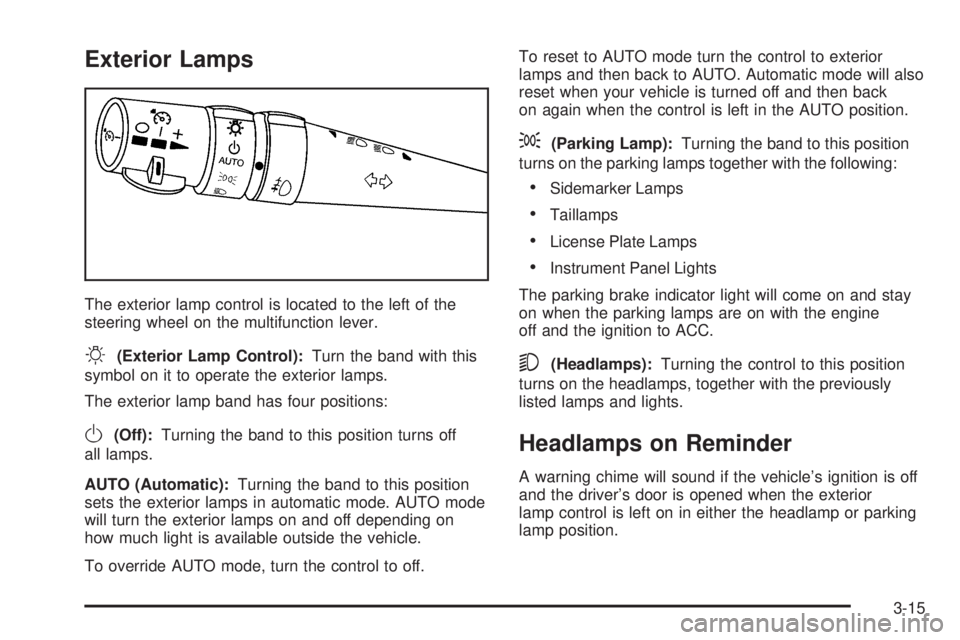
The exterior lamp control is located to the left of the
steering wheel on the multifunction lever.
O(Exterior Lamp Control):Turn the band with this
symbol on it to operate the exterior lamps.
The exterior lamp band has four positions:
O(Off):Turning the band to this position turns off
all lamps.
AUTO (Automatic):Turning the band to this position
sets the exterior lamps in automatic mode. AUTO mode
will turn the exterior lamps on and off depending on
how much light is available outside the vehicle.
To override AUTO mode, turn the control to off.To reset to AUTO mode turn the control to exterior
lamps and then back to AUTO. Automatic mode will also
reset when your vehicle is turned off and then back
on again when the control is left in the AUTO position.
;(Parking Lamp):Turning the band to this position
turns on the parking lamps together with the following:
Sidemarker Lamps
Taillamps
License Plate Lamps
Instrument Panel Lights
The parking brake indicator light will come on and stay
on when the parking lamps are on with the engine
off and the ignition to ACC.
5(Headlamps):Turning the control to this position
turns on the headlamps, together with the previously
listed lamps and lights.
Headlamps on Reminder
A warning chime will sound if the vehicle’s ignition is off
and the driver’s door is opened when the exterior
lamp control is left on in either the headlamp or parking
lamp position.
3-15
Page 146 of 472
Air Conditioning
#
(Air Conditioner):Press this button to turn the air
conditioning compressor on or off. An indicator light
to the right of the button will come on. This button has
no control over the air conditioning compressor when in
Floor/Defog and Defrost modes. The instrument
panel brightness control may have to be adjusted to the
highest setting in order to see the indicator. See
Instrument Panel Brightness on page 3-18for
additional information.
On hot days during the vehicle’s initial start-up, open
the windows to let hot inside air escape; then close
them. This helps to reduce the time it takes for
the vehicle to cool down. It also helps the system to
operate more efficiently.
For quicker cool down on hot days, do the following:
1. Select any mode setting between vent and the
setting before defrost.
2. Select the air conditioner.
3. Select the coolest temperature.
4. Select the highest climate control fan speed.
Using these settings will set recirculation for quicker
cool down (the light indicator will light). If outside air is
desired, press the recirculation button (light indicator
will turn off).Using these settings together for long periods of time
may cause the air inside the vehicle to become too dry.
To prevent this from happening, after �ve minutes
the recirculation door will open slightly to allow some
outside air into the vehicle.
The air conditioning system removes moisture from the
air, so sometimes there may be a small amount of
water dripping underneath the vehicle while it is idling or
after the engine is turned off. This is normal.
Recirculation
h
(Recirculation):Press this button to activate the
recirculation mode. With this selection, inside air is
recirculated into the vehicle. This mode reduces outside
air and odors from entering the vehicle. It may also help
to heat or cool the air inside the vehicle more quickly.
An indicator light to the right of the button will come on to
show that the recirculation button has been pressed. The
instrument panel brightness control may have to be
adjusted to the highest setting to see the indicator.
The recirculation mode has a timer. After �ve minutes,
the system’s air inlet door will move slightly to allow for
ten percent fresh outside air to maintain interior air
quality. The only way to reset the system to full
recirculation is to restart the �ve minute timer by
selecting vent/outside air and recirculation again.
3-28
Page 155 of 472
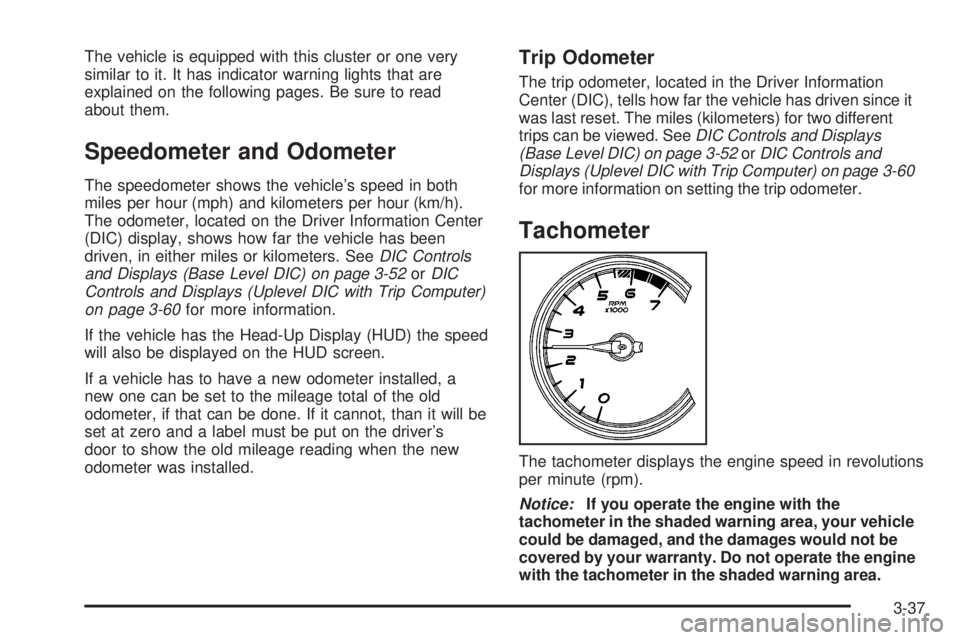
The vehicle is equipped with this cluster or one very
similar to it. It has indicator warning lights that are
explained on the following pages. Be sure to read
about them.
Speedometer and Odometer
The speedometer shows the vehicle’s speed in both
miles per hour (mph) and kilometers per hour (km/h).
The odometer, located on the Driver Information Center
(DIC) display, shows how far the vehicle has been
driven, in either miles or kilometers. SeeDIC Controls
and Displays (Base Level DIC) on page 3-52orDIC
Controls and Displays (Uplevel DIC with Trip Computer)
on page 3-60for more information.
If the vehicle has the Head-Up Display (HUD) the speed
will also be displayed on the HUD screen.
If a vehicle has to have a new odometer installed, a
new one can be set to the mileage total of the old
odometer, if that can be done. If it cannot, than it will be
set at zero and a label must be put on the driver’s
door to show the old mileage reading when the new
odometer was installed.
Trip Odometer
The trip odometer, located in the Driver Information
Center (DIC), tells how far the vehicle has driven since it
was last reset. The miles (kilometers) for two different
trips can be viewed. SeeDIC Controls and Displays
(Base Level DIC) on page 3-52orDIC Controls and
Displays (Uplevel DIC with Trip Computer) on page 3-60
for more information on setting the trip odometer.
Tachometer
The tachometer displays the engine speed in revolutions
per minute (rpm).
Notice:If you operate the engine with the
tachometer in the shaded warning area, your vehicle
could be damaged, and the damages would not be
covered by your warranty. Do not operate the engine
with the tachometer in the shaded warning area.
3-37
Page 162 of 472
Anti-Lock Brake System
Warning Light
If the vehicle has the
Anti-lock Brake System
(ABS), this light will come
on when the engine is
started and may stay on
for several seconds.
That is normal.
If the ABS warning light comes on and stays on, there
may be a problem with the anti-lock portion of the brake
system. If the brake system warning light is not on,
the vehicle still has brakes, but it does not have anti-lock
brakes. SeeBrake System Warning Light on page 3-42.If the light stays on, the vehicle needs service. If the
light comes on while the vehicle is being driven, stop as
soon as possible and turn the ignition off. Then start
the vehicle again to reset the system. If the light
still stays on, or comes on again while driving, the
vehicle needs service. If the regular brake system
warning light is not on, the vehicle still has brakes, but it
does not have anti-lock brakes. If the brake system
warning light is also on, the vehicle does not have
anti-lock brakes and there is a problem with the regular
brakes. SeeBrake System Warning Light on page 3-42.
If both the brake system warning light and the anti-lock
brake system light is on, pull off the road and have
the vehicle towed for service.
The anti-lock brake system warning light will come on
brie�y when the ignition key is turned to RUN. This
is normal. If the light does not come on then, have it
�xed so it will be ready to warn you if there is a problem.
3-44
Page 170 of 472

Driver Information Center (DIC)
The Driver Information Center (DIC) gives important
safety and maintenance facts. When the vehicle’s
ignition is turned on, all of the DIC lights illuminate for a
few seconds and an introductory message will appear.
After this, the DIC will begin working.
DIC Controls and Displays
(Base Level DIC)
The Driver Information Center (DIC) control buttons and
the message display screen are located above the radio.
The DIC gives important safety and maintenance facts
concerning the vehicle. The status of many of the
vehicle’s systems along with driver personal
programming mode menus and warning messages about
the vehicle’s systems may display on the DIC screen.
The vehicle’s transaxle position will also appear.
The buttons on the base level are trip odometer,
set/reset, and options.
Trip Odometer
3(Trip Odometer):Press this button to access the
odometer and trip distance modes.
The �rst menu on the DIC screen will be the odometer
reading, or cumulative mileage of the vehicle. The
odometer cannot be reset.
Press the trip odometer button to advance to the
next menu.
Trip Distances:This menu shows the distances that
the vehicle has driven between speci�c points. The trip
odometer will record the number of miles up to
9,999.9 miles or 9 999.9 km travelled for up to two trips.
When 9,999.9 miles or 9 999.9 km is reached for either
trip, the odometer for that trip will go back to zero.
Press the trip odometer button again to access TRIP A.
Press the trip odometer button again to access TRIP B.
To reset the trip odometer(s) back to zero miles or
kilometers, access the trip to reset and press the set/
reset button.
The trip odometer has a feature called the retro-active
reset. This can be used to set the trip odometer to the
number of miles or kilometers driven since the ignition
was last turned on. This can be used if the trip odometer
was not reset at the beginning of the trip.
3-52
Page 171 of 472

To use the retro-active reset feature, press and hold the
set/reset button for at least three seconds. The trip
odometer will display the number of miles or kilometers
driven since the ignition was last turned on and the
vehicle began moving. Once the vehicle has begun
moving, the trip odometer will accumulate mileage. For
example, if the vehicle was driven 5.0 miles (8.0 km)
before the vehicle is started again, and then the
retro-active reset feature is activated, the display will
show 5.0 miles (8.0 km). As the vehicle begins moving,
the display will increase to 5.1 miles (8.2 km), 5.2 miles
(8.4 km), etc.
If the retro-active reset feature is activated after the
vehicle is started, but before it begins moving, the display
will show the number of miles or kilometers that were
driven during the last ignition cycle.
Press the trip odometer button again to access
the odometer.
Set/Reset
r(Set/Reset):Press this button to set or reset
a menu item when using the trip odometer or
options buttons.
Options
4(Options):Press this button to access the Date,
Language, Display Units, Daytime Display
Enhancements, Engine Oil Monitor System, Tire In�ation
Monitor System, and Personal Programming modes.
Date:This menu sets the date.
The time is set through the radio. SeeSetting the Time
on page 3-96for more information.
To set the date, use the following procedure:
1. Press the options button until the date is displayed
on the DIC.
2. Press the set/reset button to access the RESET
YEAR screen. The second position in the year
will be selected. Press and hold the set/reset button
to scroll through the available digits. Release the
button when the correct digit appears.
3. Press the options button to advance to the �rst
position in the year. Press and hold the set/reset
button to scroll through the available digits. Release
the button when the correct digit appears.
4. Press the options button to advance to the months
of the year.
3-53