2006 PONTIAC GRAND PRIX odometer
[x] Cancel search: odometerPage 119 of 472

Instrument Panel Overview...............................3-4
Hazard Warning Flashers................................3-6
Other Warning Devices...................................3-6
Horn.............................................................3-6
Tilt Wheel.....................................................3-6
Turn Signal/Multifunction Lever.........................3-7
Turn and Lane-Change Signals........................3-7
Headlamp High/Low-Beam Changer..................3-8
Flash-to-Pass.................................................3-9
Windshield Wiper Lever...................................3-9
Cruise Control..............................................3-11
Exterior Lamps.............................................3-15
Headlamps on Reminder................................3-15
Daytime Running Lamps (DRL).......................3-16
Fog Lamps..................................................3-17
Exterior Lighting Battery Saver........................3-17
Interior Lamps..............................................3-17
Instrument Panel Brightness...........................3-18
Courtesy Lamps...........................................3-18
Entry Lighting...............................................3-18
Delayed Entry Lighting...................................3-19
Delayed Exit Lighting.....................................3-19
Front Reading Lamps....................................3-20
Overhead Console Reading Lamps.................3-20Rear Assist Handle Reading Lamps................3-20
Battery Run-Down Protection..........................3-20
Head-Up Display (HUD).................................3-21
Accessory Power Outlet(s).............................3-24
Ashtray(s) and Cigarette Lighter......................3-25
Climate Controls............................................3-26
Climate Control System.................................3-26
Dual Automatic Climate Control System...........3-29
Outlet Adjustment.........................................3-33
Passenger Compartment Air Filter...................3-33
Warning Lights, Gages, and Indicators............3-35
Instrument Panel Cluster................................3-36
Speedometer and Odometer...........................3-37
Tachometer.................................................3-37
Safety Belt Reminder Light.............................3-38
Passenger Safety Belt Reminder Light.............3-38
Airbag Readiness Light..................................3-39
Passenger Airbag Status Indicator...................3-40
Up-Shift Light...............................................3-42
Brake System Warning Light..........................3-42
Anti-Lock Brake System Warning Light.............3-44
Traction Control System (TCS) Warning Light. . . .3-45
Enhanced Traction System Warning Light.........3-45
Section 3 Instrument Panel
3-1
Page 138 of 472

Front Reading Lamps
If the vehicle has a sunroof, there are reading lamps in
front of the sunroof switch located on the headliner.
These lamps will come on when the doors are opened.
Press the side of each reading lamp to turn them on
and off when the doors are closed.
Overhead Console Reading Lamps
The vehicle may have reading lamps on the overhead
console. These lamps will turn on when the doors
are opened. When the doors are closed, press the side
of each lamp to turn them on and off.
Rear Assist Handle Reading Lamps
If the vehicle has a reading lamp on each rear assist
handle, press the side of each lamp to turn it on or off.
Battery Run-Down Protection
The vehicle has a feature to help prevent the battery
from draining in case the interior, trunk, or underhood
lamps are accidentally left on. If any of these lamps are
left on while the ignition is in OFF, they will automatically
turn off after 10 minutes. The lamps will not come
back on again until any of the following are done:
The ignition is turned to RUN or ACC.
The interior lamps control is turned completely to
the right, then back slightly to the left.
Open, or close and reopen, a door that is closed.
If the vehicle has less than 15 miles (25 km) on
the odometer, the battery saver will turn off the lamps
after only three minutes.
3-20
Page 155 of 472

The vehicle is equipped with this cluster or one very
similar to it. It has indicator warning lights that are
explained on the following pages. Be sure to read
about them.
Speedometer and Odometer
The speedometer shows the vehicle’s speed in both
miles per hour (mph) and kilometers per hour (km/h).
The odometer, located on the Driver Information Center
(DIC) display, shows how far the vehicle has been
driven, in either miles or kilometers. SeeDIC Controls
and Displays (Base Level DIC) on page 3-52orDIC
Controls and Displays (Uplevel DIC with Trip Computer)
on page 3-60for more information.
If the vehicle has the Head-Up Display (HUD) the speed
will also be displayed on the HUD screen.
If a vehicle has to have a new odometer installed, a
new one can be set to the mileage total of the old
odometer, if that can be done. If it cannot, than it will be
set at zero and a label must be put on the driver’s
door to show the old mileage reading when the new
odometer was installed.
Trip Odometer
The trip odometer, located in the Driver Information
Center (DIC), tells how far the vehicle has driven since it
was last reset. The miles (kilometers) for two different
trips can be viewed. SeeDIC Controls and Displays
(Base Level DIC) on page 3-52orDIC Controls and
Displays (Uplevel DIC with Trip Computer) on page 3-60
for more information on setting the trip odometer.
Tachometer
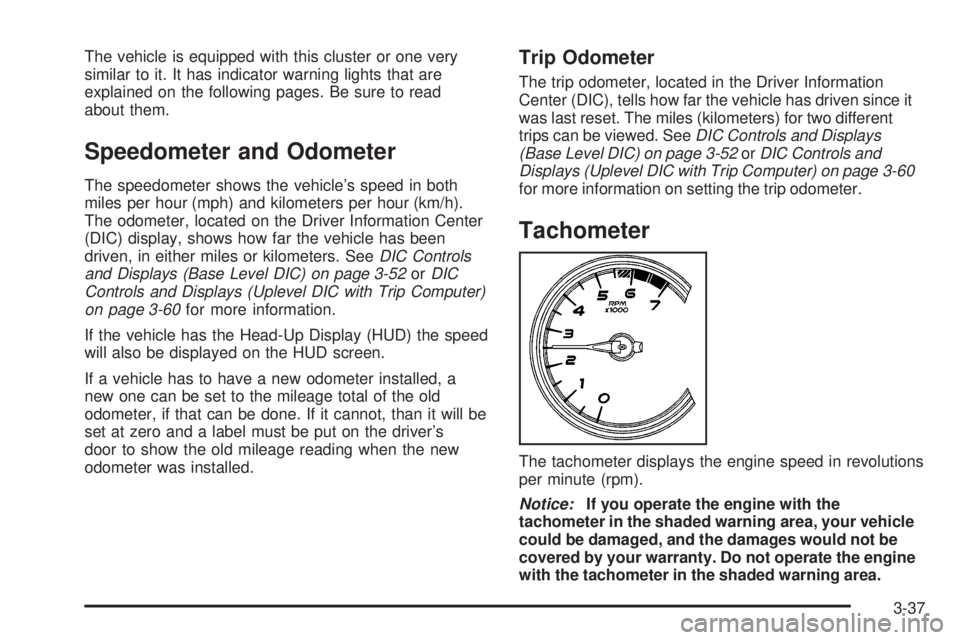
The tachometer displays the engine speed in revolutions
per minute (rpm).
Notice:If you operate the engine with the
tachometer in the shaded warning area, your vehicle
could be damaged, and the damages would not be
covered by your warranty. Do not operate the engine
with the tachometer in the shaded warning area.
3-37
Page 170 of 472

Driver Information Center (DIC)
The Driver Information Center (DIC) gives important
safety and maintenance facts. When the vehicle’s
ignition is turned on, all of the DIC lights illuminate for a
few seconds and an introductory message will appear.
After this, the DIC will begin working.
DIC Controls and Displays
(Base Level DIC)
The Driver Information Center (DIC) control buttons and
the message display screen are located above the radio.
The DIC gives important safety and maintenance facts
concerning the vehicle. The status of many of the
vehicle’s systems along with driver personal
programming mode menus and warning messages about
the vehicle’s systems may display on the DIC screen.
The vehicle’s transaxle position will also appear.
The buttons on the base level are trip odometer,
set/reset, and options.
Trip Odometer
3(Trip Odometer):Press this button to access the
odometer and trip distance modes.
The �rst menu on the DIC screen will be the odometer
reading, or cumulative mileage of the vehicle. The
odometer cannot be reset.
Press the trip odometer button to advance to the
next menu.
Trip Distances:This menu shows the distances that
the vehicle has driven between speci�c points. The trip
odometer will record the number of miles up to
9,999.9 miles or 9 999.9 km travelled for up to two trips.
When 9,999.9 miles or 9 999.9 km is reached for either
trip, the odometer for that trip will go back to zero.
Press the trip odometer button again to access TRIP A.
Press the trip odometer button again to access TRIP B.
To reset the trip odometer(s) back to zero miles or
kilometers, access the trip to reset and press the set/
reset button.
The trip odometer has a feature called the retro-active
reset. This can be used to set the trip odometer to the
number of miles or kilometers driven since the ignition
was last turned on. This can be used if the trip odometer
was not reset at the beginning of the trip.
3-52
Page 171 of 472

To use the retro-active reset feature, press and hold the
set/reset button for at least three seconds. The trip
odometer will display the number of miles or kilometers
driven since the ignition was last turned on and the
vehicle began moving. Once the vehicle has begun
moving, the trip odometer will accumulate mileage. For
example, if the vehicle was driven 5.0 miles (8.0 km)
before the vehicle is started again, and then the
retro-active reset feature is activated, the display will
show 5.0 miles (8.0 km). As the vehicle begins moving,
the display will increase to 5.1 miles (8.2 km), 5.2 miles
(8.4 km), etc.
If the retro-active reset feature is activated after the
vehicle is started, but before it begins moving, the display
will show the number of miles or kilometers that were
driven during the last ignition cycle.
Press the trip odometer button again to access
the odometer.
Set/Reset
r(Set/Reset):Press this button to set or reset
a menu item when using the trip odometer or
options buttons.
Options
4(Options):Press this button to access the Date,
Language, Display Units, Daytime Display
Enhancements, Engine Oil Monitor System, Tire In�ation
Monitor System, and Personal Programming modes.
Date:This menu sets the date.
The time is set through the radio. SeeSetting the Time
on page 3-96for more information.
To set the date, use the following procedure:
1. Press the options button until the date is displayed
on the DIC.
2. Press the set/reset button to access the RESET
YEAR screen. The second position in the year
will be selected. Press and hold the set/reset button
to scroll through the available digits. Release the
button when the correct digit appears.
3. Press the options button to advance to the �rst
position in the year. Press and hold the set/reset
button to scroll through the available digits. Release
the button when the correct digit appears.
4. Press the options button to advance to the months
of the year.
3-53
Page 178 of 472

DIC Controls and Displays (Uplevel
DIC with Trip Computer)
The Driver Information Center (DIC) control buttons and
the message display screen are located above the
radio. The DIC gives important safety and maintenance
facts concerning the vehicle. The status of many of
the vehicle’s systems along with driver personalization
menus and warning messages about the vehicle’s
systems may display on the DIC screen.
The outside temperature automatically appears on the
bottom right corner of the DIC display screen. If the
outside temperature is below 38°F (3°C), the temperature
reading will toggle between displaying the outside
temperature and the word ICE for two minutes. If there is
a problem with the system that controls the temperature
display, the letters OC (Open Circuit) or SC (Short
Circuit) will appear on the display. If this occurs, have the
vehicle serviced by
your GM dealer.
The vehicle’s transaxle position and the direction the
vehicle is traveling will also appear on the DIC screen.The compass is self-calibrating, which eliminates the
need to manually set the compass. However, under
certain circumstances, such as during a long distance
cross-country trip, it will be necessary to compensate for
compass variance and reset the zone through the
DIC. See “Setting the Compass” later in this section for
more information.
The buttons on the DIC trip computer are gages, trip
odometer, set/reset, options, and fuel.
Gages
2(Gages):Press this button to access the OIL LIFE
REMAINING, TRANSMISSION FLUID TEMPERATURE,
BATTERY, ENGINE HOURS, ENGINE BOOST, and
MAXIMUM Gs modes.
3-60
Page 180 of 472

Trip Odometer
3(Trip Odometer):Press this button to access the
Odometer, Trip Distances, AVERAGE SPEED, and
TIME ELAPSED modes.
Odometer:When the trip odometer button is pressed,
the �rst menu displayed on the DIC screen is the
odometer reading, or cumulative mileage of the vehicle.
The odometer cannot be reset.
Press the trip odometer button again to advance to the
next menu.
Trip Distances:This menu shows the distances that
the vehicle has driven between speci�c points. The
trip odometer will record the number of miles up
to 9,999.9 miles or 9 999.9 km travelled for up to
two trips. When 9,999.9 miles or 9 999.9 km is reached
for either trip, the odometer for that trip will go back
to zero.
To reset the trip distances, use the following procedures:
1. Press the trip odometer button again to access
TRIP A. Press the trip odometer button again to
access TRIP B. To reset the trip odometer(s) back to
zero miles or to zero kilometers, access the trip that
needs to be reset and press the set/reset button.
2. Press the trip odometer button again to access
the odometer.The trip odometer has a feature called the retro-active
reset. This can be used to set the trip odometer to
the number of miles (kilometers) driven since the ignition
was last turned on. This can be used if the trip
odometer is not reset at the beginning of the trip.
To use the retro-active reset feature, press and hold the
set/reset button for at least three seconds. The trip
odometer will display the number of miles or kilometers
driven since the ignition was last turned on and the
vehicle was moving. Once the vehicle begins moving,
the trip odometer will accumulate mileage. For example,
if the vehicle was driven 5.0 miles (8.0 km) before it
is started again, and then the retro-active reset feature
is activated, the display will show 5.0 miles (8.0 km).
As the vehicle begins moving, the display will then
increase to 5.1 miles (8.2 km), 5.2 miles (8.4 km), etc.
If the retro-active reset feature is activated after the
vehicle is started, but before it begins moving, the
display will show the number of miles or kilometers that
were driven during the last ignition cycle.
Average Speed:The average speed is displayed in
miles per hour (mph) or kilometers per hour (km/h). The
average speed is calculated from the various vehicle
speeds recorded since the last reset of this menu item.
To reset the average speed, press the set/reset
button. The display will return to zero.
Press the trip odometer button again to advance to the
next screen.
3-62
Page 181 of 472

Time Elapsed:This screen can be used as a
stopwatch. The display can show the hours, minutes
and seconds. The elapsed time indicator will record up
to 99 hours, 59 minutes and 59 seconds, then it will
reset to zero and continue counting.
To set the time elapsed function, use the following
procedures:
1. Press the set/reset button for less than two seconds
to start or stop the timer.
2. Press and hold the set/reset button for more than
two seconds to reset the timer back to zero.
Set/Reset
r(Set/Reset):Press this button to set or reset a
mode item when using the trip odometer or option
buttons.
Options
4(Options):Press this button to access the Date,
Language, Display Units, Daytime Display
Enhancements, Engine Oil Monitor System, Tire
In�ation Monitor System, Compass Calibration, and the
Personal Programming modes.
Date:This menu sets the date.
The time is set through the radio. SeeSetting the Time
on page 3-96for more information.To set the date, use the following procedure:
1. Press the options button until the date is displayed
on the DIC.
2. Press the set/reset button to access the RESET
YEAR screen. The second position in the year
will be selected. Press and hold the set/reset button
to scroll through the available digits. Release the
button when the correct digit appears.
3. Press the options button to advance to the �rst
position in the year. Press and hold the set/reset
button to scroll through the available digits. Release
the button when the correct digit appears.
4. Press the options button to advance to the months
of the year.
5. Press the set/reset button to scroll through the
months of the year, releasing the button when
the correct month appears.
6. Press the options button to advance to the days of
the month.
7. Press the set/reset button to scroll through the days
of the month, releasing the button when the correct
day appears.
8. Press the options button again to advance to the
main date screen. The screen will now display the
new date.
3-63