Page 2229 of 2896
HEADLAMP (FOR USA)
LT-21
C
D
E
F
G
H
I
J
L
MA
B
LT
Revision: June 20062007 Versa
8. CHECK HEADLAMP CIRCUIT
1. Turn ignition switch OFF.
2. Disconnect IPDM E/R connector.
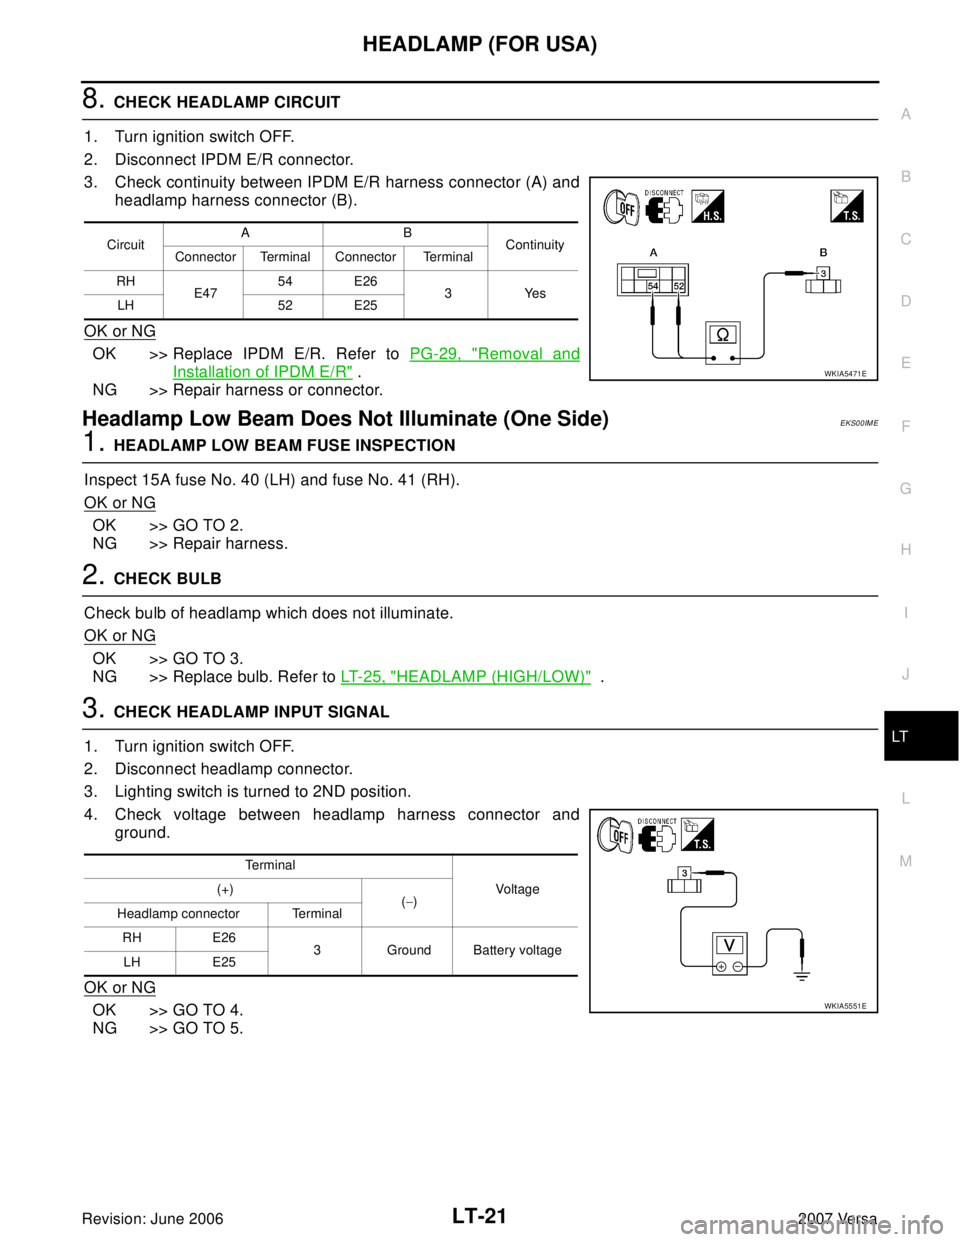
3. Check continuity between IPDM E/R harness connector (A) and
headlamp harness connector (B).
OK or NG
OK >> Replace IPDM E/R. Refer to PG-29, "Removal and
Installation of IPDM E/R" .
NG >> Repair harness or connector.
Headlamp Low Beam Does Not Illuminate (One Side)EKS00IME
1. HEADLAMP LOW BEAM FUSE INSPECTION
Inspect 15A fuse No. 40 (LH) and fuse No. 41 (RH).
OK or NG
OK >> GO TO 2.
NG >> Repair harness.
2. CHECK BULB
Check bulb of headlamp which does not illuminate.
OK or NG
OK >> GO TO 3.
NG >> Replace bulb. Refer to LT-25, "
HEADLAMP (HIGH/LOW)" .
3. CHECK HEADLAMP INPUT SIGNAL
1. Turn ignition switch OFF.
2. Disconnect headlamp connector.
3. Lighting switch is turned to 2ND position.
4. Check voltage between headlamp harness connector and
ground.
OK or NG
OK >> GO TO 4.
NG >> GO TO 5.
CircuitAB
Continuity
Connector Terminal Connector Terminal
RH
E4754 E26
3Yes
LH 52 E25
WKIA5471E
Te r m i n a l
Vo ltag e (+)
(−)
Headlamp connector Terminal
RH E26
3 Ground Battery voltage
LH E25
WKIA5551E
Page 2233 of 2896
HEADLAMP (FOR USA)
LT-25
C
D
E
F
G
H
I
J
L
MA
B
LT
Revision: June 20062007 Versa
Bulb ReplacementEKS00IMH
CAUTION:
After installing bulb, be sure to install plastic cap and bulb socket securely to ensure watertightness.
HEADLAMP (HIGH/LOW)
1. Turn lighting switch OFF.
2. Remove the headlamp. Refer to LT- 2 5 , "
Removal and Installation" .
3. Remove back cover.
4. Unlock retaining spring and remove bulb from headlamp.
PARKING (CLEARANCE) LAMP
1. Turn lighting switch OFF.
2. Remove the headlamp. Refer to LT- 2 5 , "
Removal and Installation" .
3. Turn bulb socket counterclockwise and unlock it.
4. Remove bulb from its socket.
FRONT TURN SIGNAL LAMP
1. Turn lighting switch OFF.
2. Remove the headlamp. Refer to LT- 2 5 , "
Removal and Installation" .
3. Turn bulb socket counterclockwise and unlock it.
4. Remove bulb from its socket.
Removal and InstallationEKS00IMI
REMOVAL
1. Disconnect the negative battery terminal.
2. Remove front bumper fascia. Refer to EI-14, "
FRONT BUMPER" .
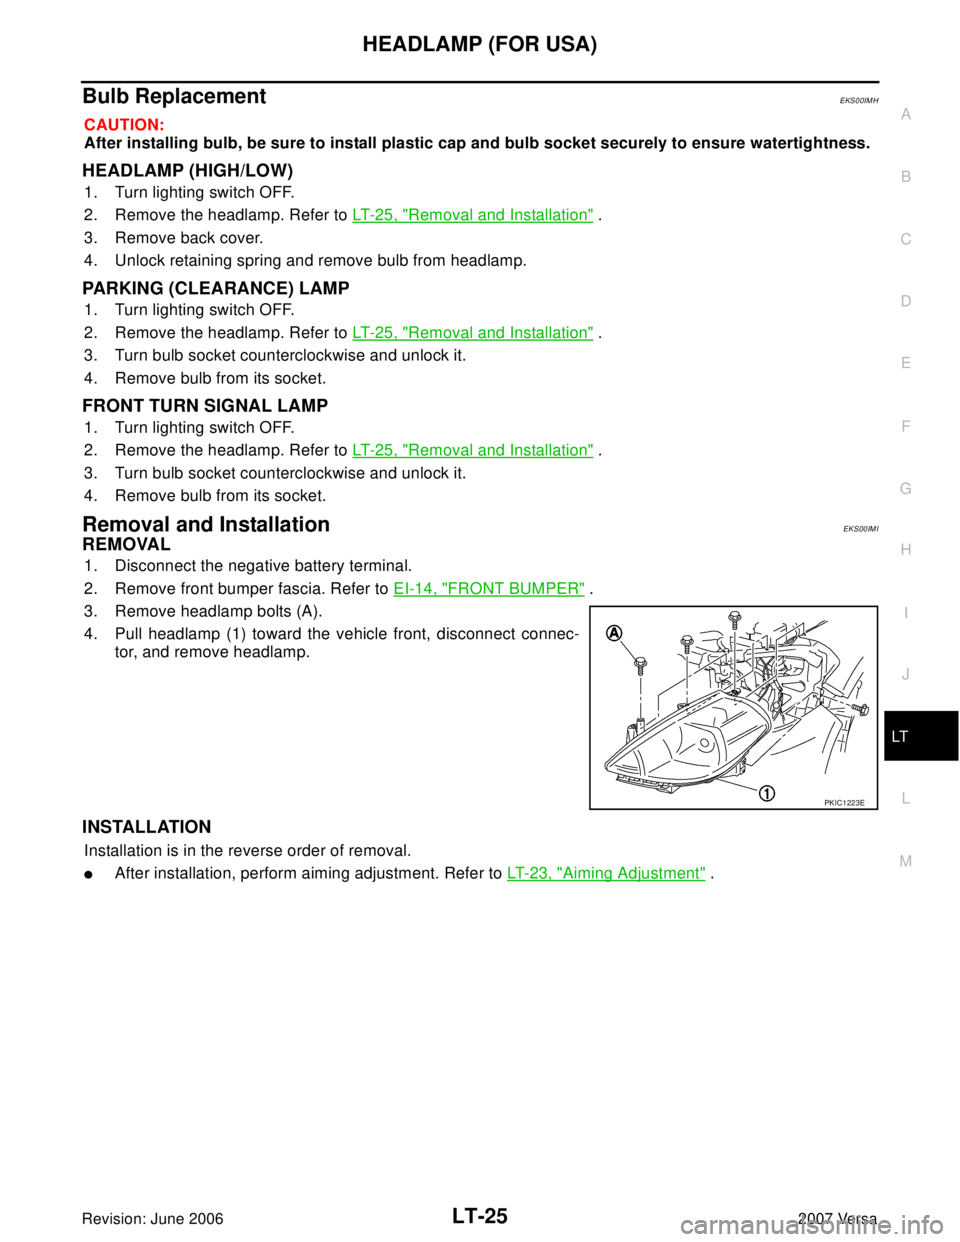
3. Remove headlamp bolts (A).
4. Pull headlamp (1) toward the vehicle front, disconnect connec-
tor, and remove headlamp.
INSTALLATION
Installation is in the reverse order of removal.
�After installation, perform aiming adjustment. Refer to LT-23, "Aiming Adjustment" .
PKIC1223E
Page 2234 of 2896
LT-26
HEADLAMP (FOR USA)
Revision: June 20062007 Versa
Disassembly and AssemblyEKS00IMJ
DISASSEMBLY
1. Remove back cover.
2. Unlock retaining spring and remove bulb (High/Low).
3. Turn parking (clearance) lamp bulb socket counterclockwise and unlock it.
4. Remove parking (clearance) lamp bulb from its socket.
5. Turn front turn signal lamp bulb socket counterclockwise and unlock it.
6. Remove front turn signal lamp bulb from its socket.
7. Remove the bumper stay.
ASSEMBLY
Assembly is in the reverse order of disassembly.
CAUTION:
�After installing bulb, be sure to install plastic cap securely to insure water tight seal.
1. Retaining spring 2. Parking (clearance) lamp bulb 3. Parking (clearance) lamp bulb socket
4. Halogen bulb (High/Low) 5. Back cover 6. Front turn signal lamp bulb socket
7. Front turn signal lamp bulb 8. Headlamp housing assembly 9. Bumper stay
A. Screw
WKIA5418E
Page 2247 of 2896
HEADLAMP (FOR CANADA) - DAYTIME LIGHT SYSTEM -
LT-39
C
D
E
F
G
H
I
J
L
MA
B
LT
Revision: June 20062007 Versa
Bulb ReplacementEKS00IM5
CAUTION:
After installing bulb, be sure to install plastic cap and bulb socket securely to ensure watertightness.
HEADLAMP (HIGH/LOW)
1. Turn lighting switch OFF.
2. Remove the headlamp. Refer to LT- 2 5 , "
Removal and Installation" .
3. Remove back cover.
4. Unlock retaining spring and remove bulb from headlamp.
PARKING (CLEARANCE) LAMP
1. Turn lighting switch OFF.
2. Remove the headlamp. Refer to LT- 2 5 , "
Removal and Installation" .
3. Turn bulb socket counterclockwise and unlock it.
4. Remove bulb from its socket.
FRONT TURN SIGNAL LAMP
1. Turn lighting switch OFF.
2. Remove the headlamp. Refer to LT- 2 5 , "
Removal and Installation" .
3. Turn bulb socket counterclockwise and unlock it.
4. Remove bulb from its socket.
Removal and InstallationEKS00IM6
REMOVAL
1. Disconnect the negative battery terminal.
2. Remove front bumper fascia. Refer to EI-14, "
FRONT BUMPER" .
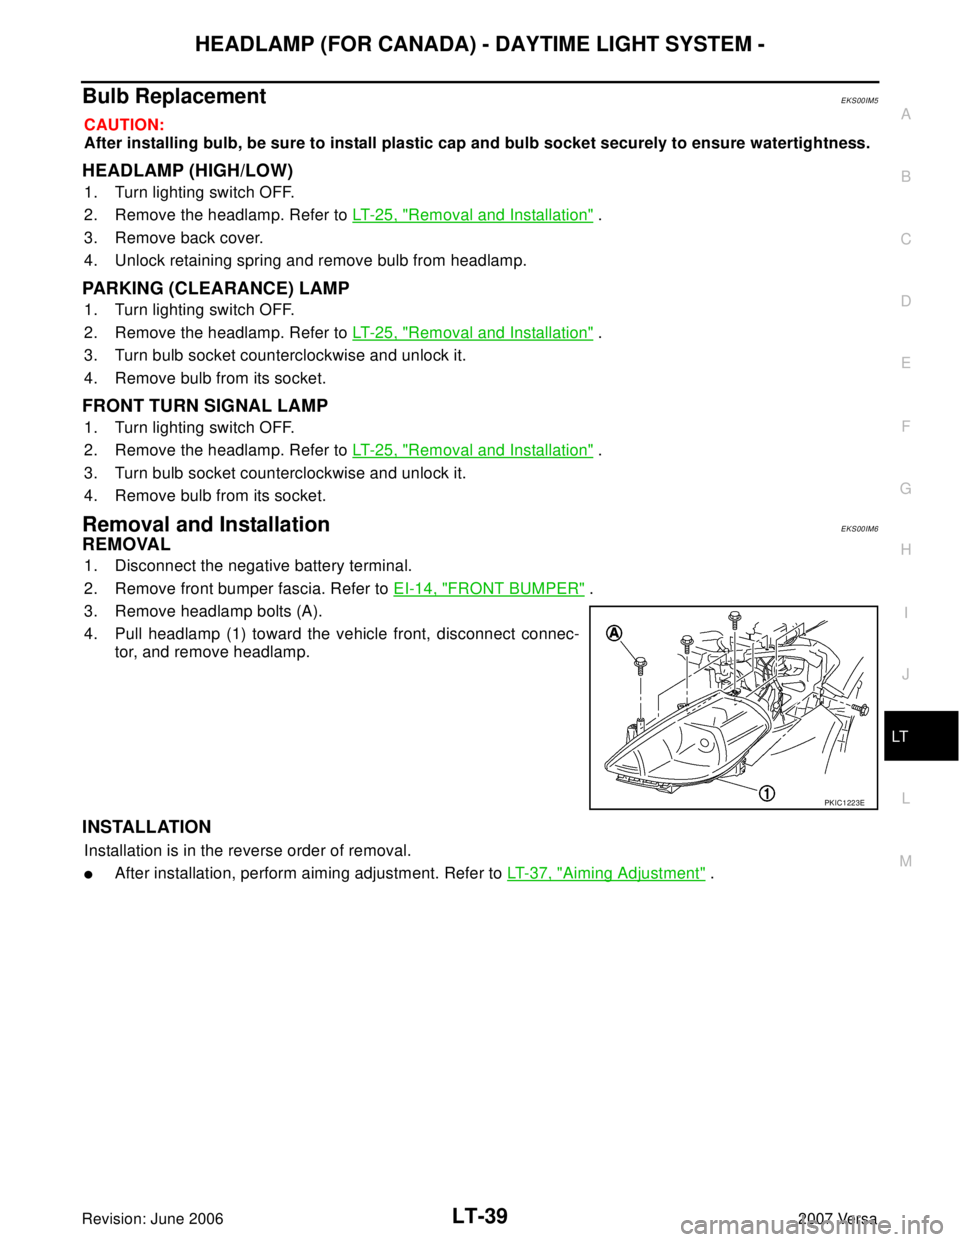
3. Remove headlamp bolts (A).
4. Pull headlamp (1) toward the vehicle front, disconnect connec-
tor, and remove headlamp.
INSTALLATION
Installation is in the reverse order of removal.
�After installation, perform aiming adjustment. Refer to LT-37, "Aiming Adjustment" .
PKIC1223E
Page 2248 of 2896
LT-40
HEADLAMP (FOR CANADA) - DAYTIME LIGHT SYSTEM -
Revision: June 20062007 Versa
Disassembly and AssemblyEKS00IM7
DISASSEMBLY
1. Remove back cover.
2. Unlock retaining spring and remove bulb (High/Low).
3. Turn parking (clearance) lamp bulb socket counterclockwise and unlock it.
4. Remove parking (clearance) lamp bulb from its socket.
5. Turn front turn signal lamp bulb socket counterclockwise and unlock it.
6. Remove front turn signal lamp bulb from its socket.
7. Remove the bumper stay.
ASSEMBLY
Assembly is in the reverse order of disassembly.
CAUTION:
�After installing bulb, be sure to install plastic cap securely to insure water tight seal.
1. Retaining spring 2. Parking (clearance) lamp bulb 3. Parking (clearance) lamp bulb socket
4. Halogen bulb (High/Low) 5. Back cover 6. Front turn signal lamp bulb socket
7. Front turn signal lamp bulb 8. Headlamp housing assembly 9. Bumper stay
A. Screw
WKIA5418E
Page 2256 of 2896
LT-48
FRONT FOG LAMP
Revision: June 20062007 Versa
7. CHECK FOG LAMP GROUND
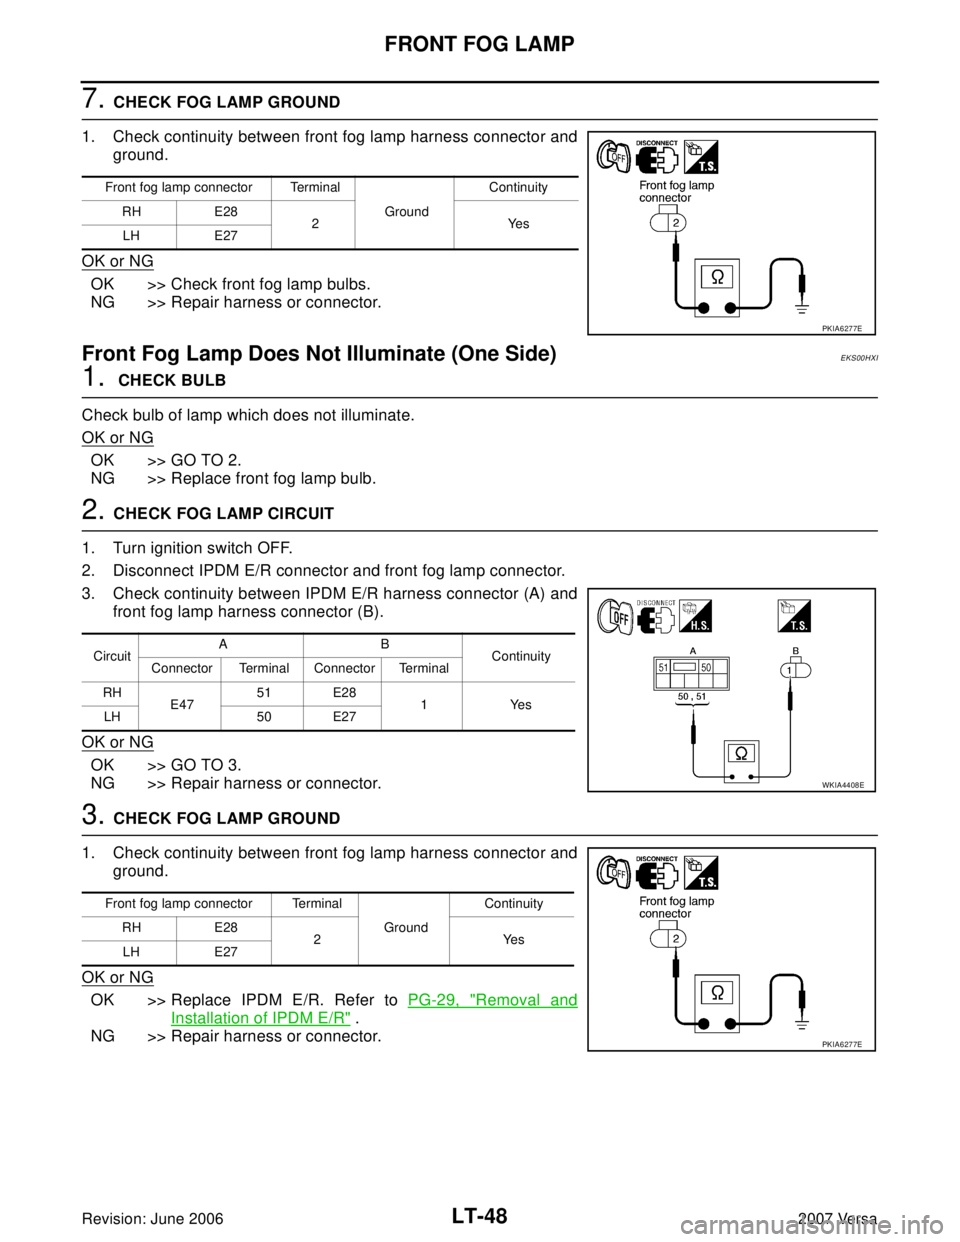
1. Check continuity between front fog lamp harness connector and
ground.
OK or NG
OK >> Check front fog lamp bulbs.
NG >> Repair harness or connector.
Front Fog Lamp Does Not Illuminate (One Side)EKS00HXI
1. CHECK BULB
Check bulb of lamp which does not illuminate.
OK or NG
OK >> GO TO 2.
NG >> Replace front fog lamp bulb.
2. CHECK FOG LAMP CIRCUIT
1. Turn ignition switch OFF.
2. Disconnect IPDM E/R connector and front fog lamp connector.
3. Check continuity between IPDM E/R harness connector (A) and
front fog lamp harness connector (B).
OK or NG
OK >> GO TO 3.
NG >> Repair harness or connector.
3. CHECK FOG LAMP GROUND
1. Check continuity between front fog lamp harness connector and
ground.
OK or NG
OK >> Replace IPDM E/R. Refer to PG-29, "Removal and
Installation of IPDM E/R" .
NG >> Repair harness or connector.
Front fog lamp connector Terminal
Ground Continuity
RH E28
2Yes
LH E27
PKIA6277E
CircuitAB
Continuity
Connector Terminal Connector Terminal
RH
E4751 E28
1Yes
LH 50 E27
WKIA4408E
Front fog lamp connector Terminal
Ground Continuity
RH E28
2Yes
LH E27
PKIA6277E
Page 2257 of 2896
FRONT FOG LAMP
LT-49
C
D
E
F
G
H
I
J
L
MA
B
LT
Revision: June 20062007 Versa
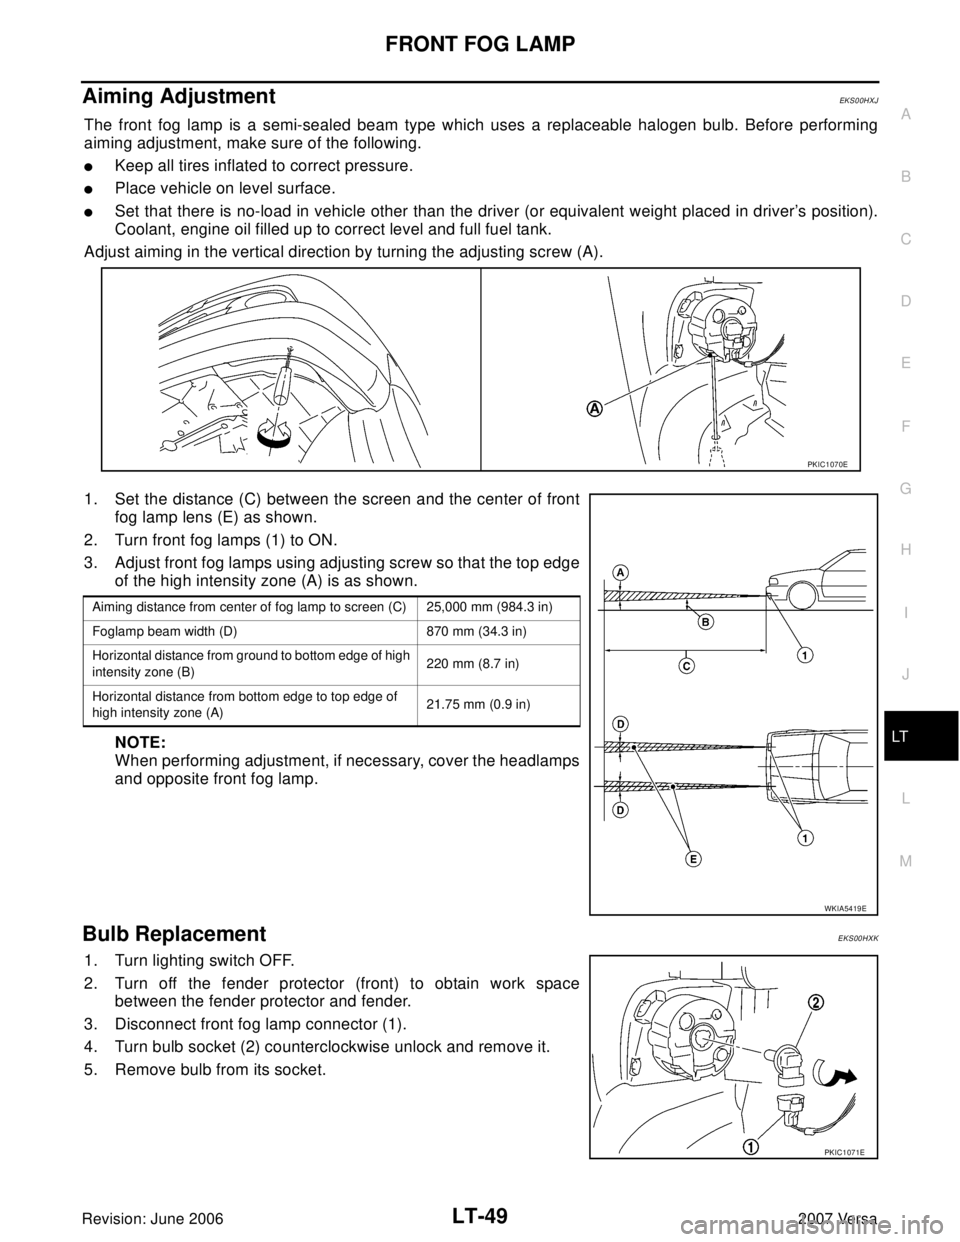
Aiming AdjustmentEKS00HXJ
The front fog lamp is a semi-sealed beam type which uses a replaceable halogen bulb. Before performing
aiming adjustment, make sure of the following.
�Keep all tires inflated to correct pressure.
�Place vehicle on level surface.
�Set that there is no-load in vehicle other than the driver (or equivalent weight placed in driver’s position).
Coolant, engine oil filled up to correct level and full fuel tank.
Adjust aiming in the vertical direction by turning the adjusting screw (A).
1. Set the distance (C) between the screen and the center of front
fog lamp lens (E) as shown.
2. Turn front fog lamps (1) to ON.
3. Adjust front fog lamps using adjusting screw so that the top edge
of the high intensity zone (A) is as shown.
NOTE:
When performing adjustment, if necessary, cover the headlamps
and opposite front fog lamp.
Bulb ReplacementEKS00HXK
1. Turn lighting switch OFF.
2. Turn off the fender protector (front) to obtain work space
between the fender protector and fender.
3. Disconnect front fog lamp connector (1).
4. Turn bulb socket (2) counterclockwise unlock and remove it.
5. Remove bulb from its socket.
PKIC1070E
Aiming distance from center of fog lamp to screen (C) 25,000 mm (984.3 in)
Foglamp beam width (D) 870 mm (34.3 in)
Horizontal distance from ground to bottom edge of high
intensity zone (B)220 mm (8.7 in)
Horizontal distance from bottom edge to top edge of
high intensity zone (A)21.75 mm (0.9 in)
WKIA5419E
PKIC1071E
Page 2267 of 2896
TURN SIGNAL AND HAZARD WARNING LAMPS
LT-59
C
D
E
F
G
H
I
J
L
MA
B
LT
Revision: June 20062007 Versa
Terminals and Reference Values for BCMEKS00HY5
Refer to BCS-12, "Terminals and Reference Values for BCM" .
How to Proceed With Trouble DiagnosisEKS00HY6
1. Confirm the symptom or customer complaint.
2. Understand operation description and function description. Refer to LT- 5 1 , "
System Description" .
3. Perform the preliminary check. Refer to LT-59, "
Preliminary Check" .
4. Check symptom and repair or replace the component.
5. Do turn signal and hazard warning lamps operate normally? If YES, GO TO 6. If NO, GO TO 4.
6. INSPECTION END
Preliminary CheckEKS00HY7
CHECK POWER SUPPLY AND GROUND CIRCUIT FOR BCM
Refer to BCS-16, "BCM Power Supply and Ground Circuit Check" .
CONSULT-II Function (BCM)EKS00HY8
Refer to LT- 1 2 , "CONSULT-II Function (BCM)" .
Turn Signals Do Not OperateEKS00HY9
1. CHECK COMBINATION SWITCH INPUT SIGNAL
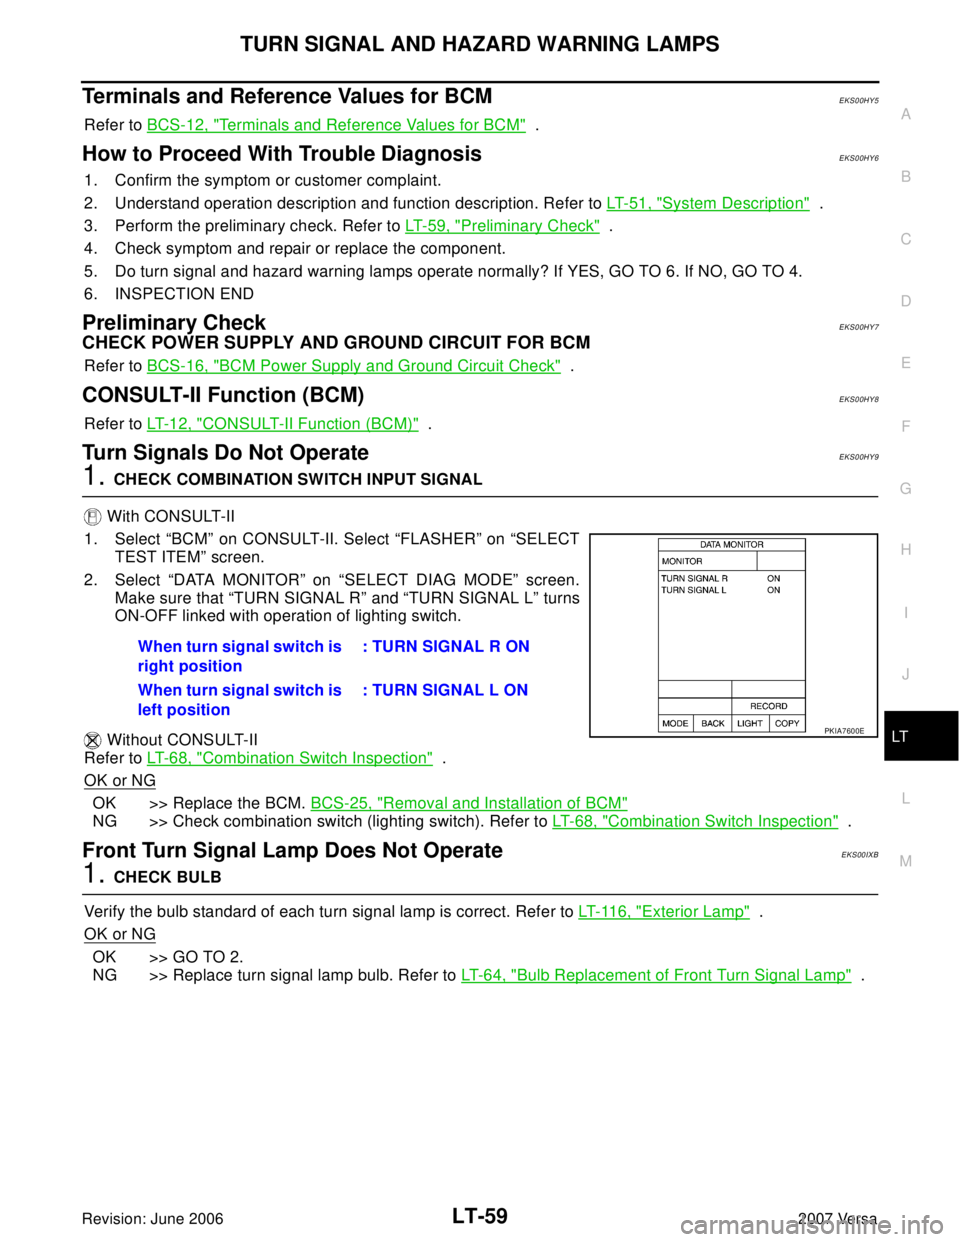
With CONSULT-II
1. Select “BCM” on CONSULT-II. Select “FLASHER” on “SELECT
TEST ITEM” screen.
2. Select “DATA MONITOR” on “SELECT DIAG MODE” screen.
Make sure that “TURN SIGNAL R” and “TURN SIGNAL L” turns
ON-OFF linked with operation of lighting switch.
Without CONSULT-II
Refer to LT- 6 8 , "
Combination Switch Inspection" .
OK or NG
OK >> Replace the BCM. BCS-25, "Removal and Installation of BCM"
NG >> Check combination switch (lighting switch). Refer to LT-68, "Combination Switch Inspection" .
Front Turn Signal Lamp Does Not OperateEKS00IXB
1. CHECK BULB
Verify the bulb standard of each turn signal lamp is correct. Refer to LT-116, "
Exterior Lamp" .
OK or NG
OK >> GO TO 2.
NG >> Replace turn signal lamp bulb. Refer to LT- 6 4 , "
Bulb Replacement of Front Turn Signal Lamp" . When turn signal switch is
right position: TURN SIGNAL R ON
When turn signal switch is
left position: TURN SIGNAL L ON
PKIA7600E