2006 NISSAN QUEST display
[x] Cancel search: displayPage 5 of 352

Table of
ContentsIllustrated table of contents
Safety—Seats, seat belts and supplemental restraint system
Instruments and controls
Pre-driving checks and adjustments
Display screen, heater, air conditioner and audio systems
Starting and driving
In case of emergency
Appearance and care
Maintenance and do-it-yourself
Technical and consumer information
Index
0
1
2
3
4
5
6
7
8
9
10
Page 12 of 352

1. Ventilators (P. 4-27)
2. Headlight/fog light (if so equipped)/turn
signal switch (P. 2-19)
3. Steering wheel switch for audio control
(if so equipped) (P. 4-51)
4. Driver supplemental air bag/horn
(P. 1-49, P. 2-24)
5. Cruise control main/set switches
(P. 5-14)
6. Windshield wiper/washer switch and
rear window wiper/washer switch
(P. 2-16, 2-17)
7. Meters and gauges (P. 2-3)
8. Display screen/Navigation system*
(P. 4-2, 4-8 &4-16 )
9. Warning/indicator lights (P. 2-7)
10. Front passenger supplemental air bag
(P. 1-49)
11. Glove box (P. 2-31)
12. Climate controls (P. 4-28, 4-37)
13. Hazard warning flasher switch (P. 2-23)
14. Audio system controls (P. 4-41)
15. Display screen/Navigation system*
controls (P. 4-2)
16. Shift selector lever (P. 5-10)
17. Tilt steering wheel controls (P. 3-20)
WIC0837
INSTRUMENT PANEL
0-6Illustrated table of contents
ZREVIEW COPYÐ2006 Quest(van)
Owners ManualÐUSA_English(nna)
05/27/05Ðtbrooks
X
Page 79 of 352

1. SRS Front Air Bag Warning Labels
2. SRS Side Air Bag Warning Label (if so
equipped)
SUPPLEMENTAL AIR BAG
WARNING LABELS
Warning labels about the supplemental front air
bag and supplemental side air bag systems (if so
equipped) are placed in the vehicle as shown in
the illustration.
SUPPLEMENTAL AIR BAG
WARNING LIGHT
The supplemental air bag warning light,
displayingin the instrument panel, moni-
tors the circuits of the supplemental front air bag,
supplemental side air bag and curtain side-
impact air bag and pre-tensioner seat belt sys-
tems. The circuits monitored by the supplemental
air bag warning light are the diagnosis sensor
unit, crash zone sensor, satellite sensors, front air
bag modules, side air bag modules, curtain side-
impact air bag modules, pre-tensioner seat belts
and all related wiring.When the ignition key is in the ON or START
position, the supplemental air bag warning light
illuminates for about 7 seconds and then turns
off. This means the system is operational.
If any of the following conditions occur, the
supplemental front air bag, supplemental side air
bag and curtain side-impact air bag and pre-
tensioner seat belt systems need servicing:
cThe supplemental air bag warning light re-
mains on after approximately 7 seconds.
cThe supplemental air bag warning light
flashes intermittently.
cThe supplemental air bag warning light does
not come on at all.
Under these conditions, the supplemental front
air bag, supplemental side air bags and curtain
side-impact air bag or pre-tensioner seat belt
systems may not operate properly. It must be
checked and repaired. Take your vehicle to the
nearest NISSAN dealer.
LRS0318LRS0100
Safety—Seats, seat belts and supplemental restraint system1-63
ZREVIEW COPYÐ2006 Quest(van)
Owners ManualÐUSA_English(nna)
05/27/05Ðtbrooks
X
Page 84 of 352

1. Ventilators (P. 4-27)
2. Headlight/fog light (if so equipped)/turn
signal switch (P. 2-19)
3. Steering wheel switch for audio control
(if so equipped) (P. 4-51)
4. Driver supplemental air bag/horn
(P. 1-49, P. 2-24)
5. Cruise control main/set switches
(P. 5-14)
6. Windshield wiper/washer switch and
rear window wiper/washer switch
(P. 2-16, 2-17)
7. Meters and gauges (P. 2-3)
8. Display screen/Navigation system*
(P. 4-8, P. 4-2, P. 4-16)
9. Warning/indicator lights (P. 2-7)
10. Front passenger supplemental air bag
(P. 1-49)
11. Glove box (P. 2-31)
12. Climate controls (P. 4-28, 4-37)
13. Hazard warning flasher switch (P. 2-23)
14. Audio system controls (P. 4-41)
15. Display screen/Navigation system*
controls (P. 4-8, P. 4-2, P. 4-16)
16. Shift selector lever (P. 5-10)
17. Tilt steering wheel control (P. 3-20)
WIC0837
INSTRUMENT PANEL
2-2Instruments and controls
ZREVIEW COPYÐ2006 Quest(van)
Owners ManualÐUSA_English(nna)
05/27/05Ðtbrooks
X
Page 85 of 352

18. Rear sonar system off switch
(if so equipped) (P. 2-25)
19. Vehicle dynamic control (VDC) off
switch (if so equipped) or Traction
control system (TCS) off switch
(if so equipped) (P. 2-25, P. 2-25)
20. Lights on demand switch (P. 2-44)
21. Instrument brightness control (P. 2-22)
22. Outside mirror controls (P. 3-23)
*: Refer to the separate Navigation System Own-
er’s Manual (if so equipped) .
See the page number indicated in paren-
theses for operating details.
1. Tachometer
2. Warning/indicator lights
3. Speedometer
4. Display screen*
5. Odometer
6. Engine coolant temperature gauge/Fuel
gauge
*Refer to the “Display screen, heater, air con-
ditioner and audio systems” section later in
this manual for details about the display
screen, including how to view trip, fuel
economy and maintenance information.
WIC0734
METERS AND GAUGES
Instruments and controls2-3
ZREVIEW COPYÐ2006 Quest(van)
Owners ManualÐUSA_English(nna)
05/27/05Ðtbrooks
X
Page 86 of 352

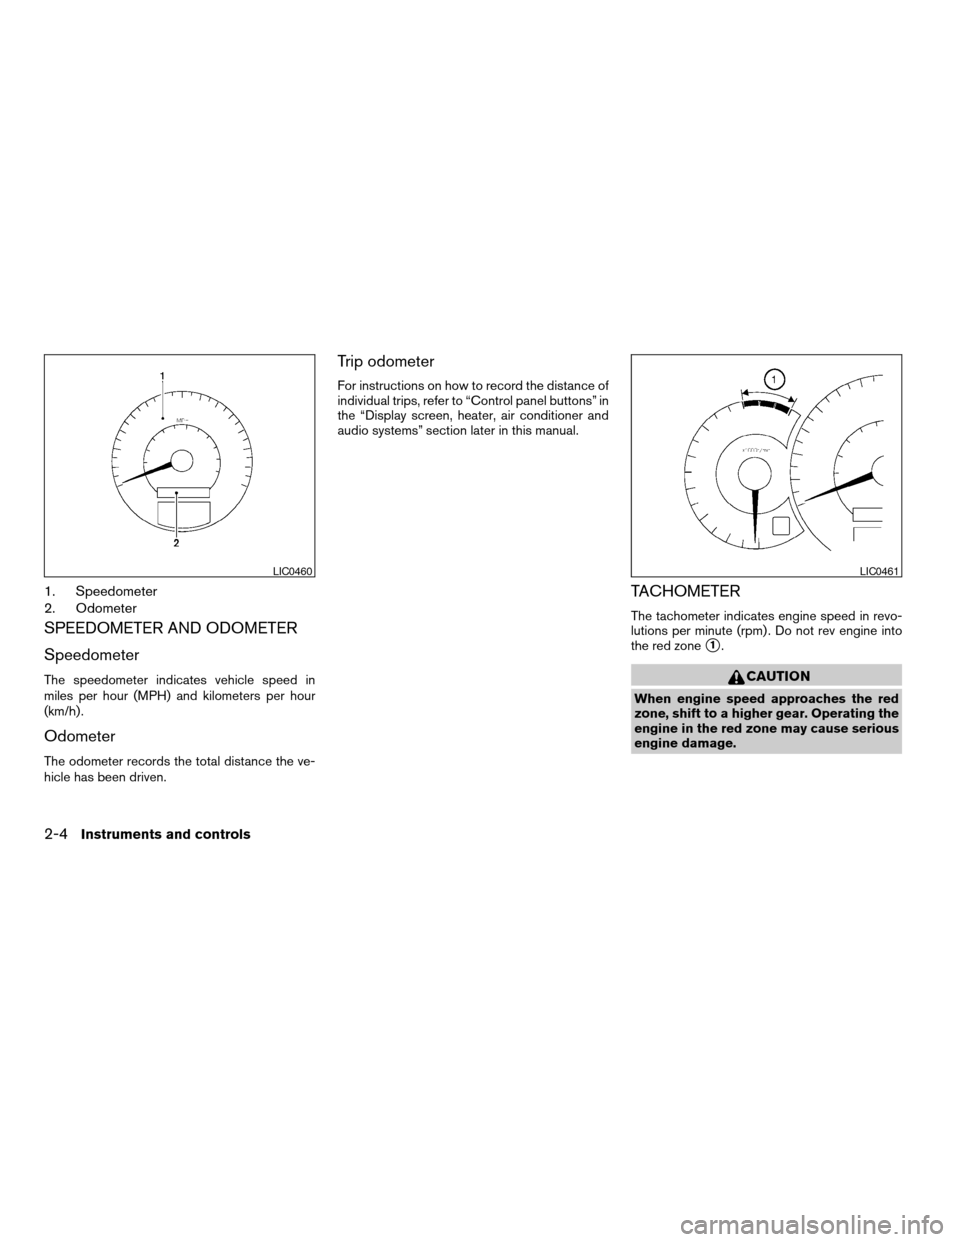
1. Speedometer
2. Odometer
SPEEDOMETER AND ODOMETER
Speedometer
The speedometer indicates vehicle speed in
miles per hour (MPH) and kilometers per hour
(km/h) .
Odometer
The odometer records the total distance the ve-
hicle has been driven.
Trip odometer
For instructions on how to record the distance of
individual trips, refer to “Control panel buttons” in
the “Display screen, heater, air conditioner and
audio systems” section later in this manual.
TACHOMETER
The tachometer indicates engine speed in revo-
lutions per minute (rpm) . Do not rev engine into
the red zone
s1.
CAUTION
When engine speed approaches the red
zone, shift to a higher gear. Operating the
engine in the red zone may cause serious
engine damage.
LIC0460LIC0461
2-4Instruments and controls
ZREVIEW COPYÐ2006 Quest(van)
Owners ManualÐUSA_English(nna)
05/27/05Ðtbrooks
X
Page 91 of 352

dipstick to check the oil level. See “Engine oil” in
the “Maintenance and do-it-yourself” section of
this manual.
CAUTION
Running the engine with the engine oil
pressure warning light on could cause se-
rious damage to the engine almost imme-
diately. Such damage is not covered by
warranty. Turn off the engine as soon as it
is safe to do so.
Low fuel warning light
This light comes on when the fuel level in the fuel
tank is getting low. The low fuel warning chime
will also sound under certain conditions. See
“Low fuel warning chime” later in this section.
Refuel as soon as it is convenient, preferably
before the fuel gauge reaches E (Empty) .There
will be a small reserve of fuel in the tank
when the fuel gauge needle reaches E
(Empty) .
Low tire pressure warning
light
Your vehicle is equipped with a tire pressure
monitoring system (TPMS) that monitors the tire
pressure of all tires except the spare.The low tire pressure warning light warns of low
tire pressure or indicates that the TPMS is not
functioning properly.
After the ignition switch is turned ON, this light
comes on for about 1 second and turns off.
Low tire pressure warning (for models with-
out MichelinTPAXTtires only):
If the vehicle is being driven with low tire pres-
sure, the warning light will illuminate. If you select
the tire pressure information in the display, the
FLAT TIRE warning message will be displayed.
The tire pressure for each tire will also be dis-
played.
When the low tire pressure warning light illumi-
nates, you should stop and adjust the tire pres-
sure to the recommended COLD tire pressure
shown on the Tire and Loading Information label
to turn the light OFF.
For additional information, see “Low tire pressure
warning system” in the “Starting and driving”
section and “Low tire pressure warning system”
in the “In case of emergency” section.
Low tire pressure warning (for models with
MichelinTPAXTtires only):
If the vehicle is being driven with low tire pressure
the warning light will illuminate. If you select the
tire pressure information in the display, the FLATTIRE warning message will be displayed. The tire
pressure for each tire will also be displayed.
When the low tire pressure warning light illumi-
nates, you should stop and adjust the tire pres-
sure to the recommended COLD tire pressure
shown on the Tire and Loading Information label
to turn the light OFF.
Flat tire warning (for models with Mich-
elinTPAXTtires only):
If the vehicle is being driven with one or more flat
tires, the warning light will flash continuously and
a chime will sound for 10 seconds.
The chime will only sound at the first indication of
a flat tire and the warning light will flash continu-
ously. When the flat tire warning is activated,
have the system reset and the tire checked and
replaced if necessary by a NISSAN dealer or
authorized Michelin PAX system dealer. Even if
the tire is inflated to the specified COLD tire
pressure, the warning light will continue to flash
until the system is reset by a NISSAN dealer.
If you select the tire pressure information in the
display, the FLAT TIRE warning message will be
displayed. The tire pressure for each tire will also
be displayed.
Your vehicle can be driven for a limited time on a
flat tire. See “Michelin PAX Tires” in the “Mainte-
nance and do-it-yourself” section.
Instruments and controls2-9
ZREVIEW COPYÐ2006 Quest(van)
Owners ManualÐUSA_English(nna)
05/27/05Ðtbrooks
X
Page 97 of 352

twice and the horn beeps once as a re-
minder that the doors are already locked.
The horn may or may not beep. Refer to
“Personalized settings menu” (vehicles with
monochrome screen) or “Vehicle electronic
systems” (vehicles with color screen) in the
“Display screen, heater, air conditioner and
audio systems” section later in this manual.
4. Confirm that the
indicator light comes
on. Thelight stays on for about 30
seconds. The vehicle security system is now
pre-armed. After about 30 seconds the ve-
hicle security system automatically shifts
into the armed phase. The
light begins
to flash once every 3 seconds. If, during the
30-second pre-arm time period, the door is
unlocked by the key or the keyfob, or the
ignition key is turned to ACC or ON, the
system will not arm.
cIf the key is turned slowly when locking
the door, the system may not arm. Fur-
thermore, if the key is turned beyond
the vertical position toward the unlock
position to remove the key, the system
may be disarmed when the key is re-
moved. If the indicator light fails to
glow for 30 seconds, unlock the door
once and lock it again.cEven when the driver and/or passen-
gers are in the vehicle, the system will
arm with all doors closed and locked
with the ignition key in the OFF posi-
tion.
Vehicle security system activation
The vehicle security system will give the following
alarm:
cThe headlights blink and the horn sounds
intermittently.
cThe alarm automatically turns off after ap-
proximately 50 seconds. However, the alarm
reactivates if the vehicle is tampered with
again. The alarm can be shut off by unlocking
a door with the key, or by pressing the
button on the keyfob.
The alarm is activated by:
copening a door without using the key or
keyfob (even if the door is unlocked by using
the inside lock knob or the power door lock
switch) .
How to stop an activated alarm
The alarm stops only by unlocking a door with the
key, or by pressing thebutton on the key-
fob.
NISSAN VEHICLE IMMOBILIZER
SYSTEM
The NISSAN Vehicle Immobilizer System will not
allow the engine to start without the use of a
registered key.
If the engine fails to start using a registered key
(for example, when interference is caused by
another registered key, an automated toll road
device or automatic payment device on the key
ring) , restart the engine using the following pro-
cedures:
1. Leave the ignition switch in the ON position
for approximately 5 seconds.
2. Turn the ignition switch to the OFF or LOCK
position, and wait approximately 10 sec-
onds.
3. Repeat steps 1 and 2.
4. Restart the engine while holding the device
(which may have caused the interference)
separate from the registered key.
If the no start condition re-occurs, NISSAN rec-
ommends placing the registered key on a sepa-
rate key ring to avoid interference from other
devices.
Instruments and controls2-15
ZREVIEW COPYÐ2006 Quest(van)
Owners ManualÐUSA_English(nna)
05/27/05Ðtbrooks
X