2006 NISSAN QUEST display
[x] Cancel search: displayPage 99 of 352

NOTE:
You can turn on or turn off the driving
speed dependent intermittent wiper func-
tion. Refer to “Personalized settings
menu” (vehicles with monochrome screen)
or “Vehicle electronic systems” (vehicles
with color screen) in the “Display screen,
heater, air conditioner and audio systems”
section later in this manual.
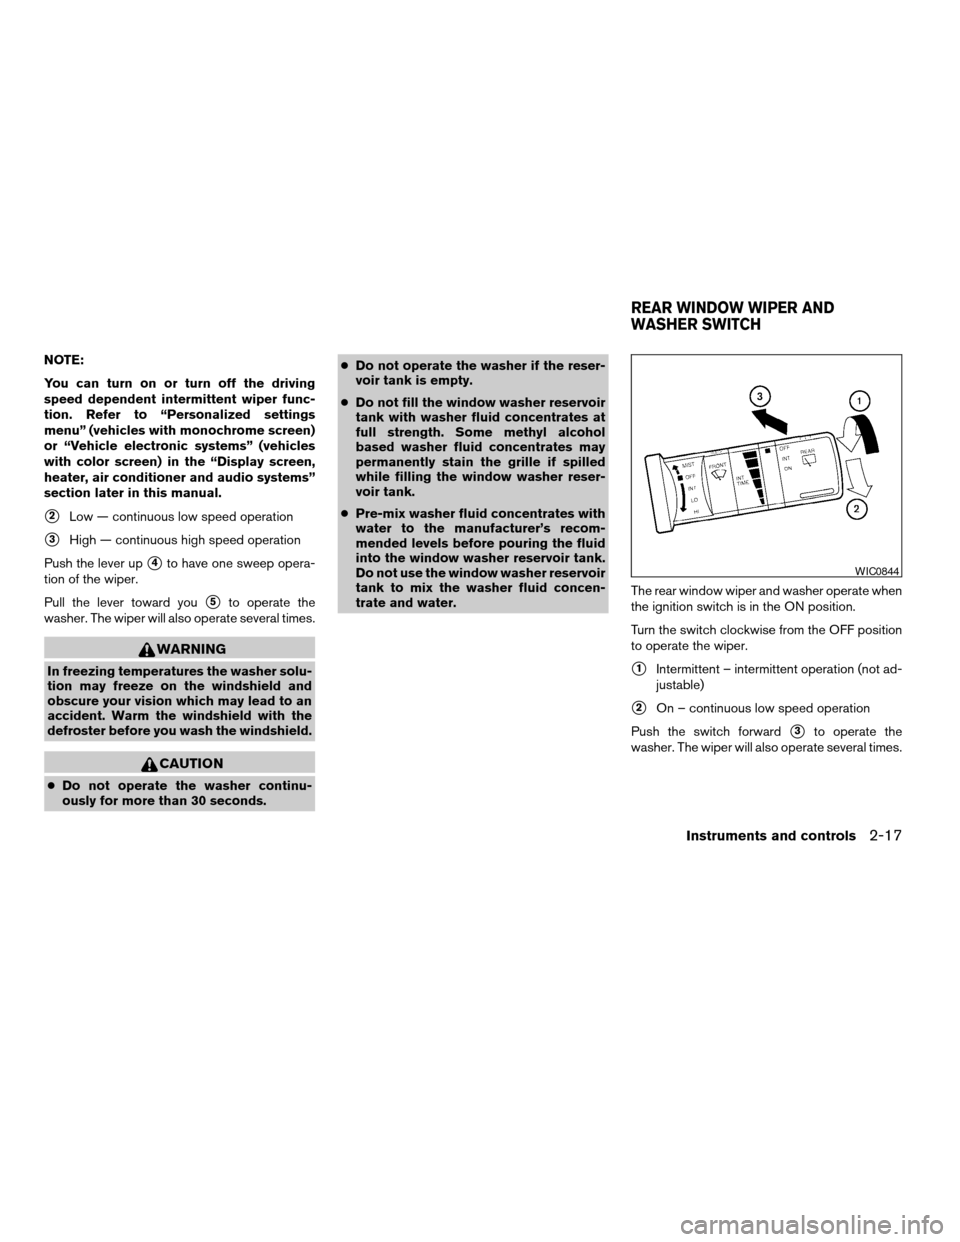
s2Low — continuous low speed operation
s3High — continuous high speed operation
Push the lever up
s4to have one sweep opera-
tion of the wiper.
Pull the lever toward you
s5to operate the
washer. The wiper will also operate several times.
WARNING
In freezing temperatures the washer solu-
tion may freeze on the windshield and
obscure your vision which may lead to an
accident. Warm the windshield with the
defroster before you wash the windshield.
CAUTION
cDo not operate the washer continu-
ously for more than 30 seconds.cDo not operate the washer if the reser-
voir tank is empty.
cDo not fill the window washer reservoir
tank with washer fluid concentrates at
full strength. Some methyl alcohol
based washer fluid concentrates may
permanently stain the grille if spilled
while filling the window washer reser-
voir tank.
cPre-mix washer fluid concentrates with
water to the manufacturer’s recom-
mended levels before pouring the fluid
into the window washer reservoir tank.
Do not use the window washer reservoir
tank to mix the washer fluid concen-
trate and water.The rear window wiper and washer operate when
the ignition switch is in the ON position.
Turn the switch clockwise from the OFF position
to operate the wiper.
s1Intermittent – intermittent operation (not ad-
justable)
s2On – continuous low speed operation
Push the switch forward
s3to operate the
washer. The wiper will also operate several times.
WIC0844
REAR WINDOW WIPER AND
WASHER SWITCH
Instruments and controls2-17
ZREVIEW COPYÐ2006 Quest(van)
Owners ManualÐUSA_English(nna)
05/27/05Ðtbrooks
X
Page 102 of 352

Autolight system (if so equipped)
The autolight system allows the headlights to be
set so they turn on and off automatically. The
autolight system can:
cTurn on the headlights, front parking, tail,
license plate and instrument panel lights au-
tomatically when it is dark.
cTurn off all the lights when it is light.
cKeep all the lights on for 45 seconds after
you turn the key to OFF and all doors are
closed.NOTE:
Autolight activation sensitivity and the
time delay for autolight shutoff can be ad-
justed. See “Personalized settings menu”
(vehicles with monochrome screen) or “Ve-
hicle electronic systems” (vehicles with
color screen) in the “Display screen, heater,
air conditioner and audio systems” section
later in this manual.
To turn on the autolight system:
1. Turn the headlight switch to the AUTO posi-
tion
s1.
2. Turn the ignition key to ON.
3. The autolight system automatically turns the
headlights on and off.
Initially, if the ignition switch is turned OFF and a
door is opened and left open, the headlights
remain on for 5 minutes. During that 5 minutes:
cif all doors are closed, the headlights remain
on for 45 seconds, then turn off.
cif another door is opened, then the 5 minute
timer is reset.
To turn the autolight system off, turn the switch to
the OFF,
,orposition.Be sure you do not put anything on top of
the autolight sensor
s1located on top of
the instrument panel. The autolight sensor
controls the autolight; if it is covered, the
autolight sensor reacts as if it is dark out
and the headlights will illuminate. If this
occurs while parked with the engine off
and the key in the ON position, your vehi-
cle’s battery could become discharged.
LIC0561LIC0515
2-20Instruments and controls
ZREVIEW COPYÐ2006 Quest(van)
Owners ManualÐUSA_English(nna)
05/27/05Ðtbrooks
X
Page 142 of 352

CAUTION
Listed below are conditions or occur-
rences which will damage the keyfob:
cDo not allow the keyfob to become wet.
cDo not drop the keyfob.
cDo not strike the keyfob sharply against
another object.
cDo not place the keyfob for an extended
period in an area where temperatures
exceed 140°F (60°C) .
If a keyfob is lost or stolen, NISSAN rec-
ommends erasing the ID code of that key-
fob. This will prevent the keyfob from un-
authorized use to unlock the vehicle. For
information regarding the erasing proce-
dure, please contact a NISSAN dealer.
HOW TO USE REMOTE KEYLESS
ENTRY SYSTEM
Locking doors
1. Close all windows.
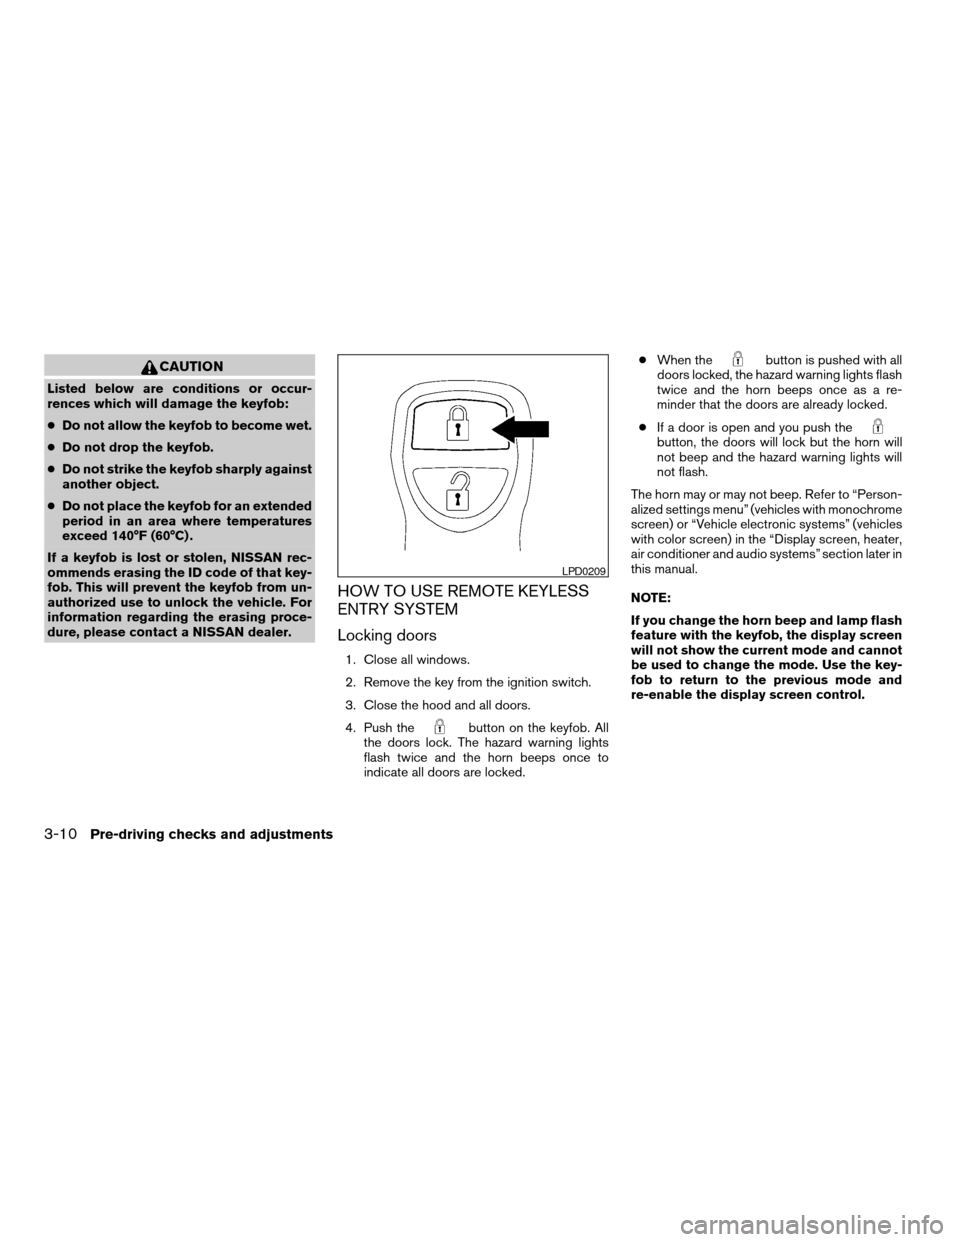
2. Remove the key from the ignition switch.
3. Close the hood and all doors.
4. Push the
button on the keyfob. All
the doors lock. The hazard warning lights
flash twice and the horn beeps once to
indicate all doors are locked.cWhen the
button is pushed with all
doors locked, the hazard warning lights flash
twice and the horn beeps once as a re-
minder that the doors are already locked.
cIf a door is open and you push the
button, the doors will lock but the horn will
not beep and the hazard warning lights will
not flash.
The horn may or may not beep. Refer to “Person-
alized settings menu” (vehicles with monochrome
screen) or “Vehicle electronic systems” (vehicles
with color screen) in the “Display screen, heater,
air conditioner and audio systems” section later in
this manual.
NOTE:
If you change the horn beep and lamp flash
feature with the keyfob, the display screen
will not show the current mode and cannot
be used to change the mode. Use the key-
fob to return to the previous mode and
re-enable the display screen control.
LPD0209
3-10Pre-driving checks and adjustments
ZREVIEW COPYÐ2006 Quest(van)
Owners ManualÐUSA_English(nna)
05/27/05Ðtbrooks
X
Page 159 of 352

cWhen the key is turned from ACC to LOCK
with the driver’s door open.
The driver’s seat will return to previous position:
cWhen the key is inserted into the ignition
switch and the driver’s door is closed.
cWhen the driver’s door is closed with the key
turned to LOCK.
cWhen the key is turned from ACC to ON
while the automatic transmission selector
lever is in the P (Park) position.
The entry/exit function can be adjusted or can-
celed. See “Personalized settings menu” (ve-
hicles with monochrome screen) or “Vehicle
electronic systems” (vehicles with color screen)
in the “Display screen, heater, air conditioner and
audio systems” section of this manual.
SYSTEM OPERATION
The automatic drive positioner system will not
work or will stop operating under the following
conditions:
cWhen the vehicle speed is above 4 MPH (7
km/h) .
cWhen any of the memory switches are
pushed while the automatic drive positioner
is operating.cWhen the adjusting switch for the driver’s
seat is turned on while the automatic drive
positioner is operating.
cWhen the memory switch (1 or 2) is not
pushed and held for at least 1 second.
cWhen the seat has been already moved to
the memorized position.
cWhen no seat position is stored in the
memory switch.
cWhen the automatic transmission selector
lever is moved from P (Park) to any other
position.
cWhen the driver’s door remains open more
than 45 seconds and the ignition switch is
not in the ON position.
The automatic drive positioner system can be
adjusted and canceled. See “Personalized set-
tings menu” (vehicles with monochrome screen)
or “Vehicle electronic systems” (vehicles with
color screen) in the “Display screen, heater, air
conditioner and audio systems” section of this
manual.
Pre-driving checks and adjustments3-27
ZREVIEW COPYÐ2006 Quest(van)
Owners ManualÐUSA_English(nna)
05/27/05Ðtbrooks
X
Page 160 of 352

4 Display screen, heater, air conditioner
and audio systems
Control panel buttons - with monochrome screen.....4-2
Names of components..........................4-3
How to use JOYSTICK and “ENTER” button.......4-3
How to use “BACK” button......................4-3
How to use “TRIP” button.......................4-3
How to use “FUEL ECON” button................4-4
Clock.........................................4-4
How to use “E/M” (English/Metric) button.........4-4
How to use
(maintenance) button..........4-5
How to use the “SETTING” button................4-6
button...................................4-7
Control panel buttons — color screen without
navigation system.................................4-8
Names of the components.......................4-8
How to use joystick and “ENTER” button..........4-8
How to use “BACK” button......................4-8
How to use the “TRIP” button....................4-9
How to use the “SETTING” button...............4-12
Setting the display (Audio or HVAC display):.....4-12
button..................................4-15
Control panel buttons — color screen with
navigation system................................4-16
Names of the components......................4-16How to use joystick and “ENTER” button.........4-16
How to use “BACK” button.....................4-16
Setting up the start-up screen..................4-17
How to use the “TRIP” button...................4-17
How to use the “SETTING” button...............4-20
Setting the display (Audio or HVAC display):.....4-20
button..................................4-25
Rearview monitor (if so equipped)..................4-25
How to read the displayed lines.................4-25
Adjusting the screen...........................4-26
Operating tips.................................4-26
Ventilators.......................................4-27
Heater and air conditioner (manual).................4-28
Controls......................................4-28
Heater operation..............................4-29
Air conditioner operation.......................4-30
Air flow charts.................................4-31
Heater and air conditioner (automatic)
(if so equipped)..................................4-37
Automatic operation...........................4-37
Manual operation..............................4-38
Rear control dial...............................4-39
Operating tips.................................4-39
ZREVIEW COPYÐ2006 Quest(van)
Owners ManualÐUSA_English(nna)
05/27/05Ðtbrooks
X
Page 162 of 352

WARNING
cPositioning of the heating or air condi-
tioning controls and display controls
should not be done while driving in or-
der that full attention may be given to
the driving operation.
cDo not disassemble or modify this sys-
tem. If you do, it may result in accidents,
fire, or electrical shock.
cDo not use this system if you notice any
abnormality, such as a frozen screen or
lack of sound. Continued use of the
system may result in accident, fire or
electric shock.
cIn case you notice any foreign object in
the system hardware, spill liquid on it,
or notice smoke or smell coming from
it, stop using the system immediately
and contact your nearest NISSAN
dealer. Ignoring such conditions may
lead to accidents, fire or electrical
shock.
When you use this system, make sure the engine
is running.
If you use the system with the engine not
running (ignition ON or ACC) for a long
time, it will use up all the battery power,
and the engine will not start.Reference symbols:
“ENTER”button — This is a button on the con-
trol panel.
“Display”key — This is a select key on the
screen. By selecting this key you can proceed to
the next function.
WHA0588
CONTROL PANEL BUTTONS - WITH
MONOCHROME SCREEN
4-2Display screen, heater, air conditioner and audio systems
ZREVIEW COPYÐ2006 Quest(van)
Owners ManualÐUSA_English(nna)
05/27/05Ðtbrooks
X
Page 163 of 352

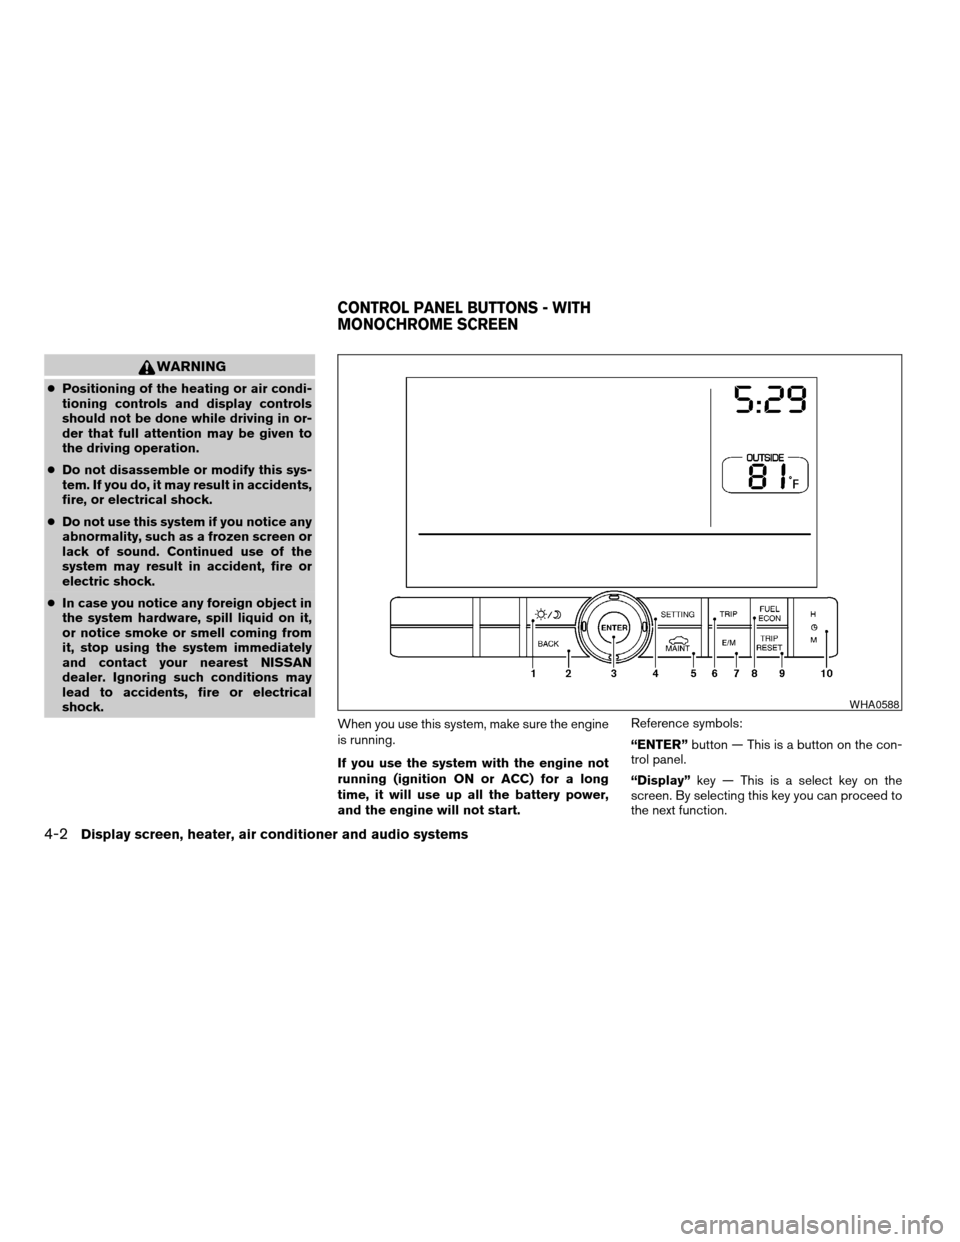
NAMES OF COMPONENTS
1.brightness control button (P. 4-7)
2. BACK (previous) button (P. 4-16)
3. Joystick and ENTER push button (P. 4-3)
4. SETTING button (P. 4-6)
5.
(maintenance) button (P. 4-5)
6. TRIP drive computer button (P. 4-3)
7. E/M (English/Metric) button (P. 4-4)
8. FUEL ECON button (P. 4-4)
9. TRIP RESET button (P. 4-3)
10. Clock adjust button (hours/minutes) (P. 4-4)
To turn off the screen, push the
button for
more than approximately 1.5 seconds. The
screen will change to “CONFIRM DISPLAY OFF
YES or NO”.
HOW TO USE JOYSTICK AND
“ENTER” BUTTON
Choose an item on the display using the joystick.
Push the“ENTER”button only when the use of it
is instructed on the display.
HOW TO USE “BACK” BUTTON
This button has two functions.
cGo back to the previous display (cancel) .
If you press the“BACK”button during setup, the
setup will be canceled and/or the display will
return to the previous screen.
cFinish setup.
If you press the“BACK”button after the setup is
completed, the setup will start over.
HOW TO USE “TRIP” BUTTON
When the“TRIP”button is pushed, the following
modes will display on the screen.
TRIP 1 (TIME, DIST, AVG)!TRIP 2 (TIME, DIST,
AVG)!OFF
TRIP 1 and TRIP 2 record journey time (TIME —
max 99 hours 59 minutes) , trip odometer (DIST
— mile or km) and average speed (AVG — MPH
or km/h) .
To reset the TRIP 1 or TRIP 2, push the“TRIP”
button or the“TRIP RESET”button for more
than approximately 1.5 seconds.
LHA0252
Display screen, heater, air conditioner and audio systems4-3
ZREVIEW COPYÐ2006 Quest(van)
Owners ManualÐUSA_English(nna)
05/27/05Ðtbrooks
X
Page 164 of 352

HOW TO USE “FUEL ECON”
BUTTON
The average fuel consumption (MPG or L/100
km) and the distance to empty (dte — mi or km)
will appear on the screen when the“FUEL
ECON”button is pushed.
Average fuel consumption (MPG or
L/100 km)
The average fuel consumption mode shows the
average fuel consumption since the last reset.
Resetting is done by pressing the“TRIP RE-
SET”or“FUEL ECON”button for more than
approximately 1.5 seconds.The display is updated every 30 seconds. For
approximately the first 30 seconds and 1/3 miles
(500 m) after a reset or connecting the battery
cables, the display will show (----) .
Distance to empty (dte — mile or km)
The distance to empty (dte) mode provides you
with an estimation of the distance that can be
driven before refueling. The dte is constantly be-
ing calculated based on the amount of fuel in the
fuel tank and the actual fuel consumption.
The display is updated every 30 seconds.
When the fuel level is low, the dte display will
change to (*) .
NOTE:
cIf the amount of fuel added while the ignition
switch is OFF is small, the display just before
the ignition switch is turned OFF may con-
tinue to be displayed.
cWhen driving uphill or rounding curves, the
fuel in the tank shifts, which may momentarily
change the display.
CLOCK
The digital clock displays time when the ignition
key is in ACC or ON.
If the power supply is disconnected, the
clock will not indicate the correct time.
Readjust the time.
Adjusting the time
To adjust the time, push the“H”or“M”button
for more than approximately 1.5 seconds. The
time indicator will flash.
Touch the“H”button to adjust the hour.
Touch the“M”button to adjust the minute.
To finish the adjusting, press the“BACK”button
or the screen will return to normal after 10 sec-
onds.
HOW TO USE “E/M” (English/Metric)
BUTTON
You can change the unit as follows using the
“E/M”button.
Unit: US — mile, °F, MPG
Metric — km, °C, L/100 km
LHA0253
4-4Display screen, heater, air conditioner and audio systems
ZREVIEW COPYÐ2006 Quest(van)
Owners ManualÐUSA_English(nna)
05/27/05Ðtbrooks
X