2006 NISSAN QUEST recommended oil
[x] Cancel search: recommended oilPage 91 of 352
dipstick to check the oil level. See “Engine oil” in
the “Maintenance and do-it-yourself” section of
this manual.
CAUTION
Running the engine with the engine oil
pressure warning light on could cause se-
rious damage to the engine almost imme-
diately. Such damage is not covered by
warranty. Turn off the engine as soon as it
is safe to do so.
Low fuel warning light
This light comes on when the fuel level in the fuel
tank is getting low. The low fuel warning chime
will also sound under certain conditions. See
“Low fuel warning chime” later in this section.
Refuel as soon as it is convenient, preferably
before the fuel gauge reaches E (Empty) .There
will be a small reserve of fuel in the tank
when the fuel gauge needle reaches E
(Empty) .
Low tire pressure warning
light
Your vehicle is equipped with a tire pressure
monitoring system (TPMS) that monitors the tire
pressure of all tires except the spare.The low tire pressure warning light warns of low
tire pressure or indicates that the TPMS is not
functioning properly.
After the ignition switch is turned ON, this light
comes on for about 1 second and turns off.
Low tire pressure warning (for models with-
out MichelinTPAXTtires only):
If the vehicle is being driven with low tire pres-
sure, the warning light will illuminate. If you select
the tire pressure information in the display, the
FLAT TIRE warning message will be displayed.
The tire pressure for each tire will also be dis-
played.
When the low tire pressure warning light illumi-
nates, you should stop and adjust the tire pres-
sure to the recommended COLD tire pressure
shown on the Tire and Loading Information label
to turn the light OFF.
For additional information, see “Low tire pressure
warning system” in the “Starting and driving”
section and “Low tire pressure warning system”
in the “In case of emergency” section.
Low tire pressure warning (for models with
MichelinTPAXTtires only):
If the vehicle is being driven with low tire pressure
the warning light will illuminate. If you select the
tire pressure information in the display, the FLATTIRE warning message will be displayed. The tire
pressure for each tire will also be displayed.
When the low tire pressure warning light illumi-
nates, you should stop and adjust the tire pres-
sure to the recommended COLD tire pressure
shown on the Tire and Loading Information label
to turn the light OFF.
Flat tire warning (for models with Mich-
elinTPAXTtires only):
If the vehicle is being driven with one or more flat
tires, the warning light will flash continuously and
a chime will sound for 10 seconds.
The chime will only sound at the first indication of
a flat tire and the warning light will flash continu-
ously. When the flat tire warning is activated,
have the system reset and the tire checked and
replaced if necessary by a NISSAN dealer or
authorized Michelin PAX system dealer. Even if
the tire is inflated to the specified COLD tire
pressure, the warning light will continue to flash
until the system is reset by a NISSAN dealer.
If you select the tire pressure information in the
display, the FLAT TIRE warning message will be
displayed. The tire pressure for each tire will also
be displayed.
Your vehicle can be driven for a limited time on a
flat tire. See “Michelin PAX Tires” in the “Mainte-
nance and do-it-yourself” section.
Instruments and controls2-9
ZREVIEW COPYÐ2006 Quest(van)
Owners ManualÐUSA_English(nna)
05/27/05Ðtbrooks
X
Page 233 of 352
cMake sure the area around the vehicle is
clear.
cCheck fluid levels such as engine oil, cool-
ant, brake fluid, and window washer fluid as
frequently as possible, or at least whenever
you refuel.
cCheck that all windows and lights are clean.
cVisually inspect tires for their appearance
and condition. Also check tires for proper
inflation.
cLock all doors.
cPosition seat and adjust head restraints.
cAdjust inside and outside mirrors.
cFasten seat belts and ask all passengers to
do likewise.
cCheck the operation of warning lights when
the key is turned to the ON (3) position. See
“Warning/indicator lights and audible re-
minders” in the “Instruments and controls”
section of this manual.1. Apply the parking brake.
2. Move the shift selector lever to P (Park) or N
(Neutral) . P (Park) is recommended.
The shift selector lever cannot be
moved out of P (Park) and into any of
the other gear positions if the ignition
key is turned to the OFF position or if
the key is removed from the ignition
switch.
The starter is designed not to operate if
the shift selector lever is in any of the
driving positions.
3. Crank the enginewith your foot off the
accelerator pedalby turning the ignition
key to START. Release the key when the
engine starts. If the engine starts, but fails to
run, repeat the above procedure.
cIf the engine is very hard to start in ex-
tremely cold weather or when restarting,
depress the accelerator pedal a little (ap-
proximately 1/3 to the floor) and hold it
and then crank the engine. Release the
key and the accelerator pedal when the
engine starts.
cIf the engine is very hard to start because
it is flooded, depress the accelerator
pedal all the way to the floor and hold it.
Crank the engine for 5-6 seconds. Aftercranking the engine, release the accel-
erator pedal. Crank the enginewith your
foot off the accelerator pedalby turn-
ing the ignition key to START. Release the
key when the engine starts. If the engine
starts, but fails to run, repeat the above
procedure.
CAUTION
Do not operate the starter for more than
15 seconds at a time. If the engine does
not start, turn the key off and wait 10
seconds before cranking again, otherwise
the starter could be damaged.
4. Allow the engine to idle for at least 30 sec-
onds after starting. Do not race the engine
while warming it up. Drive at moderate
speed for a short distance first, especially in
cold weather.
In cold weather, keep the engine running for
a minimum of 2–3 minutes before shutting it
off. Starting and stopping the engine over a
short period of time may make the vehicle
more difficult to start.
BEFORE STARTING THE ENGINE STARTING THE ENGINE
Starting and driving5-9
ZREVIEW COPYÐ2006 Quest(van)
Owners ManualÐUSA_English(nna)
05/27/05Ðtbrooks
X
Page 240 of 352
CAUTION
During the first 1,200 miles (2,000 km) ,
follow these recommendations to obtain
maximum engine performance and en-
sure the future reliability and economy of
your new vehicle. Failure to follow these
recommendations may result in short-
ened engine life and reduced engine
performance.
cAvoid driving for long periods at constant
speed, either fast or slow, and do not run the
engine over 4,000 rpm.
cDo not accelerate at full throttle in any gear.
cAvoid quick starts.
cAvoid hard braking as much as possible.
cDo not tow a trailer for the first 500 miles
(800 km) . Your engine, axle or other parts
could be damaged.cAccelerate slowly and smoothly. Maintain
cruising speeds with a constant accelerator
position.
cDrive at moderate speeds on the highway.
Driving at high speed lowers fuel economy.
cAvoid unnecessary stopping and braking.
Maintain a safe distance behind other ve-
hicles.
cUse a proper gear range which suits road
conditions. On level roads, shift into high
gear as soon as possible.
cAvoid unnecessary engine idling.
cKeep your engine tuned up.
cFollow the recommended periodic mainte-
nance schedule.
cKeep the tires inflated to the correct pres-
sure. Low tire pressure increases tire wear
and lowers fuel economy.
cKeep the wheels in correct alignment. Im-
proper alignment increases tire wear and
lowers fuel economy.
cAir conditioner operation lowers fuel
economy. Use the air conditioner only when
necessary.cWhen cruising at highway speeds, it is more
economical to use the air conditioner and
leave the windows closed to reduce drag.
cUse the recommended viscosity engine oil.
See “Engine oil and oil filter recommenda-
tion” in “Technical and consumer informa-
tion” later in this manual.
BREAK-IN SCHEDULE INCREASING FUEL ECONOMY
5-16Starting and driving
ZREVIEW COPYÐ2006 Quest(van)
Owners ManualÐUSA_English(nna)
05/27/05Ðtbrooks
X
Page 266 of 352
In order to maintain the appearance of your ve-
hicle, it is important to take proper care of it.
To protect the paint surfaces, please wash your
vehicle as soon as you can:
cafter a rainfall to prevent possible damage
from acid rain.
cafter driving on coastal roads.
cwhen contaminants such as soot, bird drop-
pings, tree sap, metal particles or bugs get
on the paint surface.
cwhen dust or mud builds up on the surface.
Whenever possible, store or park your vehicle
inside a garage or in a covered area.
When it is necessary to park outside, park in a
shady area or protect the vehicle with a body
cover.
Be careful not to scratch the paint surface
when putting on or removing the body
cover.
WASHING
Wash dirt off with a wet sponge and plenty of
water. Clean the vehicle thoroughly using a mild
soap, a special vehicle soap or general purpose
dishwashing liquid mixed with clean, lukewarm
(never hot) water.
CAUTION
cDo not wash the vehicle with strong
household soap, strong chemical deter-
gents, gasoline or solvents.
cDo not wash the vehicle in direct sun-
light or while the vehicle body is hot, as
the surface may become water-spotted.
cAvoid using tight-napped or rough
cloths, such as washing mitts. Care
must be taken when removing
caked-on dirt or other foreign sub-
stances so the paint surface is not
scratched or damaged.
Rinse the vehicle thoroughly with plenty of clean
water.
Inside flanges, seams and folds on the doors,
hatches and hood are particularly vulnerable to
the effects of road salt. Therefore, these areas
must be cleaned regularly. Take care that the
drain holes in the lower edge of the door are
open. Spray water under the body and in the
wheel wells to loosen the dirt and wash away
road salt.
A damp chamois can be used to dry the vehicle to
avoid water spots.
WAXING
Regular waxing protects the paint surface and
helps retain new vehicle appearance. Polishing is
recommended to remove built-up wax residue
and to avoid a weathered appearance before
re-applying wax.
A NISSAN dealer can assist you in choosing the
proper product.
cWax your vehicle only after a thorough wash-
ing. Follow the instructions supplied with the
wax.
cDo not use a wax containing any abrasives,
cutting compounds or cleaners that may
damage the vehicle finish.
cIf the surface does not polish easily, use a
“road tar” remover and wax again.
Machine compounding or aggressive polishing
on a base coat/clear coat paint finish may dull the
finish or leave swirl marks.
REMOVING SPOTS
Remove tar and oil spots, industrial dust, insects,
and tree sap as quickly as possible from the
surface of the paint to avoid lasting damage or
staining. Special cleaning products are available
at a NISSAN dealer or any automotive accessory
store.
CLEANING EXTERIOR
7-2Appearance and care
ZREVIEW COPYÐ2006 Quest(van)
Owners ManualÐUSA_English(nna)
05/27/05Ðtbrooks
X
Page 278 of 352
CHANGING ENGINE COOLANT
A NISSAN dealer can change the engine coolant.
The service procedure can be found in the
NISSAN Service Manual.
Improper servicing can result in reduced
heater performance and engine overheat-
ing.
WARNING
cTo avoid the danger of being scalded,
never change the coolant when the en-
gine is hot.
cNever remove the radiator cap when the
engine is hot. Serious burns could be
caused by high pressure fluid escaping
from the radiator.
cAvoid direct skin contact with used
coolant. If skin contact is made, wash
thoroughly with soap or hand cleaner
as soon as possible.
cKeep coolant out of the reach of chil-
dren and pets.
Engine coolant must be disposed of properly.
Check your local regulations.
CHECKING ENGINE OIL LEVEL
1. Park the vehicle on a level surface and apply
the parking brake.
2. Start the engine and let it idle until it reaches
operating temperature.
3. Turn off the engine.Wait more than 10
minutes for the oil to drain back into
the oil pan.
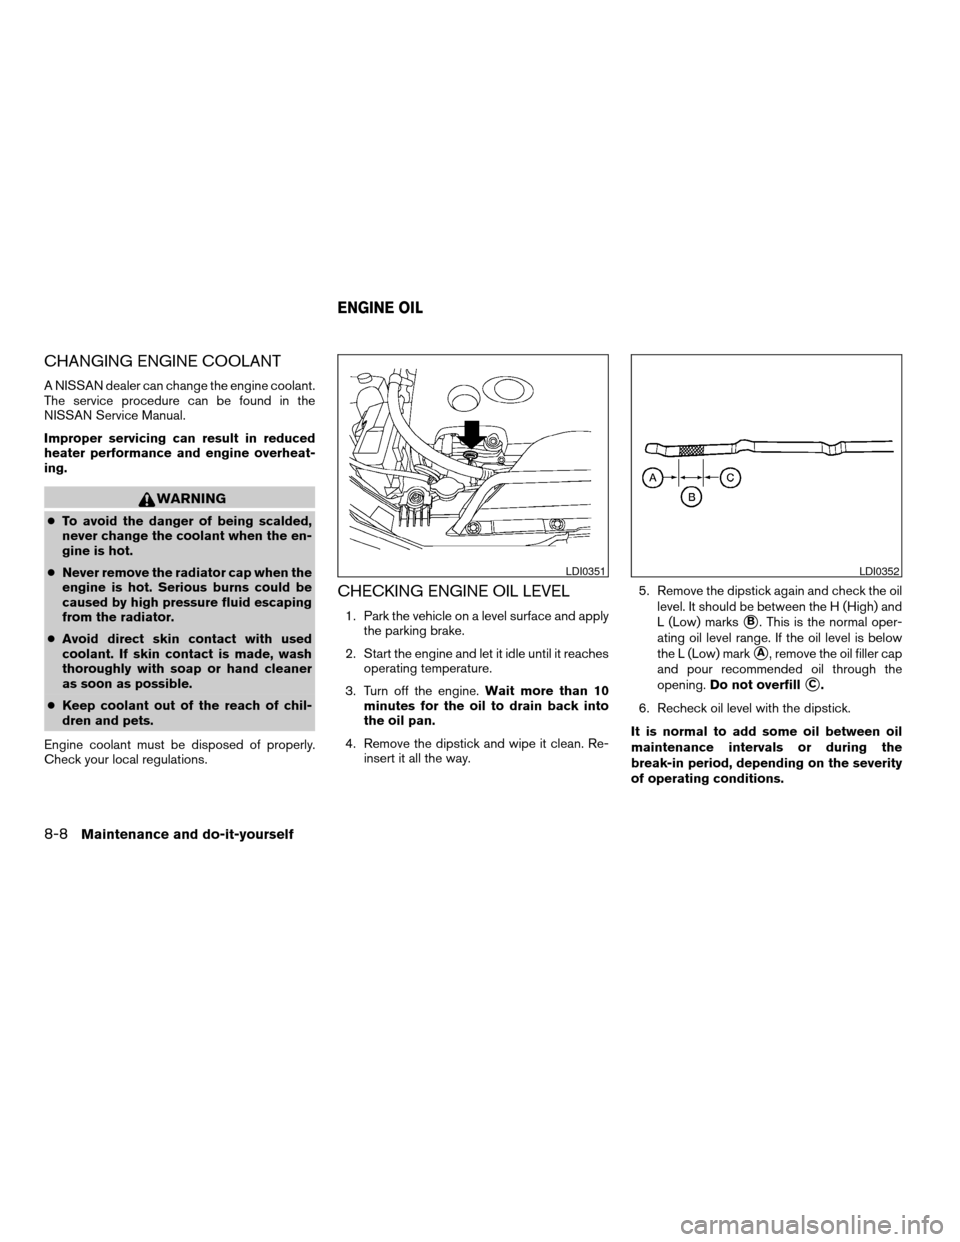
4. Remove the dipstick and wipe it clean. Re-
insert it all the way.5. Remove the dipstick again and check the oil
level. It should be between the H (High) and
L (Low) markssB. This is the normal oper-
ating oil level range. If the oil level is below
the L (Low) mark
sA, remove the oil filler cap
and pour recommended oil through the
opening.Do not overfill
sC.
6. Recheck oil level with the dipstick.
It is normal to add some oil between oil
maintenance intervals or during the
break-in period, depending on the severity
of operating conditions.
LDI0351LDI0352
ENGINE OIL
8-8Maintenance and do-it-yourself
ZREVIEW COPYÐ2006 Quest(van)
Owners ManualÐUSA_English(nna)
05/27/05Ðtbrooks
X
Page 280 of 352
7. Refill engine with recommended oil through
the oil filler opening, then install the oil filler
cap securely.
See “Capacities and recommended
fuel/lubricants” in the “Technical and con-
sumer information” section of this manual for
drain and refill capacity.
The drain and refill capacity depends on the
oil temperature and drain time. Use these
specifications for reference only. Always use
the dipstick to determine when the proper
amount of oil is in the engine.
8. Start the engine. Check for leakage around
the drain plug and oil filter. Correct as re-
quired.
9. Turn the engine off and wait more than 10
minutes. Check the oil level with the dipstick.
Add engine oil if necessary.
CHANGING ENGINE OIL FILTER
1. Park the vehicle on a level surface and apply
the parking brake.
2. Turn the engine off.
3. Place a large drain pan under the oil filter.
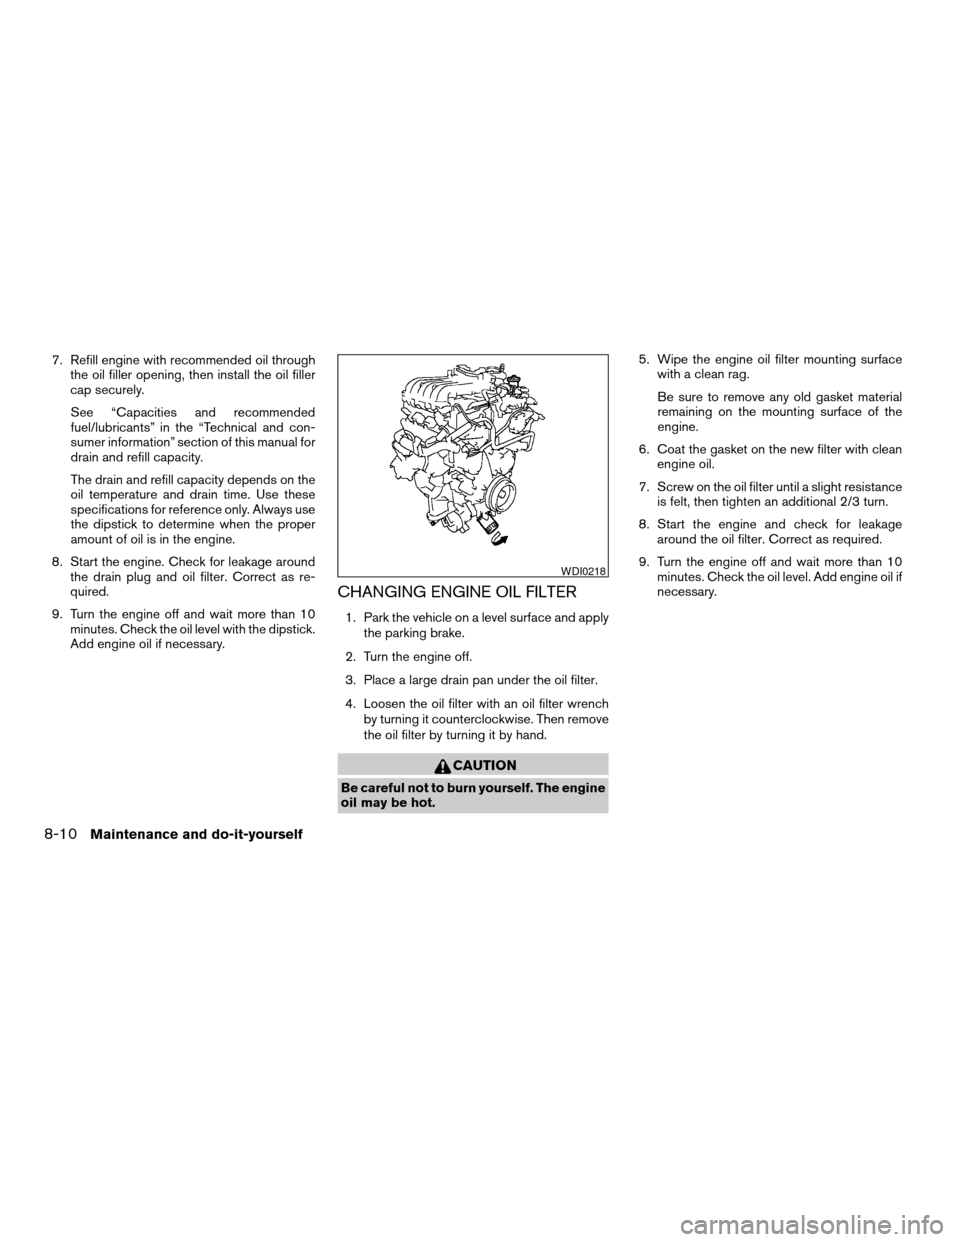
4. Loosen the oil filter with an oil filter wrench
by turning it counterclockwise. Then remove
the oil filter by turning it by hand.
CAUTION
Be careful not to burn yourself. The engine
oil may be hot.5. Wipe the engine oil filter mounting surface
with a clean rag.
Be sure to remove any old gasket material
remaining on the mounting surface of the
engine.
6. Coat the gasket on the new filter with clean
engine oil.
7. Screw on the oil filter until a slight resistance
is felt, then tighten an additional 2/3 turn.
8. Start the engine and check for leakage
around the oil filter. Correct as required.
9. Turn the engine off and wait more than 10
minutes. Check the oil level. Add engine oil if
necessary.
WDI0218
8-10Maintenance and do-it-yourself
ZREVIEW COPYÐ2006 Quest(van)
Owners ManualÐUSA_English(nna)
05/27/05Ðtbrooks
X
Page 315 of 352

9 Technical and consumer information
Capacities and recommended fuel/lubricants.........9-2
Fuel recommendation...........................9-3
Engine oil and oil filter recommendation...........9-5
Recommended SAE viscosity number............9-6
Air conditioner system refrigerant and oil
recommendations..............................9-6
Specifications.....................................9-7
Engine........................................9-7
Wheels and tires...............................9-8
Dimensions and weights........................9-8
When traveling or registering your vehicle in
another country...................................9-9
Vehicle identification...............................9-9
Vehicle identification number (VIN) plate..........9-9
Vehicle identification number
(chassis number)...............................9-9
Engine serial number...........................9-10
F.M.V.S.S./C.M.V.S.S. certification label..........9-10
Emission control information label...............9-10
Tire and loading information label................9-11Air conditioner specification label................9-11
Installing front license plate........................9-11
Vehicle loading information........................9-12
Terms........................................9-12
Vehicle load capacity..........................9-12
Loading tips..................................9-14
Measurement of weights.......................9-14
Towing a trailer...................................9-15
Maximum load limits...........................9-15
Towing load/specification.......................9-16
Towing safety.................................9-16
Flat towing....................................9-19
Uniform tire quality grading........................9-19
Emission control system warranty..................9-20
Reporting safety defects (US only).................9-21
Readiness for inspection/maintenance (I/M) test.....9-21
Event data recorders..............................9-22
Owner’s Manual/Service Manual order information . . . 9-22
In the event of a collision.......................9-23
ZREVIEW COPYÐ2006 Quest(van)
Owners ManualÐUSA_English(nna)
05/27/05Ðtbrooks
X
Page 316 of 352
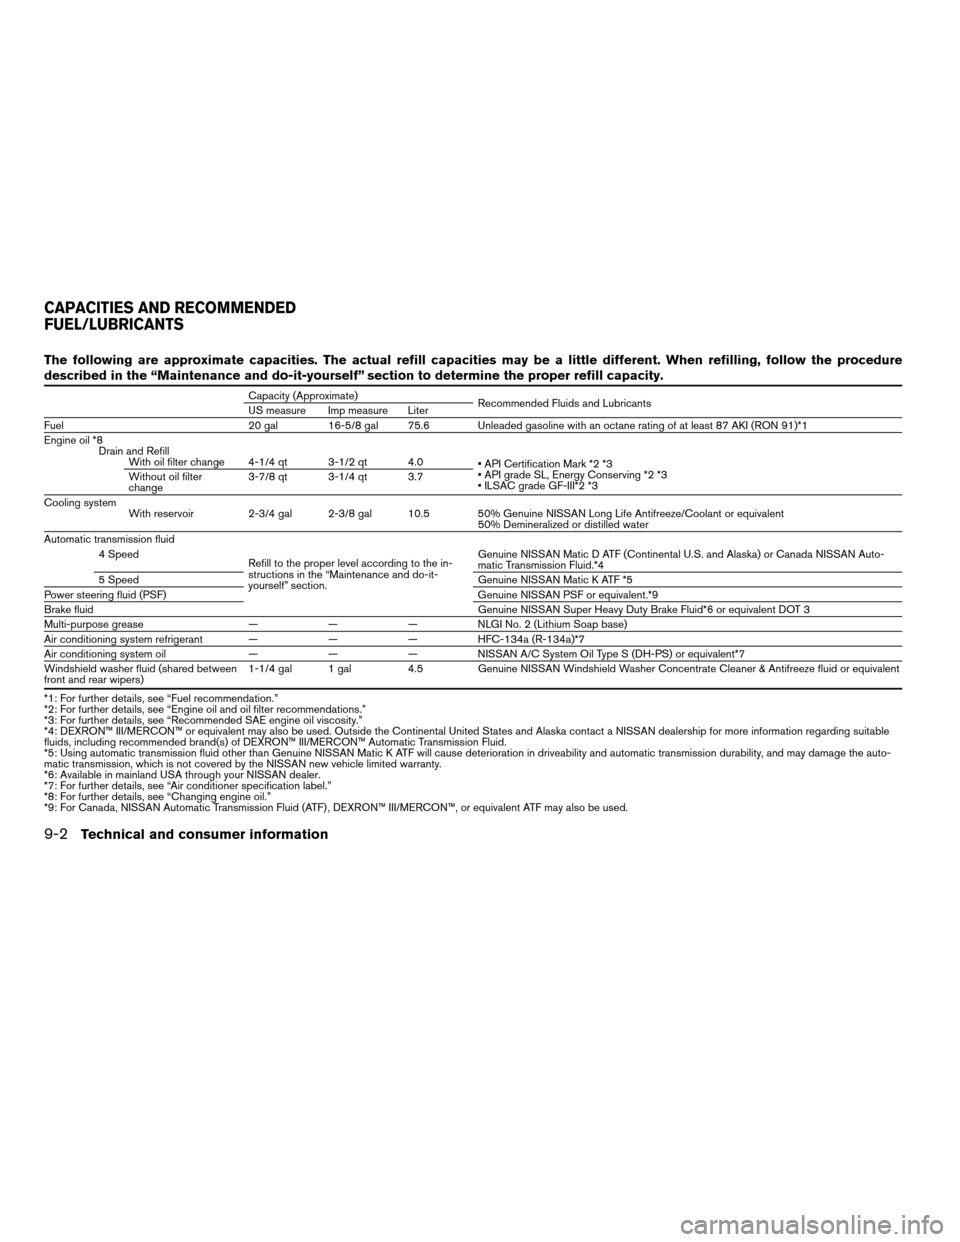
The following are approximate capacities. The actual refill capacities may be a little different. When refilling, follow the procedure
described in the “Maintenance and do-it-yourself” section to determine the proper refill capacity.
Capacity (Approximate)
Recommended Fluids and Lubricants
US measure Imp measure Liter
Fuel 20 gal 16-5/8 gal 75.6 Unleaded gasoline with an octane rating of at least 87 AKI (RON 91)*1
Engine oil *8
Drain and Refill
With oil filter change 4-1/4 qt 3-1/2 qt 4.0
• API Certification Mark *2 *3
• API grade SL, Energy Conserving *2 *3
• ILSAC grade GF-III*2 *3 Without oil filter
change3-7/8 qt 3-1/4 qt 3.7
Cooling system
With reservoir 2-3/4 gal 2-3/8 gal 10.5 50% Genuine NISSAN Long Life Antifreeze/Coolant or equivalent
50% Demineralized or distilled water
Automatic transmission fluid
Refill to the proper level according to the in-
structions in the “Maintenance and do-it-
yourself” section. 4 Speed Genuine NISSAN Matic D ATF (Continental U.S. and Alaska) or Canada NISSAN Auto-
matic Transmission Fluid.*4
5 Speed Genuine NISSAN Matic K ATF *5
Power steering fluid (PSF) Genuine NISSAN PSF or equivalent.*9
Brake fluidGenuine NISSAN Super Heavy Duty Brake Fluid*6 or equivalent DOT 3
Multi-purpose grease — — — NLGI No. 2 (Lithium Soap base)
Air conditioning system refrigerant — — — HFC-134a (R-134a)*7
Air conditioning system oil — — — NISSAN A/C System Oil Type S (DH-PS) or equivalent*7
Windshield washer fluid (shared between
front and rear wipers)1-1/4 gal 1 gal 4.5 Genuine NISSAN Windshield Washer Concentrate Cleaner & Antifreeze fluid or equivalent
*1: For further details, see “Fuel recommendation.”
*2: For further details, see “Engine oil and oil filter recommendations.”
*3: For further details, see “Recommended SAE engine oil viscosity.”
*4: DEXRON™ III/MERCON™ or equivalent may also be used. Outside the Continental United States and Alaska contact a NISSAN dealership for more information regarding suitable
fluids, including recommended brand(s) of DEXRON™ III/MERCON™ Automatic Transmission Fluid.
*5: Using automatic transmission fluid other than Genuine NISSAN Matic K ATF will cause deterioration in driveability and automatic transmission durability, and may damage the auto-
matic transmission, which is not covered by the NISSAN new vehicle limited warranty.
*6: Available in mainland USA through your NISSAN dealer.
*7: For further details, see “Air conditioner specification label.”
*8: For further details, see “Changing engine oil.”
*9: For Canada, NISSAN Automatic Transmission Fluid (ATF) , DEXRON™ III/MERCON™, or equivalent ATF may also be used.
CAPACITIES AND RECOMMENDED
FUEL/LUBRICANTS
9-2Technical and consumer information
ZREVIEW COPYÐ2006 Quest(van)
Owners ManualÐUSA_English(nna)
05/27/05Ðtbrooks
X