Page 129 of 409
128 Controls in detailControl systemThe table below shows what settings can
be changed within the various menus.
Detailed instructions on making individual
settings can be found on the following
pages.Instrument cluster
Time
Lighting
Vehicle
Selecting temperature display
mode
Setting time (hours)
Setting daytime running lamp
mode (USA only)
Setting station selection mode
(radio)
Selecting speedometer display
mode
Setting time (minutes)
Setting locator lighting
Setting automatic locking
Selecting standard display
Selecting time display mode
Exterior lamps delayed
switch-off
Tire inflation pressure display
Selecting language
Interior lighting delayed
switch-off
Page 130 of 409

129 Controls in detail
Control system
Instrument cluster submenu
Access the
Inst. cluster
submenu via
the
Settings
menu. Use the
Inst. clus-
ter
submenu to change the instrument
cluster display settings.
The following functions are available:Selecting temperature display mode
�
Move the selection marker with button
æ or ç to the
Inst. cluster
submenu.
�
Press button j or k repeatedly
until you see this message in the left
display:
Temp. indicator
.
The selection marker is on the current
setting.
�
Press button æ or ç to set tem-
perature unit to degrees Celsius (
°C) or
degrees Fahrenheit (
°F).Selecting the speedometer display
�
Move the selection marker with button
æ or ç to the
Inst. cluster
submenu.
�
Press button j or k repeatedly
until you see this message in the left
display:
Speedometer
.
The selection marker is on the current
setting.
�
Press button æ or ç to set the
speedometer units to
Kilometres
or
Miles
.
Function
Page
Selecting the temperature dis-
play
129
Selecting the speedometer dis-
play
129
Selecting the standard display
130
Selecting the language
130
Page 131 of 409
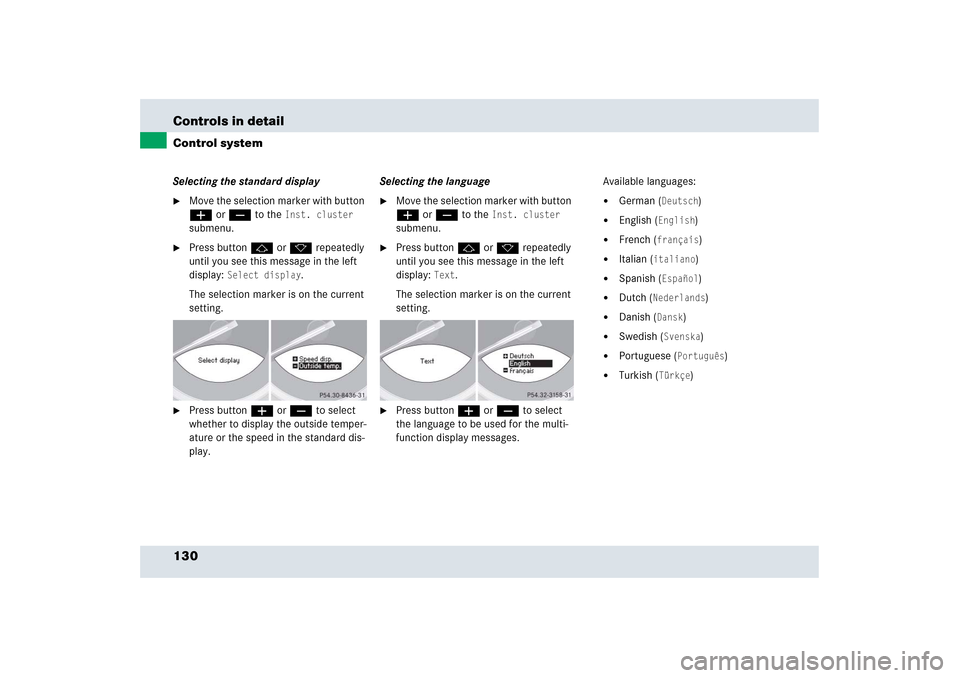
130 Controls in detailControl systemSelecting the standard display�
Move the selection marker with button
æ or ç to the
Inst. cluster
submenu.
�
Press button j or k repeatedly
until you see this message in the left
display:
Select display
.
The selection marker is on the current
setting.
�
Press button æ or ç to select
whether to display the outside temper-
ature or the speed in the standard dis-
play. Selecting the language
�
Move the selection marker with button
æ or ç to the
Inst. cluster
submenu.
�
Press button j or k repeatedly
until you see this message in the left
display:
Text
.
The selection marker is on the current
setting.
�
Press button æ or ç to select
the language to be used for the multi-
function display messages. Available languages:
�
German (
Deutsch
)
�
English (
English
)
�
French (
français
)
�
Italian (
italiano
)
�
Spanish (
Español
)
�
Dutch (
Nederlands
)
�
Danish (
Dansk
)
�
Swedish (
Svenska
)
�
Portuguese (
Português
)
�
Turkish (
Türkçe
)
Page 132 of 409
131 Controls in detail
Control system
Time submenu
Access the
Time
submenu via the
Settings
menu. Use the
Time
submenu to change
the time settings.
The following functions are available:Setting time (hours)
�
Move the selection marker with button
æ orç to the
Time
submenu.
�
Press buttonj ork repeatedly
until this message appears in the left
display:
Set time Hours
.
The selection marker is on the hour
setting.
�
Press buttonæ orç to set the
hour.Setting time (minutes)
�
Move the selection marker with button
æ orç to the
Time
submenu.
�
Press buttonj ork repeatedly
until this message appears in the left
display:
Set time Minutes
.
The selection marker is on the minute
setting.
�
Press buttonæ orç to set the
minutes.
Function
Page
Setting time (hours)
131
Setting time (minutes)
131
Selecting time display
132
Page 133 of 409

132 Controls in detailControl systemSelecting time display�
Move the selection marker with button
æ or ç to the
Time
submenu.
�
Press button j or k repeatedly
until you see this message in the left
display:
Clock
.
The selection marker is on the current
setting.
�
Press button æ or ç to set the 12-hour
or
24-hour
time display mode.Lighting submenu
Access the
Lighting
submenu via the
Settings
menu. Use the
Lighting
sub-
menu to change the lamp and lighting set-
tings on your vehicle.
The following functions are available:Setting daytime running lamp mode
(USA only)
�
Move the selection marker with button
æ or ç to the
Lighting
sub-
menu.
�
Press button j or k repeatedly
until you see this message in the left
display:
Light circuit Headlamp
mode
.
The selection marker is on the current
setting.
Function
Page
Setting daytime running lamp
mode (USA only)
132
Setting locator lighting
133
Setting night security illumina-
tion (Headlamps delayed
switch-off)
134
Interior lighting delayed
switch-off
135
iThis function is not available in
countries where the daytime running
lamp mode is mandatory and therefore
in a constant mode.
Page 134 of 409
 or daytime
running lamp mode (
Constant
)
activated.
With daytime running lamp mode activated
and")
133 Controls in detail
Control system
�
Press buttonæ orç to select
manual operation (
Manual
) or daytime
running lamp mode (
Constant
)
activated.
With daytime running lamp mode activated
and the exterior lamp switch in
positionM orU, the low beam
headlamps are switched on when the
engine is running.
In low ambient light conditions the
following lamps will switch on additionally:
�
Parking lamps
�
Tail lamps
�
License plate lamps
�
Side marker lampsFor more information on the daytime
running lamp mode, see “Daytime running
lamp mode” (
�page 107).Setting locator lighting
With the locator lighting feature activated
and the exterior lamp switch in
positionU, the following lamps will
switch on during darkness when the vehi-
cle is unlocked with the SmartKey:
�
Parking lamps
�
Tail lamps
�
License plate lamps
�
Side marker lamps
�
Front fog lamps
The locator lighting switches off when the
driver’s door is opened.
If you do not open a door after unlocking
the vehicle with the SmartKey the lamps
will switch off automatically after approxi-
mately 40 seconds.
iIf you turn the exterior lamp switch to
another position, the corresponding
lamp(s) will switch on.
For safety reasons, resetting the Lighting
submenu to factory settings
(
�page 127) will not reset the daytime
running lamp mode.
The following message appears in the
right display:
Cannot be fully reset
to factory settings when driving
.
Page 135 of 409

134 Controls in detailControl system�
Move the selection marker with button
æ or ç to the
Lighting
sub-
menu.
�
Press button j or k repeatedly
until you see this message in the left
display:
Locator lighting
.
The selection marker is on the current
setting.
�
Press button æ or ç to switch
the locator lighting function
On.
�
Turn the exterior lamp switch to
positionU when exiting the vehicle
(�page 105).
The locator lighting feature is
activated.Setting night security illumination
(Headlamps delayed switch-off)
Use this function to set whether or not the
exterior lamps to illuminate during dark-
ness after exiting the vehicle and all doors
closed.
With the delayed shut-off feature activated
and the exterior lamp switch in
positionU before the engine is turned
off, the following lamps will switch on
when the engine is turned off and remain
lit for approximately 15 seconds:
�
Parking lamps
�
Tail lamps
�
License plate lamps
�
Side marker lamps
�
Front fog lamps
If after turning off the engine you do not
open a door or do not close an opened
door, the lamps will automatically switch
off after 60 seconds.
�
Move the selection marker with button
æ or ç to the
Lighting
sub-
menu.
�
Press button j or k repeatedly
until you see this message in the left
display:
Headlamps delayed
switch-off
.
The selection marker is on the current
setting.
�
Press button æ or ç to switch
the function
On or
Off
.
iYou can reactivate this function within
10 minutes by opening a door.
Page 136 of 409
.
The headlamps delayed switch-off
feature is activated.
You can tempor")
135 Controls in detail
Control system
�
Turn the exterior lamp switch to
positionU before turning off the en-
gine (
�page 105).
The headlamps delayed switch-off
feature is activated.
You can temporarily deactivate the de-
layed switch-off feature:
�
Before leaving the vehicle turn the
SmartKey in the starter switch to
position0.
�
Then turn it to position2 and back
to0.
The delayed switch-off feature is deac-
tivated. It will reactivate as soon as you
reinsert the SmartKey in the starter
switch.Interior lighting delayed switch-off
Use this function to set whether or not the
interior lighting to remain lit during dark-
ness for approximately 10 seconds after
the SmartKey is removed from the starter
switch.
�
Move the selection marker with button
æ or ç to the
Lighting
sub-
menu.
�
Press button j or k repeatedly
until you see this message in the left
display:
Int. lighting delayed
switch-off
.
The selection marker is on the current
setting.
�
Press button æ or ç to switch
the function
On or
Off
.