Page 389 of 480

388 Practical hintsLocking/unlocking in an emergency1Locking�
Insert the mechanical key into the driv-
er’s door lock until it stops.
�
Turn the mechanical key clockwise to
position1.
The driver’s door is locked.
Lowering the load assist manually
If the load assist feature does not fully low-
er the retractable hardtop into the trunk
compartment and you are unable to close
the trunk lid, follow the instructions below.
1Hex-socket wrench
2Locking screw�
Remove the trunk floor from the trunk.
�
Lift up the lid located at the lower left
side of the trunk.
�
Have a second person lift and hold the
retracted hardtop.
�
Using the hex-socket wrench provided
in the vehicle tool kit, carefully turn the
locking screw 2 approximately one
quarter of a turn.
�
Hook luggage cover into holders
(�page 196).
�
Let go of the hardtop.
It should gradually lower into the trunk.
�
When top is completely lowered, return
locking screw 2 to its original posi-
tion.
�
Close the lid.
�
Replace the trunk floor.
�
Visit an authorized Mercedes-Benz
Center as soon as possible.!Do not overtighten the screw.
��
Page 390 of 480

389 Practical hints
Replacing SmartKey batteries
�Replacing SmartKey batteries
If the batteries in the SmartKey or the
SmartKey with KEYLESS-GO* are dis-
charged, the vehicle can no longer be
locked or unlocked. It is recommended to
have the batteries replaced at an autho-
rized Mercedes-Benz Center.
Batteries contain materials that can harm
the environment if disposed of improperly.
Recycling of batteries is the preferred
method of disposal. Many states require
sellers of batteries to accept old batteries
for recycling.
SmartKey
Replacement batteries: Lithium, type
CR 2025 or equivalent.�
Remove mechanical key1
(�page 385).
1Mechanical key
2Slide
3Battery compartment
�
Insert mechanical key1in direction
of arrow into side opening.
�
Using mechanical key1, push gray
slide2to unlatch battery compart-
ment 3.
�
Pull battery compartment3out of the
housing in direction of arrow.
�
Remove the batteries in direction of ar-
row.
4Battery
5Contact spring
�
Using a lint-free cloth, insert new bat-
teries 4 under contact spring 5 with
the positive terminal (+) facing up.
�
Return battery compartment 3 into
housing until it locks into place.
�
Slide mechanical key 1 back into the
SmartKey.
�
Check the operation of the SmartKey.
Warning!
G
Keep the batteries out of reach of children.
If a battery is swallowed, seek medical help
immediately.iWhen inserting batteries, make sure
they are clean and free of lint.
Page 391 of 480
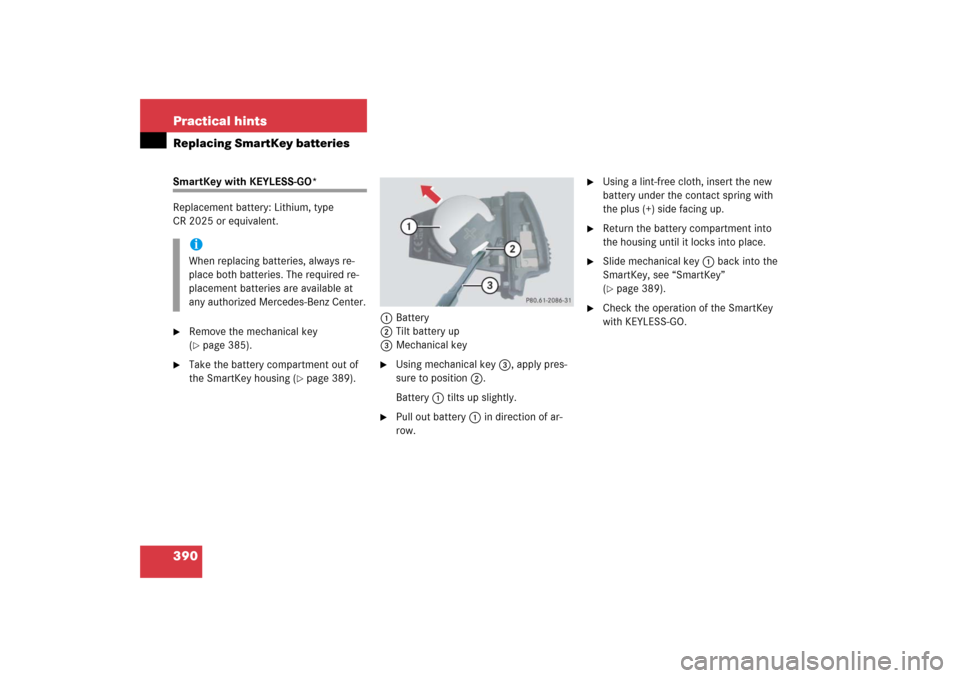
390 Practical hintsReplacing SmartKey batteriesSmartKey with KEYLESS-GO*
Replacement battery: Lithium, type
CR 2025 or equivalent.�
Remove the mechanical key
(�page 385).
�
Take the battery compartment out of
the SmartKey housing (
�page 389).1Battery
2Tilt battery up
3Mechanical key
�
Using mechanical key3, apply pres-
sure to position 2.
Battery 1 tilts up slightly.
�
Pull out battery 1 in direction of ar-
row.
�
Using a lint-free cloth, insert the new
battery under the contact spring with
the plus (+) side facing up.
�
Return the battery compartment into
the housing until it locks into place.
�
Slide mechanical key 1 back into the
SmartKey, see “SmartKey”
(�page 389).
�
Check the operation of the SmartKey
with KEYLESS-GO.
iWhen replacing batteries, always re-
place both batteries. The required re-
placement batteries are available at
any authorized Mercedes-Benz Center.
Page 392 of 480
391 Practical hints
Replacing bulbs
�Replacing bulbs
Bulbs
Safe vehicle operation depends on proper
exterior lighting and signaling. It is there-
fore essential that all bulbs and lamp as-
semblies are in good working order at all
times.
Correct headlamp adjustment is extremely
important. Have headlamps checked and
readjusted at regular intervals and when a
bulb has been replaced. See an authorized
Mercedes-Benz Center for headlamp ad-
justment.
iIf the headlamps or front fog lamps are
fogged up on the inside as a result of
high humidity, driving the vehicle a dis-
tance with the lights on should clear up
the fogging.
iSubstitute bulbs will be brought into
use when the following lamps malfunc-
tion:�
Turn signal lamps
�
Brake lamps
�
Parking lamps
�
Tail lamps
Observe the messages in the multi-
function display (
�page 345).
Page 395 of 480

394 Practical hintsReplacing bulbsReplacing bulbs for front lamps
Before you start to replace a bulb for a
front lamp, do the following first:�
Turn the exterior lamp switch to posi-
tion M (
�page 123).
�
Open the hood (
�page 272).
1Bulb socket for turn signal lamp
2High beam headlamp cover
3Low beam headlamp cover (Xenon or
Bi-Xenon* lamp). Do not remove.4High beam bulbs
5Locking mechanism
6Parking and standing lampsFront turn signal bulb
�
Turn bulb socket 1 counterclockwise
and pull it out.
�
Push the bulb into socket 1, turn
socket 1 counterclockwise and re-
move it.
�
Insert the new bulb in socket 1, push
and turn bulb socket 1 clockwise.
�
Reinsert bulb socket 1 in lamp and
turn bulb socket 1 clockwise.
Warning!
G
Do not remove the cover for the Xenon or
Bi-Xenon* headlamp. Because of high volt-
age in Xenon and Bi-Xenon* lamps, it is dan-
gerous to replace the bulb or repair the lamp
and its components. We recommend that
you have such work done by a qualified
technician.
Page 397 of 480
396 Practical hintsReplacing bulbsReplacing bulbs for rear lamps
Before you start to replace a bulb for a rear
lamp, do the following first:�
Turn the exterior lamp switch to posi-
tion M (
�page 123).
�
Open the trunk (
�page 108).
Tail lamp unit
1Backup lamp
2Turn signal lamp
3Driver’s side: Rear fog lamp
Passenger’s side: Substitute lamp
�
Fold the trim to the side and remove it.
�
Turn the bulb socket counterclockwise
and pull it out.
�
Gently push the bulb into the socket,
turn it counterclockwise and remove it.
�
Insert the new bulb and reinstall the
bulb socket.
The bulb socket should audibly click
into place.
�
Reinstall the trim.License plate lamp
1Screws
�
Loosen both screws 1.
�
Remove the license plate lamp.
�
Replace the bulb.
�
Reinstall the license plate lamp.
�
Retighten screws 1.
Page 398 of 480
.
�
Wi")
397 Practical hints
Replacing wiper blades
�Replacing wiper blades
Removing wiper blades�
Turn SmartKey in starter switch to
position1.
�
Turn combination switch to wiper
settingII (
�page 54).
�
With wiper arms in the vertical position,
turn SmartKey in starter switch to
position0.
!Never open the hood when the wiper
arms are folded forward.
Hold on to the wiper when folding the
wiper arm back. If released, the force
of the impact from the tensioning
spring could crack the windshield.
Do not allow the wiper arms to contact
the windshield glass without a wiper
blade inserted.
Make sure the wiper blades are proper-
ly installed. Improperly installed wiper
blades may cause windshield damage.
For your convenience, we recommend
that you have this work carried out by
an authorized Mercedes-Benz Center.
!To avoid damage to the hood, the wiper
arms should only be folded forward
when in the vertical position.
Warning!
G
For safety reasons, switch off wipers and re-
move SmartKey from starter switch (vehi-
cles with KEYLESS-GO*: Make sure the
vehicle’s on-board electronics have
status0) before replacing a wiper blade.
Otherwise the wiper motor could suddenly
turn on and cause injury.
��
Page 400 of 480

399 Practical hints
Flat tire
�Flat tire
Your SL 55 AMG with Performance
Package* and SL 65 AMG are equipped
with a TIREFIT kit.Preparing the vehicle�
Park the vehicle in a safe distance from
moving traffic on a hard, flat surface
when possible.
�
Turn on the hazard warning flashers.
�
Turn the steering wheel so that the
front wheels are in a straight ahead po-
sition.
�
Set the parking brake.
�
Move the gear selector lever to P.
Vehicles with SmartKey:
�
Turn off the engine (
�page 60).
�
Remove the SmartKey from the starter
switch.Vehicles with KEYLESS-GO*:
�
Turn off the engine by pressing the
KEYLESS-GO* button on the gear se-
lector lever once (
�page 60).
�
Open the driver’s door (this puts the
starter switch in position 0, same as
with the SmartKey removed from the
starter switch). The driver’s door then
can be closed again.
�
Have any passenger exit the vehicle at
a safe distance from the roadway.
Sealing tires with TIREFIT
Small tire punctures, particularly those in
the tread, can be sealed with TIREFIT.
TIREFIT can be used in ambient tempera-
tures down to -4°F (-20°C).
iOpen door only when conditions are
safe to do so.
iSL 55 AMG with Performance
Package* and SL 65 AMG only.Warning!
G
Keep TIREFIT away from sparks, open flame
or heat source.
Do not smoke.