Page 202 of 417

201 Controls in detail
Useful features
FloormatsTelephone*
Radio transmitters, such as a portable tele-
phone or a citizens band unit, should only
be used inside the vehicle if they are con-
nected to an antenna that is installed on
the outside of the vehicle.
The external antenna must be approved by
Mercedes-Benz. Please contact an autho-
rized Mercedes-Benz Light Truck Center
for information on the installation of an ap-
proved external antenna. Refer to the radio
transmitter operation instructions regard-
ing use of an external antenna.
Warning!G
Whenever you are using floormats, make
sure there is enough clearance and the
floormats are securely fastened.
Floormats should always be securely fas-
tened using the eyelets and retainer pins.
Before driving off, check that the floormats
are securely in place and adjust them if nec-
essary. A loose floormat could slip and
hinder proper functioning of the pedals.
Do not place several floormats on top of
each other as this may impair pedal move-
ment.
Warning!G
Never operate radio transmitters equipped
with a built-in or attached antenna (i.e. with-
out being connected to an external antenna)
from inside the vehicle while the engine is
running. Doing so could lead to a malfunc-
tion of the vehicle’s electronic system, pos-
sibly resulting in an accident and/or
personal injury.
Warning!G
Please do not forget that your primary re-
sponsibility is to drive the vehicle. A driver’s
attention to the road must always be
his /her primary focus when driving. For
your safety and the safety of others, we rec-
ommend that you pull over to a safe location
and stop before placing or taking a tele-
phone call.
If you choose to use the telephone
1 while
driving, please use the hands-free device
and only use the telephone when road, traf-
fic and weather conditions permit. Some ju-
risdictions prohibit the driver from using a
cellular telephone while driving a vehicle.
Only operate the COMAND (Cockpit
Management and Data System)
1 if road,
traffic and weather conditions permit.
Bear in mind that at a speed of just 30 mph
(approximately 50 km / h), your vehicle is
covering a distance of 44 feet
(approximately 14 m) every second.
1Observe all legal requirements.
Page 228 of 417

227 Operation
Driving instructions
Passenger compartment
Off-road driving
Warning!G
Always fasten items being carried as secure-
ly as possible.
In an accident, during hard braking or sud-
den maneuvers, loose items will be thrown
around inside the vehicle, and cause injury
to vehicle occupants unless the items are
securely fastened in the vehicle.
The rear cargo compartment is the preferred
place to carry objects. Always use partition
net when transporting cargo. Partition net
cannot secure hard or heavy objects. Al-
ways fasten items being carried as securely
as possible using the cargo tie-down rings in
the cargo compartment floor and fastening
material.
Do not load items on the roof. It may cause
instability during some maneuvers which
could result in an accident. This vehicle is
not intended to carry items on its roof. Thus
roof rails and roof mounted ski or bike hold-
ers must not be used.
Warning!G
Do not load items on the roof. It may cause
instability during some maneuvers which
could result in an accident.
Warning!G
Drive slowly in unknown terrain. This will
make it easier to recognize unexpected ob-
stacles and avoid damage to the vehicle.
To help avoid the vehicle rolling over, never
turn it around on steep inclines. If the vehi-
cle cannot complete the attempted climb,
back it down in reverse gear.
Do not drive along the side of a slope (dan-
ger of vehicle rollover). If in doing so the ve-
hicle begins to show a tendency to roll,
immediately steer into a line of gravity
(straight up or downhill).
��
Page 229 of 417

228 Operation
Driving instructions
Read this chapter carefully before you be-
gin off-road travel.
Familiarize yourself with the vehicle char-
acteristics and gear changing before you
attempt any difficult terrain off-road driv-
ing. We recommend that you start out with
easy off-road travel.Special driving features for off-road
driving
The following driving features are available
for specific kind of operation:
�ABS (�page 80)
�ESP (�page 84)
�4-ETS (�page 83)
�Differential lock (�page 159)
�Transfer case (�page 157)
Off-road driving rules
�Engage the transfer case in position
LOW before driving under off-road con-
ditions (
�page 157).
�If necessary activate differential locks
(
�page 161).
The ABS, BAS and ESP are switched off
automatically when the differential
locks are activated.
�Fasten items being carried as securely
as possible (
�page 192).
Never let the vehicle roll backwards in idle.
You may lose control of the vehicle if you
use only the brake.
Sand, dirt, mud and other material having
friction property can cause exceptional wear
and tear as well as brake failure.
Have the brakes checked for dirt build-up
and cleaned. There is otherwise a risk that
full braking power may not be available in an
emergency.i
Whenever driving in off-road mode, we
recommend:
�Keeping doors, tailgate, windows
and tilt/sliding sunroof closed.
�Switching cruise control off.
!
Observe the following during off-road
driving:
�Adjust vehicle speed to condition of
terrain. The more uneven, rutty, and
steeper the terrain, the lower the
speed should be. Drive through wa-
ter slowly at an even speed, avoid-
ing a bow wave.
�Be especially careful when driving
in unknown territory. It may be nec-
essary to get out of the vehicle and
scout the path you intend to take.
�Watch out for obstacles, such as
rocks, holes, tree stumps, and ruts.
��
Page 326 of 417
325 Practical hints
Where will I find...?
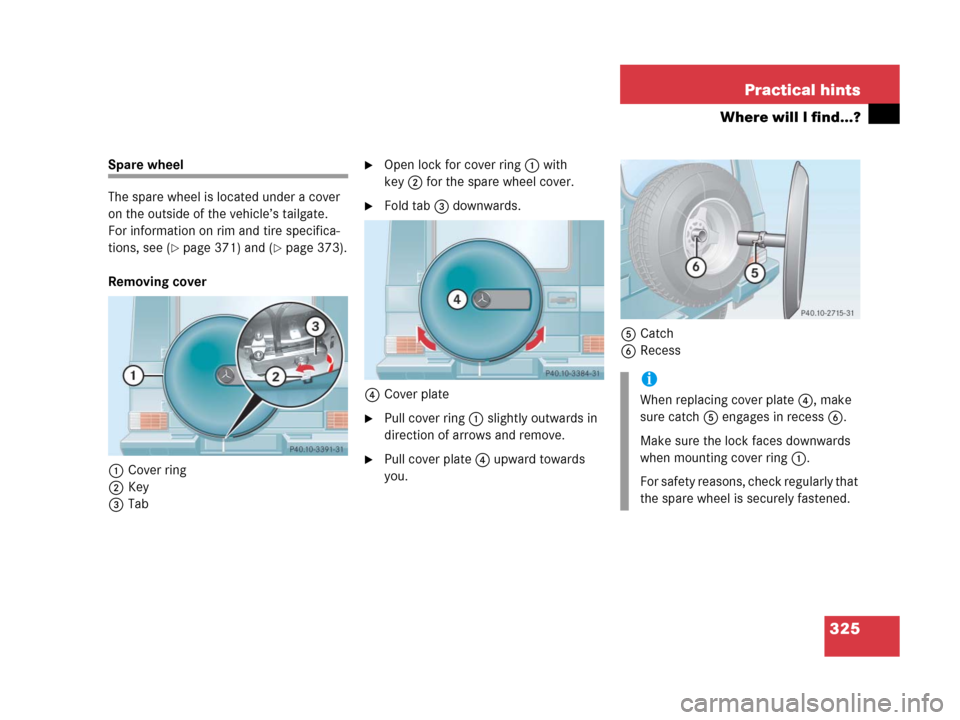
Spare wheel
The spare wheel is located under a cover
on the outside of the vehicle’s tailgate.
For information on rim and tire specifica-
tions, see (
�page 371) and (�page 373).
Removing cover
1Cover ring
2Key
3Tab
�Open lock for cover ring1 with
key2 for the spare wheel cover.
�Fold tab3 downwards.
4Cover plate
�Pull cover ring1 slightly outwards in
direction of arrows and remove.
�Pull cover plate4 upward towards
you.5Catch
6Recess
i
When replacing cover plate4, make
sure catch5 engages in recess6.
Make sure the lock faces downwards
when mounting cover ring1.
For safety reasons, check regularly that
the spare wheel is securely fastened.
Page 327 of 417
326 Practical hints
Where will I find...?
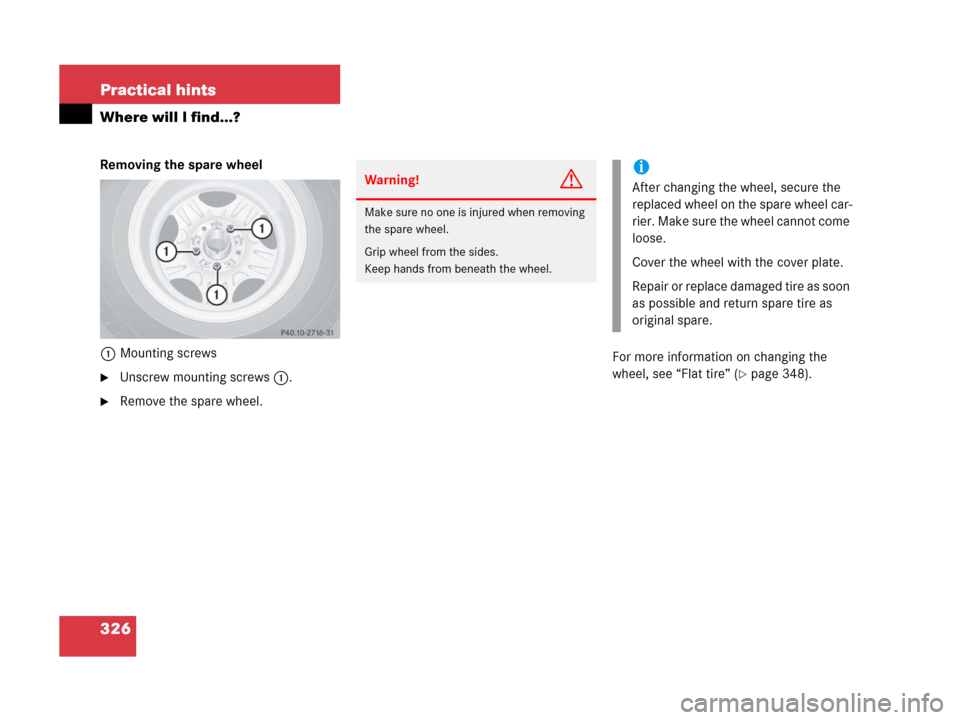
Removing the spare wheel
1Mounting screws
�Unscrew mounting screws1.
�Remove the spare wheel.For more information on changing the
wheel, see “Flat tire” (
�page 348).
Warning!G
Make sure no one is injured when removing
the spare wheel.
Grip wheel from the sides.
Keep hands from beneath the wheel.
i
After changing the wheel, secure the
replaced wheel on the spare wheel car-
rier. Make sure the wheel cannot come
loose.
Cover the wheel with the cover plate.
Repair or replace damaged tire as soon
as possible and return spare tire as
original spare.
Page 333 of 417
332 Practical hints
Brush guard*
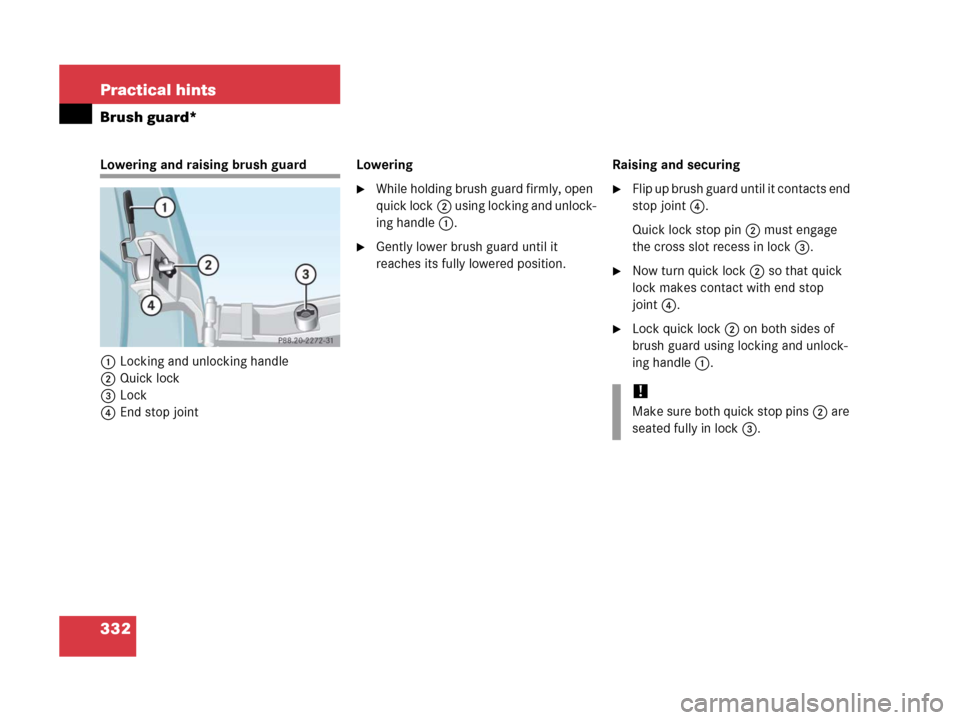
Lowering and raising brush guard
1Locking and unlocking handle
2Quick lock
3Lock
4End stop jointLowering
�While holding brush guard firmly, open
quick lock2 using locking and unlock-
ing handle1.
�Gently lower brush guard until it
reaches its fully lowered position.Raising and securing
�Flip up brush guard until it contacts end
stop joint4.
Quick lock stop pin2 must engage
the cross slot recess in lock3.
�Now turn quick lock2 so that quick
lock makes contact with end stop
joint4.
�Lock quick lock2 on both sides of
brush guard using locking and unlock-
ing handle1.
!
Make sure both quick stop pins2 are
seated fully in lock3.
Page 339 of 417
338 Practical hints
Replacing bulbs
Replacing bulbs for front lamps
Before you start to replace a bulb for a
front lamp, do the following first:
�Turn the exterior lamp switch to
positionM (
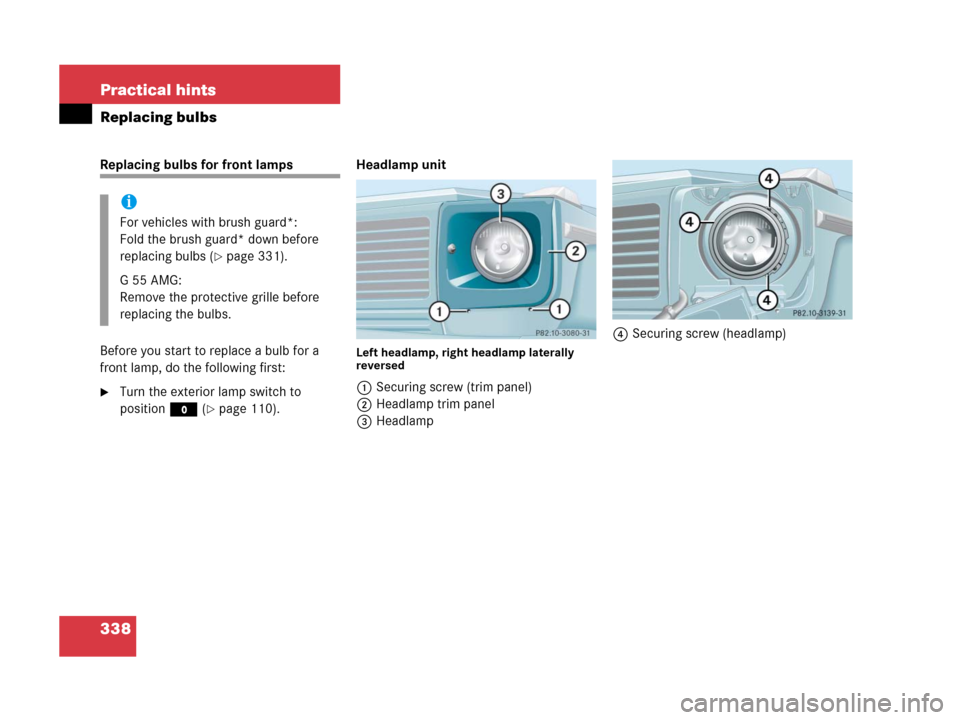
�page 110).Headlamp unit
Left headlamp, right headlamp laterally
reversed
1Securing screw (trim panel)
2Headlamp trim panel
3Headlamp4Securing screw (headlamp)
i
For vehicles with brush guard*:
Fold the brush guard* down before
replacing bulbs (
�page 331).
G55AMG:
Remove the protective grille before
replacing the bulbs.
Page 340 of 417
339 Practical hints
Replacing bulbs
Removing
�Loosen and remove securing
screws1.
�Remove headlamp trim panel2 and
seal.
�Loosen and remove headlamp-securing
screws4.
�Remove headlamp3.
Installing
�Insert headlamp3 and install and
tighten headlamp-securing screws4.
�Install headlamp trim panel2 and
seal.
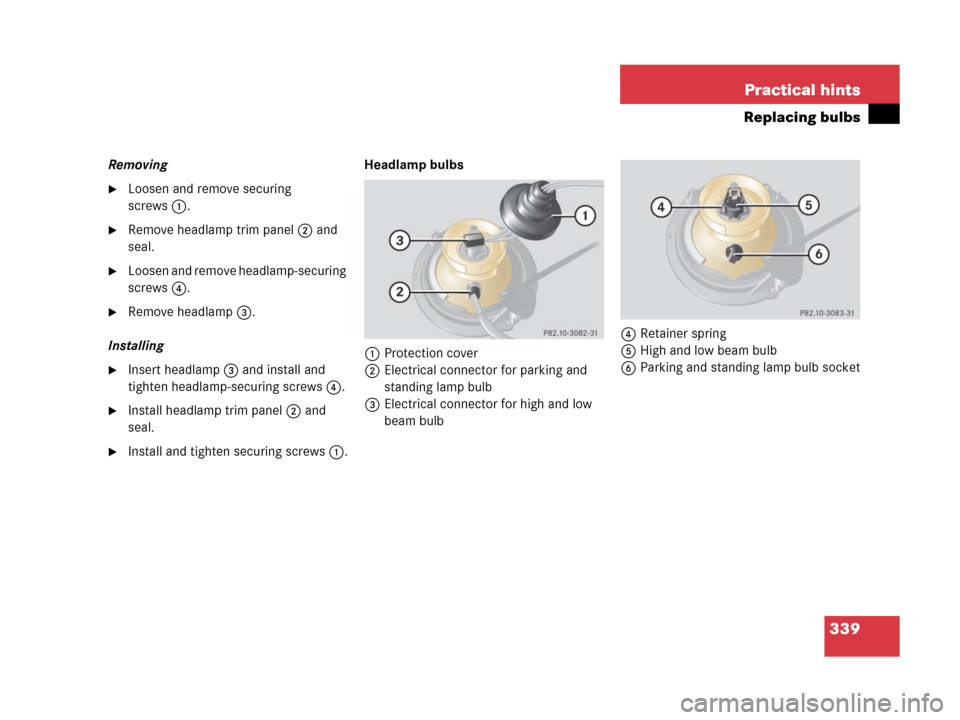
�Install and tighten securing screws1.Headlamp bulbs
1Protection cover
2Electrical connector for parking and
standing lamp bulb
3Electrical connector for high and low
beam bulb4Retainer spring
5High and low beam bulb
6Parking and standing lamp bulb socket