Page 31 of 417
30 At a glance
Overhead control panel
ItemPage
1Tele Aid (emergency call
system)202
2Cargo compartment lamps118
3Right front reading lamp116
4Power tilt/sliding sunroof178
5Interior rear view mirror 41
ItemPage
6Signal transmitter buttons
for garage door opener210
7Indicator lamp for garage
door opener210
8Interior lighting control116
9Left front reading lamp116
Page 43 of 417

42 Getting started
Adjusting
The buttons are located above the exterior
lamp switch.
1Adjustment button
2Driver’s side exterior rear view mirror
3Passenger-side exterior rear view
mirror�Switch on the ignition (�page 35).
�Press switch2 or3 to select the
respective exterior rear view mirror.
�Push adjustment button1 up, down,
left, or right according to the desired
setting.
For more information, see “Storing exterior
rear view mirror parking position”
(
�page 109).
!
If an exterior rear view mirror housing
is forcibly pushed forward (hit from the
rear) or rearward (hit from the front),
reposition it by applying firm pressure
until it snaps into place. The exterior
rear view mirror housing is now proper-
ly positioned and you can adjust the
mirror normally.
i
At low ambient temperatures, the exte-
rior rear view mirrors will be heated au-
tomatically.
i
The memory function (�page 107) lets
you store the setting for the exterior
rear view mirrors together with the set-
tings for the steering wheel and the
seat position.
Page 95 of 417

94 Controls in detail
Locking and unlocking
Factory setting
Global unlocking
�Press buttonŒ.
All turn signal lamps flash once. The
locking knobs on the doors move up.
The anti-theft alarm system is dis-
armed.
The vehicle will lock again automatically
within approximately 40 seconds of un-
locking if:
�neither door nor tailgate is opened
�the SmartKey is not inserted in the
starter switch
�the central locking switch is not
activatedGlobal locking
�Press button‹.
With the hood, tailgate and all doors
closed, all turn signal lamps flash three
times. The locking knobs on the doors
move down.
The anti-theft alarm system is armed.
Selective setting
If you frequently travel alone, you may wish
to reprogram the SmartKey so that
pressingŒ only unlocks the driver’s
door and the fuel filler flap.
�Press and hold buttonsŒ and‹
simultaneously for about five seconds
until battery check lamp4 blinks
twice.
The SmartKey will then function as
follows:Unlocking the driver’s door and fuel
filler flap
�Press buttonŒ once.
All turn signal lamps flash once. The
locking knobs on the doors move up.
The anti-theft alarm system is
disarmed.
Global unlocking
�Press buttonŒ twice.
All turn signal lamps flash once. The
locking knobs on the doors move up.
The anti-theft alarm system is
disarmed.
Page 96 of 417

95 Controls in detail
Locking and unlocking
Global locking
�Press button‹.
With the hood, tailgate and all doors
closed, all turn signal lamps flash three
times. The locking knobs on the doors
move down.
The anti-theft alarm system is armed.
Restoring to factory setting
�Press and hold buttonsŒ and‹
simultaneously for about six seconds
until battery check lamp4 blinks
twice.Checking the batteries
�Press button‹ orŒ.
Battery check lamp4 comes on brief-
ly to indicate that the SmartKey batter-
ies are in order.
!
If you can no longer lock or unlock the
vehicle with the SmartKey, then the
batteries in the SmartKey are dis-
charged, the SmartKey is malfunction-
ing or the vehicle battery is drained.
�Check the batteries in the
SmartKey (
�page 95) and replace
them if necessary (
�page 333).
�Use the mechanical key to unlock
the driver’s door (
�page 327).
�Have the vehicle battery and the
battery connections checked by an
authorized Mercedes-Benz Light
Truck Center (
�page 353).
�Use the mechanical key to lock the
driver’s door and the tailgate
(
�page 328).
If the SmartKey is malfunctioning, con-
tact an authorized Mercedes-Benz
Light Truck Center.
!
If battery check lamp4 does not
come on briefly during check, then the
SmartKey batteries are discharged.
Replace the batteries (
�page 333).
You can obtain the required batteries
at any authorized Mercedes-Benz Light
Truck Center.
i
If the batteries are checked within sig-
nal range of the vehicle, pressing the
button‹ orŒ will lock or unlock
the vehicle accordingly.
Page 109 of 417
108 Controls in detail
Memory function
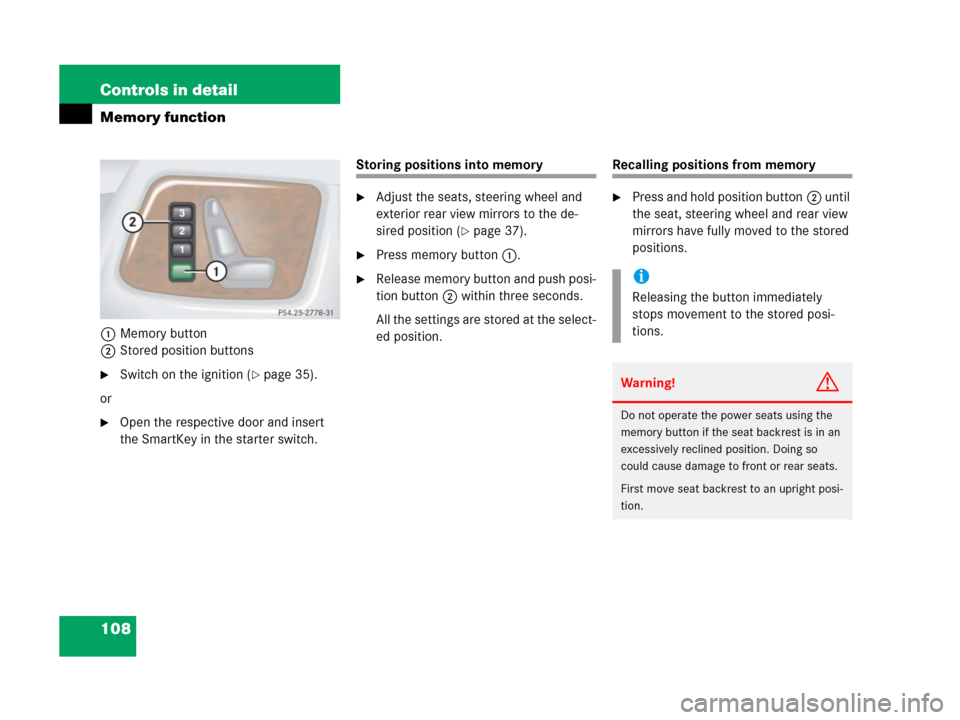
1Memory button
2Stored position buttons
�Switch on the ignition (�page 35).
or
�Open the respective door and insert
the SmartKey in the starter switch.
Storing positions into memory
�Adjust the seats, steering wheel and
exterior rear view mirrors to the de-
sired position (
�page 37).
�Press memory button1.
�Release memory button and push posi-
tion button2 within three seconds.
All the settings are stored at the select-
ed position.
Recalling positions from memory
�Press and hold position button2 until
the seat, steering wheel and rear view
mirrors have fully moved to the stored
positions.
i
Releasing the button immediately
stops movement to the stored posi-
tions.
Warning!G
Do not operate the power seats using the
memory button if the seat backrest is in an
excessively reclined position. Doing so
could cause damage to front or rear seats.
First move seat backrest to an upright posi-
tion.
Page 125 of 417
124 Controls in detail
Control system
Multifunction steering wheel
The displays in the multifunction display
and the settings in the control system are
controlled by the buttons on the multifunc-
tion steering wheel.1Multifunction display
Operating the control system:
2Selecting a submenu or setting the
volume:
Press button
æup / to increase
çdown / to decrease
3Telephone*:
Press button
sto take a call, or
to dial a call
tto end a call, or
to reject an incoming call
4Menu systems:
Press button
èfor next menu
ÿfor previous menu
5Moving within a menu:
Press button
jfor next display
kfor previous display
i
G55AMG:
The steering wheel in this vehicle may
vary from steering wheel shown.
However, multifunction steering wheel
symbols and feature description apply
to AMG vehicles as well.
Page 126 of 417

125 Controls in detail
Control system
Pressing any of the buttons on the multi-
function steering wheel will alter what is
shown in the multifunction display.
The information available in the multifunc-
tion display is arranged in menus, each
containing a number of functions or sub-
menus.
The individual functions are then found
within the relevant menu (radio or CD op-
erations under
AUDIO, for example). These
functions serve to call up relevant informa-
tion or to customize the settings for your
vehicle.It is helpful to think of the menus, and the
functions within each menu, as being ar-
ranged in a circular pattern.
�If you press buttonè orÿ
repeatedly, you will pass through each
menu one after the other.
�If you press buttonk orj
repeatedly, you will pass through each
function display, one after the other, in
the current menu.In the
SETTINGS... menu, instead of func-
tions you will find a number of submenus
for calling up and changing settings. For in-
structions on using these submenus, see
the “Settings menu” section (
�page 132).
The number of menus available in the sys-
tem depends on which optional equipment
is installed in your vehicle.
i
The headings used in the menus table
are designed to facilitate navigation
within the system and are not neces-
sarily identical to those shown in the
control system displays.
The first function displayed in each
menu will automatically show you
which part of the system you are in.
Page 148 of 417

147 Controls in detail
Control system
You can use the functions in the TEL menu
to operate your telephone, provided it is
connected to a hands-free system and
switched on.
�Switch on the telephone and COMAND.
�Press buttonÿ orè on the
steering wheel repeatedly until you see
the
TEL menu in the display.
Which messages will appear in the display
field depends on whether your telephone is
switched on or off:
�If the telephone is off, the message in
the multifunction display is:
TEL OFF.
�If the telephone is on:
The telephone will then search for a
network. During this time the display is
empty.
As soon as the telephone has found a
network,
READY is indicated in the dis-
play.
1Signal strength
This standby message indicates that your
telephone is ready for use and you can op-
erate it using the control system.Answering a call
When your telephone is ready to receive
calls, you can answer a call at any time. In
the display you will then see the message:
�Press buttons.
You have answered the call. In the dis-
play you see the length of the call.
Ending a call
�Press buttont.
You have ended the call. In the display
you will again see the standby
message.
Never operate radio transmitters equipped
with a built-in or attached antenna (i.e. with-
out being connected to an external antenna)
from inside the vehicle while the engine is
running. Doing so could lead to a malfunc-
tion of the vehicle’s electronic system, pos-
sibly resulting in an accident and/or
personal injury.
202
2Cargo compartment lamps118
3Right front reading lamp116
4Power tilt/sliding sunroof178
5Interior rear view mirror")