Page 341 of 417
340 Practical hints
Replacing bulbs
High and low beam bulb
�Remove protection cover1.
�Pull off electrical connector3.
�Unclip retainer spring4.
�Remove bulb5.
�Insert the new bulb so that its socket
locates in the recess of the lamp
housing.
�Clip on retainer spring4.
�Plug electrical connector3 onto
bulb5.
�Reinstall protection cover1.Parking and standing lamp bulb
�Pull off electrical connector2 from
bulb socket6.
�Turn bulb socket6 counterclockwise
out of the lamp housing.
�Insert a new bulb into bulb socket6.
�Insert bulb socket6 into the lamp
housing and turn clockwise until it
engages.
�Plug electrical connector2 onto bulb
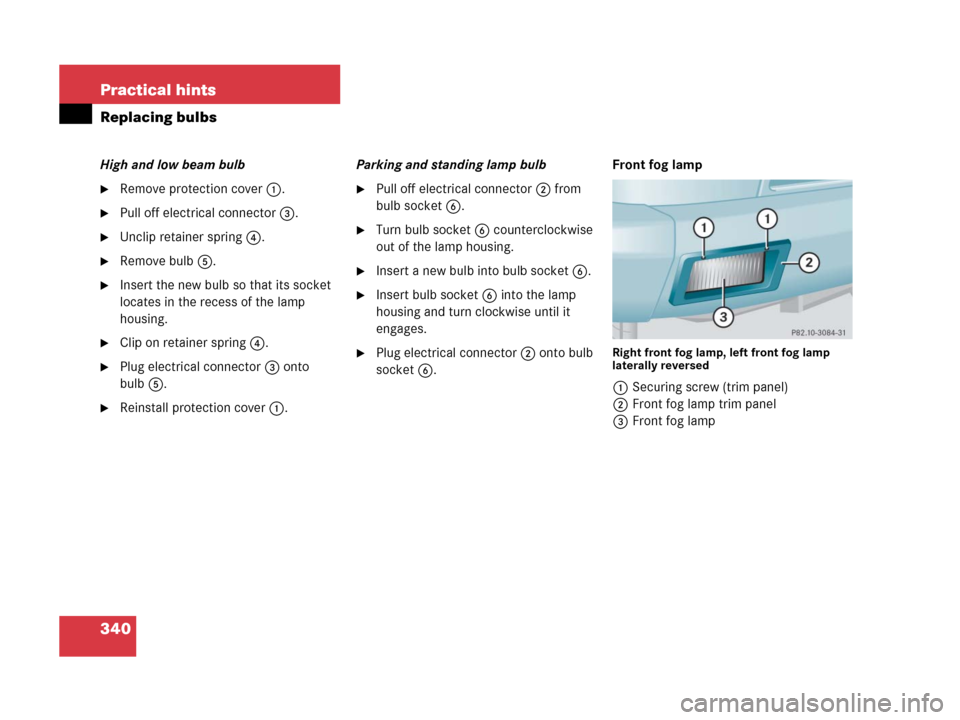
socket6.Front fog lampRight front fog lamp, left front fog lamp
laterally reversed
1Securing screw (trim panel)
2Front fog lamp trim panel
3Front fog lamp
Page 342 of 417
341 Practical hints
Replacing bulbs
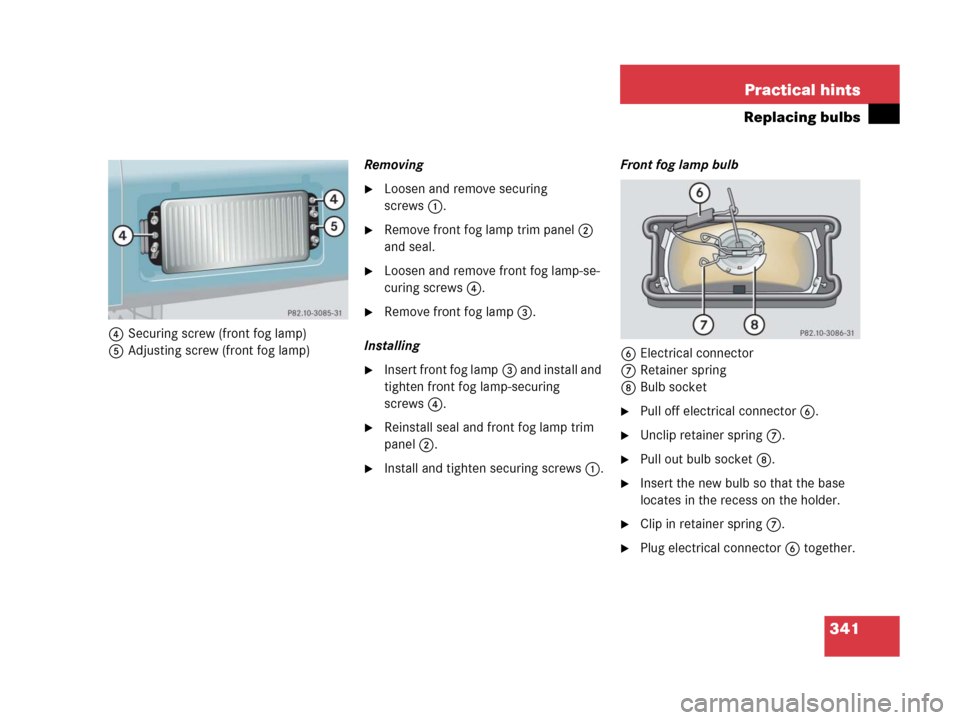
4Securing screw (front fog lamp)
5Adjusting screw (front fog lamp)Removing
�Loosen and remove securing
screws1.
�Remove front fog lamp trim panel2
and seal.
�Loosen and remove front fog lamp-se-
curing screws4.
�Remove front fog lamp3.
Installing
�Insert front fog lamp3 and install and
tighten front fog lamp-securing
screws4.
�Reinstall seal and front fog lamp trim
panel2.
�Install and tighten securing screws1.Front fog lamp bulb
6Electrical connector
7Retainer spring
8Bulb socket
�Pull off electrical connector6.
�Unclip retainer spring7.
�Pull out bulb socket8.
�Insert the new bulb so that the base
locates in the recess on the holder.
�Clip in retainer spring7.
�Plug electrical connector6 together.
Page 343 of 417
342 Practical hints
Replacing bulbs
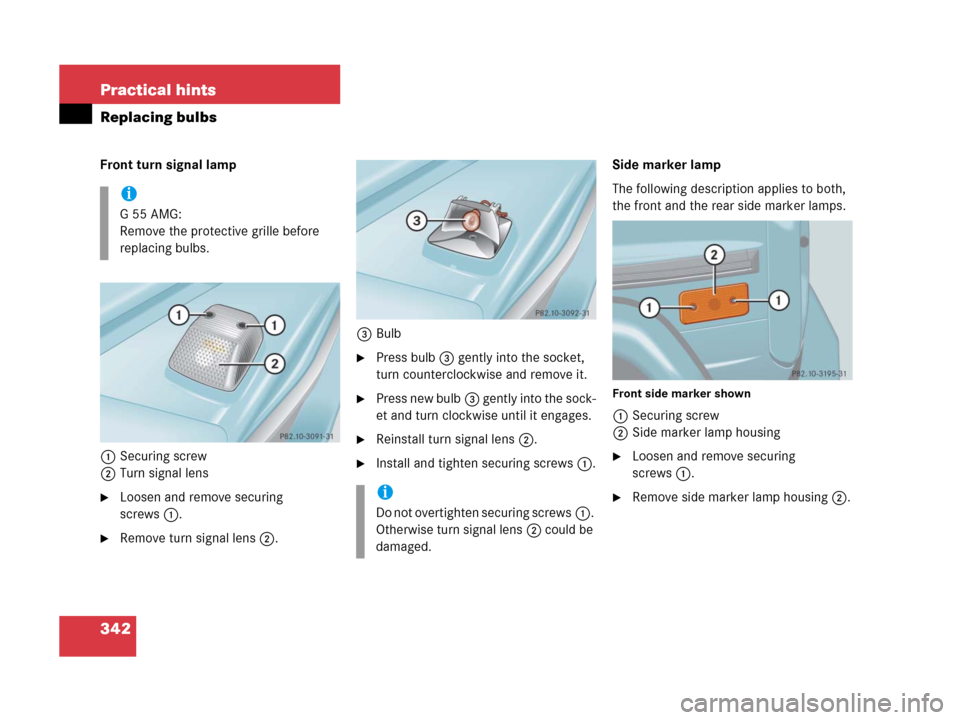
Front turn signal lamp
1Securing screw
2Turn signal lens
�Loosen and remove securing
screws1.
�Remove turn signal lens2.3Bulb
�Press bulb3 gently into the socket,
turn counterclockwise and remove it.
�Press new bulb3 gently into the sock-
et and turn clockwise until it engages.
�Reinstall turn signal lens2.
�Install and tighten securing screws1.Side marker lamp
The following description applies to both,
the front and the rear side marker lamps.
Front side marker shown
1Securing screw
2Side marker lamp housing
�Loosen and remove securing
screws1.
�Remove side marker lamp housing2.
i
G55AMG:
Remove the protective grille before
replacing bulbs.
i
Do not overtighten securing screws1.
Otherwise turn signal lens2 could be
damaged.
Page 344 of 417
343 Practical hints
Replacing bulbs
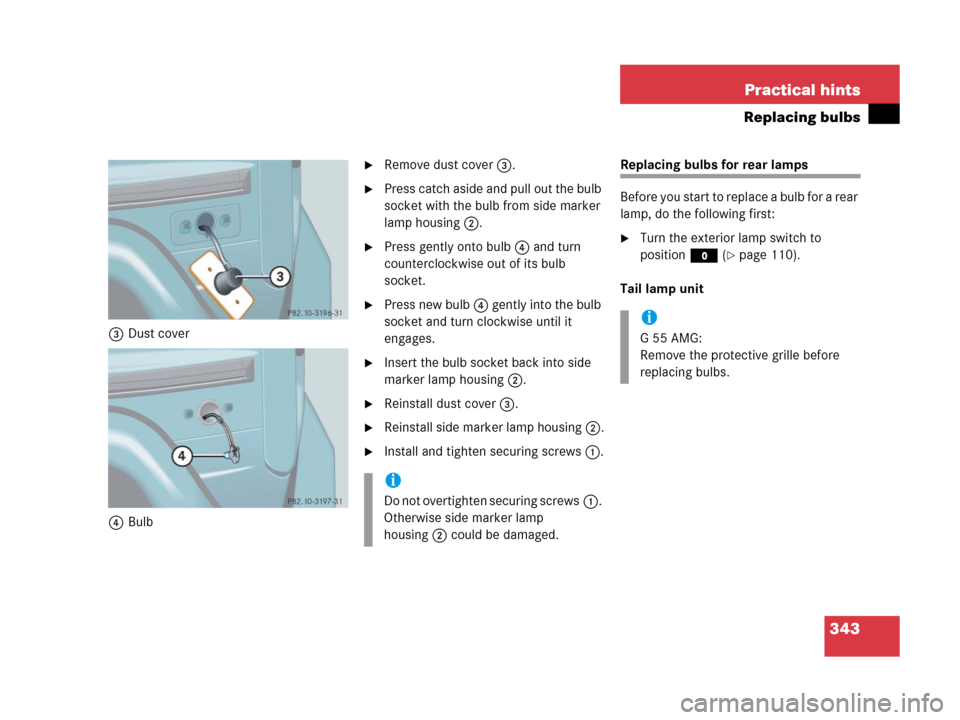
3Dust cover
4Bulb
�Remove dust cover3.
�Press catch aside and pull out the bulb
socket with the bulb from side marker
lamp housing2.
�Press gently onto bulb4 and turn
counterclockwise out of its bulb
socket.
�Press new bulb4 gently into the bulb
socket and turn clockwise until it
engages.
�Insert the bulb socket back into side
marker lamp housing2.
�Reinstall dust cover3.
�Reinstall side marker lamp housing2.
�Install and tighten securing screws1.
Replacing bulbs for rear lamps
Before you start to replace a bulb for a rear
lamp, do the following first:
�Turn the exterior lamp switch to
positionM (
�page 110).
Tail lamp unit
i
Do not overtighten securing screws1.
Otherwise side marker lamp
housing2 could be damaged.
i
G55AMG:
Remove the protective grille before
replacing bulbs.
Page 345 of 417
344 Practical hints
Replacing bulbs
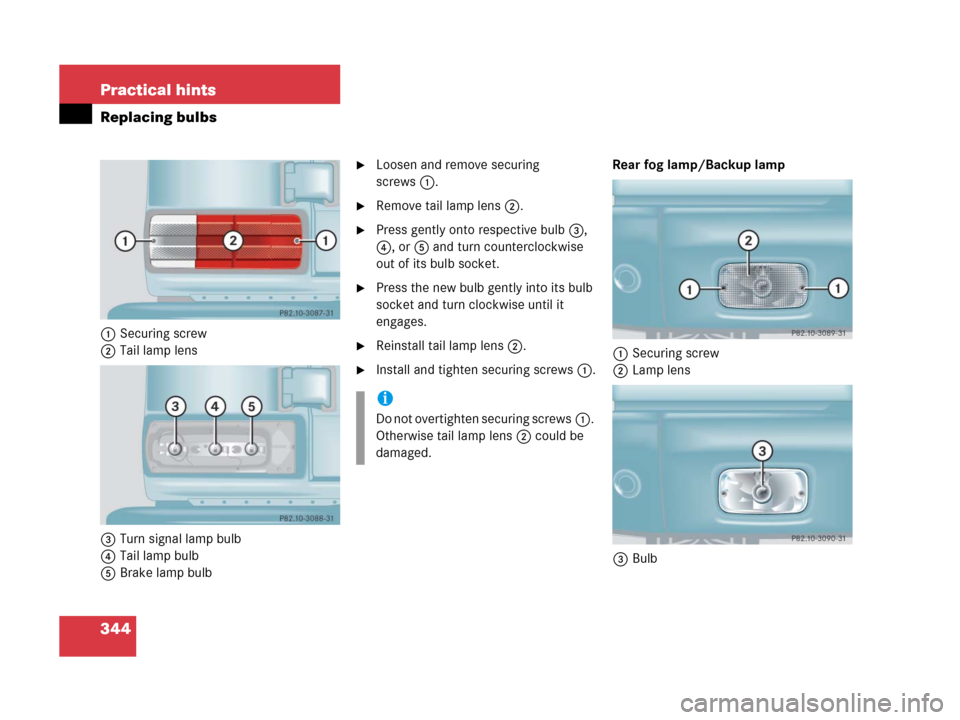
1Securing screw
2Tail lamp lens
3Turn signal lamp bulb
4Tail lamp bulb
5Brake lamp bulb
�Loosen and remove securing
screws1.
�Remove tail lamp lens2.
�Press gently onto respective bulb3,
4, or5 and turn counterclockwise
out of its bulb socket.
�Press the new bulb gently into its bulb
socket and turn clockwise until it
engages.
�Reinstall tail lamp lens2.
�Install and tighten securing screws1.Rear fog lamp/Backup lamp
1Securing screw
2Lamp lens
3Bulb
i
Do not overtighten securing screws1.
Otherwise tail lamp lens2 could be
damaged.
Page 346 of 417
345 Practical hints
Replacing bulbs
�Loosen and remove securing
screws1.
�Remove lamp lens2.
�Press gently onto bulb3 and turn
counterclockwise out of its bulb
socket.
�Press new bulb3 gently into the bulb
socket and turn clockwise until it
engages.
�Reinstall lamp lens2.
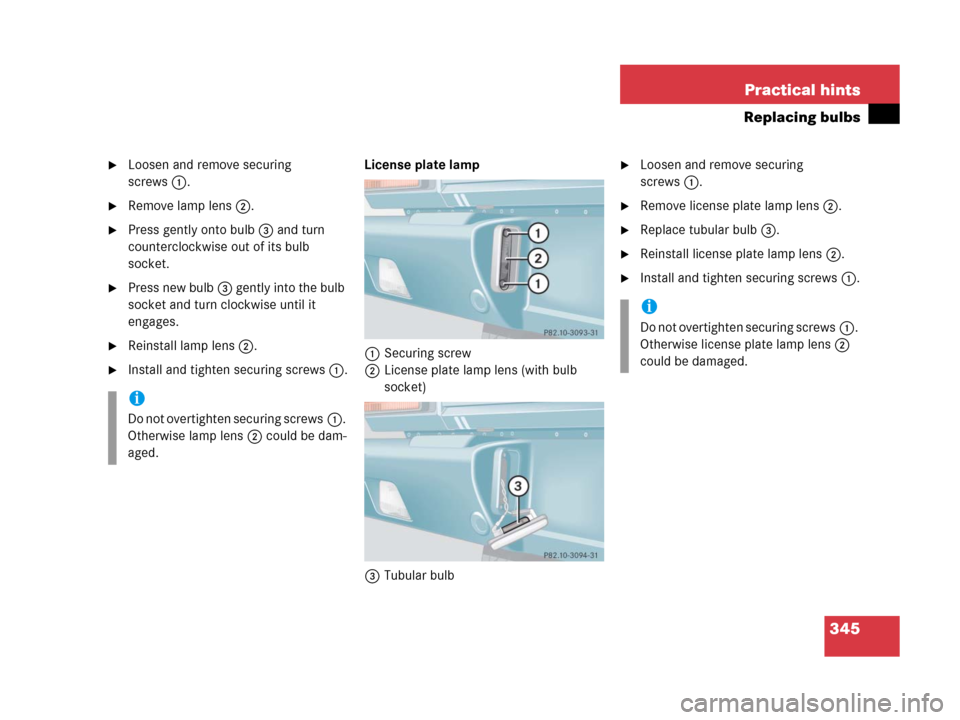
�Install and tighten securing screws1.License plate lamp
1Securing screw
2License plate lamp lens (with bulb
socket)
3Tubular bulb
�Loosen and remove securing
screws1.
�Remove license plate lamp lens2.
�Replace tubular bulb3.
�Reinstall license plate lamp lens2.
�Install and tighten securing screws1.
i
Do not overtighten securing screws1.
Otherwise lamp lens2 could be dam-
aged.
i
Do not overtighten securing screws1.
Otherwise license plate lamp lens2
could be damaged.
Page 353 of 417
.
The vehicle is resting fully on its own
weight.")
352 Practical hints
Flat tire
Lowering the vehicle
�Using the pump handle, open the low-
ering screw on the jack approximately
one turn (
�page 350).
The vehicle is resting fully on its own
weight.
�Remove the jack.
After use, disassemble pump handle
(
�page 350) and store jack in the des-
ignated storage compartment
(
�page 324).
1-5 Wheel bolts
�Tighten the five wheel bolts evenly, fol-
lowing the diagonal sequence illustrat-
ed (1 to 5), until all bolts are tight.
Observe a tightening torque of 97 lb-ft
(130 Nm).�Press the jack piston in again and close
the lowering screw. Store the jack
(
�page 324) and the other vehicle
tools (
�page 323).
�After changing the wheel, secure the
damaged wheel on the spare wheel
mounting bracket (
�page 326). Make
sure the wheel cannot come loose.
�Check the tire inflation pressure and
correct it if necessary.
A table with the tire pressure values for
your vehicle is located on the fuel filler
flap.
Warning!G
Have the tightening torque checked after
changing a wheel as soon as possible. The
wheels could come loose if they are not
tightened to a torque of 97 lb-ft (130 Nm).
Page 356 of 417
355 Practical hints
Battery
Reconnecting the battery
�Turn off all electrical consumers.
�Connect the positive lead and fasten its
cover.
�Connect the negative lead.
�Install the breather hose.
!
Never invert the terminal connections.
!
The battery, its filler caps and the vent
tube must always be securely installed
when the vehicle is in operation.
i
The following procedures must be car-
ried out following any interruption of
battery power (e.g. due to reconnec-
tion):
�Set the clock (see COMAND
operator’s manual).
�Resynchronize the front seat head
restraints and seat adjustment fore,
aft (
�page 102).
�Synchronize the ESP (�page 302).