Page 156 of 417

155 Controls in detail
Automatic transmission
One-touch gearshifting
Even with an automatic transmission, you
can change the gears manually and limit or
extend the gear range for automatic
shifting with the gear selector lever in
positionD.Downshifting
�Briefly press the gear selector lever to
the left in the D–direction.
The transmission will shift from the current
gear to the next lower gear as permitted by
the shift program. This action simulta-
neously limits the gear range of the trans-
mission (
�page 154).Upshifting
�Briefly press the gear selector lever to
the right in the D+direction.
The transmission will shift from the current
gear to the next higher gear as permitted
by the shift program. This action simulta-
neously extends the gear range of the
transmission.
Canceling gear range limit
�Press and hold the gear selector lever
in the D+direction until
Dreappears in
the multifunction display.
The transmission will shift from the current
gear range directly to gear rangeD.
Shifting into optimal gear range
�Press and hold the gear selector lever
in the D-direction.
The transmission will automatically select
the gear range suited for optimal accelera-
tion and deceleration. This will involve
shifting down one or more gears.
!
Allow engine to warm up under low
load use. Do not place full load on the
engine until the operating temperature
has been reached.
Shift into reverse gearR or parking
positionP only when the vehicle is
stopped.
Warning!G
On slippery road surfaces, never downshift
in order to obtain braking action. This could
result in drive wheel slip and reduced vehi-
cle control. Your vehicle’s ABS will not pre-
vent this type of loss of control.
i
To avoid overrevving the engine when
the gear selector lever is moved to the
D–direction, the transmission will not
shift to a lower gear if the engine’s
max. speed would be exceeded.
Page 159 of 417
 of the trans-
fer case switch.
Once the shift is complete, gear
position
H is displayed in the transfer")
158 Controls in detail
Transfer case
Switching from LOW to HIGH
�Press lower half (“HIGH”) of the trans-
fer case switch.
Once the shift is complete, gear
position
H is displayed in the transfer
case indicator.
� Put gear selector in D.Messages in the multifunction display
If a shift was not completed and the multi-
function display shows one of the following
messages:
�TC SHIFT CONDITIONS NOT FULFILLED
The shift did not take place. At least
one shift condition was not met.
�Repeat the shift procedure.
�TC IN NEUTRAL
The shift did not take place. The trans-
fer case is in neutral. The gear
position
N is displayed in transfer case
indicator1.
�Repeat the shift procedure.
�TC SHIFT – CANCELLED
The shift did not take place.
�Repeat the shift procedure.
�TRANSFER CASE – VISIT WORKSHOP!
There may be a malfunction in the
system.
�Repeat the shift procedure.
�If the shift procedure still does not take
place, have the vehicle checked at an
authorized Mercedes-Benz Light Truck
Center as soon as possible.
For more information, see “Practical hints”
section (
�page 321).
!
The shift procedure can only be per-
formed when:
�The engine is running.
�The gear selector lever for the auto-
matic transmission is in positionN.
�The vehicle is not at standstill.
�The vehicle speed does not exceed
40 mph (70 km/h).
i
If the shift procedure does not take
place press lower half (“HIGH”) of the
transfer case switch again.
Warning!G
If TC is in neutral, transmission positionP
will not hold vehicle. The parking brake must
be applied to hold vehicle in place.
i
If the SmartKey is in starter switch
position0 or1, an alarm will sound if
the transfer case is in positionN and
the driver’s door is opened.
Engage transfer case to gear position
HIGH or LOW.
Page 160 of 417
.
Differential locks improve the vehicle’s
tractive p")
159 Controls in detail
Differential locks
�Differential locks
For more information on off-road driving,
see “Off-road driving” (
�page 227).
Differential locks improve the vehicle’s
tractive power off-road. Switch on differen-
tial locks:
�for off-road driving
�to turn the ABS off during off-road driv-
ing
�for driving through water
�when driving on deep snow and icy or
fouled surfaces
!
Do not engage the front axle differen-
tial lock when driving around tight cor-
ners. This restricts steering ability.
!
When driving off-road, apply only mod-
erate pressure to the accelerator pedal
if the differential locks are switched on.
When running on a (single-axle) dyna-
mometer – no matter how briefly – you
must:
�raise the non-driven axle
or
�disconnect its drive shaft
and
�engage the transfer differential lock
Otherwise the transfer case can be
damaged, which is not covered by the
Mercedes-Benz Limited Warranty.
Warning!G
Never drive on pavement with differential
locks engaged.
Steering control will be strongly affected
with the differential locks activated.
The ABS, BAS, and ESP are switched off au-
tomatically when the transfer case differen-
tial lock is activated.
Page 162 of 417
 differential lock
2Rear axle differential lock
3F")
161 Controls in detail
Differential locks
Switching differential locks on and off
The switch is located in the center console.
1Transfer case (center) differential lock
2Rear axle differential lock
3Front differential lock
4Engagement indicator lamps (yellow)
5Function indicator lamps (red)Switching differential locks on Transfer case differential lock
�Press switch1.
The yellow engagement indicator
lamp4 for the transfer case differen-
tial lock comes on.
The ESP warning lampv comes on.
When the differential lock engagement
operation has been completed, the red
function indicator lamp5 comes on.
The message
ABS NOT AVAILABLE -
DIFFERENTIAL LOCKED
appears in the
multifunction display.
The ESP warning lampv and the
ABS- warning lamp in the instru-
ment cluster come on.
i
The differential locks can only be
switched on in the sequence 1,
2,3.
!
To avoid damage to the transfer case
and differential locks:
�Engage differential locks only at low
speed (walking speed, not more
than 5 mph).
�Do not engage differential locks if
the driving wheels are spinning due
to lack of traction.
�Do not engage on paved roads.
��
Page 163 of 417

162 Controls in detail
Differential locks
Once the transfer case differential lock
is switched on, you can now, if needed,
�switch on rear axle differential
lock2
or
�switch on rear axle differential
lock2 and front differential
lock3.
Rear axle differential lock
�Press switch2.
The yellow engagement indicator
lamp4 comes on first, followed by the
red function indicator lamp5.
The rear axle differential lock is
switched on.Front differential lock
�Press switch 3.
The yellow engagement indicator
lamp4 comes on first, followed by the
red function indicator lamp5.
The front differential lock is switched
on.
Switching differential locks off
There are two different methods to disen-
gage differential locks:
�You can switch the differential locks off
in reverse order (3, 2,1).
�To switch off all differential locks at the
same time:
�Press switch1.
The yellow engagement indicator
lamps4 go out first. The red func-
tion indicator lamps5 go out
when the switching process has
been carried out in the differential.To activate the ESP, BAS, and ABS sys-
tems, drive again for three seconds using a
constant driving style.
All messages in the multifunction display
disappear. The ESP warning lampv
and the ABS- warning lamp in the in-
strument cluster go out.
i
If the function lamps do not go out
when the differential locks are disen-
gaged, bring vehicle to a stop and then
continue driving. Changing the vehicle
load can help to disengage locks.
Warning!G
Always remember to disengage the differen-
tial locks when returning to drive on paved
roads, see “A few words about differentials
and differential locks” (
�page 160).
��
Page 164 of 417
 and for
setting the exterior rear view mirrors, see
“Mirrors�")
163 Controls in detail
Good visibility
�Good visibility
For information on windshield wipers, see
“Windshield wipers” (
�page 53) and for
setting the exterior rear view mirrors, see
“Mirrors” (
�page 41).
Rear view mirrors
Auto-dimming mirrors
The reflection brightness of the exterior
rear view mirrors and the interior rear view
mirror will respond automatically to glare
when
�ignition is switched on, and
�incoming light from headlamps falls on
the sensor in the interior rear view
mirror
The interior rear view mirror will not react if
�reverse gear is engaged
�the interior lighting is turned on
Warning!G
The auto-dimming function does not react if
incoming light is not aimed directly at sen-
sors in the interior rear view mirror.
The interior rear view mirror and the exterior
rear view mirrors do not react, for example,
when transporting cargo which covers the
rear window.
Glare can endanger you and others.
Warning!G
In case of an accident, liquid electrolyte may
escape from the mirror housing if the mirror
glass breaks.
Electrolyte has an irritating effect. Do not al-
low the liquid to come into contact with
eyes, skin, clothing, or the respiratory sys-
tem. In case it does, immediately flush af-
fected area with water, and seek medical
help if necessary.
!
Electrolyte drops coming into contact
with the vehicle paint finish can be
completely removed only while in the
liquid state by applying plenty of water.
Page 165 of 417

164 Controls in detail
Good visibility
Activating exterior rear view mirror
parking position
Follow these steps to activate the mirror
parking position so that the passen-
ger-side exterior rear view mirror will be
turned downward to the stored position.
The buttons are located above the exterior
lamp switch.
1Driver’s side exterior rear view mirror
button
2Passenger-side exterior rear view
mirror button�Make sure you have stored a parking
position for the passenger-side exterior
rear view mirror (
�page 109).
�Make sure the MIRROR SETTING WHEN
PARKING
function in the CONVENIENCE
submenu of the control system is
switched to
ON (�page 144).
�Switch on the ignition (�page 35).
�Press button2 for the passenger-side
exterior rear view mirror.
�Place the gear selector lever in reverse
gear R.
The passenger-side exterior rear view
mirror will be turned downward to the
stored position.
Warning!G
Exercise care when using the passen-
ger-side exterior rear view mirror. The mirror
surface is convex (outwardly curved surface
for a wider field of view). Objects in mirror
are closer than they appear. Check your in-
side rear view mirror or glance over your
shoulder before changing lanes.
Page 166 of 417
165 Controls in detail
Good visibility
The exterior rear view mirror returns to its
previously stored driving position:
�ten seconds after you put the gear se-
lector lever out of position R
�immediately once you exceed a vehicle
speed of approx. 6 mph (10 km/h)
�immediately when you press button1
for driver’s side exterior rear view
mirror
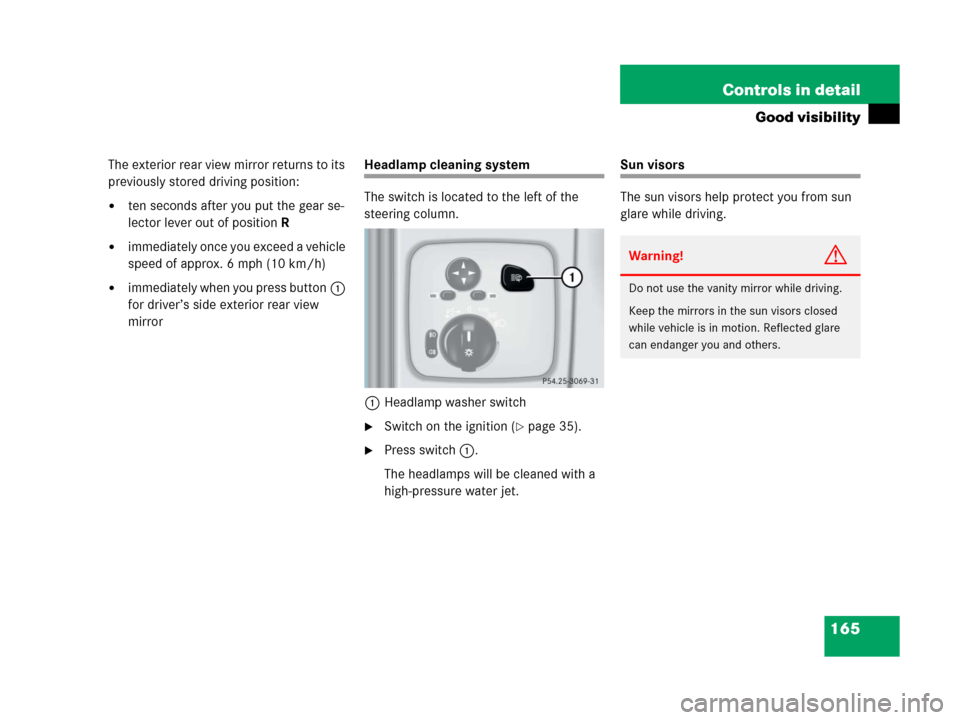
Headlamp cleaning system
The switch is located to the left of the
steering column.
1Headlamp washer switch
�Switch on the ignition (�page 35).
�Press switch1.
The headlamps will be cleaned with a
high-pressure water jet.
Sun visors
The sun visors help protect you from sun
glare while driving.
Warning!G
Do not use the vanity mirror while driving.
Keep the mirrors in the sun visors closed
while vehicle is in motion. Reflected glare
can endanger you and others.