Page 109 of 417
108 Controls in detail
Memory function
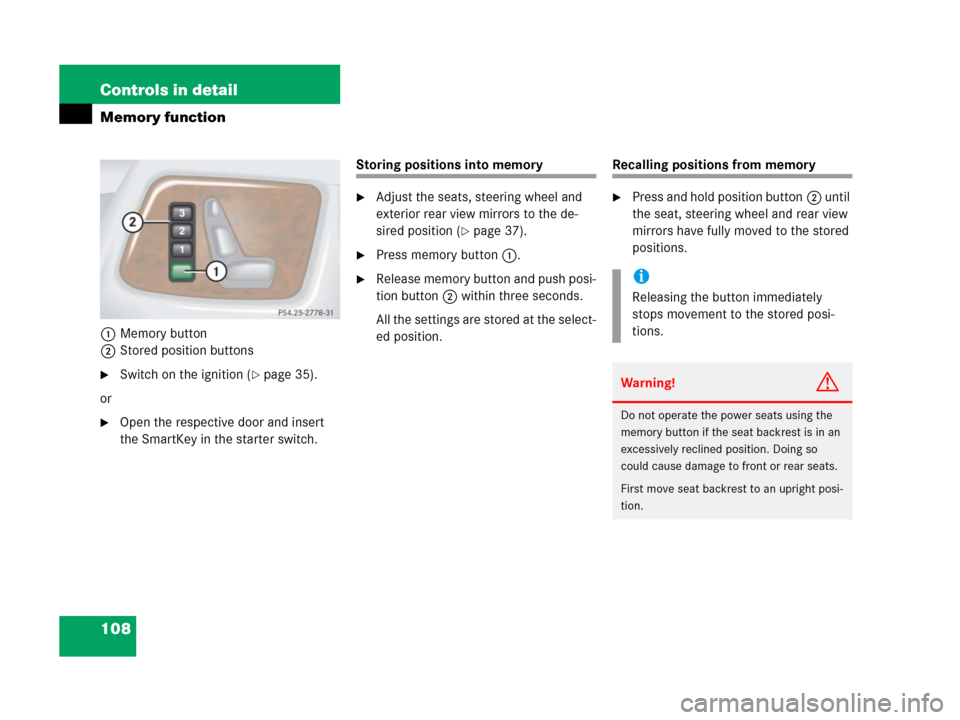
1Memory button
2Stored position buttons
�Switch on the ignition (�page 35).
or
�Open the respective door and insert
the SmartKey in the starter switch.
Storing positions into memory
�Adjust the seats, steering wheel and
exterior rear view mirrors to the de-
sired position (
�page 37).
�Press memory button1.
�Release memory button and push posi-
tion button2 within three seconds.
All the settings are stored at the select-
ed position.
Recalling positions from memory
�Press and hold position button2 until
the seat, steering wheel and rear view
mirrors have fully moved to the stored
positions.
i
Releasing the button immediately
stops movement to the stored posi-
tions.
Warning!G
Do not operate the power seats using the
memory button if the seat backrest is in an
excessively reclined position. Doing so
could cause damage to front or rear seats.
First move seat backrest to an upright posi-
tion.
Page 112 of 417

111 Controls in detail
Lighting
Manual headlamp mode
The low beam headlamps and the parking
lamps can be switched on and off with the
exterior lamp switch.
Automatic headlamp mode
The following lamps switch on and off au-
tomatically depending on the brightness of
the ambient light:
�Low beam headlamps
�Tail and parking lamps
�License plate lamps
�Side marker lamps
�Turn the exterior lamp switch to
positionU.
With the SmartKey in starter switch
position1 only the parking lamps will
switch on and off automatically.
When the engine is running, the low
beam headlamps, the tail and parking
lamps, the license plate lamps, and the
side marker lamps will switch on and
off automatically.
i
With the SmartKey removed from the
starter switch and the driver’s door
open, a warning sounds if the parking
lamps or low beam headlamps are
switched on.
The message
TURN OFF LIGHTS! ap-
pears in the multifunction display.
Warning!G
If the exterior lamp switch is set toU,
�the headlamps may switch off unexpect-
edly when the system senses bright am-
bient light, for example light from
oncoming traffic.
�the headlamps will not be automatically
switched on under foggy conditions.
To minimize risk to you and to others,
activate headlamps by turning exterior
lamp switch to B when driving or
when traffic and / or ambient lighting
conditions require you to do so.
In low ambient lighting conditions, only
switch from position U to B with
the vehicle at a standstill in a safe loca-
tion. Switching from U to B will
briefly switch off the headlamps. Doing
so while driving in low ambient lighting
conditions may result in an accident.
The automatic headlamp feature is only an
aid to the driver. The driver is responsible for
the operation of the vehicle’s lights at all
times.
Page 114 of 417

113 Controls in detail
Lighting
Locator lighting and night security illu-
mination
The locator lighting and the night security
illumination are described in the “Control
system section”, see (
�page 139) and
(
�page 140).
Exterior rear view mirror lamps
If the vehicle is centrally unlocked in the
darkness, the lamps in the exterior rear
view mirrors come on.
If a door is opened, the lamp on this side
goes out. If no doors are opened, the
lamps will switch off:
�after a maximum of 40 seconds
�immediately, when you switch on the
ignition (
�page 35)Fog lamps
Front fog lamps
�Switch on the low beam headlamps
(
�page 110).
�Pull out the exterior lamp switch to first
stop.
The front fog lamps switch on.
The green indicator lamp‡ in the
exterior lamp switch comes on
(
�page 110).
�Push in the exterior lamp switch.
The front fog lamps switch off.
The green indicator lamp‡ in the
exterior lamp switch goes out.
Warning!G
In low ambient lighting or foggy conditions,
only switch from position UtoBwith
the vehicle at a standstill in a safe location.
Switching from UtoB will briefly
switch off the headlamps. Doing so while
driving in low ambient lighting conditions
may result in an accident.
i
Fog lamps will operate with the parking
lamps and/or low beam headlamps on.
Fog lamps should only be used in con-
junction with low beam headlamps.
Consult your State or Province Motor
Vehicle Regulations regarding allow-
able lamp operation.
i
Fog lamps cannot be switched on with
the exterior lamp switch in
positionU. For switching on the fog
lamps, turn the exterior lamp switch to
positionB first.
Page 116 of 417
115 Controls in detail
Lighting
Hazard warning flasher
The hazard warning flasher can be
switched on at all times, even with the
SmartKey removed from the starter
switch.
The hazard warning flasher switches on au-
tomatically when an airbag deploys.
The hazard warning flasher switch is locat-
ed on the center console.
1Hazard warning flasher switchSwitching on hazard warning flasher
�Press hazard warning flasher
switch1.
All the turn signal lamps are flashing.Switching off hazard warning flasher�Press hazard warning flasher switch1
again.
i
With the hazard warning flasher acti-
vated and the combination switch set
for either left or right turn, only the re-
spective turn signals will operate when
the SmartKey is in starter switch
position1or2.
i
If the hazard warning flasher has been
activated automatically, press hazard
warning flasher switch1 once to
switch it off.
Page 120 of 417
119 Controls in detail
Lighting
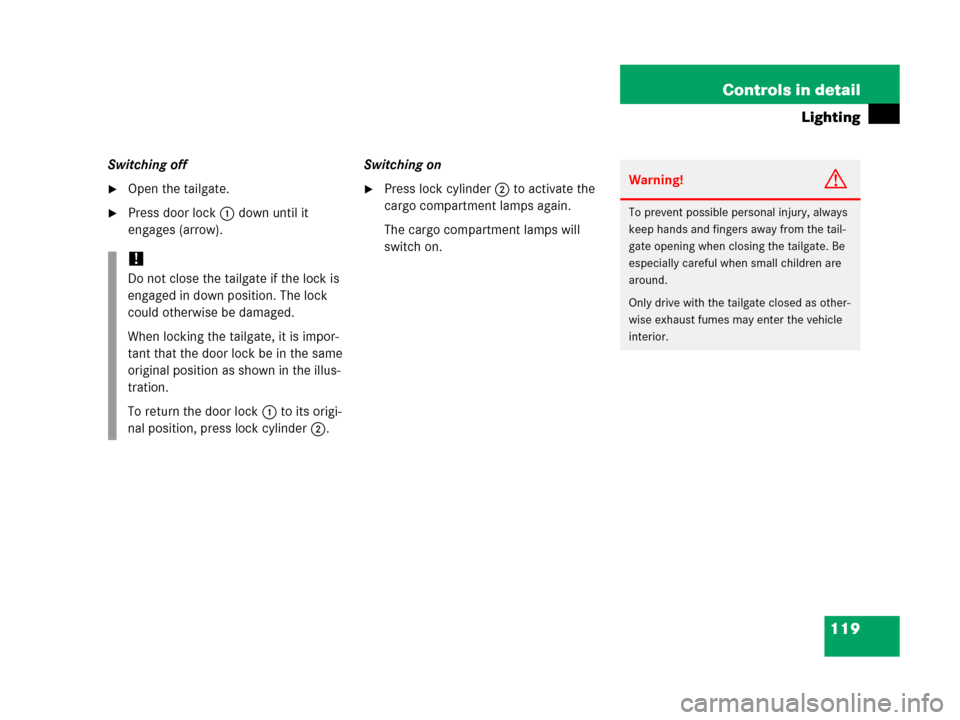
Switching off
�Open the tailgate.
�Press door lock1 down until it
engages (arrow).Switching on
�Press lock cylinder2 to activate the
cargo compartment lamps again.
The cargo compartment lamps will
switch on.
!
Do not close the tailgate if the lock is
engaged in down position. The lock
could otherwise be damaged.
When locking the tailgate, it is impor-
tant that the door lock be in the same
original position as shown in the illus-
tration.
To return the door lock1 to its origi-
nal position, press lock cylinder2.
Warning!G
To prevent possible personal injury, always
keep hands and fingers away from the tail-
gate opening when closing the tailgate. Be
especially careful when small children are
around.
Only drive with the tailgate closed as other-
wise exhaust fumes may enter the vehicle
interior.
Page 121 of 417
.
1Reset button
The instrument cl")
120 Controls in detail
Instrument cluster
A full view illustration of the instrument
cluster can be found in the “At a glance”
section of this manual (
�page 24).
1Reset button
The instrument cluster is activated when
you:
�Open a door.
�Switch on ignition.
�Press reset button1.
�Switch on the exterior lamps.
You can change the instrument cluster set-
tings in the Instrument cluster submenu of
the control system (
�page 136).
Instrument cluster illumination
Use the reset button to adjust the illumina-
tion brightness for the instrument cluster.
To brighten illumination
�Turn reset button1 in the instrument
cluster clockwise.
The instrument cluster illumination will
brighten.To dim illumination
�Turn reset button1 in the instrument
cluster counterclockwise.
The instrument cluster illumination will
dim.
Coolant temperature display
i
The instrument cluster illumination is
dimmed or brightened automatically to
suit ambient light conditions.
The instrument cluster illumination will
also be adjusted automatically when
you switch on the vehicle’s exterior
lamps.
Warning!G
�Driving when your engine is badly over-
heated can cause some fluids which
may have leaked into the engine com-
partment to catch fire. You could be se-
riously burned.
�Steam from an overheated engine can
cause serious burns and can occur just
by opening the hood. Stay away from
the engine if you see or hear steam com-
ing from it.
Turn off the engine, get out of the vehicle
and do not stand near the vehicle until the
engine has cooled down.
Page 122 of 417
.
�Call up the trip odometer and main
odometer (
�page 123) by pressing
buttonè orÿ on the multifunc-
tion steering whee")
121 Controls in detail
Instrument cluster
�Switch on the ignition (�page 35).
�Call up the trip odometer and main
odometer (
�page 123) by pressing
buttonè orÿ on the multifunc-
tion steering wheel (
�page 124).
�Press buttonj ork until the
coolant temperature display appears.During severe operating conditions, e.g.
stop-and-go traffic, the coolant tempera-
ture may rise close to 248°F (120°C).
The engine should not be operated with
the coolant temperature above 248°F
(120°C). Doing so may cause serious en-
gine damage which is not covered by the
Mercedes-Benz Limited Warranty.
Trip odometer
�Make sure you are viewing the trip
odometer display (
�page 123).
�If it is not displayed, press buttonè
orÿ on the multifunction steering
wheel (
�page 124) until the trip
odometer appears.
�Press and hold the reset button on the
instrument cluster (
�page 120) until
the trip odometer is reset.
Tachometer
The red marking on the tachometer de-
notes excessive engine speed.
To help protect the engine, the fuel supply
is interrupted if the engine is operated
within the red marking.
i
Excessive coolant temperature triggers
a warning in the multifunction display
(
�page 308).
!
Avoid driving at excessive engine
speeds, as it may result in serious en-
gine damage that is not covered by the
Mercedes-Benz Limited Warranty.
Page 123 of 417
.
For information on how to select the unit of")
122 Controls in detail
Instrument cluster
Outside temperature indicator
The outside temperature is displayed in
the multifunction display (
�page 123).
For information on how to select the unit of
the displayed temperature, i.e. degrees
Celsius (°C) or degrees Fahrenheit (°F),
see “Selecting temperature display mode”
(
�page 136).The temperature sensor is located in the
front bumper area. Due to its location, the
sensor can be affected by road or engine
heat during idling or slow driving. This
means that the accuracy of the displayed
temperature can only be verified by com-
parison to a thermometer placed next to
the sensor, not by comparison to external
displays (e.g. bank signs, etc.).When moving the vehicle into colder ambi-
ent temperatures (e.g. when leaving your
garage), you will notice a delay before the
lower temperature is displayed.
A delay also occurs when ambient temper-
atures rise. This prevents inaccurate tem-
perature indications caused by heat
radiated from the engine during idling or
slow driving.
Warning!G
The outside temperature indicator is not de-
signed to serve as an ice-warning device and
is therefore unsuitable for that purpose.
Indicated temperatures just above the freez-
ing point do not guarantee that the road sur-
face is free of ice. The road may still be icy,
especially in wooded areas or on bridges.