Page 17 of 417

16 Introduction
Symbols
The following symbols are found in this
Operator’s Manual:
* Optional equipment is identified
with an asterisk. Since standard
equipment varies between models,
the descriptions and illustrations in
this manual may differ slightly from
the actual equipment of your
vehicle.�This symbol points to instructions for
you to follow.
�A number of these symbols appearing
in succession indicates a multiple-step
procedure.
� Page This symbol tells you where to
look for further information on a
topic.
��This continuation symbol marks
an interrupted procedure which
will be continued on the next
page.
-> In the glossary of technical
terms, this symbol is used to in-
dicate cross-references to term
definitions.
DisplayWords appearing in the multi-
function display are printed in
the type shown here.
Warning!G
Warning notices draw your attention to haz-
ards that may endanger your health or life,
or the health or life of others.
!
Highlights hazards that may result in
damage to your vehicle.
i
Helpful hints or further information you
may find useful.
Page 112 of 417

111 Controls in detail
Lighting
Manual headlamp mode
The low beam headlamps and the parking
lamps can be switched on and off with the
exterior lamp switch.
Automatic headlamp mode
The following lamps switch on and off au-
tomatically depending on the brightness of
the ambient light:
�Low beam headlamps
�Tail and parking lamps
�License plate lamps
�Side marker lamps
�Turn the exterior lamp switch to
positionU.
With the SmartKey in starter switch
position1 only the parking lamps will
switch on and off automatically.
When the engine is running, the low
beam headlamps, the tail and parking
lamps, the license plate lamps, and the
side marker lamps will switch on and
off automatically.
i
With the SmartKey removed from the
starter switch and the driver’s door
open, a warning sounds if the parking
lamps or low beam headlamps are
switched on.
The message
TURN OFF LIGHTS! ap-
pears in the multifunction display.
Warning!G
If the exterior lamp switch is set toU,
�the headlamps may switch off unexpect-
edly when the system senses bright am-
bient light, for example light from
oncoming traffic.
�the headlamps will not be automatically
switched on under foggy conditions.
To minimize risk to you and to others,
activate headlamps by turning exterior
lamp switch to B when driving or
when traffic and / or ambient lighting
conditions require you to do so.
In low ambient lighting conditions, only
switch from position U to B with
the vehicle at a standstill in a safe loca-
tion. Switching from U to B will
briefly switch off the headlamps. Doing
so while driving in low ambient lighting
conditions may result in an accident.
The automatic headlamp feature is only an
aid to the driver. The driver is responsible for
the operation of the vehicle’s lights at all
times.
Page 141 of 417

140 Controls in detail
Control system
�Move the selection marker with
theæ orç button to the
LIGHTING submenu.
�Press buttonj ork repeatedly
until you see this message in the dis-
play:
LOCATOR LIGHTING.
The selection marker is on the current
setting.
�Pressæ orç to switch the loca-
tor lighting function
ON or OFF.
�Turn the exterior lamp switch to
positionU when exiting the vehicle
(
�page 110).
The locator lighting feature is
activated.Setting night security illumination
(Headlamps delayed shut-off)
Use this function to set whether and how
long you would like the exterior lamps to
illuminate during darkness after exiting the
vehicle and all doors closed.
With the delayed shut-off feature activated
and the exterior lamp switch in
positionU before the engine is turned
off, the following lamps will switch on
when the engine is turned off:
�Parking lamps
�Tail lamps
�License plate lamps
�Side marker lamps
�Front fog lamps
If after turning off the engine you do not
open a door or do not close an opened
door, the lamps will switch off automatical-
ly after approximately 60 seconds.
�Move the selection marker with
theæ orç button to the
LIGHTING submenu.
�Press buttonj ork repeatedly
until you see this message in the dis-
play:
HEADLIGHTS DELAYED SHUT-OFF.
The selection marker is on the current
setting.
�Pressæ orç to select the
desired lamp-on period.
i
You can reactivate this function within
ten minutes by opening a door.
Page 154 of 417

153 Controls in detail
Automatic transmission
Driving tips
Accelerator position
Your driving style influences the
transmission’s shifting behavior:
Less throttle Earlier upshifting
More throttle Later upshifting
Kickdown
Use kickdown when you want maximum
acceleration.
�Press the accelerator past the point of
resistance.
The transmission shifts into a lower
gear.
�Ease on the accelerator when you have
reached the desired speed.
The transmission shifts up again.Stopping
When you stop briefly, e.g. at traffic lights:
�Leave the transmission in gear.
�Hold the vehicle with the brake.
When you stop longer with the engine
idling and/or on a hill:
�Set the parking brake.
�Move the gear selector lever to
positionP.Maneuvering
When you maneuver in tight areas,
e.g. when pulling into a parking space:
�Control the vehicle speed by gradually
releasing the brakes.
�Accelerate gently.
�Never abruptly step on the accelerator.
Working on the vehicle
Warning!G
When working on the vehicle, set the
parking brake and move gear selector lever
to positionP. Otherwise the vehicle could
roll away.
Page 187 of 417

186 Controls in detail
Driving systems
Warning indicator
Visual signals indicate to the driver the rel-
ative distance between the sensors and an
obstacle. The warning indicator is located
next to the tailgate.
Warning indicator
As your vehicle approaches an object, one
or more segments will come on, depending
on the distance. When the sixth segment
lights, you have reached the minimum dis-
tance.An intermittent acoustic warning will
sound when the first yellow segment
comes on. This signal quickens with each
additional segment lit. When all segments
illuminate, the acoustic warning becomes
a constant signal. The signal is canceled
when the gear selector lever is placed in
position D or P.
Rear Parking Assist malfunction
There is a malfunction in the Rear Parking
Assist system if:
�a low warning tone sounds while the
vehicle is reversing
The Rear Parking Assist sensors are
dirty or malfunctioning.
�Clean the Rear Parking Assist sys-
tem sensors (
�page 286).
�Switch on the ignition again.
�no segments come on and no warning
sounds
The Rear Parking Assist is malfunction-
ing.
�Have the Rear Parking Assist sys-
tem checked by an authorized
Mercedes-Benz Light Truck Center
as soon as possible.
Malfunction may also be caused by inter-
ference from other radio or ultrasonic sig-
nals.
�Check the Rear Parking Assist opera-
tion at another location to rule out in-
terference from outside radio or
ultrasonic signals.
Page 317 of 417

316 Practical hints
What to do if …
Display symbolDisplay messagePossible causePossible solution
. LIGHT SENSOR
DRIVE TO WORKSHOP!The lamp sensor is malfunctioning. The
headlamps switch on automatically.�In the control system, set lamp opera-
tion to manual (
�page 138).
�Switch on headlamps using the
exterior lamp switch (
�page 110).
�Visit an authorized Mercedes-Benz
Light Truck Center as soon as possi-
ble.
LICENSE PLATE LIGHT, L
CHECK LIGHT!
The left license plate lamp is malfunction-
ing.�Replace the bulb as soon as possible.
LICENSE PLATE LIGHT R
CHECK LIGHT!
The right license plate lamp is malfunc-
tioning.�Replace the bulb as soon as possible.
LIGHTS
TURN OFF LIGHTS!The display appears if the driver’s door is
opened with the engine shut off and no
SmartKey in the starter switch.�Insert SmartKey in the starter switch.
�Switch off the lights (�page 110).
LOW BEAM, L
CHECK LIGHT!The left low beam lamp is malfunctioning.�Visit an authorized Mercedes-Benz
Light Truck Center as soon as
possible.
LOW BEAM, R
CHECK LIGHT!The right low beam lamp is malfunction-
ing.�Visit an authorized Mercedes-Benz
Light Truck Center as soon as
possible.
Page 332 of 417
331 Practical hints
Brush guard*
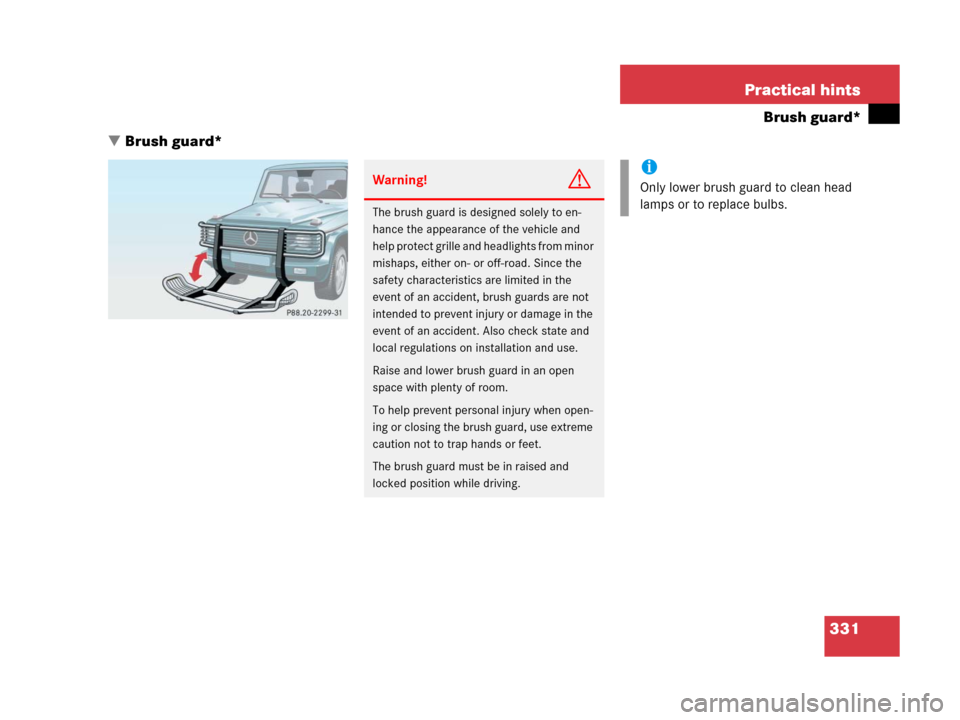
�Brush guard*
Warning!G
The brush guard is designed solely to en-
hance the appearance of the vehicle and
help protect grille and headlights from minor
mishaps, either on- or off-road. Since the
safety characteristics are limited in the
event of an accident, brush guards are not
intended to prevent injury or damage in the
event of an accident. Also check state and
local regulations on installation and use.
Raise and lower brush guard in an open
space with plenty of room.
To help prevent personal injury when open-
ing or closing the brush guard, use extreme
caution not to trap hands or feet.
The brush guard must be in raised and
locked position while driving.
i
Only lower brush guard to clean head
lamps or to replace bulbs.
Page 336 of 417
335 Practical hints
Replacing bulbs
�Replacing bulbs
Safe vehicle operation depends on proper
exterior lighting and signaling. It is there-
fore essential that all bulbs and lamp as-
semblies are in good working order at all
times.
Correct headlamp adjustment is extremely
important. Have headlamps checked and
readjusted at regular intervals and when a
bulb has been replaced. See an authorized
Mercedes-Benz Light Truck Center for
headlamp adjustment. i
If the headlamps or front fog lamps are
fogged up on the inside as a result of
high humidity, driving the vehicle a dis-
tance with the lights on should clear up
the fogging.
i
Backup bulbs will be brought into use
when lamps malfunction. Observe the
messages in the multifunction display
(
�page 298).