Page 193 of 417

192 Controls in detail
Loading
Loading instructions
The gross vehicle weight which is the
weight of the vehicle including fuel, tools,
spare wheel, installed accessories, pas-
sengers and luggage / cargo must never
exceed the Gross Vehicle Weight Rating
(GVWR) for your vehicle. In addition, the
load must be distributed in such a way so
that the weight on each axle never exceeds
the Gross Axle Weight Rating (GAWR) for
the front and rear axle. The GVWR and
GAWR for your vehicle are indicated on the
certification label which can be found on
the driver’s door B-pillar (
�page 368). The handling characteristics of a fully load-
ed vehicle depend greatly on the load dis-
tribution. It is therefore recommended to
load the vehicle according to the illustra-
tions shown, with the heaviest items being
placed towards the front of the vehicle.
Warning!G
Always fasten items being carried as secure-
ly as possible using cargo tie-down rings and
fastening materials appropriate for the
weight and size of the load.
In an accident, during hard braking or sud-
den maneuvers, loose items will be thrown
around inside the vehicle, and can cause in-
jury to vehicle occupants unless the items
are securely fastened in the vehicle.
To help avoid personal injury during a colli-
sion or sudden maneuver, always use parti-
tion net when transporting cargo.
Never ride vehicle with the tailgate open.
Deadly carbon monoxide (CO) gases may
enter vehicle interior resulting in uncon-
sciousness and death.
Page 194 of 417

193 Controls in detail
Loading
�Always place items being carried
against front or rear seat backrests,
and fasten them as securely as possi-
ble.
�The heaviest portion of the cargo
should always be kept as low as possi-
ble against front or rear seat backrest
since it influences the handling charac-
teristics of the vehicle.
�For additional safety when transporting
cargo while the rear seats are unoccu-
pied, fasten the outer seat belts cross-
wise into the opposite side buckles.
�Always pad off sharp edges.
Cargo tie-down rings
The cargo compartment is provided with
four tie-down anchors.
Carefully secure cargo by applying even
load on all rings with rope of sufficient
strength to hold down the cargo.
i
The rear cargo compartment is the pre-
ferred place to carry objects. The en-
larged cargo compartment (rear seats
folded) should only be used for items
which do not fit in the rear cargo com-
partment alone.
Warning!G
While the partition net will help protect you
from smaller objects, it cannot prevent the
movement of large, heavier objects into the
passenger area in an accident.
Such items must be properly secured using
the cargo tie-down rings in the cargo com-
partment floor.
Page 195 of 417

194 Controls in detail
Useful features
Storage compartments
Glove box
1Unlocked position
2Locked position
3HandleOpening the glove box
�Pull handle to open.
The glove box is illuminated with SmartKey
in starter switch position1 or2 when
opening the lid.
Closing the glove box
�Push lid up to close.
Warning!G
To help avoid personal injury during a colli-
sion or sudden maneuver, exercise care
when storing objects in the vehicle. Put lug-
gage or cargo in the cargo compartment if
possible. Do not pile luggage or cargo higher
than the seat backs.
Luggage nets cannot secure hard or heavy
objects.
Warning!G
Do not load items on the roof. It may cause
instability during some maneuvers which
could result in an accident.
Warning!G
Keep compartment lids closed. This will help
to prevent stored objects from being thrown
about and injuring vehicle occupants during
an accident and sudden maneuvers.
i
The glove box can be locked and un-
locked with the mechanical key.
i
The glove box lid contains two cup
holders.
Page 197 of 417

196 Controls in detail
Useful features
Cup holdersCup holder next to the armrest
�Place cup holder bracket1 into re-
cess.
If the cup holder is no longer in use, it can
for example, be stored in the storage com-
partment below the armrest or in storage
pouch on the door panel.
Warning!G
In order to help prevent spilling liquids on
vehicle occupants and/or vehicle equip-
ment, only use containers that fit into the
cup holder. Use lids on open containers and
do not fill containers to a height where the
contents, especially hot liquids, could spill
during braking, vehicle maneuvers, or in an
accident. Liquids spilled on vehicle occu-
pants may cause damage not covered by the
Mercedes-Benz Limited Warranty.
When not in use, keep the cup holder
closed. An open cup holder may cause injury
to you or others when contacted during
braking, vehicle maneuvers, or in an acci-
dent.
Keep in mind that objects placed in the cup
holder may come loose during braking, vehi-
cle maneuvers, or in an accident and be
thrown around in the vehicle interior. Ob-
jects thrown around in the vehicle interior
may cause an accident and/or serious per-
sonal injury.
i
The glove box lid also contains cup
holders (
�page 194).
Page 198 of 417
197 Controls in detail
Useful features
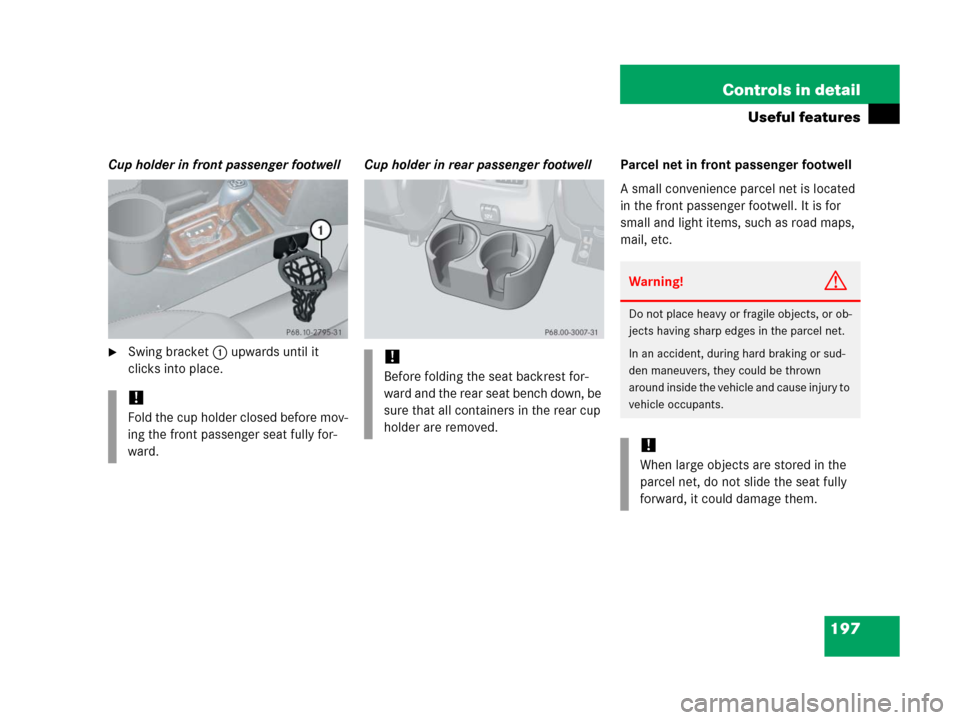
Cup holder in front passenger footwell
�Swing bracket1 upwards until it
clicks into place.Cup holder in rear passenger footwellParcel net in front passenger footwell
A small convenience parcel net is located
in the front passenger footwell. It is for
small and light items, such as road maps,
mail, etc.
!
Fold the cup holder closed before mov-
ing the front passenger seat fully for-
ward.
!
Before folding the seat backrest for-
ward and the rear seat bench down, be
sure that all containers in the rear cup
holder are removed.
Warning!G
Do not place heavy or fragile objects, or ob-
jects having sharp edges in the parcel net.
In an accident, during hard braking or sud-
den maneuvers, they could be thrown
around inside the vehicle and cause injury to
vehicle occupants.
!
When large objects are stored in the
parcel net, do not slide the seat fully
forward, it could damage them.
Page 199 of 417
198 Controls in detail
Useful features
Storage bags
Storage bags are located on the rear side
of the front seats.Ashtrays
Center console ashtray
1Ashtray
2Cigarette lighter
3Cover plate
Opening ashtray
�Briefly push the cover plate3.
The ashtray opens automatically.Removing the ashtray insert
4Sliding knob
5Astray insert
Warning!G
Do not place heavy or fragile objects, or ob-
jects having sharp edges in the storage
bags.
In an accident, during hard braking or sud-
den maneuvers, they could be thrown
around inside the vehicle and cause injury to
vehicle occupants.
Warning!G
Remove ashtray only with vehicle standing
still. Turn off the engine and set the parking
brake. Otherwise the vehicle might move as
a result of unintended contact with the gear
selector lever.
Page 201 of 417
200 Controls in detail
Useful features
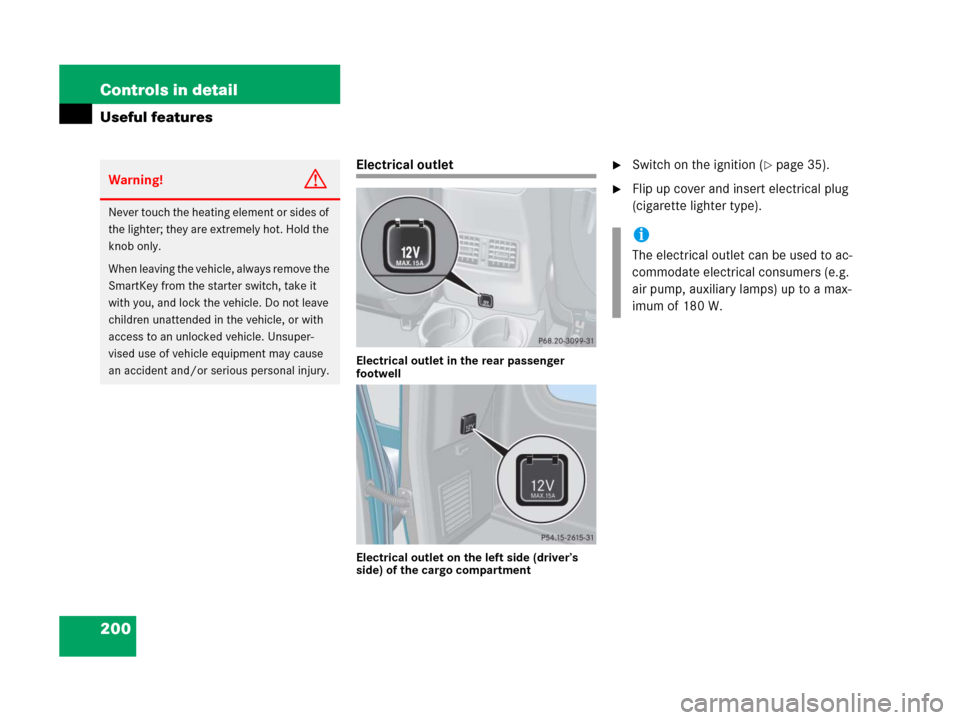
Electrical outlet
Electrical outlet in the rear passenger
footwell
Electrical outlet on the left side (driver’s
side) of the cargo compartment
�Switch on the ignition (�page 35).
�Flip up cover and insert electrical plug
(cigarette lighter type).Warning!G
Never touch the heating element or sides of
the lighter; they are extremely hot. Hold the
knob only.
When leaving the vehicle, always remove the
SmartKey from the starter switch, take it
with you, and lock the vehicle. Do not leave
children unattended in the vehicle, or with
access to an unlocked vehicle. Unsuper-
vised use of vehicle equipment may cause
an accident and/or serious personal injury.
N
N
i
The electrical outlet can be used to ac-
commodate electrical consumers (e.g.
air pump, auxiliary lamps) up to a max-
imum of 180 W.
Page 202 of 417

201 Controls in detail
Useful features
FloormatsTelephone*
Radio transmitters, such as a portable tele-
phone or a citizens band unit, should only
be used inside the vehicle if they are con-
nected to an antenna that is installed on
the outside of the vehicle.
The external antenna must be approved by
Mercedes-Benz. Please contact an autho-
rized Mercedes-Benz Light Truck Center
for information on the installation of an ap-
proved external antenna. Refer to the radio
transmitter operation instructions regard-
ing use of an external antenna.
Warning!G
Whenever you are using floormats, make
sure there is enough clearance and the
floormats are securely fastened.
Floormats should always be securely fas-
tened using the eyelets and retainer pins.
Before driving off, check that the floormats
are securely in place and adjust them if nec-
essary. A loose floormat could slip and
hinder proper functioning of the pedals.
Do not place several floormats on top of
each other as this may impair pedal move-
ment.
Warning!G
Never operate radio transmitters equipped
with a built-in or attached antenna (i.e. with-
out being connected to an external antenna)
from inside the vehicle while the engine is
running. Doing so could lead to a malfunc-
tion of the vehicle’s electronic system, pos-
sibly resulting in an accident and/or
personal injury.
Warning!G
Please do not forget that your primary re-
sponsibility is to drive the vehicle. A driver’s
attention to the road must always be
his /her primary focus when driving. For
your safety and the safety of others, we rec-
ommend that you pull over to a safe location
and stop before placing or taking a tele-
phone call.
If you choose to use the telephone
1 while
driving, please use the hands-free device
and only use the telephone when road, traf-
fic and weather conditions permit. Some ju-
risdictions prohibit the driver from using a
cellular telephone while driving a vehicle.
Only operate the COMAND (Cockpit
Management and Data System)
1 if road,
traffic and weather conditions permit.
Bear in mind that at a speed of just 30 mph
(approximately 50 km / h), your vehicle is
covering a distance of 44 feet
(approximately 14 m) every second.
1Observe all legal requirements.