Page 238 of 417
237 Operation
Driving instructions
Emission control
Certain engine systems serve to keep the
toxic components of the exhaust gases
within permissible legal limits.
These systems, of course, will function
properly only when maintained strictly ac-
cording to factory specifications. Any ad-
justments on the engine should, therefore,
be carried out only by qualified
Mercedes-Benz Light Truck Center autho-
rized technicians. Engine adjustments
should not be altered in any way. More-
over, the specified service jobs must be
carried out regularly according to
Mercedes-Benz servicing requirements.
For details refer to the Maintenance
Booklet.
Warning!G
As with any vehicle, do not idle, park or op-
erate this vehicle in areas where combusti-
ble materials such as grass, hay or leaves
can come into contact with the hot exhaust
system, as these materials could be ignited
and cause a vehicle fire.
Warning!G
Inhalation of exhaust gas is hazardous to
your health. All exhaust gas contains carbon
monoxide, and inhaling it can cause uncon-
sciousness and lead to death.
Do not run the engine in confined areas
(such as a garage) which are not properly
ventilated. If you think that exhaust gas
fumes are entering the vehicle while driving,
have the cause determined and corrected
immediately. If you must drive under these
conditions, drive only with at least one win-
dow fully open at all times.
Page 239 of 417
238 Operation
Driving instructions
Coolant temperature
During severe operating conditions, e.g.
stop-and-go city traffic, the coolant tem-
perature may rise to approx. 248°F
(120°C).
The engine should not be operated with
the coolant temperature above 248°F
(120°C). Doing so may cause serious en-
gine damage which is not covered by the
Mercedes-Benz Limited Warranty.
i
Excessive coolant temperatures trigger
a warning message in the multifunction
display (
�page 308).
Warning!G
�Driving when your engine is badly over-
heated can cause some fluids which
may have leaked into the engine com-
partment to catch fire. You could be se-
riously burned.
�Steam from an overheated engine can
cause serious burns and can occur just
by opening the hood. Stay away from
the engine if you see or hear steam com-
ing from it.
Turn off the engine, get out of the vehicle
and do not stand near the vehicle until the
engine has cooled down.
Page 240 of 417
239 Operation
At the gas station
�At the gas station
Refueling
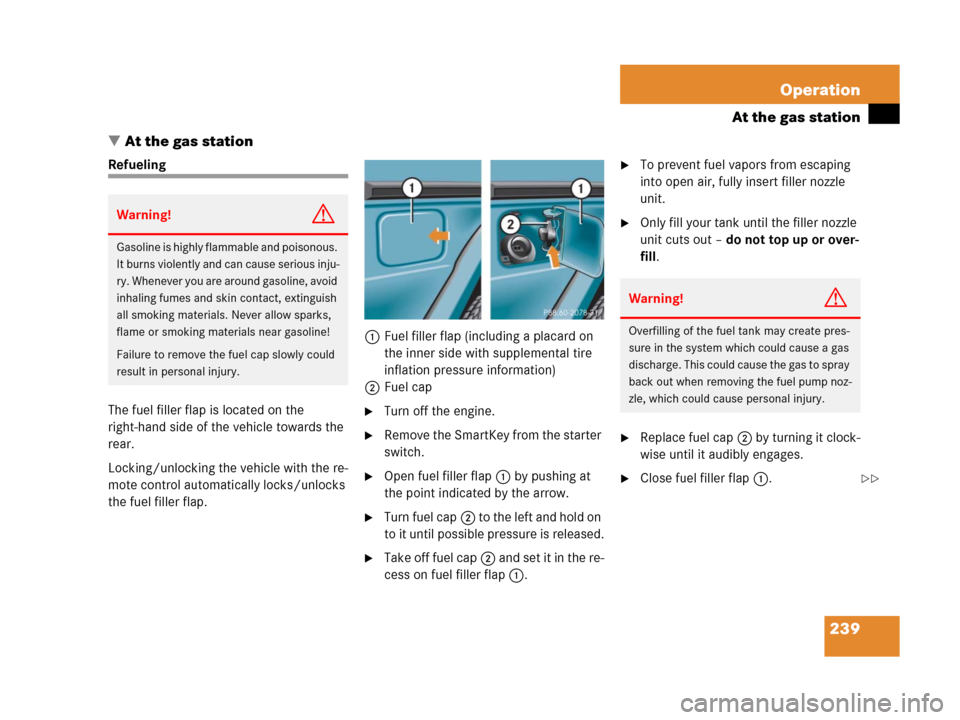
The fuel filler flap is located on the
right-hand side of the vehicle towards the
rear.
Locking/unlocking the vehicle with the re-
mote control automatically locks/unlocks
the fuel filler flap.1Fuel filler flap (including a placard on
the inner side with supplemental tire
inflation pressure information)
2Fuel cap
�Turn off the engine.
�Remove the SmartKey from the starter
switch.
�Open fuel filler flap1 by pushing at
the point indicated by the arrow.
�Turn fuel cap2 to the left and hold on
to it until possible pressure is released.
�Take off fuel cap2 and set it in the re-
cess on fuel filler flap1.
�To prevent fuel vapors from escaping
into open air, fully insert filler nozzle
unit.
�Only fill your tank until the filler nozzle
unit cuts out – do not top up or over-
fill.
�Replace fuel cap2 by turning it clock-
wise until it audibly engages.
�Close fuel filler flap1.
Warning!G
Gasoline is highly flammable and poisonous.
It burns violently and can cause serious inju-
ry. Whenever you are around gasoline, avoid
inhaling fumes and skin contact, extinguish
all smoking materials. Never allow sparks,
flame or smoking materials near gasoline!
Failure to remove the fuel cap slowly could
result in personal injury.
Warning!G
Overfilling of the fuel tank may create pres-
sure in the system which could cause a gas
discharge. This could cause the gas to spray
back out when removing the fuel pump noz-
zle, which could cause personal injury.
��
Page 243 of 417
242 Operation
Engine compartment
Hood
Opening
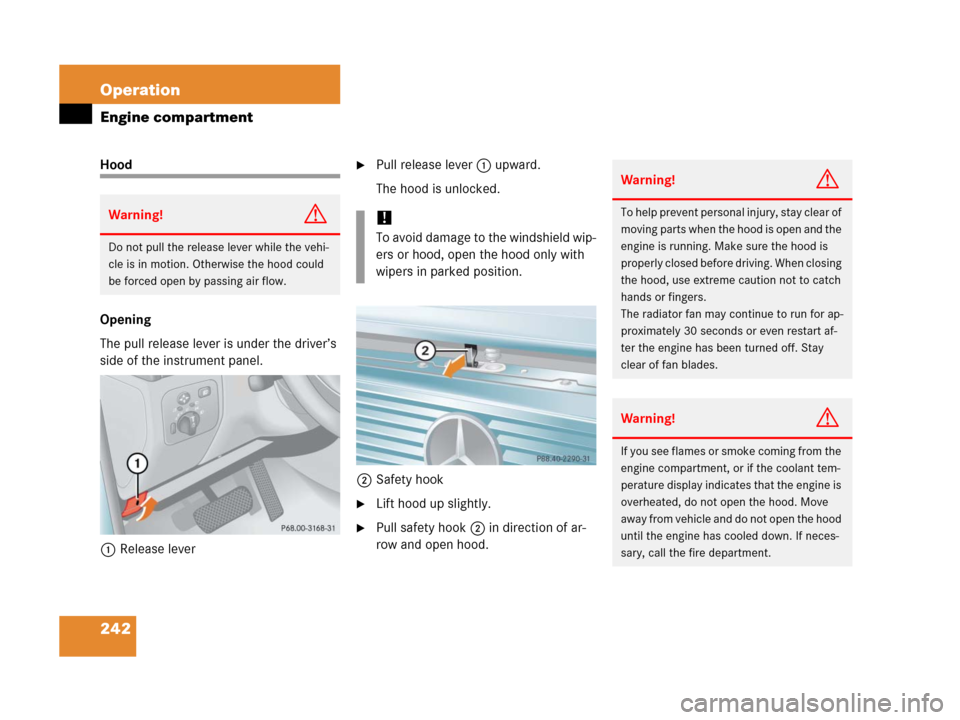
The pull release lever is under the driver’s
side of the instrument panel.
1Release lever�Pull release lever1 upward.
The hood is unlocked.
2Safety hook
�Lift hood up slightly.
�Pull safety hook2 in direction of ar-
row and open hood.
Warning!G
Do not pull the release lever while the vehi-
cle is in motion. Otherwise the hood could
be forced open by passing air flow.
!
To avoid damage to the windshield wip-
ers or hood, open the hood only with
wipers in parked position.
Warning!G
To help prevent personal injury, stay clear of
moving parts when the hood is open and the
engine is running. Make sure the hood is
properly closed before driving. When closing
the hood, use extreme caution not to catch
hands or fingers.
The radiator fan may continue to run for ap-
proximately 30 seconds or even restart af-
ter the engine has been turned off. Stay
clear of fan blades.
Warning!G
If you see flames or smoke coming from the
engine compartment, or if the coolant tem-
perature display indicates that the engine is
overheated, do not open the hood. Move
away from vehicle and do not open the hood
until the engine has cooled down. If neces-
sary, call the fire department.
Page 244 of 417
243 Operation
Engine compartment
Closing
�Lower hood and let it drop into lock
from a height of approximately 0.7 ft
(20 cm).
The hood will lock audibly.
�Check to make sure the hood is fully
closed.
If you can raise the hood at a point
above the turn signals to the left and
right of the hood, then it is not properly
closed. Open it again and let it drop
with somewhat greater force.
Engine oil
The amount of oil your engine needs will
depend on a number of factors, including
driving style. Higher oil consumption can
occur when
�the vehicle is new
�the vehicle is driven frequently at
higher engine speeds
Engine oil consumption checks should only
be made after the vehicle break-in period.
Warning!G
The engine is equipped with a transistorized
ignition system. Because of the high voltage,
it is dangerous to touch any components (ig-
nition coils, spark plug sockets, diagnostic
socket) of the ignition system
�with the engine running
�while starting the engine
�if ignition is “on” and the engine is
turned manually
Warning!G
Be careful that you do not close the hood on
anyone.
!
Do not push the hood closed manually,
as this could damage it.
i
Do not use any special lubricant addi-
tives, as these may damage the drive
assemblies. Using special additives not
approved by Mercedes-Benz may
cause damage not covered by the
Mercedes-Benz Limited Warranty.
More information on this subject is
available at any Mercedes-Benz Light
Truck Center.
Page 249 of 417
248 Operation
Engine compartment
�Screw oil filler cap2 back on filler
neck.
For more information on engine oil, see the
“Technical data” section (
�page 376) and
(
�page 377).
Transmission fluid level
The transmission fluid level does not need
to be checked. The transmission has a per-
manent supply of automatic transmission
fluid.
If you notice transmission fluid loss or gear
shifting malfunctions, have an authorized
Mercedes-Benz Light Truck Center check
the automatic transmission.
Coolant level
The engine coolant is a mixture of water
and anticorrosion/antifreeze.
When checking the coolant level,
�the vehicle must be parked on level
ground.
�the engine must be cool. The coolant
level should reach the Cold Level mark
(plastic bridge) in the reservoir.
!
Excess oil must be siphoned or drained
off. It could cause damage to the
engine and catalytic converter not
covered by the Mercedes-Benz Limited
Warranty.Warning!G
In order to avoid any possibly serious burns:
�Use extreme caution when opening the
hood if there are any signs of steam or
coolant leaking from the cooling system,
or if the coolant temperature display in-
dicates that the coolant is overheated.
�Do not remove pressure cap on coolant
reservoir if coolant temperature is
above 158°F (70°C). Allow engine to
cool down before removing cap. The
coolant reservoir contains hot fluid and
is under pressure.
�Using a rag, slowly open the cap approx-
imately 1/2turn to relieve excess pres-
sure. If opened immediately, scalding
hot fluid and steam will be blown out un-
der pressure.
�Do not spill antifreeze on hot engine
parts. Antifreeze contains ethylene gly-
col which may burn if it comes into con-
tact with hot engine parts.
��
Page 251 of 417
250 Operation
Engine compartment
�Use the tab to pull cap1 upwards.
�Check washer solvent level and add
washer solvent as required.
�Press cap1 on the filler neck until is
has completely engaged. Add MB Windshield Washer Concentrate
“S” to the water during all seasons.
�At temperatures above freezing point,
use MB Windshield Washer
Concentrate “S” to prevent smearing.
�If there is a danger of frost, use
MB Windshield Washer Concentrate
“S” and commercially available pre-
mixed windshield washer solvent/anti-
freeze to prevent water from freezing
on the windshield and the reservoir
from being damaged.
Premix the windshield washer fluid in a
suitable container, adapting the mixing
ratio to the outside temperature
(
�page 382).
Warning!G
Washer solvent / antifreeze is highly flam-
mable. Do not spill washer
solvent /antifreeze on hot engine parts, be-
cause it may ignite and burn. You could be
seriously burned.
!
Only use washer fluid which is suitable
for plastic lenses. Improper washer flu-
id can damage the plastic lenses of the
headlamps.
Page 253 of 417
252 Operation
Tires and wheels
See an authorized Mercedes-Benz Light
Truck Center for information on tested and
recommended rims and tires for summer
and winter operation. They can also offer
advice concerning tire service and
purchase.
Retreaded tires are not tested or recom-
mended by Mercedes-Benz, since previous
damage cannot always be recognized on
retreads. The operating safety of the
vehicle cannot be assured when such tires
are used.Important guidelines
�Only use sets of tires and rims of the
same type and make.
�Tires must be of the correct size for the
rim.
�Break in new tires for approximately
60 miles (100 km) at moderate
speeds.
�Regularly check the tires and rims for
damage. Dented or bent rims can
cause tire inflation pressure loss and
damage to the tire beads.
�If vehicle is heavily loaded, check tire
inflation pressure and correct as
required.
�Do not allow your tires to wear down
too far. Adhesion properties on wet
roads are sharply reduced at tread
depths under
1/8in (3 mm).
�When replacing individual tires, you
should mount new tires on the front
wheels first (on vehicles with
same-sized wheels all around).
Warning!G
Replace rims or tires with the same designa-
tion, manufacturer and type as shown on the
original part. See an authorized
Mercedes-Benz Light Truck Center for fur-
ther information. If incorrectly sized rims
and tires are mounted:
�The wheel brakes or suspension
components can be damaged.
�The operating clearance of the wheels
and the tires may no longer be correct.
Warning!G
Worn, old tires can cause accidents. If the
tire tread is badly worn, or if the tires have
sustained damage, replace them.
When replacing rims, only use genuine
Mercedes-Benz wheel bolts specified for the
particular rim type. Failure to do so can
result in the bolts loosening and possibly an
accident.