Page 6 of 417

Contents
Automatic transmission ..................... 149
Gear selector lever position ......... 151
Driving tips ................................... 153
Gear ranges ................................. 154
One-touch gearshifting................. 155
Emergency operation
(Limp Home Mode) ...................... 156
Transfer case ..................................... 157
Transfer case position .................. 157
Switching transfer case................ 157
Differential locks ............................... 159
A few words about differentials
and differential locks.................... 160
Switching differential locks
on and off..................................... 161
Good visibility .................................... 163
Rear view mirrors ......................... 163
Headlamp cleaning system .......... 165
Sun visors .................................... 165
Rear window defroster ................. 166Climate control ................................... 168
Setting the temperature................ 170
Adjusting air distribution
and volume ................................... 171
Defrosting ..................................... 172
Air recirculation ............................ 172
Residual engine heat utilization .... 173
Deactivating the climate control
system .......................................... 173
Air conditioning............................. 174
Rear passenger compartment
adjustable air vents....................... 174
Power windows .................................. 175
Opening and closing the windows. 175
Power tilt/sliding sunroof................... 178
Opening and closing the power
tilt/sliding sunroof ........................ 178
Driving systems .................................. 181
Cruise control ............................... 181
Rear Parking Assist* ..................... 184Loading .............................................. 187
Roof rack ...................................... 187
Cargo compartment cover ............ 187
Enlarged cargo compartment ....... 188
Split rear seat bench .................... 188
Partition net* (MB Accessory) ...... 189
Loading instructions ..................... 192
Cargo tie-down rings..................... 193
Useful features ................................... 194
Storage compartments ................. 194
Ashtrays........................................ 198
Cigarette lighter ............................ 199
Electrical outlet............................. 200
Floormats ..................................... 201
Telephone* ................................... 201
Tele Aid ......................................... 202
Garage door opener ...................... 210
Heated steering wheel .................. 215
Page 30 of 417
29 At a glance
Center console
Lower partItemPage
1Storage tray
2Gear selector lever for
automatic transmission49,
149
3Transfer case switch157
4Parking brake lever50,
57
Page 50 of 417

49 Getting started
Driving
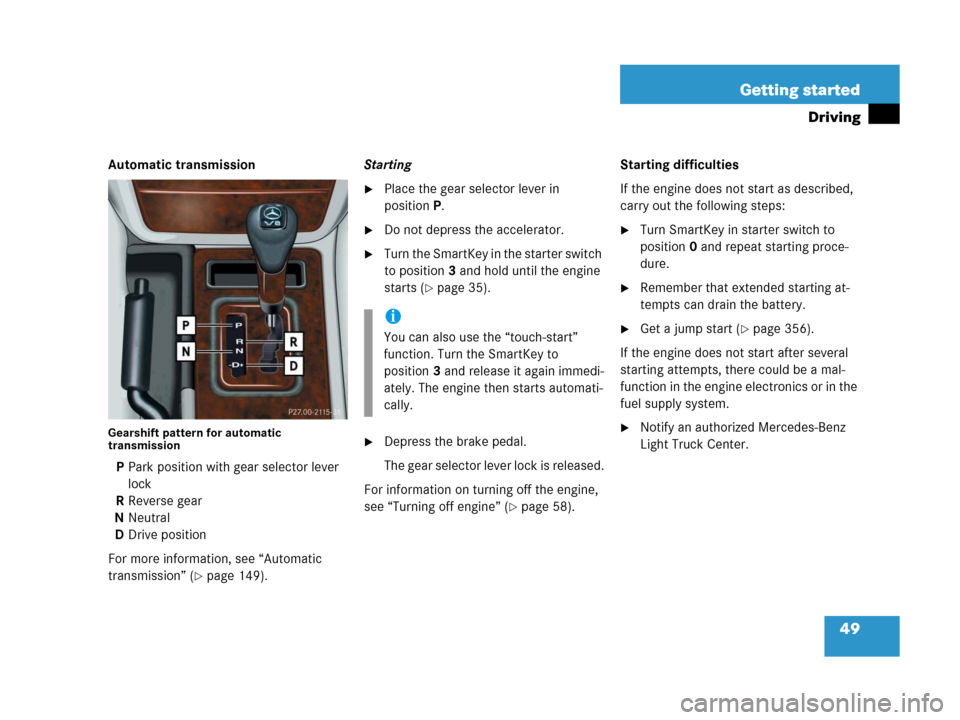
Automatic transmission
Gearshift pattern for automatic
transmission
PPark position with gear selector lever
lock
RReverse gear
NNeutral
DDrive position
For more information, see “Automatic
transmission” (
�page 149).Starting
�Place the gear selector lever in
positionP.
�Do not depress the accelerator.
�Turn the SmartKey in the starter switch
to position3 and hold until the engine
starts (
�page 35).
�Depress the brake pedal.
The gear selector lever lock is released.
For information on turning off the engine,
see “Turning off engine” (
�page 58).Starting difficulties
If the engine does not start as described,
carry out the following steps:
�Turn SmartKey in starter switch to
position0 and repeat starting proce-
dure.
�Remember that extended starting at-
tempts can drain the battery.
�Get a jump start (�page 356).
If the engine does not start after several
starting attempts, there could be a mal-
function in the engine electronics or in the
fuel supply system.
�Notify an authorized Mercedes-Benz
Light Truck Center.
i
You can also use the “touch-start”
function. Turn the SmartKey to
position3 and release it again immedi-
ately. The engine then starts automati-
cally.
Page 92 of 417
91 Controls in detail
Locking and unlocking
Seats
Memory function
Lighting
Instrument cluster
Control system
Automatic transmission
Transfer case
Differential locks
Good visibility
Climate control
Power windows
Power tilt/sliding sunroof
Driving systems
Loading
Useful features
Page 113 of 417

112 Controls in detail
Lighting
Daytime running lamp mode
�Turn exterior lamp switch to
positionM orU.
When the engine is running, the low
beam headlamps are switched on.
In low ambient light conditions, the
following lamps will switch on
additionally:
�Tail and parking lamps
�License plate lamps
�Side marker lamps
For nighttime driving, you should turn the
exterior lamp switch to positionB to
permit activation of the high beam head-
lamps.Canada only:
The daytime running lamp mode is manda-
tory and therefore in a constant mode.
Vehicles with automatic transmission*:
When the engine is running, and you shift
from a driving position to positionN orP,
the low beam headlamps will switch off
with a three-minute delay.
When the engine is running, and you
�turn the exterior lamp switch to
positionC, the parking lamps
switch on additionally.
�turn the exterior lamp switch to
positionB, the manual headlamp
mode has priority over the daytime run-
ning lamp mode.
The corresponding exterior lamps
switch on (
�page 110).USA only:
By default, the daytime running lamp mode
is deactivated. Activate the daytime run-
ning lamp mode using the control system,
see “Setting daytime running lamp mode”
(
�page 138).
When the engine is running, and you turn
the exterior lamp switch to
positionCorB, the manual head-
lamp mode has priority over the daytime
running lamp mode.
The corresponding exterior lamps switch
on (
�page 110).
i
With the daytime running lamp mode
and the exterior lamp switch in
positionM you cannot switch on the
high beam headlamps.
The high beam flasher is available at all
times.
Page 150 of 417

149 Controls in detail
Automatic transmission
�Automatic transmission
For more information on driving with an
automatic transmission, see “Automatic
transmission” (
�page 49).
Your vehicle’s transmission adapts its gear
shifting process to your individual driving
style by continually adjusting the shift
points up or down. These shift point adjust-
ments are performed based on current
operating and driving conditions.
If the operating conditions change, the
automatic transmission reacts by
adjusting its shift program.
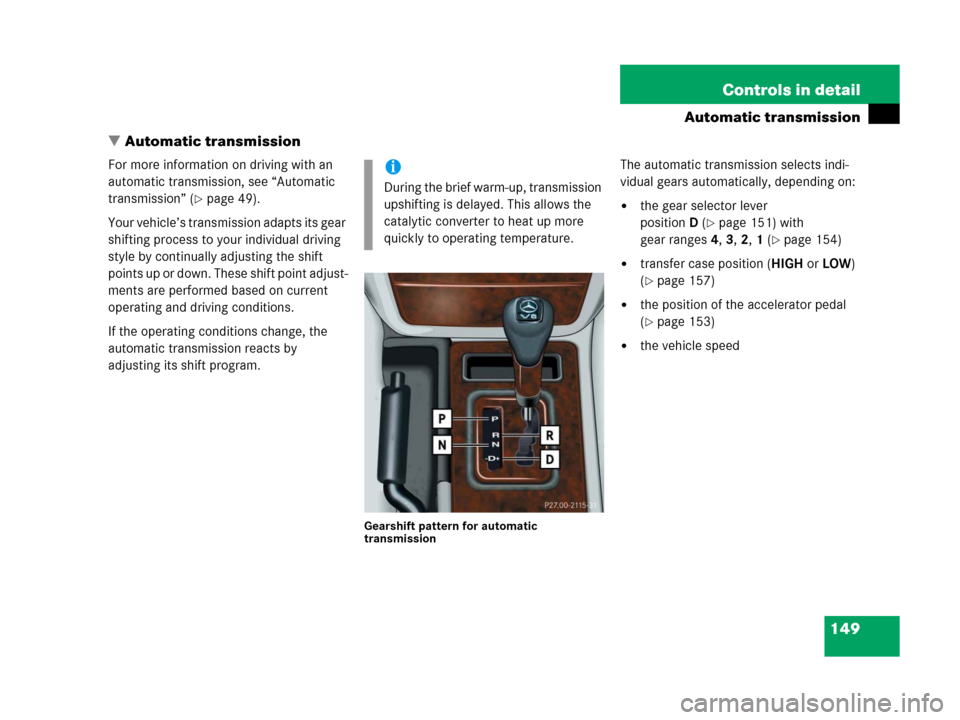
Gearshift pattern for automatic
transmission
The automatic transmission selects indi-
vidual gears automatically, depending on:
�the gear selector lever
positionD(
�page 151) with
gear ranges4, 3, 2, 1 (
�page 154)
�transfer case position (HIGH or LOW)
(
�page 157)
�the position of the accelerator pedal
(
�page 153)
�the vehicle speed
i
During the brief warm-up, transmission
upshifting is delayed. This allows the
catalytic converter to heat up more
quickly to operating temperature.
Page 151 of 417

150 Controls in detail
Automatic transmission
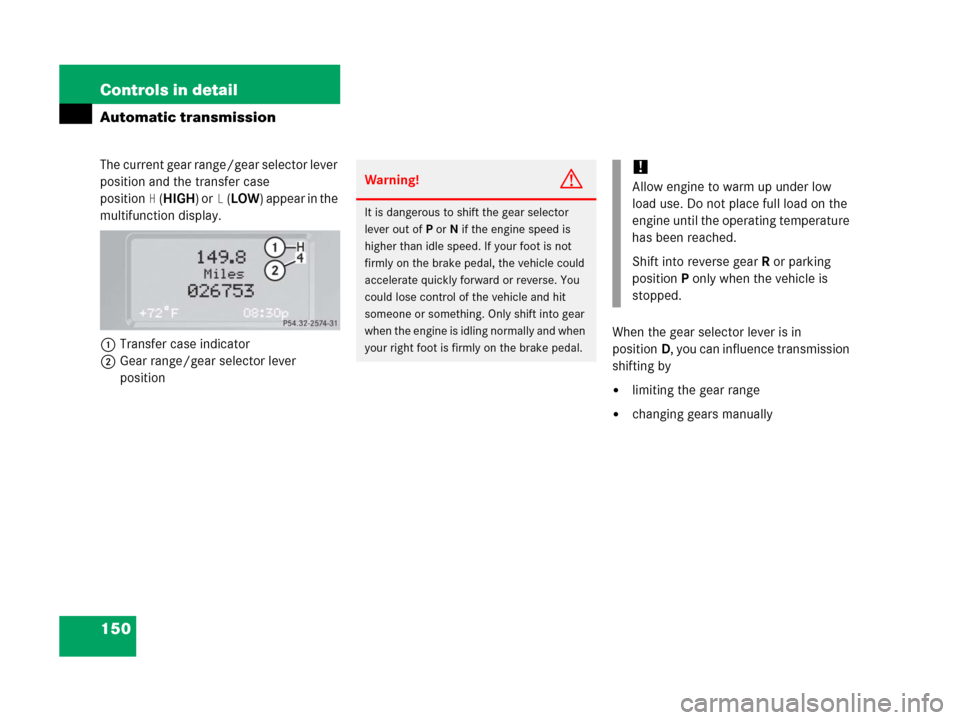
The current gear range/gear selector lever
position and the transfer case
position
H(HIGH) orL(LOW) appear in the
multifunction display.
1Transfer case indicator
2Gear range/gear selector lever
positionWhen the gear selector lever is in
positionD, you can influence transmission
shifting by
�limiting the gear range
�changing gears manually
Warning!G
It is dangerous to shift the gear selector
lever out ofP orN if the engine speed is
higher than idle speed. If your foot is not
firmly on the brake pedal, the vehicle could
accelerate quickly forward or reverse. You
could lose control of the vehicle and hit
someone or something. Only shift into gear
when the engine is idling normally and when
your right foot is firmly on the brake pedal.
!
Allow engine to warm up under low
load use. Do not place full load on the
engine until the operating temperature
has been reached.
Shift into reverse gearR or parking
positionP only when the vehicle is
stopped.
Page 152 of 417

151 Controls in detail
Automatic transmission
Gear selector lever position
Effect
ìPark position
Gear selector lever position
when the vehicle is parked. Place
gear selector lever in positionP
only when vehicle is stopped.
The park position is not intended
to serve as a brake when the
vehicle is parked. Rather, the
driver should always set the
parking brake in addition to
placing the gear selector lever in
positionP to secure the vehicle.
Effect
The SmartKey can only be
removed from the starter switch
with the gear selector lever in
positionP. With the SmartKey
removed, the gear selector lever
is locked in positionP.
If the vehicle’s electrical system
is malfunctioning, the gear
selector lever could remain
locked in positionP
(
�page 329).
íReverse gear
Place gear selector lever in
positionR only when vehicle is
stopped.
Effect
ëNeutral
No power is transmitted from the
engine to the drive axle. When
the brakes are released, the
vehicle can be moved freely
(pushed or towed).
Do not engageN while driving
except:
�to coast when vehicle is in
danger of skidding (e.g. on
icy roads) when the ESP is
deactivated or malfunction-
ing
�when you have to shift the
transfer case
êDrive
The transmission shifts
automatically. All five forward
gears are available.