Page 239 of 521

238 Controls in detailPower tilt/sliding sunroof*Stopping the power tilt/sliding sunroof
during Express-operation�
Move the sunroof switch in any direc-
tion.Synchronizing the power tilt/sliding
sunroof
The tilt/sliding sunroof must be synchro-
nized�
after the battery has been disconnect-
ed or discharged
�
after the tilt/sliding sunroof has been
closed manually (
�page 427)
�
after a malfunction
�
if the tilt/sliding sunroof does not open
smoothly
�
Remove the respective fuse from the
main fuse box (
�page 462).
�
Reinsert the fuse in the main fuse box.
�
Switch on the ignition (
�page 36).
�
Move and hold the sunroof switch in di-
rection of arrow3 until the tilt/sliding
sunroof is fully raised at the rear.
Keep holding the sunroof switch in di-
rection of arrow3 for approximately
1 second.
�
Check the Express-open feature
(�page 237).
If the tilt/sliding sunroof opens com-
pletely, the roof is synchronized. Other-
wise repeat the above steps.
iIf the movement of the tilt/sliding sun-
roof is blocked during the
Express-close procedure, the tilt/slid-
ing sunroof will stop and reopen
slightly.
Page 257 of 521

256 Controls in detailDriving systems1Damping button
2Indicator lamps�
Start the engine.
�
Press the damping button1 until the
desired suspension style is set.Vehicle level control
Your vehicle automatically adjusts its ride
height to
�
increase vehicle safety
�
reduce fuel consumption
The following vehicle chassis ride heights
can be selected:
�
Normal
�
Raised
The vehicle chassis ride height is raised or
lowered according to the selected level
setting and to the vehicle speed:
�
At a speed exceeding approximately
68 mph (110 km/h) with normal level
set or exceeding 75 mph (120 km/h)
with raised level set, the ride height is
reduced automatically. The table on
the next page provides an overview of
the vehicle levels.
�
With decreasing speed, the ride height
is again raised to the normal level.
!If you have selected the Comfort sus-
pension tuning, the vehicle lowers
slightly when you lock it within approx-
imately 60 seconds after switching off
the engine. When parking, make sure
that your vehicle cannot come into con-
tact with other objects, such as a curb,
while lowering. Your vehicle could oth-
erwise be damaged.iThe selected suspension style is stored
in memory, even after the SmartKey is
removed from the starter switch.
Page 261 of 521

260 Controls in detailLoadingSplit rear bench seat
To expand the cargo compartment, you
can fold down the left and right rear seat
backrests.
The two sections can be folded down sep-
arately to enlarge the cargo compartment.Folding the backrest forward
1Release catch
2Seat cushion
�
Pull release catch1 and use it to pull
seat cushion2 up.1Release catch
2Seat backrest
�
Pull release catch1 up.
The seat backrest is released and the
head restraints fold back.
�
Fold the seat backrest2 forward.
Warning!
G
When expanding the cargo compartment, al-
ways fold the seat cushions fully forward.
Unless you are transporting cargo, the back-
rests must remain properly locked in the up-
right position.
In an accident, during hard braking or sud-
den maneuvers, loose items will be thrown
around inside the vehicle, and cause injury
to vehicle occupants unless the items are
securely fastened in the vehicle.
Always use the cargo tie down rings
(�page 264).
!You must always release the seat cush-
ion and fold it up before folding the seat
backrests forward. The upholstery on
the backrest may otherwise be dam-
aged.
iIf tall persons have occupied the
driver’s and front passenger seats, it
may be necessary to move these seats
forward slightly in order to fold the rear
seat backrests forward.
Page 268 of 521
267 Controls in detail
Loading
Belt reel
1Belt reel
2Mounting element
3Locking button
�
Insert two mounting elements 2 into a
cargo rail.
�
Turn mounting element 2 in the cargo
rail toN.
�
Insert belt reel 1 into mounting ele-
ment 2.
�
Turn mounting element 2 in the cargo
rail until it engages in the‹ posi-
tion.
You should be able to feel the mounting
element engage in the cargo rail.
�
Press locking button 3 on the belt reel
and pull cargo net out in direction of ar-
row.
�
Place load between the cargo net and
the side wall of the cargo compart-
ment.
�
Press locking button 3 on belt reel.
With the other hand, slowly pull net
over load until it is taut.Telescoping rod
1Telescoping rod
2Mounting element
iThe belt reel can be used to tighten
light-weight loads against the side wall
of the cargo compartment, thus secur-
ing them from slipping.
iThe telescoping rod can be used to
tighten the load against the rear seats
so as to secure it from slipping.
Page 274 of 521
273 Controls in detail
Useful features
Storage compartment in the rear cen-
ter console�
Briefly press the top of the compart-
ment.
It extends automatically.Ruffled storage bags
Ruffled storage bags are located on the
back of the front seats.
Warning!
G
Do not place objects with a combined
weight of more than 4.4 lbs (2 kg) into the
ruffled storage bag. Otherwise, the Occu-
pant Classification System OCS (
�page 81)
may not be able to properly approximate the
occupant weight category.
The ruffled storage bag is intended for stor-
ing light-weight items only.
Heavy objects, objects with sharp edges or
fragile objects may not be transported in the
ruffled storage bag. In an accident, during
hard braking, or sudden maneuvers, they
could be thrown around inside the vehicle
and cause injury to vehicle occupants.
The ruffled storage bag cannot protect
transported goods in the event of an acci-
dent.
Page 275 of 521

274 Controls in detailUseful featuresParcel net in front passenger footwell
A small convenience parcel net is located
in the front passenger footwell. It is for
small and light items, such as road maps,
mail, etc.
Cup holders
Warning!
G
The parcel net is intended for storing
light-weight items only.
Heavy objects, objects with sharp edges or
fragile objects may not be transported in the
parcel net. In an accident, during hard brak-
ing, or sudden maneuvers, they could be
thrown around inside the vehicle and cause
injury to vehicle occupants.
The parcel net cannot protect transported
goods in the event of an accident.
Warning!
G
In order to help prevent spilling liquids on
vehicle occupants and/or vehicle equip-
ment, only use containers that fit into the
cup holder. Use lids on open containers and
do not fill containers to a height where the
contents, especially hot liquids, could spill
during braking, vehicle maneuvers, or in an
accident. Liquids spilled on vehicle occu-
pants may cause serious personal injury.
Liquids spilled on vehicle equipment may
cause damage not covered by the
Mercedes-Benz Limited Warranty.
When not in use, keep the cup holder
closed. An open cup holder may cause injury
to you or others when contacted during
braking, vehicle maneuvers, or in an acci-
dent.
Page 279 of 521
278 Controls in detailUseful featuresReinstalling ashtray insert�
Install insert by pushing it back into
frame until it engages again.
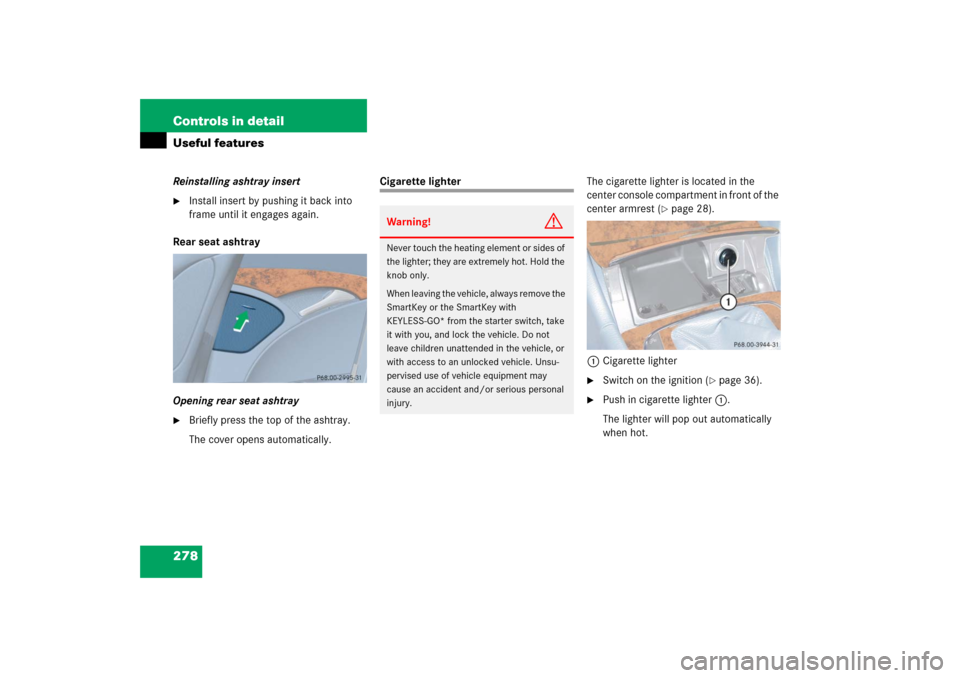
Rear seat ashtray
Opening rear seat ashtray
�
Briefly press the top of the ashtray.
The cover opens automatically.
Cigarette lighterThe cigarette lighter is located in the
center console compartment in front of the
center armrest (
�page 28).
1Cigarette lighter
�
Switch on the ignition (
�page 36).
�
Push in cigarette lighter1.
The lighter will pop out automatically
when hot.
Warning!
G
Never touch the heating element or sides of
the lighter; they are extremely hot. Hold the
knob only.
When leaving the vehicle, always remove the
SmartKey or the SmartKey with
KEYLESS-GO* from the starter switch, take
it with you, and lock the vehicle. Do not
leave children unattended in the vehicle, or
with access to an unlocked vehicle. Unsu-
pervised use of vehicle equipment may
cause an accident and/or serious personal
injury.
Page 280 of 521
.
�
Flip up cover and insert electrical plug
(c")
279 Controls in detail
Useful features
Power outlet
The power outlet is located in the rear pas-
senger compartment.�
Switch on the ignition (
�page 36).
�
Flip up cover and insert electrical plug
(cigarette lighter type).
Heated steering wheel*
The steering wheel heating warms up the
leather area of the steering wheel.
The stalk is on the lower left-hand side of
the steering wheel.
1Indicator lamp
2Switching off
3Switching on
!The lighter socket can be used to ac-
commodate 12V DC electrical acces-
sories (up to a maximum of 85 W)
designed for use with the standard
“cigarette lighter” plug type. Keep in
mind, however, that connecting acces-
sories to the lighter socket (for exam-
ple extensive connecting and
disconnecting, or using plugs that do
not fit properly) can damage the lighter
socket. With the socket damaged, the
lighter may no longer be able to be
placed in the heating (pushed-in) posi-
tion, or the lighter may pop out too ear-
ly with the lighter not hot enough.
To help avoid damaging the cigarette
lighter socket, we recommend con-
necting 12V DC electrical accessories
designed for use with a standard “ciga-
rette lighter” plug type to the 12V pow-
er outlets in your vehicle whenever
possible.
iThe power outlet can be used to
accommodate 12V DC electrical ac-
cessories (e.g. air pump, auxiliary
lamps) up to a maximum of 180 W.
An additional power outlet is located on
the left side in the cargo compartment.