Page 293 of 521

292 Controls in detailUseful featuresStep 3:�
Hold the end of the hand-held remote
control5 of the device you wish to
train approximately 2 to 5 in
(5 to12 cm) away from the signal trans-
mitter button (2, 3 or4) to be pro-
grammed, while keeping the indicator
lamp1 in view.
Step 4:
�
Using both hands, simultaneously
press the hand-held remote control
button6 and the desired signal trans-
mitter button (2, 3 or4). Do not
release the buttons until step 5 is com-
pleted.
The indicator lamp1 will flash, first
slowly and then rapidly.Step 5:
�
After the indicator lamp1 changes
from a slow to a rapidly flashing light,
release the hand-held remote control
button and the signal transmitter but-
ton.
Step 6:
�
Press and hold the just-trained signal
transmitter button (2, 3 or4) and
observe the indicator lamp1.If the indicator lamp1 stays on
constantly, programming is complete
and your device should activate when
the respective signal transmitter
button (2, 3 or4) is pressed and re-
leased.
Step 7:
�
To program the remaining two signal
transmitter buttons, repeat the steps
above starting with step 3.
iThe indicator lamp1 flashes immedi-
ately the first time the signal transmit-
ter button is programmed. If this button
has already been programmed, the in-
dicator lamp will only start flashing af-
ter 20 seconds.
iIf the indicator lamp1 flashes rapidly
for about 2 seconds and then turns to a
constant light, continue with
programming steps 8 through 12 as
your garage door opener may be
equipped with the “rolling code”
feature.
��
Page 294 of 521

293 Controls in detail
Useful features
Rolling code programming
To train a garage door opener (or other
rolling code devices) with the rolling code
feature, follow these instructions after
completing the “Programming” portion
(steps 1 through 6) of this text. (A second
person may make the following training
procedures quicker and easier.)
Step 8:�
Locate “training” button on the garage
door opener motor head unit.
Exact location and color of the button
may vary by garage door opener brand.
Depending on manufacturer, the
“training” button may also be referred
to as “learn”or “smart” button. If there
is difficulty locating the transmitting
button, refer to the garage door opener
operator’s manual. Step 9:
�
Press the “training” button on the ga-
rage door opener motor head unit.
The “training light” is activated.
You have 30 seconds to initiate the follow-
ing two steps.
Step 10:
�
Return to the vehicle and firmly press,
hold for 2 seconds and release the pro-
grammed signal transmitter button
(2, 3 or4).
Step 11:
�
Press, hold for 2 seconds and release
same signal transmitter button a sec-
ond time to complete the training pro-
cess.Step 12:
�
Confirm the garage door operation by
pressing the programmed signal trans-
mitter button (2, 3 or4).
Step 13:
�
To program the remaining two signal
transmitter buttons, repeat the steps
above starting with step 3.iSome garage door openers (or other
rolling code equipped devices) may
require you to press, hold for 2 seconds
and release the same signal transmit-
ter button a third time to complete the
training process.
Page 413 of 521

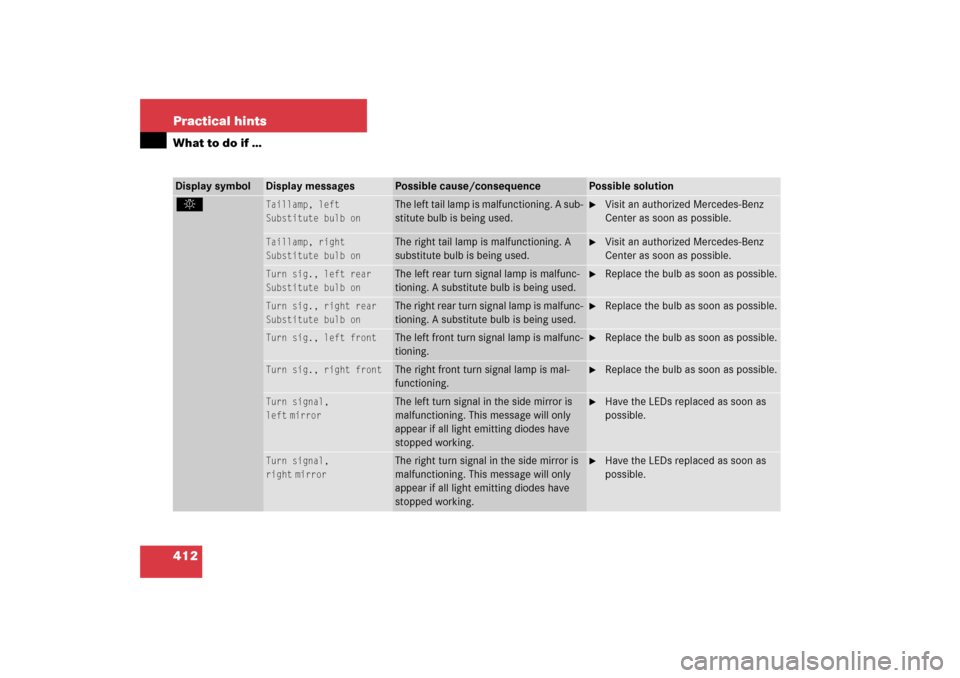
412 Practical hintsWhat to do if …Display symbol
Display messages
Possible cause/consequence
Possible solution
.
Taillamp, left
Substitute bulb on
The left tail lamp is malfunctioning. A sub-
stitute bulb is being used.
�
Visit an authorized Mercedes-Benz
Center as soon as possible.
Taillamp, right
Substitute bulb on
The right tail lamp is malfunctioning. A
substitute bulb is being used.
�
Visit an authorized Mercedes-Benz
Center as soon as possible.
Turn sig., left rear
Substitute bulb on
The left rear turn signal lamp is malfunc-
tioning. A substitute bulb is being used.
�
Replace the bulb as soon as possible.
Turn sig., right rear
Substitute bulb on
The right rear turn signal lamp is malfunc-
tioning. A substitute bulb is being used.
�
Replace the bulb as soon as possible.
Turn sig., left front
The left front turn signal lamp is malfunc-
tioning.
�
Replace the bulb as soon as possible.
Turn sig., right front
The right front turn signal lamp is mal-
functioning.
�
Replace the bulb as soon as possible.
Turn signal,
left
mirror
The left turn signal in the side mirror is
malfunctioning. This message will only
appear if all light emitting diodes have
stopped working.
�
Have the LEDs replaced as soon as
possible.
Turn signal,
right
mirror
The right turn signal in the side mirror is
malfunctioning. This message will only
appear if all light emitting diodes have
stopped working.
�
Have the LEDs replaced as soon as
possible.
Page 506 of 521

505 Index
Instrument lighting see Instrument cluster,
Illumination brightness
Instrument panel see Instrument cluster
Instruments and controls see Cockpit
Interior lighting
Delayed shut-off 175
Interior rear view mirror 45
Auto-dimming mirrors 197
Interior storage spaces see Storage com-
partments
J
Jack 422
Jump starting 456K
Key, Mechanical 424
Key, SmartKey
Battery check lamp 106
Changing batteries 429
Factory setting 108
Locking/unlocking 34
Locking/unlocking, Global
setting 108
Locking/unlocking, Selective
setting 109
Loss of 111
Messages in display 408
Opening and closing the power
tilt/sliding sunroof* 234
Opening and closing the
windows 234
Positions in starter switch 36
Remote control 106
Starting the engine 50
Turning off engine 61Key, SmartKey with KEYLESS-GO*
Battery check lamp 111
Changing batteries 429, 430
Factory setting 114
Locking, Tailgate 115
Locking/unlocking 35
Locking/unlocking, Selective
setting 115
Loss of 118
Messages in display 407
Opening and closing the power
tilt/sliding sunroof* 234
Opening and closing the
windows 234
Starting the engine 51
Turning off engine 61
Unlocking, Tailgate 117
KEYLESS-GO* 493
KEYLESS-GO* see Key, SmartKey with
KEYLESS-GO*
Kickdown 187, 493
Kilopascal 351