Page 135 of 521

134 Controls in detailSeatsMulticontour features
Seat cushion depth�
Adjust the seat cushion depth to the
length of your upper leg using
switch3.
Backrest contour
�
Move the backrest support to the bot-
tom by using button2 or to the center
by using button1.
�
Adjust the contour of the backrest to
the desired position using æ or
ç.
Backrest side bolsters
�
Adjust the side bolsters so that they
provide good lateral support using
switch5.Drive-dynamic features
Activating
�
Press button4 (
�page 133).
The indicator lamp on the button
comes on and the following display ap-
pears in the multifunction display for
about 5 seconds.
Deactivating
�
Press button4 (
�page 133) again.
The indicator lamp on the button goes
out.Massage function (PULSE)
The massage function can help prevent
muscle tension during long drives.
�
Press button6 (
�page 133).
The indicator lamp on the button
comes on. The air cushions in the lum-
bar area pulsate.
iYou can adjust the characteristics of
the Drive - Dynamic seat using the con-
trol system (
�page 179).
iWhen the engine is turned off, the last
cushion setting is retained in memory.
The cushion is automatically adjusted
to this setting when the engine is re-
started.iThe massage function turns off auto-
matically after approximately
5minutes.
Page 136 of 521

135 Controls in detailSeats
Seat heating*
Both switches for the front seats are locat-
ed in the center console. The red indicator
lamps in the switch come on to show
which heating level you have selected.
1Seat heating switch
�
Switch on the ignition (
�page 36).
Switching seat heating on
�
Press switch1 repeatedly until the
desired heating level is set.
One or more red indicator lamps on the
switch show the selected heating level.Switching seat heating off
�
Press switch1 repeatedly until all in-
dicator lamps go out.
Level3
Three indicator lamps on
(highest level)
The seat heating automatically
switches to level2 after approxi-
mately 5 minutes.
2
Two indicator lamps on
The seat heating automatically
switches to level1 after approxi-
mately 10 minutes.
1
One indicator lamp on
(lowest level)
The seat heating automatically
switches off after approximately
20 minutes.
off
No indicator lamp on
iIf one or more of the lamps on the seat
heating switch are flashing, there is in-
sufficient voltage available since too
many electrical consumers are turned
on. The seat heating switches off auto-
matically.
The seat heating will switch back on
again automatically as soon as suffi-
cient voltage is available.
Page 137 of 521

136 Controls in detailSeatsSeat ventilation*
The switch is located on the center con-
sole. Seat ventilation can be activated
manually with the ignition on, or by the
summer opening feature (
�page 234).
The blue indicator lamps on the switch
show the ventilation level selected:
1Seat ventilation switch
�
Switch on the ignition (
�page 36).
Switching seat ventilation on
�
Press button1 repeatedly until the
desired ventilation level is set.Switching seat ventilation off
�
Press button1 repeatedly until all in-
dicator lamps go out.
Level3
Three indicator lamps on
(highest level)
2
Two indicator lamps on
1
One indicator lamp on
(lowest level)
off
No indicator lamp on
iThe seat ventilation is automatically set
to the highest level if activated via sum-
mer opening feature (
�page 234).
iIf one or more of the lamps on the seat
ventilation switch are flashing, there is
insufficient voltage available since too
many electrical consumers are turned
on. The seat ventilation switches off au-
tomatically.
The seat ventilation will switch back on
again automatically as soon as suffi-
cient voltage is available.
Page 138 of 521

137 Controls in detailSeats
Folding bench seat in cargo compart-mentFolding out the folding bench seat
1Release handle for seat backrest
2Release handle for seat cushion
Before folding out the seat backrest, you
must:
�
fold the rear seat backrests into an up-
right position and lock them into place
�
move the handle for the twin roller
blind into the upper position
iThe folding bench seat in the cargo
compartment is approved only for per-
sons up to a height of 4.6 ft (1.40 m)
and a maximum weight of 110 lbs
(50 kg).
The twin roller blind must be installed
when the folding bench seat is in use.Warning!
G
When using the folding bench seat in the
cargo compartment, the seats in front of it
must be in the driving position.
Only drive when the head restraints for the
folding bench seat have been properly ad-
justed. The head restraints should be adjust-
e d so t ha t th e ba c k of th e h ea d is s uppo r te d
at approximately eye level. This can reduce
a child’s risk of injury in the event of an ac-
cident.
Warning!
G
Make sure that the seat belt is positioned
correctly on the body and is engaged in the
seat belt buckle.
Damaged covers should be replaced with
original covers only.
Do not leave children unattended in the ve-
hicle, even when they are secured in a child
restraint system.
Make sure that luggage and other objects
are adequately secured. The load could oth-
erwise injure someone in the event of an ac-
cident, during hard braking or steering
maneuvers.
iThe rear seat backrests can be adjust-
ed to a more reclined position to make
the folding bench seat more comfort-
able (
�page 262).
Page 139 of 521
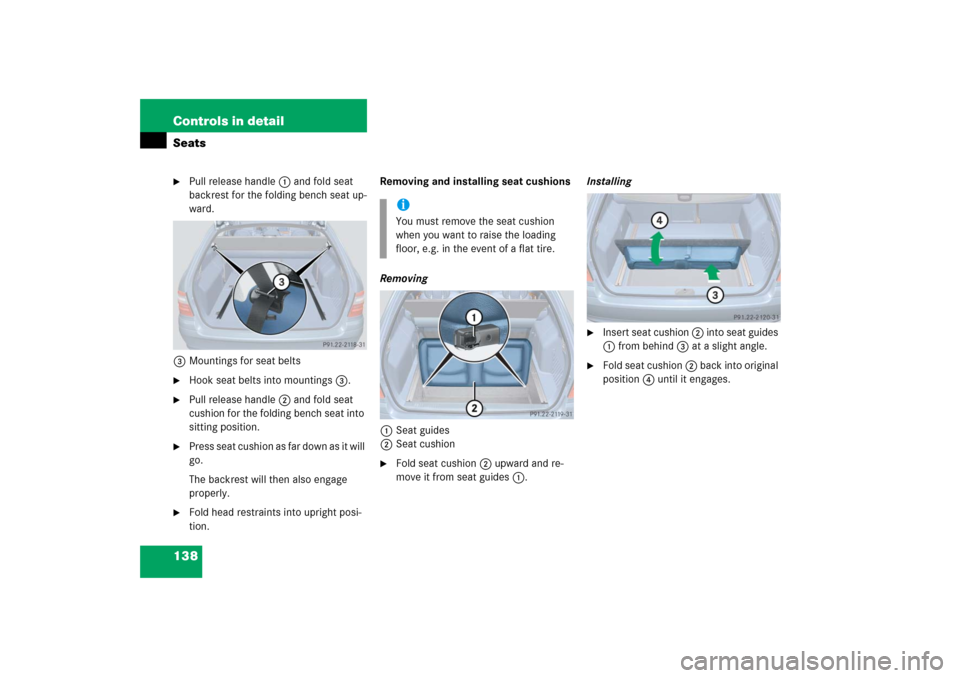
138 Controls in detailSeats�
Pull release handle 1 and fold seat
backrest for the folding bench seat up-
ward.
3Mountings for seat belts
�
Hook seat belts into mountings 3.
�
Pull release handle 2 and fold seat
cushion for the folding bench seat into
sitting position.
�
Press seat cushion as far down as it will
go.
The backrest will then also engage
properly.
�
Fold head restraints into upright posi-
tion.Removing and installing seat cushions
Removing
1Seat guides
2Seat cushion
�
Fold seat cushion 2 upward and re-
move it from seat guides 1.Installing
�
Insert seat cushion 2 into seat guides
1 from behind 3 at a slight angle.
�
Fold seat cushion 2 back into original
position 4 until it engages.
iYou must remove the seat cushion
when you want to raise the loading
floor, e.g. in the event of a flat tire.
Page 140 of 521
139 Controls in detailSeats
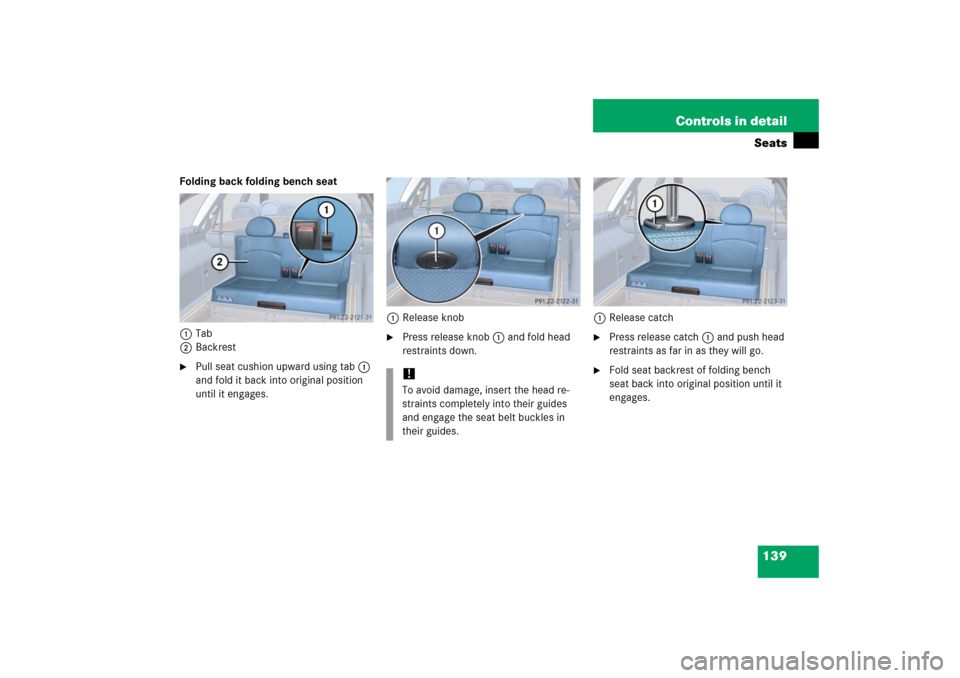
Folding back folding bench seat
1Tab
2Backrest�
Pull seat cushion upward using tab 1
and fold it back into original position
until it engages.1Release knob
�
Press release knob 1 and fold head
restraints down.1Release catch
�
Press release catch 1 and push head
restraints as far in as they will go.
�
Fold seat backrest of folding bench
seat back into original position until it
engages.
!To avoid damage, insert the head re-
straints completely into their guides
and engage the seat belt buckles in
their guides.
Page 142 of 521
.
�
Press memory buttonM.
�")
141 Controls in detail
Memory function
Storing positions into memory�
Adjust the seats, steering wheel and
exterior rear view mirrors to the de-
sired position (
�page 40).
�
Press memory buttonM.
�
Release memory buttonM and press
memory position button 1, 2 or 3 with-
in 3 seconds.
All the settings are stored at the select-
ed position.
Recalling positions from memory�
Press and hold memory position
button1, 2 or3 until the seat, steering
wheel and exterior rear view mirrors
have completely moved to the stored
positions.Storing exterior rear view mirror park-
ing position
For easier parking, you can adjust the
passenger-side exterior rear view mirror so
that you can see the right rear wheel as
soon as you engage reverse gearR.
For information on activating the parking
position, see “Activating exterior rear view
mirror parking position” (
�page 198).
!Do not operate the power seats using
the memory button if the seat backrest
is in an excessively reclined position.
Doing so could cause damage to front
or rear seats.iReleasing the memory position button
stops movement to the stored posi-
tions immediately.
Page 179 of 521
178 Controls in detailControl systemSetting parking position for exterior rear
view mirror
Use the
Mirror adjustment parking aid
function to select whether the passen-
ger-side exterior rear view mirror should be
turned downward during parking maneu-
vers when reverse gearR is engaged. For
additional information, see “Activating ex-
terior rear view mirror parking position”
(
�page 198).
�
Move the selection marker to the Convenience
submenu using
buttonæ orç.
�
Press buttonj ork repeatedly
until the message
Mirror adjustment
parking aid
appears in the multifunc-
tion display.
The selection marker is on the current
setting.
�
Press buttonæ orç to switch Mirror adjustment parking aid
on or
off
.Dynamic seat* submenu
Access the
Dynamic Seat
submenu via the
Settings
menu. Use the
Dynamic Seat
submenu to change the settings for the dy-
namic seats. The following functions are
available:
Function
Page
Adjust driver seat
179
Adjust passenger seat
179