Page 261 of 521

260 Controls in detailLoadingSplit rear bench seat
To expand the cargo compartment, you
can fold down the left and right rear seat
backrests.
The two sections can be folded down sep-
arately to enlarge the cargo compartment.Folding the backrest forward
1Release catch
2Seat cushion
�
Pull release catch1 and use it to pull
seat cushion2 up.1Release catch
2Seat backrest
�
Pull release catch1 up.
The seat backrest is released and the
head restraints fold back.
�
Fold the seat backrest2 forward.
Warning!
G
When expanding the cargo compartment, al-
ways fold the seat cushions fully forward.
Unless you are transporting cargo, the back-
rests must remain properly locked in the up-
right position.
In an accident, during hard braking or sud-
den maneuvers, loose items will be thrown
around inside the vehicle, and cause injury
to vehicle occupants unless the items are
securely fastened in the vehicle.
Always use the cargo tie down rings
(�page 264).
!You must always release the seat cush-
ion and fold it up before folding the seat
backrests forward. The upholstery on
the backrest may otherwise be dam-
aged.
iIf tall persons have occupied the
driver’s and front passenger seats, it
may be necessary to move these seats
forward slightly in order to fold the rear
seat backrests forward.
Page 268 of 521
267 Controls in detail
Loading
Belt reel
1Belt reel
2Mounting element
3Locking button
�
Insert two mounting elements 2 into a
cargo rail.
�
Turn mounting element 2 in the cargo
rail toN.
�
Insert belt reel 1 into mounting ele-
ment 2.
�
Turn mounting element 2 in the cargo
rail until it engages in the‹ posi-
tion.
You should be able to feel the mounting
element engage in the cargo rail.
�
Press locking button 3 on the belt reel
and pull cargo net out in direction of ar-
row.
�
Place load between the cargo net and
the side wall of the cargo compart-
ment.
�
Press locking button 3 on belt reel.
With the other hand, slowly pull net
over load until it is taut.Telescoping rod
1Telescoping rod
2Mounting element
iThe belt reel can be used to tighten
light-weight loads against the side wall
of the cargo compartment, thus secur-
ing them from slipping.
iThe telescoping rod can be used to
tighten the load against the rear seats
so as to secure it from slipping.
Page 269 of 521

268 Controls in detailLoading�
Insert one mounting element 2 into
each cargo rail.
�
Turn mounting element 2 in cargo rail
toN.
�
Insert telescoping rod 1 into mount-
ing element 2.
�
Turn mounting element 2 in cargo rail
until it engages in the‹ position.
You should be able to feel the mounting
element engage in the cargo rail.Storage box in cargo compartment
(Canada only)
1Storage boxWarning!
G
When you are using the storage box in the
cargo compartment, the backrests of the
seats in front of it must be completely en-
gaged to the rear, and the twin roller blind
must be installed.
Do not exceed the storage box’s maximum
load of 44 lbs (20 kg), as it could otherwise
become detached during an accident or
sharp braking maneuvers, and could injure
you or other passengers.
When leaving the vehicle, always remove the
SmartKey or the SmartKey with
KEYLESS-GO* from the starter switch, take
it with you, and lock the vehicle. Do not
leave children unattended in the vehicle, or
with access to an unlocked vehicle. Unsu-
pervised use of vehicle equipment may
cause an accident and/or serious personal
injury.
Page 274 of 521
273 Controls in detail
Useful features
Storage compartment in the rear cen-
ter console�
Briefly press the top of the compart-
ment.
It extends automatically.Ruffled storage bags
Ruffled storage bags are located on the
back of the front seats.
Warning!
G
Do not place objects with a combined
weight of more than 4.4 lbs (2 kg) into the
ruffled storage bag. Otherwise, the Occu-
pant Classification System OCS (
�page 81)
may not be able to properly approximate the
occupant weight category.
The ruffled storage bag is intended for stor-
ing light-weight items only.
Heavy objects, objects with sharp edges or
fragile objects may not be transported in the
ruffled storage bag. In an accident, during
hard braking, or sudden maneuvers, they
could be thrown around inside the vehicle
and cause injury to vehicle occupants.
The ruffled storage bag cannot protect
transported goods in the event of an acci-
dent.
Page 351 of 521

350 OperationTires and wheelsTire ply material
1Plies in sidewall
2Plies under tread
This marking tells you about the type of
cord and number of plies in the sidewall
and under the tread.
Tire and loading terminology
Accessory weight
The combined weight (in excess of those
standard items which may be replaced) of
automatic transmission, power steering,
power brakes, power windows, power
seats, radio, and heater, to the extent that
these items are available as
factory-installed equipment (whether
installed or not).
Air pressure
The amount of air inside the tire pressing
outward on each square inch of the tire.
Air pressure is expressed in pounds per
square inch (psi), or kilopascal (kPa) or
bar.
Aspect ratio
Dimensional relationship between tire
section height and section width
expressed in percentage.Bar
Another metric unit for air pressure. There
are 14.5038 pounds per square inch (psi)
to 1 bar; there are 100 kilopascals (kPa)
to 1 bar.
Bead
The tire bead contains steel wires wrapped
by steel cords that hold the tire onto the
rim.
Cold tire inflation pressure
Tire inflation pressure when your vehicle
has been sitting for at least 3 hours or driv-
en no more than 1 mile (1.6 km).
Curb weight
The weight of a motor vehicle with stan-
dard equipment including the maximum
capacity of fuel, oil, and coolant, and, if so
equipped, air conditioning and additional
optional equipment, but without passen-
gers and cargo.
iFor illustration purposes only. Actual
data on tires are specific to each vehi-
cle and may vary from data shown in
above illustration.
Page 369 of 521

368 OperationVehicle careHard plastic trim items�
Use Pour Mercedes-Benz approved
Interior Care, a soft, lint-free cloth and
apply with light pressure onto.
Steering wheel and gear selector lever
�
Wipe with a damp cloth and dry thor-
oughly or clean with Mercedes-Benz
approved Leather Care.
Carpets
�
Use Mercedes-Benz approved Carpet
and Fabric Care for cleaning the car-
pets.
Headliner and shelf below rear window
�
Use a soft bristle brush or a dry-sham-
poo cleaner in case of excessive dirt. Seat belts
�
Only use clear, lukewarm water and
soap.Upholstery
Using aftermarket seat covers or wearing
clothing that have the tendency to give off
coloring (e.g. when wet, etc.) may cause
the upholstery to become permanently dis-
colored. By lining the seats with a proper
intermediate cover, contact-discoloration
will be prevented.
Leather upholstery
�
Wipe leather upholstery with a damp
cloth and dry thoroughly or clean with
Mercedes-Benz approved Leather
Care.
Exercise particular care when cleaning per-
forated leather as its underside should not
become wet.
!To prevent scratches, do not use scour-
ing agents.
!The webbing must not be treated with
chemical cleaning agents. Do not dry
the webbing at temperatures above
176°F (80°C) or in direct sunlight.Warning!
G
Do not bleach or dye seat belts as this may
severely weaken them. In a crash they may
not be able to provide adequate protection.
Page 429 of 521

428 Practical hintsResetting activated head restraintsIf the active head restraints have been trig-
gered in an accident, the active head re-
straints must be reset. Otherwise, the
active head restraints cannot offer any ad-
ditional protection in the event of another
rear-end collision.
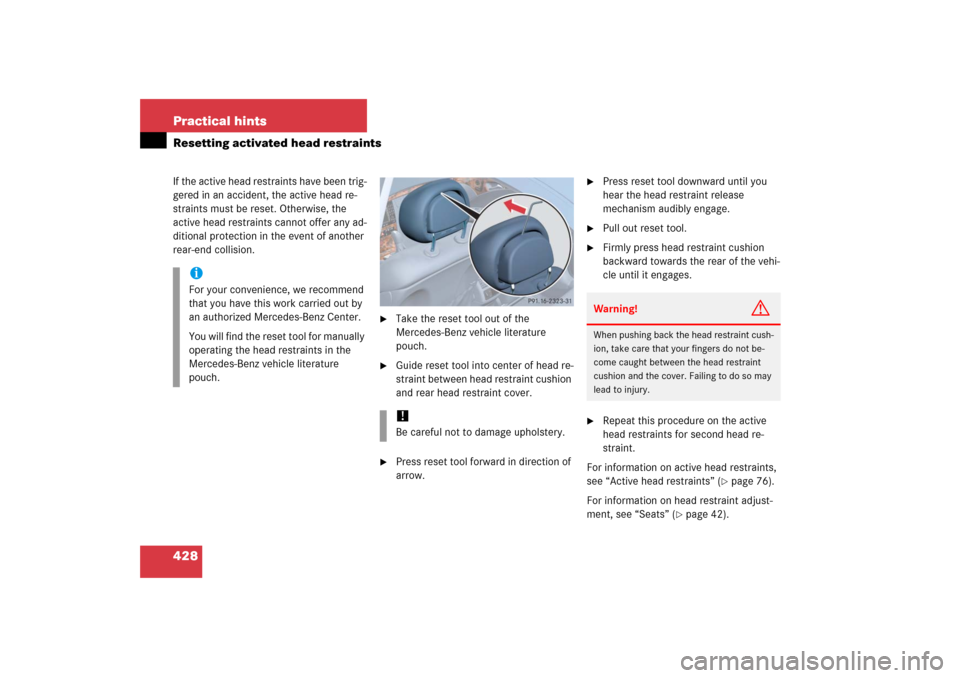
�
Take the reset tool out of the
Mercedes-Benz vehicle literature
pouch.
�
Guide reset tool into center of head re-
straint between head restraint cushion
and rear head restraint cover.
�
Press reset tool forward in direction of
arrow.
�
Press reset tool downward until you
hear the head restraint release
mechanism audibly engage.
�
Pull out reset tool.
�
Firmly press head restraint cushion
backward towards the rear of the vehi-
cle until it engages.
�
Repeat this procedure on the active
head restraints for second head re-
straint.
For information on active head restraints,
see “Active head restraints” (
�page 76).
For information on head restraint adjust-
ment, see “Seats” (
�page 42).
iFor your convenience, we recommend
that you have this work carried out by
an authorized Mercedes-Benz Center.
You will find the reset tool for manually
operating the head restraints in the
Mercedes-Benz vehicle literature
pouch.
!Be careful not to damage upholstery.
Warning!
G
When pushing back the head restraint cush-
ion, take care that your fingers do not be-
come caught between the head restraint
cushion and the cover. Failing to do so may
lead to injury.
Page 505 of 521

504 IndexGear selector lever, Cleaning 368
Global Positioning System see GPS
Glove box 272
Good visibility 197
GPS 493
Gross Axle Weight Rating see GAWR
Gross Vehicle Weight Rating see GVWR
Gross Vehicle Weight see GVW
GVW 351
GVWR 351
H
Halogen headlamps see Headlamps
Hard plastic trim items, cleaning 368
Hazard warning flasher 147
Head restraints 129
Folding back 132
Front seat, Adjusting 42
Rear seat, Removing and installing
Removing and installing 132
Headlamp cleaning system* 197
Headlamp shut-off delay see Delayed
shut-off, Exterior lampsHeadlamps
Automatic headlamp mode 144
Bi-Xenon*
Cleaning lenses 365
Cleaning system* 197
Halogen 434
High beam see High beam flasher
High beam see High beam headlamps
Low beam see Low beam headlamps
Manual headlamp mode 144
Messages in display 409, 410, 411,
412
Replacing bulbs 434
Switch 54
Headliner and shelf below rear window,
Cleaning and care of 368
Heated seats* 135
Heated steering wheel* 279
Height adjustment
Vehicle level control 256
High beam flasher 147
High beam headlamps
Indicator lamp 25
Messages in display 410
Replacing bulbs 432
Switching onHigh mounted brake lamp 432
Hood 315
Message in display 407
Horn 23
Hydroplaning 305
I
Identification labels 468
Identification Number, Vehicle (VIN) 468
Ignition 36, 50
Switching on 51
Immobilizer 101
Indicator lamps see Lamps, indicator and
warning
Infant and child restraint systems see Chil-
dren in the vehicle
Inflation pressure see Tires, Inflation pres-
sure
Inside door handle 119
Instrument cluster 24, 151, 493
Cleaning 367
Illumination brightness 151
Lamps 372
Messages in display see Multifunction
display messages
Multifunction display 155