Page 313 of 521

312 OperationAt the gas stationRefueling
The fuel filler flap is located on the
right-hand side of the vehicle towards the
rear. Locking/unlocking the vehicle with
the remote control automatically
locks/unlocks the fuel filler flap.
�
Turn the engine off �
by turning the SmartKey to
position0.
�
by pressing the KEYLESS-GO*
start/stop button. Open the driv-
er’s door (with the driver’s door
open, starter switch is now in
position0, same as SmartKey re-
moved from starter switch).
�
Remove the SmartKey from the starter
switch.
�
Open the fuel filler flap by pushing at
the point indicated by the arrow.
The fuel filler flap springs open.
�
Turn the fuel cap to the left and hold on
to it until possible pressure is released.
�
Take off the cap and set it in the recess
on the fuel filler flap.
To prevent fuel vapors from escaping
into open air, fully insert filler nozzle
unit.
�
Only fill your tank until the filler nozzle
unit cuts out – do not top up or over-
fill.
�
Replace fuel cap by turning it clockwise
until it audibly engages.
�
Close the fuel filler flap.
Warning!
G
Gasoline is highly flammable and poisonous.
It burns violently and can cause serious
injury. Whenever you are around gasoline,
avoid inhaling fumes and skin contact, extin-
guish all smoking materials. Never allow
sparks, flame or smoking materials near
gasoline!
Warning!
G
Overfilling of the fuel tank may create pres-
sure in the system which could cause a gas
discharge. This could cause the gasoline to
spray back out when removing the fuel
pump nozzle, which could cause personal in-
jury.
Page 314 of 521

313 Operation
At the gas station
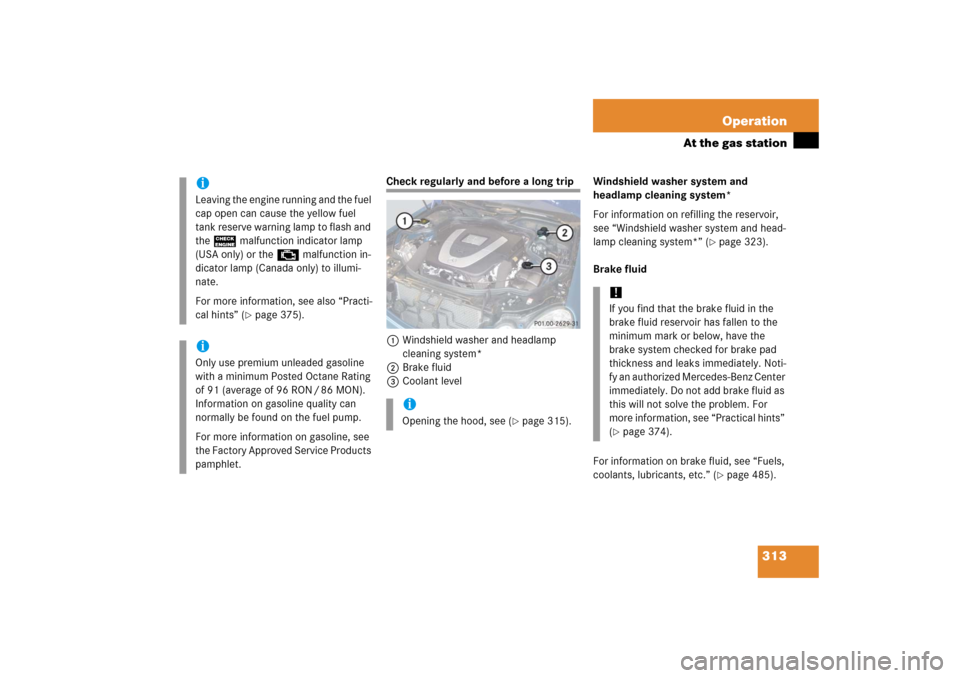
Check regularly and before a long trip
1Windshield washer and headlamp
cleaning system*
2Brake fluid
3Coolant levelWindshield washer system and
headlamp cleaning system*
For information on refilling the reservoir,
see “Windshield washer system and head-
lamp cleaning system*” (
�page 323).
Brake fluid
For information on brake fluid, see “Fuels,
coolants, lubricants, etc.” (�page 485).
iLeaving the engine running and the fuel
cap open can cause the yellow fuel
tank reserve warning lamp to flash and
the? malfunction indicator lamp
(USA only) or the ± malfunction in-
dicator lamp (Canada only) to illumi-
nate.
For more information, see also “Practi-
cal hints” (
�page 375).
iOnly use premium unleaded gasoline
with a minimum Posted Octane Rating
of 91 (average of 96 RON / 86 MON).
Information on gasoline quality can
normally be found on the fuel pump.
For more information on gasoline, see
the Factory Approved Service Products
pamphlet.
iOpening the hood, see (
�page 315).
!If you find that the brake fluid in the
brake fluid reservoir has fallen to the
minimum mark or below, have the
brake system checked for brake pad
thickness and leaks immediately. Noti-
fy an authorized Mercedes-Benz Center
immediately. Do not add brake fluid as
this will not solve the problem. For
more information, see “Practical hints”
(�page 374).
Page 445 of 521

444 Practical hintsFlat tire�
After driving vehicle for an initial
10 minutes, check tire inflation pres-
sure using the pressure gauge on the
air pump.
�
Visit an authorized Mercedes-Benz
Center as soon as possible to obtain a
new TIREFIT kit.
�
Bring used TIREFIT materials to an au-
thorized Mercedes-Benz Center for
proper disposal.
�
Replace your TIREFIT container every
four years. Replacement containers are
available at your authorized
Mercedes-Benz Center.
Warning!
G
If tire inflation pressure has fallen below
20 psi (1.3 bar) do not continue to drive the
vehicle.
Park your vehicle safely away from the road-
way and contact the nearest authorized
Mercedes-Benz Center or Roadside
Assistance.
If tire inflation pressure is at least
20 psi (1.3 bar), inflate tire to correct pres-
sure (see placard on the driver’s door
B-pillar), and drive vehicle to nearest tire re-
pair facility to have tire repaired or replaced.
Recommended duration of use:
300 miles (500 km) at 50 mph (80 km/h)
with the recommended tire inflation pres-
sure.
Warning!
G
Follow recommend inflation pressures.
Do not overinflate tires. Overinflating tires
can result in sudden deflation (blowout) be-
cause they are more likely to become punc-
tured or damaged by road debris, potholes,
etc.
Do not underinflate tires. Underinflated tires
wear unevenly, adversely affect handling
and fuel economy, and are more likely to fail
from being overheated.
Do not overload the tires by exceeding the
specified vehicle capacity weight (as indicat-
ed by the label on the pillar in the driver’s
door opening). Overloading the tires can
overheat them, possibly causing a blowout.
Warning!
G
Do not exceed vehicle speed of 50 mph
(80 km/h). A TIREFIT repair is not designed
to operate at higher speeds.
The sticker must be attached on the instru-
ment cluster where it will be easily seen by
the driver.
Vehicle handling characteristics may
change. Adapt your driving accordingly.
��
Page 451 of 521

450 Practical hintsFlat tire�
Press0 on electric air pump switch 2.
�
Turn the SmartKey in the starter switch
to position0.
�
If the tire pressure is above 51 psi
(3.5 bar), release excess tire pressure
using the vent screw.
�
Detach the electric air pump.
�
Store the electrical plug 3 and the air
hose 4 behind the flap 1 and place
the electric air pump back in the desig-nated storage space underneath the
cargo compartment floor
(
�page 419).
Lowering the vehicle
�
Lower vehicle by turning crank coun-
terclockwise until vehicle is resting ful-
ly on its own weight.
�
Remove the jack.
1-5 Wheel bolts
�
Tighten the five wheel bolts evenly, fol-
lowing the diagonal sequence illustrat-
ed (1 to 5), until all bolts are tight.
Observe a tightening torque of 96 lb-ft
(130 Nm).Before storing the jack, it should be fully
collapsed, with handle folded in (storage
position).
�
Store the jack and the other vehicle
tools in the designated storage space
underneath the cargo compartment
floor (
�page 419).
Warning!
G
Follow recommend inflation pressures.
Do not overinflate tires. Overinflating tires
can result in sudden deflation (blowout) be-
cause they are more likely to become punc-
tured or damaged by road debris, potholes,
etc.
Do not underinflate tires. Underinflated tires
wear unevenly, adversely affect handling
and fuel economy, and are more likely to fail
from being overheated.
Warning!
G
Have the tightening torque checked after
changing a wheel. The wheels could come
loose if they are not tightened to a torque of
96 lb-ft (130 Nm).iWrap the damaged wheel in the protec-
tive film that comes with the spare
wheel and put the wheel in the cargo
compartment.
Do not activate the tire pressure moni-
toring system* until the depressurized
tire is no longer in the vehicle.
��