Page 244 of 473
.Opening and closing the power
tilt/sliding sunroof
�To open, close, raise, or lower the
tilt/sliding sunroof, mov")
243 Controls in detail
Power tilt/sliding sunroof
�Switch on the ignition (�page 33).Opening and closing the power
tilt/sliding sunroof
�To open, close, raise, or lower the
tilt/sliding sunroof, move the sunroof
switch to resistance point in the
required direction of arrows1 to4.
Release the sunroof switch when the
tilt/sliding sunroof has reached the
desired position.
Fully opening (Express-open) and
closing (Express-close) the power
tilt/sliding sunroof
�To open or close the tilt/sliding
sunroof, move the sunroof switch past
the resistance point in the required
direction of arrow1 to4 and
release.
The tilt/sliding sunroof opens or closes
completely.
When leaving the vehicle, always remove the
SmartKey from the starter switch, take it
with you, and lock the vehicle. Do not leave
children unattended in the vehicle, or with
access to an unlocked vehicle. Unsuper-
vised use of vehicle equipment can cause an
accident and/or serious personal injury.
!
To avoid damaging the seals, do not
transport any objects with sharp edges
which can stick out of the tilt/sliding
sunroof.
Do not open the tilt/sliding sunroof if
there is snow or ice on the roof, as this
could result in malfunctions.
The tilt/sliding sunroof can be opened
or closed manually should an electrical
malfunction occur (
�page 389).
i
You can also open or close the tilt/slid-
ing sunroof using the SmartKey, see
“Summer opening feature”
(
�page 241) and “Convenience clos-
ing feature” (
�page 241).
Depending on current position, the
tilt/sliding sunroof may also open or
close when the air recirculation
button, in the control panel of the
climate control (
�page 175) or auto-
matic climate control* (Canada only)
(
�page 191), or the charcoal filter
buttone in the control panel of the
automatic climate control* (Canada
only) (
�page 193) is pressed and held.
Page 245 of 473
244 Controls in detail
Power tilt/sliding sunroof
Stopping the power tilt/sliding sunroof
during Express-operation
�Move the sunroof switch in any
direction.Synchronizing the power tilt/sliding
sunroof
The tilt/sliding sunroof must be
synchronized
�after the battery has been
disconnected or discharged
�after the tilt/sliding sunroof has been
closed manually (
�page 389)
�after a malfunction
�if the tilt/sliding sunroof does not open
smoothly
�Switch on the ignition (�page 33).
�Move and hold the sunroof switch in di-
rection of arrow1 (
�page 242) until
the tilt/sliding sunroof is fully raised at
the rear.
�Hold the sunroof switch for
approximately 1 second.
�Check the Express-open feature
(
�page 243).
If the tilt/sliding sunroof opens
completely, the tilt/sliding sunroof is
synchronized. Otherwise repeat the
above steps.
i
If the movement of the tilt/sliding
sunroof is blocked during the closing
procedure, the tilt/sliding sunroof will
stop and reopen slightly.
Page 253 of 473

252 Controls in detail
Loading
Installing the ski sack
Install the ski sack in the reverse order.
�Push ski sack frame2 with ski sack
inward until the ski sack frame snaps
into place.
�Close flap3.
�Close trunk lid.
Split rear bench seat
To expand the cargo area, you can fold
down the left and right rear seat backrests.
The two sections can be folded down
separately.Folding the backrest forward
The release handle1 is located in the
trunk.
�Pull release handle1.
�Fully retract and fold rearward head
restraints (
�page 108).
Warning!G
Never drive vehicle with trunk open while
the ski sack is removed. Deadly carbon
monoxide (CO) gases may enter vehicle in-
terior, resulting in unconsciousness and
death.
i
To prevent unauthorized persons from
accessing the trunk, always close the
flap.
Warning!G
When expanding the luggage area, always
fold the seat cushions fully forward.
Unless you are transporting cargo, the
backrests must remain properly locked in
the upright position.
In an accident, during hard braking or
sudden maneuvers, loose items will be
thrown around inside the vehicle, and cause
injury to vehicle occupants unless the items
are securely fastened in the vehicle.
Always use the cargo tie down rings*
(
�page 255).
Page 254 of 473
253 Controls in detail
Loading
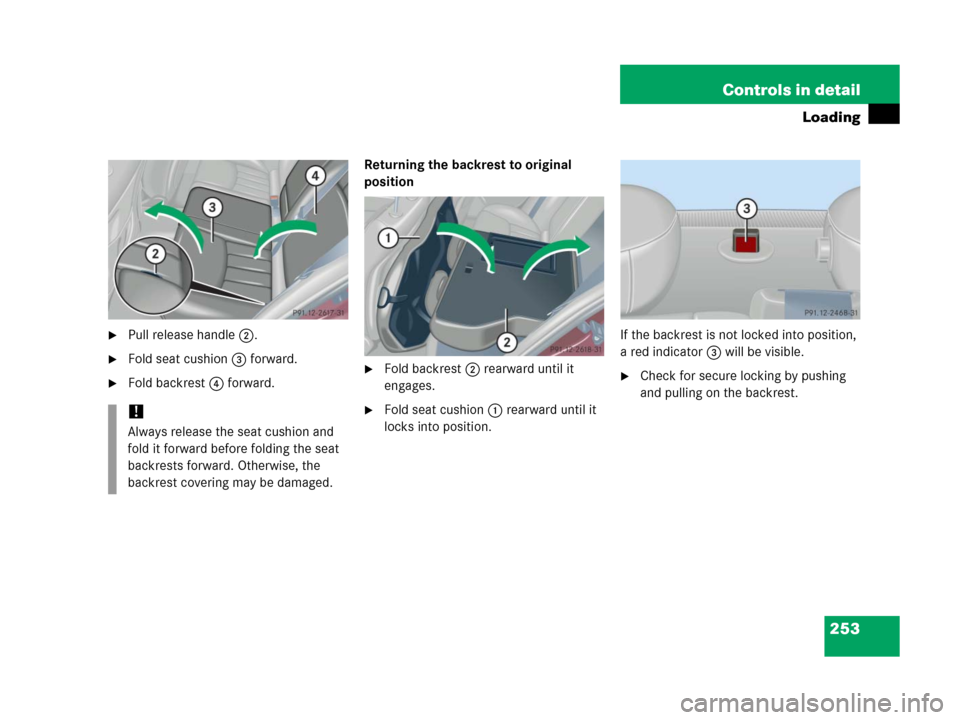
�Pull release handle2.
�Fold seat cushion3 forward.
�Fold backrest4 forward.Returning the backrest to original
position�Fold backrest2 rearward until it
engages.
�Fold seat cushion1 rearward until it
locks into position.If the backrest is not locked into position,
a red indicator3 will be visible.
�Check for secure locking by pushing
and pulling on the backrest.
!
Always release the seat cushion and
fold it forward before folding the seat
backrests forward. Otherwise, the
backrest covering may be damaged.
Page 255 of 473

254 Controls in detail
Loading
Loading instructions
The total load weight including vehicle
occupants and luggage/cargo should not
exceed the load limit or vehicle capacity
weight indicated on the corresponding
placard located on the driver’s door
B-pillar.
The handling characteristics of a fully load-
ed vehicle depend greatly on the load dis-
tribution. It is therefore recommended to
load the vehicle according to the illustra-
tions shown, with the heaviest items being
placed towards the front of the vehicle.Always place items being carried against
front or rear seat backrests, and fasten
them as securely as possible.
The heaviest portion of the cargo should al-
ways be kept as low as possible since it in-
fluences the handling characteristics of
the vehicle.
Warning!G
If a red indicator is visible with the backrest
up, then the backrest is not properly locked
into position.
Always lock backrest in its upright position
when rear seat bench is occupied, cargo is
being carried in the trunk, or the extended
cargo compartment is not in use. Check for
secure locking by pushing and pulling on the
backrest.
In an accident, during hard braking or sud-
den maneuvers, loose items will be thrown
around inside the vehicle, and cause injury
to vehicle occupants unless the items are
securely fastened in the vehicle.
To help avoid personal injury during a
collision or sudden maneuver, exercise care
when transporting cargo.
i
To prevent unauthorized persons from
access to the trunk, always lock
backrest in its upright position.
Warning!G
Always fasten items being carried as secure-
ly as possible using cargo tie-down rings and
fastening materials appropriate for the
weight and size of the load.
In an accident, during hard braking or sud-
den maneuvers, loose items will be thrown
around inside the vehicle and can cause in-
jury to vehicle occupants unless the items
are securely fastened in the vehicle.
Page 257 of 473

256 Controls in detail
Useful features
Storage compartments Glove box
1Glove box lid release
2Glove box
Opening glove box
�Pull glove box lid release1.
The glove box lid2 opens downward.
Closing glove box
�Push glove box lid2 up to close.1Unlocking
2Locking
Locking glove box
�Insert mechanical key (�page 386)
into the glove box lock and turn it to
position2.
Unlocking glove box
�Turn mechanical key in the glove box
lock to position1.
Warning!G
To help avoid personal injury during a colli-
sion or sudden maneuver, exercise care
when storing objects in the vehicle. Put lug-
g a g e o r c a r g o i n t h e t r u n k i f p o s s i b l e . D o n o t
pile luggage or cargo higher than the seat
backs. Do not place anything on the shelf
below the rear window.
Luggage nets cannot secure hard or heavy
objects.
Keep compartment lids closed. This will help
to prevent stored objects from being thrown
about and injuring vehicle occupants during
an accident.
i
Audio system/COMAND* with CD
changer*: The CD changer* is located
in the glove box.
Page 263 of 473
.1Cover plate
2Cigarette lighter
�Briefly press the bottom of cover
plate1.
The cover plate opens automatica")
262 Controls in detail
Useful features
Cigarette lighter
�Switch on the ignition (�page 33).1Cover plate
2Cigarette lighter
�Briefly press the bottom of cover
plate1.
The cover plate opens automatically.
�Push in cigarette lighter2.
The cigarette lighter will pop out
automatically when hot.
Warning!G
Never touch the heating element or sides of
the lighter; they are extremely hot. Hold the
knob only.
When leaving the vehicle, always remove the
SmartKey from the starter switch, take it
with you, and lock the vehicle. Do not leave
children unattended in the vehicle, or with
access to an unlocked vehicle. Unsuper-
vised use of vehicle equipment may cause
an accident and/or serious personal injury.
!
The lighter socket can be used to ac-
commodate 12V DC electrical acces-
sories (up to a maximum of 85 W)
designed for use with the standard
“cigarette lighter” plug type. Keep in
mind, however, that connecting acces-
sories to the lighter socket (for exam-
ple extensive connecting and
disconnecting, or using plugs that do
not fit properly) can damage the lighter
socket. With the socket damaged, the
lighter may no longer be able to be
placed in the heating (pushed-in) posi-
tion, or the lighter may pop out too ear-
ly with the lighter not hot enough.
To help avoid damaging the cigarette
lighter socket, we recommend con-
necting 12V DC electrical accessories
designed for use with the standard
“cigarette lighter” plug type to the 12V
power outlets (
�page 263) in your ve-
hicle whenever possible.
Page 265 of 473

264 Controls in detail
Useful features
You can take and place telephone calls
using thes andt buttons on the
steering wheel. To carry out other tele-
phone functions, use the control system
(
�page 152).
See separate operating manual for instruc-
tions on how to use the telephone.
Tele Aid*
Shortly after the completion of your Tele
Aid acquaintance call, you will receive a
user ID and password. By visiting
www.mbusa.com and selecting “Tele Aid”
(USA only), you will have access to account
information, remote door unlock and
more.
Warning!G
Please do not forget that your primary re-
sponsibility is to drive the vehicle. A driver’s
attention to the road must always be
his/her primary focus when driving. For
your safety and the safety of others, we rec-
ommend that you pull over to a safe location
and stop before placing or taking a tele-
phone call.
If you choose to use the telephone
1 while
driving, please use the hands-free device
and only use the telephone when road,
weather and traffic conditions permit. Some
jurisdictions prohibit the driver from using a
cellular telephone while driving a vehicle.
Only operate the COMAND* (Cockpit Man-
agement and Data System)
1 if road, weather
and traffic conditions permit.
Bear in mind that at a speed of just 30 mph
(approximately 50 km/h), your vehicle is
covering a distance of 44 feet
(approximately 14 m) every second.
1Observe all legal requirements.
!
The initial activation of the Tele Aid
system may only be performed by
completing the subscriber agreement
and placing an acquaintance call using
the ¡button. Failure to complete
either of these steps will result in a
system that is not activated.
If you have any questions regarding
activation, please call the Response
Center at 1-800-756-9018 (in the USA)
or 1-888-923-8367 (in Canada).