Page 384 of 473

383 Practical hints
Where will I find ...?
Spare wheel
The spare wheel with collapsible tire is lo-
cated in the storage compartment under-
neath the trunk floor.
�Lift up trunk floor cover and engage
trunk floor handle in upper edge of
trunk.
1Spare wheel with collapsible tire
2Vehicle tool kit (under collapsible tire)
3Retaining screwRemoving the spare wheel
�Loosen retaining screw3 by turning it
counterclockwise.
�Remove spare wheel1.
Storing the spare wheel
If you wish to store the spare wheel after
use, carry out the following steps.
Otherwise the spare wheel will not fit the
storage compartment.
�Unscrew the valve cap from the valve
of the collapsible tire.
�Take the valve extractor from the
vehicle tool kit (
�page 381).
�Unscrew the valve insert from the valve
and allow the air to escape.
�Screw the valve insert back into the
valve.
�Screw the valve cap back on the valve.
�Pull the protective wrap provided with
the vehicle tool kit over the spare
wheel.
�Store the spare wheel and the valve ex-
tractor in the storage compartment un-
derneath the trunk floor.
!
Make sure the spare wheel is dry when
storing it.
i
It may take a few minutes for the col-
lapsible tire to deflate completely.
��
Page 385 of 473

384 Practical hints
Where will I find ...?
�Pierce the protective wrap with
retaining screw3.
�Secure the spare wheel by turning re-
taining screw3 clockwise.In case of a flat tire, you may temporarily
use the spare wheel with collapsible tire
when observing the following restrictions:
�Do not exceed a vehicle speed of
50 mph (80 km/h).
�Drive to the nearest tire repair facility
to have the flat tire repaired or
replaced as appropriate.
�Do not operate vehicle with more than
one spare wheel mounted.
For more information, see “Rims and Tires”
(
�page 429).
!
To prevent damage, always disengage
trunk floor handle from upper edge of
trunk and lower trunk floor before
closing the trunk.
Warning!G
The dimensions of the spare wheel with
collapsible tire are different from those of
the road wheels. As a result, the vehicle han-
dling characteristics change when driving
with a spare wheel mounted.
The spare wheel with collapsible tire should
only be used temporarily, and should be re-
placed with a regular road wheel as quickly
as possible.
��
Page 387 of 473
386 Practical hints
Unlocking/locking in an emergency
Unlocking the vehicle
If you are unable to unlock the vehicle with
the SmartKey, open the driver’s door and
the trunk using the mechanical key. Removing the mechanical key
1Mechanical key locking tab
2Mechanical key
�Move locking tab1 in direction of
arrow.
�Slide mechanical key2 out of the
housing.Unlocking the driver’s door
1Unlocking
�Insert the mechanical key into the
driver’s door lock until it stops.
�Turn the mechanical key counterclock-
wise to position1.
The driver’s door is unlocked.
i
Unlocking and opening the driver’s
door and/or the trunk with the me-
chanical key will trigger the anti-theft
alarm system*.
To cancel the alarm, do one of the
following:
�Press buttonŒ or‹ on the
SmartKey.
�Insert the SmartKey in the starter
switch.
Page 388 of 473
 is required to open the trunk lid.
The trunk lid lock is located n")
387 Practical hints
Unlocking/locking in an emergency
Unlocking and opening the trunk
A minimum height clearance of 5.71 ft
(1.74 m) is required to open the trunk lid.
The trunk lid lock is located next to the
handle above the rear license plate recess.
1Unlocking in an emergency
2Handle�Insert the mechanical key into the
trunk lid lock until it stops.
�Turn the mechanical key
counterclockwise to position1.
The trunk lid unlocks.
�Pull on handle2.
The trunk opens.
�Turn the mechanical key back and
remove it from the trunk lid lock.
Locking the vehicle
If you can not lock the vehicle with the
SmartKey, do the following:
�Close the passenger door, the rear
doors and the trunk.
�Press the central locking switch in the
center console (
�page 104).
�Check to see whether the locking
knobs on the doors have moved down.
�If necessary push them down manually.
�Remove the mechanical key out of the
SmartKey (
�page 386).
�Check whether the trunk is locked.
�If necessary, lock the trunk with the
mechanical key (
�page 103).
�Close the driver’s door.
Except for the driver’s door, the vehicle
should now be locked.
!
The trunk lid swings open upwards
automatically. Always make sure there
is sufficient overhead clearance.
��
Page 389 of 473
388 Practical hints
Unlocking/locking in an emergency
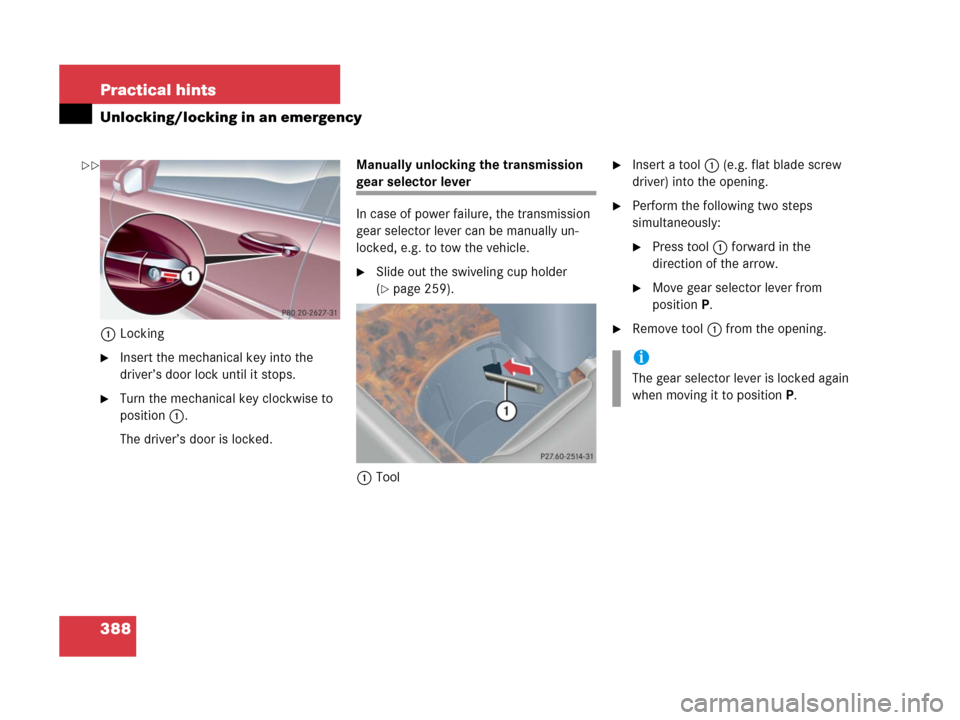
1Locking
�Insert the mechanical key into the
driver’s door lock until it stops.
�Turn the mechanical key clockwise to
position1.
The driver’s door is locked.Manually unlocking the transmission
gear selector lever
In case of power failure, the transmission
gear selector lever can be manually un-
locked, e.g. to tow the vehicle.
�Slide out the swiveling cup holder
(
�page 259).
1Tool
�Insert a tool1 (e.g. flat blade screw
driver) into the opening.
�Perform the following two steps
simultaneously:
�Press tool1 forward in the
direction of the arrow.
�Move gear selector lever from
positionP.
�Remove tool1 from the opening.
i
The gear selector lever is locked again
when moving it to positionP.
��
Page 390 of 473
389 Practical hints
Opening/closing in an emergency
�Opening/closing in an emergency
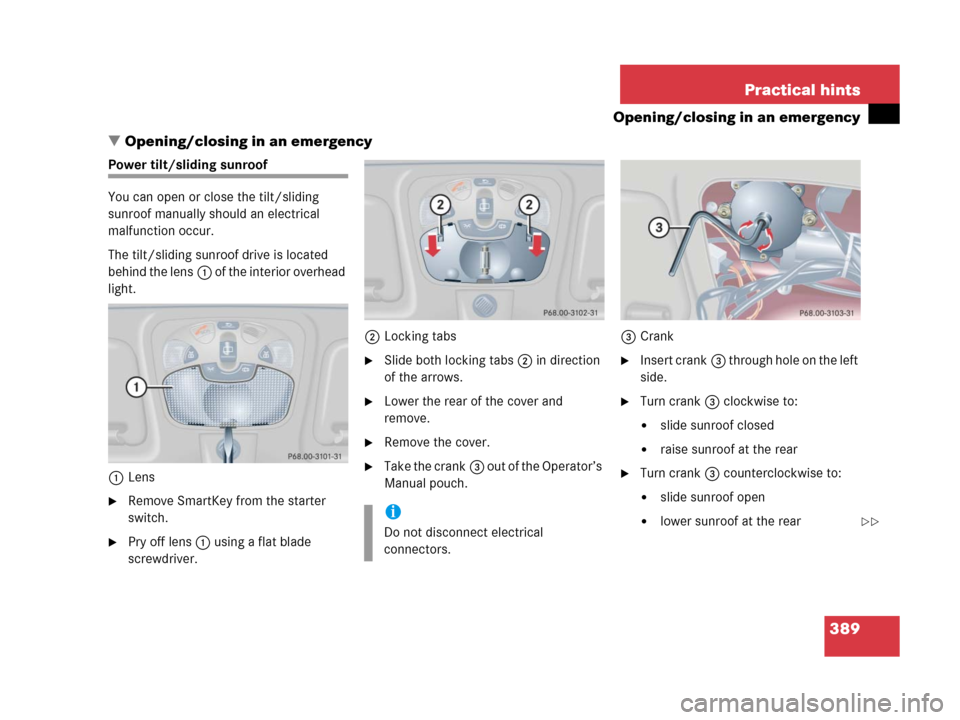
Power tilt/sliding sunroof
You can open or close the tilt/sliding
sunroof manually should an electrical
malfunction occur.
The tilt/sliding sunroof drive is located
behind the lens1 of the interior overhead
light.
1Lens
�Remove SmartKey from the starter
switch.
�Pry off lens1 using a flat blade
screwdriver.2Locking tabs
�Slide both locking tabs2 in direction
of the arrows.
�Lower the rear of the cover and
remove.
�Remove the cover.
�Take the crank3 out of the Operator’s
Manual pouch.3Crank
�Insert crank3 through hole on the left
side.
�Turn crank3 clockwise to:
�slide sunroof closed
�raise sunroof at the rear
�Turn crank3 counterclockwise to:
�slide sunroof open
�lower sunroof at the reari
Do not disconnect electrical
connectors.��
Page 393 of 473
392 Practical hints
Replacing SmartKey batteries
If the batteries in the SmartKey are
discharged, the vehicle can no longer be
locked or unlocked. It is recommended to
have the batteries replaced at an
authorized Mercedes-Benz Center.Batteries contain materials that can harm
the environment if disposed of improperly.
Recycling of batteries is the preferred
method of disposal. Many states require
sellers of batteries to accept old batteries
for recycling.
Warning!G
Keep the batteries out of reach of children.
If a battery is swallowed, seek medical help
immediately.
i
When inserting the batteries, make
sure they are clean and free of lint.
i
When replacing batteries, always
replace both batteries of both
SmartKeys.
The required replacement batteries are
available at any Mercedes-Benz
Center.
Page 394 of 473
393 Practical hints
Replacing SmartKey batteries
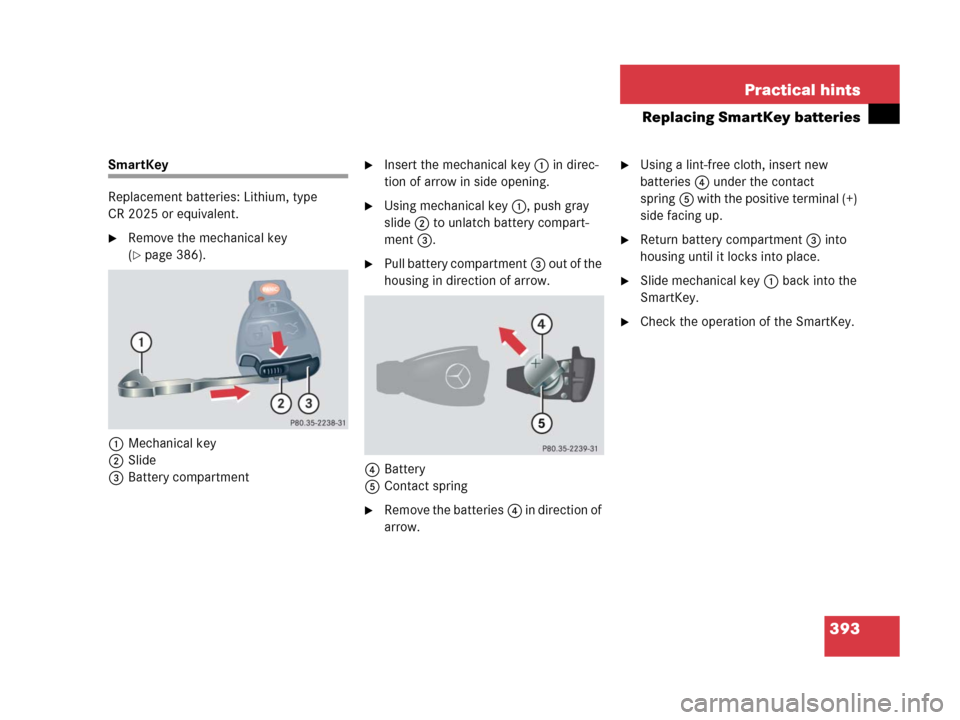
SmartKey
Replacement batteries: Lithium, type
CR 2025 or equivalent.
�Remove the mechanical key
(
�page 386).
1Mechanical key
2Slide
3Battery compartment
�Insert the mechanical key1 in direc-
tion of arrow in side opening.
�Using mechanical key1, push gray
slide 2 to unlatch battery compart-
ment 3.
�Pull battery compartment3 out of the
housing in direction of arrow.
4Battery
5Contact spring
�Remove the batteries4 in direction of
arrow.
�Using a lint-free cloth, insert new
batteries4 under the contact
spring5 with the positive terminal (+)
side facing up.
�Return battery compartment3 into
housing until it locks into place.
�Slide mechanical key1 back into the
SmartKey.
�Check the operation of the SmartKey.