Page 399 of 473

398 Practical hints
Replacing bulbs
Low beam bulb
�Press the clamp on housing cover1
and remove it.
�Pull the electrical connector off.
�Turn bulb socket4 counterclockwise
and take out the bulb.
�Insert the new bulb so that its socket
locates in the recess of the lamp
housing.
�Turn bulb socket4 clockwise until it
engages.
�Plug the electrical connector onto the
bulb.
�Align housing cover1 and press until
it engages.High beam bulb
�Press the clamp on housing cover2
and remove it.
�Pull the electrical connector off.
�Turn bulb socket5 counterclockwise
and take out the bulb.
�Insert the new bulb so that its socket
locates in the recess of the lamp
housing.
�Turn bulb socket5 clockwise until it
engages.
�Plug the electrical connector onto the
bulb.
�Align housing cover2 and press until
it engages.Front turn signal lamp bulb
�Turn bulb socket3 with the bulb
counterclockwise and remove it.
�Press gently onto the bulb and turn it
counterclockwise out of bulb
socket3.
�Press new bulb gently into bulb
socket3 and turn clockwise until it
engages.
�Place bulb socket3 back into the
lamp and turn it clockwise.
Parking and standing lamp bulb
�Press the clamp on housing cover2
and remove it.
�Pull out bulb socket6 with the bulb.
�Pull the bulb out of bulb socket6.
�Press the new bulb into bulb socket6.
�Press bulb socket6 back into the
lamp.
�Align housing cover2 and press until
it engages.
Page 400 of 473
399 Practical hints
Replacing bulbs
Bi-Xenon* headlamp
1Housing cover for Bi-Xenon headlamp
2Housing cover for high beam flasher,
parking and standing lamp3Bulb socket for turn signal lamp bulb
4Bulb socket for high beam flasher bulb
5Bulb socket for parking and standing
lamp bulbHigh beam flasher bulb
�Press the clamp on housing cover2
and remove it.
�Pull the electrical connector off.
�Turn bulb socket4 counterclockwise
and take out the bulb.
�Insert the new bulb so that its socket
locates in the recess of the lamp
housing.
�Turn bulb socket4 clockwise until it
engages.
�Plug the electrical connector onto the
bulb.
�Align housing cover2 and press until
it engages.
Warning!G
Do not remove the cover1 for the
Bi-Xenon headlamp. Because of high voltage
in Bi-Xenon lamps, it is dangerous to replace
the bulb or repair the lamp and its compo-
nents. We recommend that you have such
work done by a qualified technician.
Page 401 of 473

400 Practical hints
Replacing bulbs
Front turn signal lamp bulb
�Turn bulb socket3 with the bulb
counterclockwise and remove it.
�Press gently onto the bulb and turn it
counterclockwise out of bulb
socket3.
�Press new bulb gently into bulb
socket3 and turn clockwise until it
engages.
�Place bulb socket3 back into the
lamp and turn it clockwise.
Parking and standing lamp bulb
�Press the clamp on housing cover2
and remove it.
�Pull out bulb socket5 with the bulb.
�Pull the bulb out of bulb socket5.
�Press the new bulb into bulb socket5.
�Press bulb socket5 back into the
lamp.
�Align housing cover2 and press until
it engages.Additional turn signal lamp bulbs
The additional turn signal lamps in the
exterior rear view mirrors have LEDs.
If a malfunction occurs or LEDs fail to func-
tion, the entire turn signal unit must be re-
placed. Have the turn signal unit replaced
by an authorized Mercedes-Benz Center.
Front side marker lamp bulbs
Since replacing the side marker lamp bulbs
is a technically highly demanding process,
we recommend you have the side marker
lamp bulbs replaced by an authorized
Mercedes-Benz Center.
Replacing bulbs for rear lamps
Before you start to replace a bulb for a rear
lamp, do the following first:
�Turn the exterior lamp switch to
positionM (
�page 114).
�Open the trunk (�page 99).
Tail lamp unit
1Latch
Page 402 of 473
401 Practical hints
Replacing bulbs
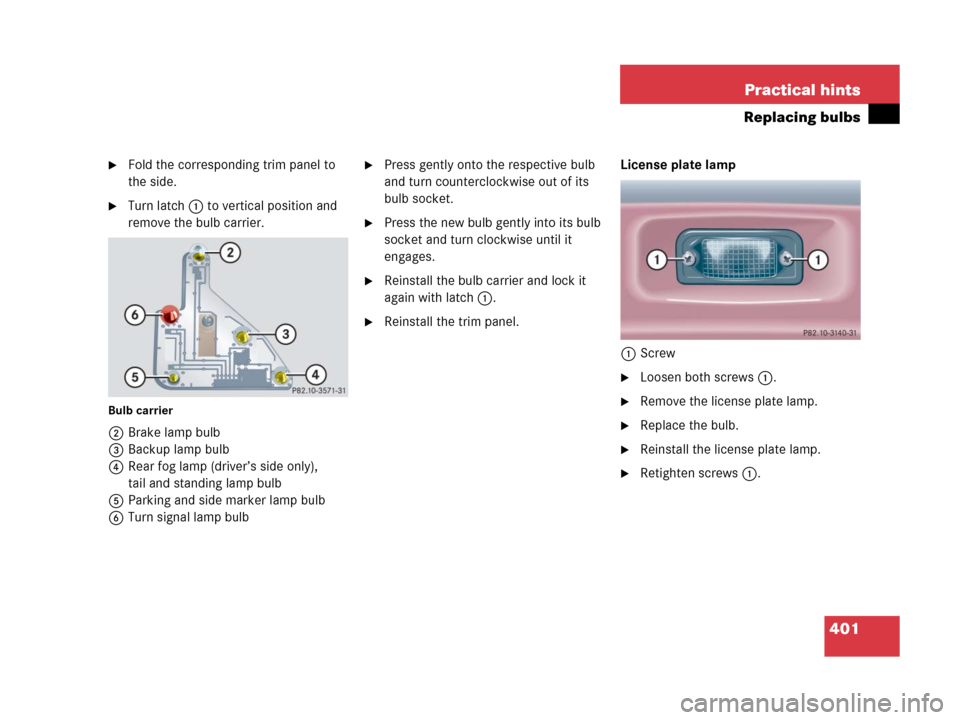
�Fold the corresponding trim panel to
the side.
�Turn latch1 to vertical position and
remove the bulb carrier.
Bulb carrier
2Brake lamp bulb
3Backup lamp bulb
4Rear fog lamp (driver’s side only),
tail and standing lamp bulb
5Parking and side marker lamp bulb
6Turn signal lamp bulb
�Press gently onto the respective bulb
and turn counterclockwise out of its
bulb socket.
�Press the new bulb gently into its bulb
socket and turn clockwise until it
engages.
�Reinstall the bulb carrier and lock it
again with latch1.
�Reinstall the trim panel.License plate lamp
1Screw
�Loosen both screws1.
�Remove the license plate lamp.
�Replace the bulb.
�Reinstall the license plate lamp.
�Retighten screws1.
Page 403 of 473
402 Practical hints
Replacing wiper blades
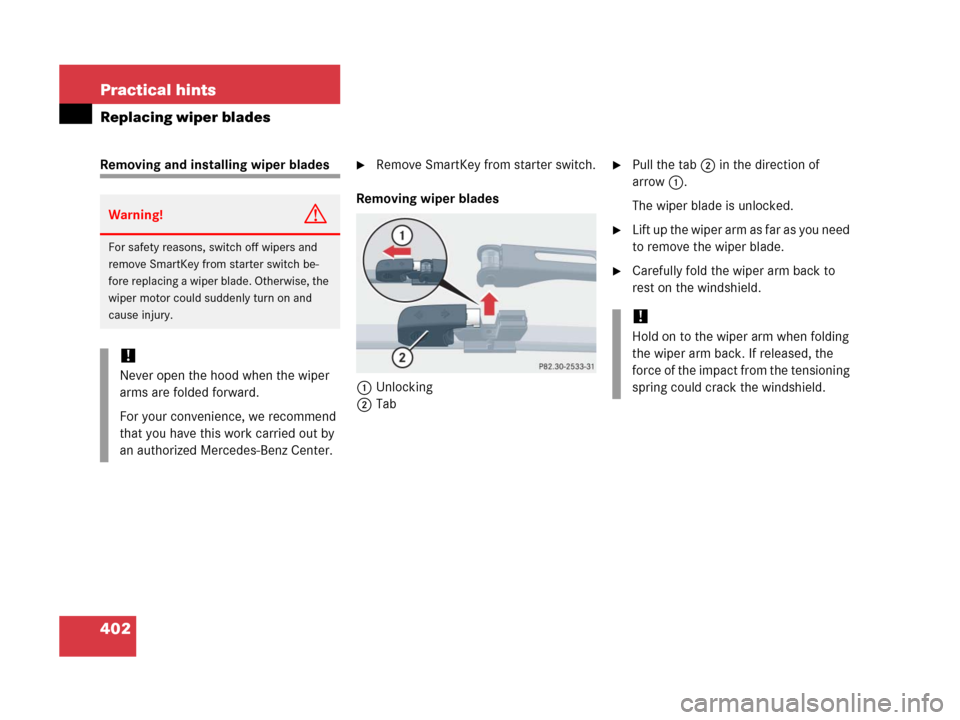
Removing and installing wiper blades�Remove SmartKey from starter switch.
Removing wiper blades
1Unlocking
2Tab�Pull the tab2 in the direction of
arrow1.
The wiper blade is unlocked.
�Lift up the wiper arm as far as you need
to remove the wiper blade.
�Carefully fold the wiper arm back to
rest on the windshield.
Warning!G
For safety reasons, switch off wipers and
remove SmartKey from starter switch be-
fore replacing a wiper blade. Otherwise, the
wiper motor could suddenly turn on and
cause injury.
!
Never open the hood when the wiper
arms are folded forward.
For your convenience, we recommend
that you have this work carried out by
an authorized Mercedes-Benz Center.
!
Hold on to the wiper arm when folding
the wiper arm back. If released, the
force of the impact from the tensioning
spring could crack the windshield.
Page 404 of 473
403 Practical hints
Replacing wiper blades
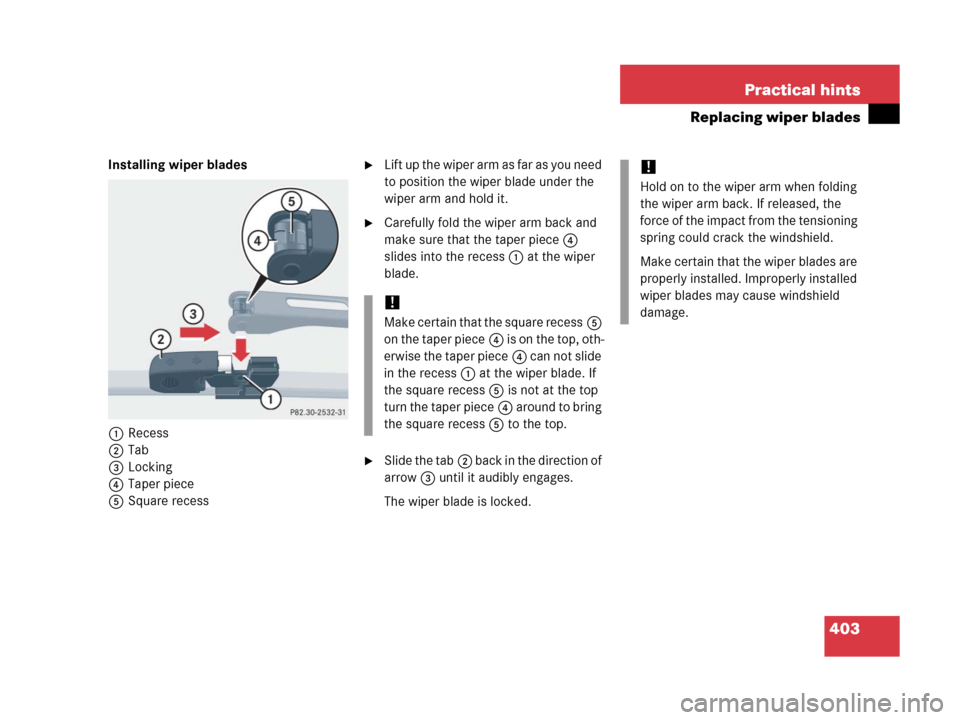
Installing wiper blades
1Recess
2Tab
3Locking
4Taper piece
5Square recess�Lift up the wiper arm as far as you need
to position the wiper blade under the
wiper arm and hold it.
�Carefully fold the wiper arm back and
make sure that the taper piece4
slides into the recess1 at the wiper
blade.
�Slide the tab2 back in the direction of
arrow3 until it audibly engages.
The wiper blade is locked.
!
Make certain that the square recess5
on the taper piece4 is on the top, oth-
erwise the taper piece4 can not slide
in the recess1 at the wiper blade. If
the square recess5 is not at the top
turn the taper piece4 around to bring
the square recess5 to the top.
!
Hold on to the wiper arm when folding
the wiper arm back. If released, the
force of the impact from the tensioning
spring could crack the windshield.
Make certain that the wiper blades are
properly installed. Improperly installed
wiper blades may cause windshield
damage.
Page 406 of 473

405 Practical hints
Flat tire
Lifting the vehicle
�Prevent the vehicle from rolling away
by blocking wheels with wheel chocks
or other sizable objects.
One wheel chock is included with the
vehicle tool kit (
�page 380).
When changing wheel on a level surface:
�Place the wheel chock in front of and
another sizable object behind the
wheel that is diagonally opposite to the
wheel being changed.
Always try lifting the vehicle using the jack
on a level surface. However, should cir-
cumstances require you to do so on a hill,
place the wheel chock and the other size-
able object as follows:
�Place wheel chocks and another siz-
able object on the downhill side block-
ing both wheels of the axle not being
worked on.
�On wheel to be changed, loosen but do
not yet remove the wheel bolts
(approximately one full turn with
wrench).
Warning!G
The jack is designed exclusively for jacking
up the vehicle at the jack take-up brackets
built into both sides of the vehicle. To help
avoid personal injury, use the jack only to lift
the vehicle during a wheel change. Never
get beneath the vehicle while it is supported
by the jack. Keep hands and feet away from
the area under the lifted vehicle. Always
firmly set parking brake and block wheels
before raising vehicle with jack.
Do not disengage parking brake while the
vehicle is raised. Be certain that the jack is
always vertical (plumb line) when in use,
especially on hills. Always try to use the jack
on level surface. Make sure the jack arm is
fully seated in the jack take-up bracket. Al-
ways lower the vehicle onto sufficient ca-
pacity jackstands before working under the
vehicle.
��
Page 411 of 473
410 Practical hints
Flat tire
Lowering the vehicle
�Lower vehicle by turning crank
counterclockwise until vehicle is
resting fully on its own weight.
�Remove the jack.1 - 5Wheel bolts
�Tighten the five wheel bolts evenly,
following the diagonal sequence
illustrated (1to5), until all bolts are
tight. Observe a tightening torque
of 80 lb-ft (110 Nm).Before storing the jack, it should be fully
collapsed, with handle folded in (storage
position) (
�page 381).
�Store the jack and the other vehicle
tools in the trunk.
Warning!G
Inflate collapsible tire only after the wheel is
properly mounted.
Inflate the collapsible tire using the electric
pump (
�page 408) before lowering the ve-
hicle.
Warning!G
Have the tightening torque checked after
changing a wheel. The wheels could come
loose if they are not tightened to a torque
of 80 lb-ft (110 Nm).