Page 103 of 473

102 Controls in detail
Locking and unlocking
Trunk emergency release
With the emergency release button, the
trunk can be opened from inside the trunk.
The emergency release button is located
on the inside of the trunk lid.
1Emergency release button
�Briefly press emergency release
button1.
The trunk unlocks and the trunk lid
opens.Illumination of the emergency release
button:
�The button flashes 30 minutes after
opening the trunk.
�The button flashes 60 minutes after
closing the trunk.
!
The trunk lid swings open upwards
automatically.
i
The emergency release button unlocks
and opens the trunk while the vehicle is
standing still or in motion.
i
The emergency release button does
not open the trunk lid if the vehicle
battery is discharged or disconnected.
i
If the vehicle has previously been
locked with the SmartKey, opening the
trunk from the inside using the emer-
gency release button will trigger the
anti-theft alarm system*.
To cancel the alarm, do one of the
following:
�Press buttonŒ or‹ on the
SmartKey.
�Insert the SmartKey in the starter
switch.
Page 104 of 473
.
�Pull th")
103 Controls in detail
Locking and unlocking
Valet locking
The lock is located next to the handle
above the rear license plate recess.
1Neutral position
2Locked
�Close the trunk (�page 101).
�Pull the mechanical key out of the
SmartKey (
�page 386).
�Insert the mechanical key in the trunk
lid lock.
�Turn the mechanical key clockwise to
position2 and remove the mechani-
cal key in that position to lock the
trunk.
The trunk remains locked even when the
vehicle is centrally unlocked.
�Insert the mechanical key in the trunk
lid lock.
�Turn the mechanical key counterclock-
wise to neutral position1 and remove
the mechanical key in that position to
unlock the trunk.
You can now open the trunk
(
�page 99).
Automatic central locking
The doors and the trunk automatically lock
when the ignition is switched on and the
wheels are turning at vehicle speeds of
approximately 9 mph (15 km/h) or more.
You can open a locked door from the
inside. Open door only when conditions
are safe to do so.
You can deactivate the automatic locking
mode using the control system, see “Set
automatic locking” (
�page 147).
i
To deny any unauthorized person ac-
cess to the trunk, lock it separately
with the mechanical key. Leave only
the SmartKey less its mechanical key
with the vehicle.
i
You can only cancel the separate trunk
locking mode by means of the
mechanical key.
i
The doors unlock automatically after an
accident if the force of the impact
exceeds a preset threshold.
To prevent the vehicle door locks from
locking, deactivate the automatic
central locking when the vehicle
�is pushed or towed
�is on a test stand
Page 105 of 473

104 Controls in detail
Locking and unlocking
Locking and unlocking from the inside
You can lock or unlock the doors and the
trunk from inside using the central locking
or unlocking switch. This can be useful, for
example, if you want to lock the vehicle
before starting to drive.
You cannot lock or unlock the fuel filler flap
with the central locking or unlocking
switch.The switches are located in the center
console.
1Central locking switch
2Central unlocking switch
Warning!G
When leaving the vehicle, always remove the
SmartKey from the starter switch, take it
with you, and lock the vehicle. Do not leave
children unattended in the vehicle, or with
access to an unlocked vehicle. Unsuper-
vised use of vehicle equipment may cause
an accident and/or serious personal injury.
i
You can open a locked door from the
inside. Open door only when conditions
are safe to do so.
If the vehicle was previously centrally
locked using the SmartKey, it will not
unlock using the central unlocking
switch2.
If the vehicle was previously locked
with the central locking switch1
�while in the selective remote con-
trol mode, only the door opened
from the inside is unlocked.
�while in the global remote control
mode, the complete vehicle is
unlocked when a door is opened
from the inside.
Page 106 of 473
105 Controls in detail
Locking and unlocking
Locking
�Press central locking switch1.
If all doors are closed, the vehicle
locks.
Unlocking
�Press central unlocking switch2.
The vehicle unlocks.
Page 109 of 473
108 Controls in detail
Seats
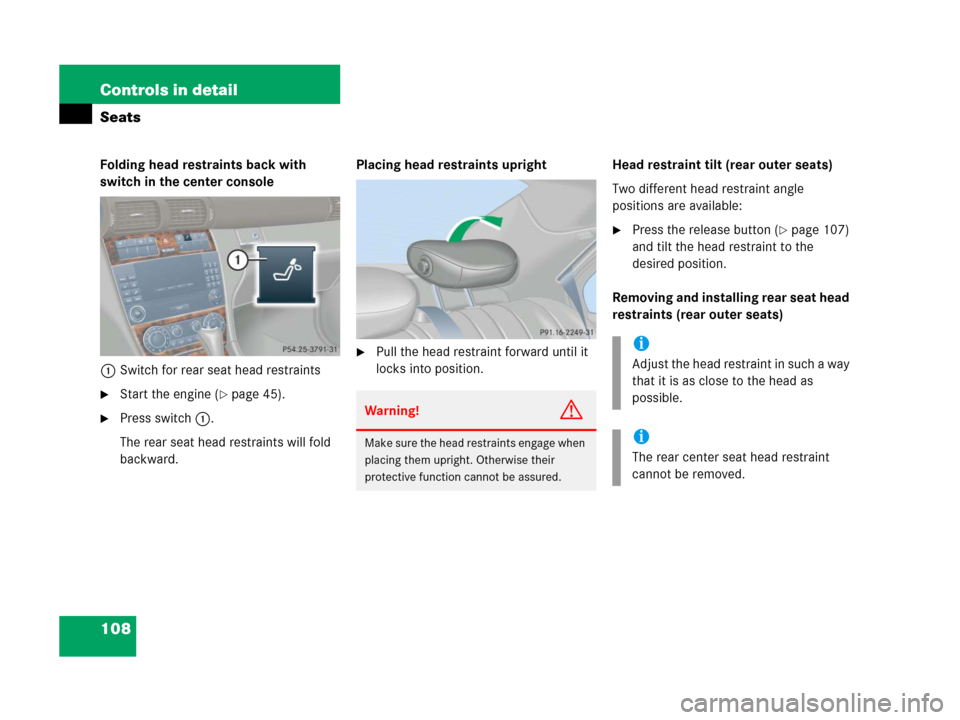
Folding head restraints back with
switch in the center console
1Switch for rear seat head restraints
�Start the engine (�page 45).
�Press switch1.
The rear seat head restraints will fold
backward.Placing head restraints upright
�Pull the head restraint forward until it
locks into position.Head restraint tilt (rear outer seats)
Two different head restraint angle
positions are available:
�Press the release button (�page 107)
and tilt the head restraint to the
desired position.
Removing and installing rear seat head
restraints (rear outer seats)
Warning!G
Make sure the head restraints engage when
placing them upright. Otherwise their
protective function cannot be assured.
i
Adjust the head restraint in such a way
that it is as close to the head as
possible.
i
The rear center seat head restraint
cannot be removed.
Page 121 of 473

120 Controls in detail
Lighting
Interior lighting
The controls are located in the overhead
control panel.
1Rear interior lights on/off
2Right front reading lamp on/off
3Rocker switch for automatic control
system
4Left front reading lamp on/offDeactivating automatic control
�Press the= symbol on rocker
switch3.
The interior lighting remains switched
off in darkness, even when you
�unlock the vehicle
�open a door
�remove the SmartKey from the
starter switchActivating automatic control
�Press rocker switch3 to center
position.
The interior lighting switches on in
darkness, when you
�unlock the vehicle
�open a door
�remove the SmartKey from the
starter switch
The interior lighting switches off after a
preset time (
�page 147).
!
Leaving an interior light switch in the
ON position for extended periods of
time with the engine turned off could
result in a discharged battery.
i
If the door remains open, the interior
lamps switch off automatically after
approximately 5 minutes, when the
SmartKey is removed or in starter
switch position0.
An interior lamp switched on manually
does not go out automatically.
Page 123 of 473
.
1Reset button
The instrument cluster is activated when
you
�open")
122 Controls in detail
Instrument cluster
For a full view illustration of the instrument
cluster, see “At a glance” (
�page 24).
1Reset button
The instrument cluster is activated when
you
�open a door
�switch on the ignition (�page 33)
�press reset button1
�switch on the exterior lighting
You can change the instrument cluster
settings in the Instrument cluster submenu
of the control system (
�page 138).
Instrument cluster illumination
Use reset button1 to adjust the
illumination brightness for the instrument
cluster.
To brighten illumination
�Turn reset button1 clockwise.
The instrument cluster illumination will
brighten.
To dim illumination
�Turn reset button1 counterclock-
wise.
The instrument cluster illumination will
dim.
Warning!G
No messages will be displayed if either the
instrument cluster or the multifunction dis-
play is inoperative.
As a result, you will not be able to see infor-
mation about your driving conditions, such
as speed or outside temperature, warning/
indicator lamps, malfunction/warning mes-
sages or the failure of any systems. Driving
characteristics may be impaired.
If you must continue to drive, please do so
with added caution. Visit an authorized
Mercedes-Benz Center as soon as possible.
i
The instrument cluster illumination is
dimmed or brightened automatically to
suit ambient light conditions.
The instrument cluster illumination will
also be adjusted automatically when
you switch on the vehicle’s exterior
lamps.
Page 126 of 473

125 Controls in detail
Control system
�Control system
The control system is activated as soon as
the SmartKey in the starter switch is
turned to position1. The control system
enables you to
�call up information about your vehicle
�change vehicle settings
For example, you can use the control
system to find out when your vehicle is
next due for service, to set the language
for messages in the instrument cluster
display, and much more.
The control system relays information to
the multifunction display.
Multifunction display
1Trip odometer
2Main odometer
3Current program mode
(automatic transmission)
4Current gear selector lever
position/gear range
(automatic transmission)
5Digital clock
6Status indicator (outside tempera-
ture/digital speedometer)
i
The displays for the audio systems
(radio, CD player) will appear in English,
regardless of the language selected.
Warning!G
A driver’s attention to the road and traffic
conditions must always be his/her primary
focus when driving.
For your safety and the safety of others,
selecting features through the multifunction
steering wheel should only be done by the
driver when traffic and road conditions
permit it to be done safely.
Bear in mind that at a speed of just 30 mph
(approximately 50 km/h), your vehicle is
covering a distance of 44 feet
(approximately 14 m) every second.