Page 347 of 473

346 Operation
Vehicle care
Light alloy wheels
If possible, clean wheels once a week.
�Use Mercedes-Benz approved Wheel
Care, a soft bristle brush and a strong
spray of water for cleaning the light al-
loy wheels.
Plastic and rubber parts
�Use a gentle dishwashing detergent or
mild detergent for delicate fabrics as a
washing solution.
Instrument cluster and cup holders
�Use a gentle dishwashing detergent or
mild detergent for delicate fabrics as a
washing solution.
�Wipe with a cloth moistened in a luke-
warm solution.Hard plastic trim items
�Use Mercedes-Benz approved Interior
Care, a soft, lint-free cloth and apply
with light pressure.
Steering wheel and gear selector lever
�Wipe with a damp cloth and dry thor-
oughly or clean with Mercedes-Benz
approved Leather Care.
Carpets
�Use Mercedes-Benz approved Carpet
and Fabric Care for cleaning the car-
pets.
!
Only use acid-free cleaning materials.
Acid may cause corrosion or damage
the clear coat.
!
The vehicle should not be parked for an
extended period of time immediately
after it has been cleaned, especially not
after the wheel rims have been cleaned
with wheel rim cleaner. Wheel rim
cleaners can lead to increased corro-
sion of the brake disks and brake pads.
Therefore, the vehicle’s brake system
should always be warmed-up before it
is parked after cleaning. To do so,
please drive your vehicle for several
minutes to allow the brakes to dry.
When applying Mercedes-Benz ap-
proved Tire Care and Mercedes-Benz
approved Wheel Care products, take
care not to spray them on the brake
disks.
!
Do not use oil or wax on these parts.
!
To prevent scratches, do not use scour-
ing agents.
!
To prevent scratches, do not use scour-
ing agents.
Page 348 of 473

347 Operation
Vehicle care
Headliner and shelf below rear window
�Use a soft bristle brush or a dry-sham-
poo cleaner in case of excessive dirt.
Seat belts
�Only use clear, lukewarm water and
soap.Upholstery
Using aftermarket seat covers or wearing
clothing that have the tendency to give off
coloring (e.g. when wet, etc.) may cause
the upholstery to become permanently dis-
colored. By lining the seats with a proper
intermediate cover, contact-discoloration
will be prevented.
Leather upholstery
�Wipe leather upholstery with a damp
cloth and dry thoroughly or clean with
Mercedes-Benz approved Leather
Care.
Exercise particular care when cleaning per-
forated leather as its underside should not
become wet.MB Tex upholstery
�Use Mercedes-Benz approved Interior
Care onto a soft, lint-free cloth and ap-
ply with light pressure for cleaning the
upholstery.
Wood trims
�Dampen cloth using water and use
damp cloth to clean wood trims in your
vehicle.!
The webbing must not be treated with
chemical cleaning agents. Do not dry
the webbing at temperatures above
176°F (80°C) or in direct sunlight.
Warning!G
Do not bleach or dye seat belts as this may
severely weaken them. In a crash they may
not be able to provide adequate protection.
!
Do not use solvents like tar remover or
wheel cleaner nor polishes or waxes as
these may be abrasive.
Page 375 of 473

374 Practical hints
What to do if …
Display symbolDisplay messagePossible cause/consequencePossible solution
.3rd brake lampThe high mounted brake lamp is
malfunctioning. This message will only
appear if all light emitting diodes have
stopped working.�Visit an authorized Mercedes-Benz
Center as soon as possible.
Backup lamp, leftThe left backup lamp is malfunctioning.�Replace the bulb as soon as possible.
Backup lamp, rightThe right backup lamp is malfunctioning.�Replace the bulb as soon as possible.
Brake lamp
Drive to workshopBrake lamp illumination is delayed or
lamp is permanently on.�Visit an authorized Mercedes-Benz
Center as soon as possible.
Brake lamp leftThe left brake lamp is malfunctioning.�Replace the bulb as soon as possible.
Brake lamp rightThe right brake lamp is malfunctioning.�Replace the bulb as soon as possible.
Display malfunction
Visit workshop.The display for the lamps or the system is
malfunctioning.�Visit an authorized Mercedes-Benz
Center as soon as possible.
Front foglamp leftThe left front fog lamp is malfunctioning.�Visit an authorized Mercedes-Benz
Center as soon as possible.
Front foglamp rightThe right front fog lamp is malfunctioning.�Visit an authorized Mercedes-Benz
Center as soon as possible.
Front left
side marker lampThe left front side marker lamp is
malfunctioning.�Visit an authorized Mercedes-Benz
Center as soon as possible.
Front right
sider marker lampThe right front side marker lamp is
malfunctioning.�Visit an authorized Mercedes-Benz
Center as soon as possible.
Page 376 of 473

375 Practical hints
What to do if …
Display symbolDisplay messagePossible cause/consequencePossible solution
.High beam leftThe left high beam lamp is
malfunctioning.�Replace the bulb as soon as possible.
High beam rightThe right high beam lamp is
malfunctioning.�Replace the bulb as soon as possible.
License plate lamp,
leftThe left license plate lamp is
malfunctioning.�Replace the bulb as soon as possible.
License plate lamp,
rightThe right license plate lamp is
malfunctioning.�Replace the bulb as soon as possible.
Light sensor
Drive to workshopThe light sensor is malfunctioning.
The headlamps switch on automatically.�In the control system, set lamp
operation to manual (
�page 144).
�Switch on the headlamps using the
exterior lamp switch (
�page 114).
�Visit an authorized Mercedes-Benz
Center as soon as possible.
Low beam leftThe left low beam lamp is malfunctioning.Halogen headlamp:
�Replace the bulb as soon as possible.
Bi-Xenon* headlamp:
�Visit an authorized Mercedes-Benz
Center as soon as possible.
Page 377 of 473

376 Practical hints
What to do if …
Display symbolDisplay messagePossible cause/consequencePossible solution
.Low beam rightThe right low beam lamp is
malfunctioning.Halogen headlamp:
�Replace the bulb as soon as possible.
Bi-Xenon* headlamp:
�Visit an authorized Mercedes-Benz
Center as soon as possible.
Parking lamp
left frontThe left front parking lamp is
malfunctioning.�Replace the bulb as soon as possible.
Parking lamp
right frontThe right front parking lamp is
malfunctioning.�Replace the bulb as soon as possible.
Rear fog lamp
Substit. bulb onThe rear fog lamp is malfunctioning.
A substitute bulb is being used.�Replace the bulb as soon as possible.
Switch off lightsHeadlamps have been turned on with the
driver’s door opened and the SmartKey
removed from the starter switch.�Switch off the headlamps.
Taillamp left
Substit. bulb on
The left tail lamp is malfunctioning.
A substitute bulb is being used.�Replace the bulb as soon as possible.
Taillamp right
Substit. bulb on
The right tail lamp is malfunctioning.
A substitute bulb is being used.�Replace the bulb as soon as possible.
Page 378 of 473

377 Practical hints
What to do if …
Display symbolDisplay messagePossible cause/consequencePossible solution
.Turn signal
left frontThe left front turn signal lamp is
malfunctioning.�Replace the bulb as soon as possible.
Turn signal
right frontThe right front turn signal lamp is
malfunctioning.�Replace the bulb as soon as possible.
Turn signal
left mirrorThe left turn signal in the side mirror is
malfunctioning. This message will only
appear if all light emitting diodes have
stopped working.�Visit an authorized Mercedes-Benz
Center as soon as possible.
Turn signal
right mirrorThe right turn signal in the side mirror is
malfunctioning. This message will only
appear if all light emitting diodes have
stopped working.�Visit an authorized Mercedes-Benz
Center as soon as possible.
Turn signal
left rear
Substit. bulb on
The left rear turn signal lamp is
malfunctioning.
A substitute bulb is being used.�Replace the bulb as soon as possible.
Turn signal
right rear
Substit. bulb on
The right rear turn signal lamp is
malfunctioning.
A substitute bulb is being used.�Replace the bulb as soon as possible.
Page 386 of 473
385 Practical hints
Where will I find ...?
Spare wheel bolts
1Wheel bolt for light alloy rims
2Wheel bolt for spare wheel (located in
trunk with spare wheel)!
Wheel bolts2 must be used when
mounting the spare wheel. The use of
any wheel bolts other than wheel
bolts2 for the spare wheel will physi-
cally damage the vehicle’s brakes.
Warning!G
Make sure to use the original length wheel
bolts when remounting the original wheel
after it has been repaired.
Page 390 of 473
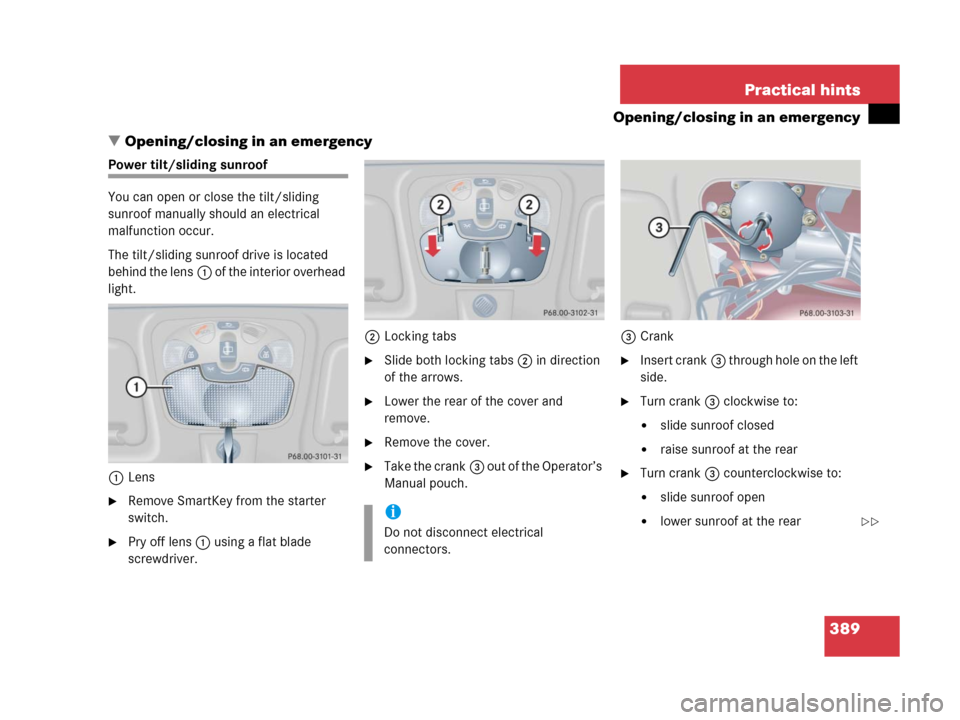
389 Practical hints
Opening/closing in an emergency
�Opening/closing in an emergency
Power tilt/sliding sunroof
You can open or close the tilt/sliding
sunroof manually should an electrical
malfunction occur.
The tilt/sliding sunroof drive is located
behind the lens1 of the interior overhead
light.
1Lens
�Remove SmartKey from the starter
switch.
�Pry off lens1 using a flat blade
screwdriver.2Locking tabs
�Slide both locking tabs2 in direction
of the arrows.
�Lower the rear of the cover and
remove.
�Remove the cover.
�Take the crank3 out of the Operator’s
Manual pouch.3Crank
�Insert crank3 through hole on the left
side.
�Turn crank3 clockwise to:
�slide sunroof closed
�raise sunroof at the rear
�Turn crank3 counterclockwise to:
�slide sunroof open
�lower sunroof at the reari
Do not disconnect electrical
connectors.��
!
Wheel bolts2 must be used when
mounting")