Page 239 of 473

238 Controls in detail
Power windows
Opening and closing the windows
The side windows are opened and closed
electrically. The switches for all the side
windows are on the driver’s door. The
switches for the respective windows are
on the front passenger door and the rear
doors.
1Left front window
2Right front window
3Right rear window
4Left rear window
5Rear window override switch
(
�page 80)
Warning!G
When closing the power windows, make
sure there is no danger of anyone being
harmed by the closing procedure.
The closing of the door windows can be im-
mediately halted by releasing the switch or,
if switch was pulled past the resistance
point and released, by either pressing or
pulling the respective switch.
If the window encounters an obstruction
t h a t b l o c k s i t s p a t h i n a c i r c u m s t a n c e w h e r e
you pulled the switch past the resistance
point and released it to close the window,
the automatic reversal function will stop the
window and open it slightly.
If the window encounters an obstruction
that blocks its path in a circumstance where
you are closing the window by pulling and
holding the switch, by pressing and holding
button‹ on the SmartKey, or by press-
ing and holding button, ore on the
automatic climate control panel, the auto-
matic reversal function will not operate.
When leaving the vehicle, always remove the
SmartKey from the starter switch, take it
with you, and lock the vehicle. Do not leave
children unattended in the vehicle, or with
access to an unlocked vehicle. Unsuper-
vised use of vehicle equipment can cause an
accident and/or serious personal injury.
Page 241 of 473

240 Controls in detail
Power windows
Stopping windows
�Press or pull respective switch again.
Synchronizing power windows
The power windows must be
resynchronized each time
�after the battery has been
disconnected or discharged.
�if the power windows cannot be fully
opened (Express-open) or closed
(Express-close).
�Switch on the ignition (�page 33).
�Pull the power window switches until
the side windows are closed.
�Hold the switches for approximately
1 second.
The power windows are synchronized.
!
If the upward movement of the window
is blocked during the closing
procedure, the window will stop and
open slightly.
Remove the obstruction, pull the
switch again past the resistance point
and release.
If the window still does not close when
there is no obstruction, then pull and
hold the switch again. The side window
will then close without the obstruction
sensor function.Warning!G
Driver’s door only:
If within 5 seconds you again pull the switch
past the resistance point and release, the
automatic reversal will not function.
Page 245 of 473
244 Controls in detail
Power tilt/sliding sunroof
Stopping the power tilt/sliding sunroof
during Express-operation
�Move the sunroof switch in any
direction.Synchronizing the power tilt/sliding
sunroof
The tilt/sliding sunroof must be
synchronized
�after the battery has been
disconnected or discharged
�after the tilt/sliding sunroof has been
closed manually (
�page 389)
�after a malfunction
�if the tilt/sliding sunroof does not open
smoothly
�Switch on the ignition (�page 33).
�Move and hold the sunroof switch in di-
rection of arrow1 (
�page 242) until
the tilt/sliding sunroof is fully raised at
the rear.
�Hold the sunroof switch for
approximately 1 second.
�Check the Express-open feature
(
�page 243).
If the tilt/sliding sunroof opens
completely, the tilt/sliding sunroof is
synchronized. Otherwise repeat the
above steps.
i
If the movement of the tilt/sliding
sunroof is blocked during the closing
procedure, the tilt/sliding sunroof will
stop and reopen slightly.
Page 259 of 473

258 Controls in detail
Useful features
Parcel net in front passenger footwell
A small convenience parcel net is located
in the front passenger footwell. It is for
small and light items, such as road maps,
mail, etc.Cup holders
Cup holders in front of seat armrest
Underneath the swiveling cup holder is
another stationary cup holder. You can
only use this when the swiveling cup holder
is pulled out and completely turned
outward.
Warning!G
The parcel net is intended for storing
light-weight items only.
Heavy objects, objects with sharp edges or
fragile objects may not be transported in the
parcel net. In an accident, during hard brak-
ing, or sudden maneuvers, they could be
thrown around inside the vehicle and cause
injury to vehicle occupants.
The parcel net cannot protect transported
goods in the event of an accident.
Warning!G
In order to help prevent spilling liquids on
vehicle occupants and/or vehicle equip-
ment, only use containers that fit into the
cup holder. Use lids on open containers and
do not fill containers to a height where the
contents, especially hot liquids, could spill
during braking, vehicle maneuvers, or an ac-
cident. Liquids spilled on vehicle occupants
may cause serious personal injury. Liquids
spilled on vehicle equipment may cause
damage not covered by the Mercedes-Benz
Limited Warranty.
When not in use, keep the cup holder
closed. An open cup holder may cause injury
to you or others when contacted during
braking, vehicle maneuvers, or in an acci-
dent.
Keep in mind that objects placed in the cup
holder may come loose during braking, vehi-
cle maneuvers, or in an accident and be
thrown around in the vehicle interior.
Objects thrown around in the vehicle interi-
or may cause an accident and/or serious
personal injury.
Page 261 of 473
260 Controls in detail
Useful features
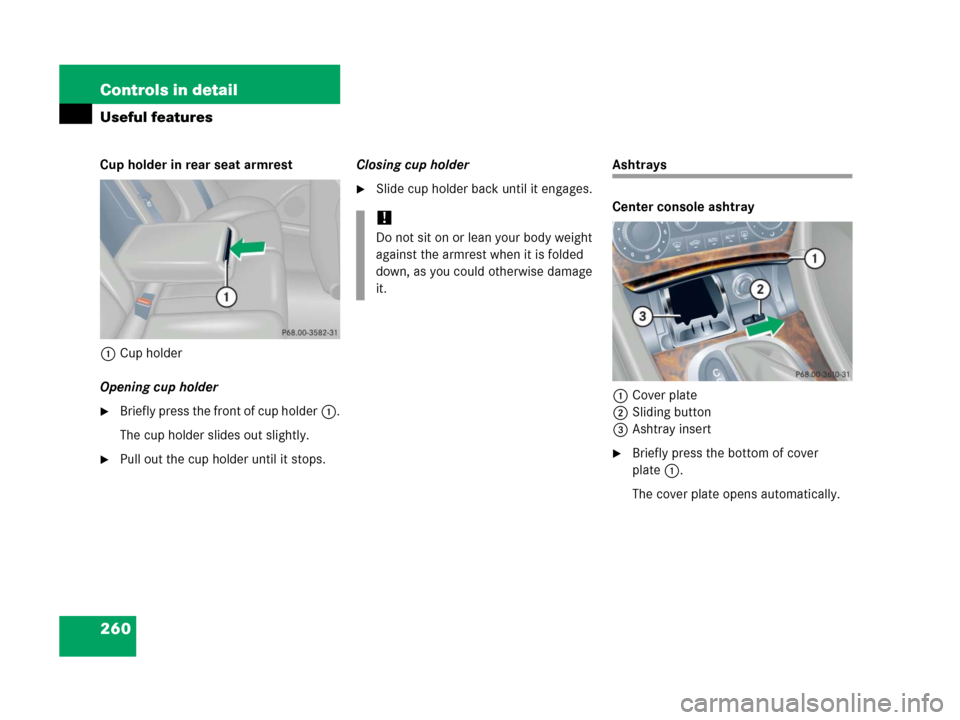
Cup holder in rear seat armrest
1Cup holder
Opening cup holder
�Briefly press the front of cup holder1.
The cup holder slides out slightly.
�Pull out the cup holder until it stops.Closing cup holder
�Slide cup holder back until it engages.
Ashtrays
Center console ashtray
1Cover plate
2Sliding button
3Ashtray insert
�Briefly press the bottom of cover
plate1.
The cover plate opens automatically.
!
Do not sit on or lean your body weight
against the armrest when it is folded
down, as you could otherwise damage
it.
Page 262 of 473

261 Controls in detail
Useful features
Removing ashtray insert
�Secure vehicle from movement by
setting the parking brake.
�Move the gear selector lever to
positionN.
Now you have more room to take out
the ashtray insert.
�Push sliding button2 to the right.
The ashtray insert3 slides out
slightly.
�Remove the ashtray insert.Reinstalling ashtray insert
�Push the ashtray insert3 down into
the retainer until it engages.
�Push down cover plate1 to close
ashtray.
The cover plate engages.
Rear seat ashtray
1Button
2Ashtray insert
3Cover
�Pull at top of cover3.Removing ashtray insert
�Push button1 to disengage ashtray
insert2 and remove it.
Reinstalling ashtray insert
�Push the ashtray insert2 down into
the retainer until it engages.
�Push at top of cover3 to close
ashtray.
Warning!G
Remove front ashtray only with vehicle
standing still. Set the parking brake to
secure vehicle from movement. Move gear
selector lever to positionN. With gear selec-
tor lever in positionN turn off the engine.
Page 263 of 473
.1Cover plate
2Cigarette lighter
�Briefly press the bottom of cover
plate1.
The cover plate opens automatica")
262 Controls in detail
Useful features
Cigarette lighter
�Switch on the ignition (�page 33).1Cover plate
2Cigarette lighter
�Briefly press the bottom of cover
plate1.
The cover plate opens automatically.
�Push in cigarette lighter2.
The cigarette lighter will pop out
automatically when hot.
Warning!G
Never touch the heating element or sides of
the lighter; they are extremely hot. Hold the
knob only.
When leaving the vehicle, always remove the
SmartKey from the starter switch, take it
with you, and lock the vehicle. Do not leave
children unattended in the vehicle, or with
access to an unlocked vehicle. Unsuper-
vised use of vehicle equipment may cause
an accident and/or serious personal injury.
!
The lighter socket can be used to ac-
commodate 12V DC electrical acces-
sories (up to a maximum of 85 W)
designed for use with the standard
“cigarette lighter” plug type. Keep in
mind, however, that connecting acces-
sories to the lighter socket (for exam-
ple extensive connecting and
disconnecting, or using plugs that do
not fit properly) can damage the lighter
socket. With the socket damaged, the
lighter may no longer be able to be
placed in the heating (pushed-in) posi-
tion, or the lighter may pop out too ear-
ly with the lighter not hot enough.
To help avoid damaging the cigarette
lighter socket, we recommend con-
necting 12V DC electrical accessories
designed for use with the standard
“cigarette lighter” plug type to the 12V
power outlets (
�page 263) in your ve-
hicle whenever possible.
Page 264 of 473

263 Controls in detail
Useful features
�Push down cover plate1 to close
ashtray.
The cover plate engages.
Power outlet
The power outlet is located in the rear pas-
senger compartment.
1Power outlet
2Cover
�Switch on the ignition (�page 33).
�Pull at top of cover2.
�Flip cover1 to the left and insert
electrical plug (cigarette lighter type).
Telephone*
Radio transmitters, such as a portable tele-
phone or a citizens band unit, should only
be used inside the vehicle if they are con-
nected to an antenna that is installed on
the outside of the vehicle.
The external antenna must be approved by
Mercedes-Benz. Please contact an autho-
rized Mercedes-Benz Center for informa-
tion on the installation of an approved
external antenna. Refer to the radio trans-
mitter operation instructions regarding use
of an external antenna.
i
The power outlet can be used to
accommodate 12V DC electrical ac-
cessories (e.g. air pump, auxiliary
lamps) up to a maximum of 180 W.
Warning!G
Never operate radio transmitters equipped
with a built-in or attached antenna (i.e. with-
out being connected to an external antenna)
from inside the vehicle while the engine is
running. Doing so could lead to a malfunc-
tion of the vehicle’s electronic system, pos-
sibly resulting in an accident and personal
injury.