Page 363 of 473

362 Practical hints
What to do if …
Display messagePossible cause/consequencePossible solution
ESPunavailable
See Operator’s ManualThe charging voltage has fallen below
10 volts. The battery might not be charged
sufficiently.
The ESP
®, BAS and the Run Flat Indicator*
are deactivated.
The brake system is still functioning
normally but without the systems specified
above.
�Continue driving with added caution.
�If necessary, have the generator and bat-
tery checked.
When the voltage is above this value again,
the ESP
® is operational again.
malfunction
Visit workshop.The ESP® is deactivated because of a
malfunction.
The ESP
®, BAS and the Run Flat Indicator*
are deactivated.
The brake system is still functioning
normally but without the systems specified
above.
�Continue driving with added caution.
�Visit an authorized Mercedes-Benz Cen-
ter as soon as possible.
Failure to follow these instructions increases
the risk of an accident.
Display malfunction
Visit workshopThe ESP® or the ESP® display is
malfunctioning.�Continue driving with added caution.
�Visit an authorized Mercedes-Benz Cen-
ter as soon as possible.
Failure to follow these instructions increases
the risk of an accident.
Page 372 of 473
371 Practical hints
What to do if …
Display symbolDisplay messagesPossible cause/consequencePossible solution
NUSA only:
At next gas station
add 1.0 qt engine oil
Canada only:
At next gas station
add 1.0 l engine oil
The engine oil level is too low.�Add engine oil (�page 300) and check
the engine oil level (
�page 299).
Engine oil level
Stop, engine off!There is no oil in the engine. There is a
danger of engine damage.�Carefully bring the vehicle to a halt as
soon as possible.
�Turn off the engine.
�Add engine oil (�page 300) and check
the engine oil level (
�page 299).
Engine oil level
Reduce oil levelYou have added too much engine oil.
There is a risk of damaging the engine or
the catalytic converter.�Have oil siphoned or drained off.
Observe all legal requirements with
respect to its disposal.
Change engine oil
Visit workshopIt may be that there is water in the engine
oil.�Have the engine oil checked.
Page 373 of 473

appears while the engine is running and at
operating temperature, the engine oil le")
372 Practical hints
What to do if …
When the message At next gas station
add 1.0 qt engine oil
(Canada: 1.0 l)
appears while the engine is running and at
operating temperature, the engine oil level
has dropped to approximately the mini-
mum level.When this occurs, the warning will first
come on intermittently and then stay on if
the oil level drops further.
Visually check for oil leaks. If no obvious oil
leaks are noted, drive to the nearest
service station where the engine oil should
be topped to the required level with an
approved oil specified in the Factory
Approved Service Products pamphlet.
Display symbolDisplay messagesPossible cause/consequencePossible solution
NEngine oil level
Visit workshopThe engine oil has dropped to a critical
level.�Check the engine oil level
(
�page 299) and add oil as required
(
�page 300).
�If you must add engine oil frequently,
have the engine checked for possible
leaks.
Oil sensor malfunction
Visit workshopThe measuring system is malfunctioning.�Have the measuring system checked
by an authorized Mercedes-Benz
Center.
!
The engine oil level warnings should
not be ignored. Extended driving with
the symbol displayed could result in
serious engine damage that is not
covered by the Mercedes-Benz Limited
Warranty.
Page 382 of 473

381 Practical hints
Where will I find ...?
1Vehicle jack
2Collapsible wheel chock and spare
wheel bolts
3Towing eye bolt
4Alignment bolt
5Wheel wrench
6Spare fuses and valve extractor
7Electric air pumpVehicle jackThe vehicle jack is located in the storage
compartment underneath the trunk floor.
Storage position
�Turn crank handle in the direction of ar-
row as far as it will go.
Warning!G
The jack is designed exclusively for jacking
up the vehicle at the jack take-up brackets
built into both sides of the vehicle. To help
avoid personal injury, use the jack only to lift
the vehicle during a wheel change. Never
get beneath the vehicle while it is supported
by the jack. Keep hands and feet away from
the area under the lifted vehicle. Always
firmly set parking brake and block wheels
before raising vehicle with jack.
Do not disengage parking brake while the
vehicle is raised. Be certain that the jack is
always vertical (plumb line) when in use,
especially on hills. Always try to use the jack
on level surface. Make sure the jack arm is
fully seated in the jack take-up bracket.
Always lower the vehicle onto sufficient
capacity jackstands before working under
the vehicle.
Page 402 of 473
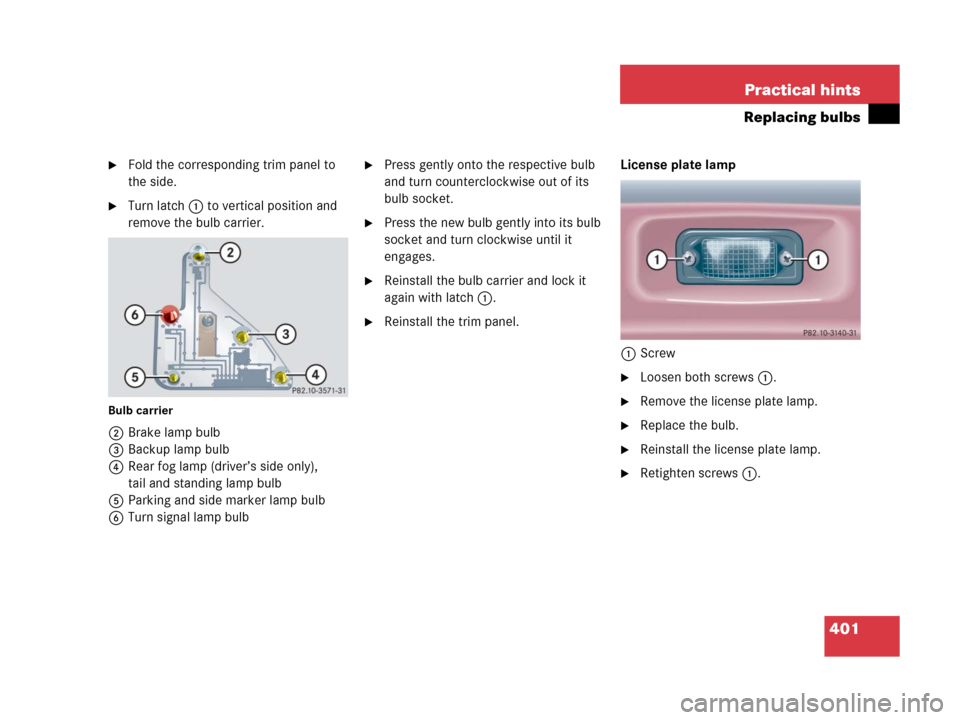
401 Practical hints
Replacing bulbs
�Fold the corresponding trim panel to
the side.
�Turn latch1 to vertical position and
remove the bulb carrier.
Bulb carrier
2Brake lamp bulb
3Backup lamp bulb
4Rear fog lamp (driver’s side only),
tail and standing lamp bulb
5Parking and side marker lamp bulb
6Turn signal lamp bulb
�Press gently onto the respective bulb
and turn counterclockwise out of its
bulb socket.
�Press the new bulb gently into its bulb
socket and turn clockwise until it
engages.
�Reinstall the bulb carrier and lock it
again with latch1.
�Reinstall the trim panel.License plate lamp
1Screw
�Loosen both screws1.
�Remove the license plate lamp.
�Replace the bulb.
�Reinstall the license plate lamp.
�Retighten screws1.
Page 405 of 473
.")
404 Practical hints
Flat tire
Preparing the vehicle
�Park the vehicle in a safe distance from
moving traffic on a hard, flat surface
when possible.
�Turn on the hazard warning flasher
(
�page 119).
�Turn the steering wheel so that the
front wheels are in a straight ahead
position.
�Set the parking brake (�page 54).
�Move the gear selector lever toP.
�Turn off the engine (�page 56).
�Remove the SmartKey from the starter
switch.
�Have any passenger exit the vehicle at
a safe distance from the roadway.
Mounting the spare wheel
Preparing the vehicle
Prepare the vehicle as described
(
�page 404).
�Take the collapsible tire, wheel wrench,
wheel bolts, jack, and electric air pump
out of the trunk (
�page 380).
Warning!G
The dimensions of the spare wheel with col-
lapsible tire are different from those of the
road wheels. As a result, the vehicle han-
dling characteristics change when driving
with a spare wheel mounted. Adapt your
driving style accordingly.
The spare wheel is for temporary use only.
When driving with spare wheel mounted,
ensure proper tire pressure and do not ex-
ceed a vehicle speed of 50 mph (80 km/h).
Drive to the nearest Mercedes-Benz Center
as soon as possible to have the spare wheel
replaced with a regular road wheel.
Never operate the vehicle with more than
one spare wheel mounted.
Do not switch off the ESP
® when a spare
wheel is mounted.
i
Open doors only when conditions are
safe to do so.
Page 406 of 473

405 Practical hints
Flat tire
Lifting the vehicle
�Prevent the vehicle from rolling away
by blocking wheels with wheel chocks
or other sizable objects.
One wheel chock is included with the
vehicle tool kit (
�page 380).
When changing wheel on a level surface:
�Place the wheel chock in front of and
another sizable object behind the
wheel that is diagonally opposite to the
wheel being changed.
Always try lifting the vehicle using the jack
on a level surface. However, should cir-
cumstances require you to do so on a hill,
place the wheel chock and the other size-
able object as follows:
�Place wheel chocks and another siz-
able object on the downhill side block-
ing both wheels of the axle not being
worked on.
�On wheel to be changed, loosen but do
not yet remove the wheel bolts
(approximately one full turn with
wrench).
Warning!G
The jack is designed exclusively for jacking
up the vehicle at the jack take-up brackets
built into both sides of the vehicle. To help
avoid personal injury, use the jack only to lift
the vehicle during a wheel change. Never
get beneath the vehicle while it is supported
by the jack. Keep hands and feet away from
the area under the lifted vehicle. Always
firmly set parking brake and block wheels
before raising vehicle with jack.
Do not disengage parking brake while the
vehicle is raised. Be certain that the jack is
always vertical (plumb line) when in use,
especially on hills. Always try to use the jack
on level surface. Make sure the jack arm is
fully seated in the jack take-up bracket. Al-
ways lower the vehicle onto sufficient ca-
pacity jackstands before working under the
vehicle.
��
Page 418 of 473

417 Practical hints
Towing the vehicle
�Towing the vehicle
Mercedes-Benz recommends that the
vehicle be transported with all wheels off
the ground using flatbed or appropriate
wheel lift/dolly equipment. This method is
preferable to other types of towing.When circumstances do not permit the
recommended towing methods, the
vehicle may be towed with all wheels on
the ground or front wheels raised only so
far as necessary to have the vehicle moved
to a safe location where the recommended
towing methods can be employed.
!
Do not tow-start the vehicle.
!
Use flatbed or wheel lift/dolly equip-
ment with the SmartKey in the starter
switch turned to position0.
Do not tow with sling-type equipment.
Towing with sling-type equipment over
bumpy roads will damage radiator and
supports.
To prevent damage during transport,
do not tie down vehicle by its chassis or
suspension parts.
Switch off the tow-away alarm*
(
�page 90) and deactivate the auto-
matic central locking (
�page 147).
!
If the vehicle is towed with the front
axle raised, the engine must be shut off
(SmartKey in starter switch position0
or1). Otherwise the ESP
® will immedi-
ately be engaged and will apply the rear
wheel brakes.
When towing the vehicle with all wheels
on the ground, the gear selector lever
must be in positionN and the
SmartKey must be in starter switch
position2.
When towing the vehicle with all wheels
on the ground or the front axle raised,
the vehicle may be towed only for
distances up to 30 miles (50 km) and
at a speed not to exceed 30 mph
(50 km/h).
!
To be certain to avoid a possibility of
damage to the drivetrain, however, we
recommend the drive shaft be discon-
nected at the rear axle drive flange for
any towing beyond a short tow to a
nearby garage.