Page 332 of 651
AUDIO
311
NOTICE
Observe the followings, otherwise the remote control
may be damaged.
�Do not drop or strongly knock the remote control
against hard objects.
� Do not sit on or place heavy objects on the remote
control.
� Do not leave the remote control exposed to high
temperatures (such as on the instrument panel) for a
long time, otherwise the remote control may be
damaged.
(c) Locating the remote control
If you lose sight of the remote control, push and hold the
“CURSOR (REMOTE)” button on the DVD player unit until you
hear a beep. A buzzer sounds from the remote control to let you
know where it is.
To stop the buzzer, push any button of the remote control.
If the remote control is located close to something that blocks
the signal, such as some kind of metal, the remote control may
not receive the signal and the buzzer may not sound.
Page 391 of 651

This power outlet is designed for use as a power supply
for the audio device connected to the input terminal
adapter.
The key must be in the “ON” position for the")
AUDIO
370
Power outlet (115 VAC)
This power outlet is designed for use as a power supply
for the audio device connected to the input terminal
adapter.
The key must be in the “ON” position for the power outlet to be
used.
The maximum capacity for this power outlet is 115 VAC/100W.
If you attempt to use an appliance that requires more than 115
VAC or 100W, the protection circuit will activate and cut the
power supply. The power supply will restart automatically
when you use an appliance that operates within the 115
VAC/100W limits.
� Main switch
To use the power outlet, push the main switch on the
instrument panel.
An indicator light will illuminate to indicate that the power outlet
is ready for use.
Push the main switch once again to turn the power outlet off.
When the power outlet is not in use, make sure that the main
switch is turned off.
NOTICE
� To prevent the battery from being discharged, do not
use the power outlet longer than necessary when the
engine is not running.
Page 408 of 651
STARTING AND DRIVING
387
PARKING BRAKE
To set: Hold the regular brake pedal down with your right
foot. Push down the parking brake pedal with your left
foot.
To release: Hold the regular brake pedal down with your
right foot and push the parking brake pedal with your left
foot. When you lift your left foot, the parking brake pedal
will follow it to the released position.
Before leaving your vehicle, firmly apply the parking brake.
To remind you that the parking brake is set, the parking brake
reminder light in the instrument panel remains on until you
release the parking brake.
The buzzer will remind you to release the parking brake when
the vehicle speed rises above 5 km/h (3 mph) with the parking
brake is applied.
CAUTION
Before driving, make sure the parking brake is fully
released and that the parking brake reminder light is off.
Page 455 of 651
 Turning the system on and off
To turn the conventional cruise control mode on, press the
“ON−OFF” button. The “CRUISE” and “READY” indicator
lights on the
i")
STARTING AND DRIVING
434(a) Turning the system on and off
To turn the conventional cruise control mode on, press the
“ON−OFF” button. The “CRUISE” and “READY” indicator
lights on the
instrument panel will come on. Push the lever in
the “MODE” direction for longer than 1 second to change to
conventional cruise control mode. The indicator on the
instrument panel is as shown. You can now set the cruising
speed. Pressing the “ON− OFF” button again turns the system
off.
When the system is turned off, cruising speed must be reset
when the conventional cruise control mode is turned on again.
However, once the vehicle −to−vehicle distance control mode
activates and is used, the system cannot be changed to the
conventional cruise control mode using the above operation.
To change the mode, you must turn this system off and then on
again. Next pu sh the lever in the “MODE” direction for longer
than about 1 second. To change to the vehicle
−to−vehicle distance control mode
from the conventional cruise control mode, push the lever in
the “MODE” direction for longer than about 1 second.
CAUTION
To avoid accidentally engaging the cruise control, turn
the system off when it is not in use. Make sure the
“CRUISE” indicator light is off.
Page 486 of 651

STARTING AND DRIVING
465
4. With the vehicle stopped, push the reset switch on the left
lower instrument panel and hold it until the low tire pressure
warning light blinks three times.
Initialization is
completed after driving at the speeds of 30 km/h
(19 mph) or over for about a few hours total, when the tire
pressure warning system detects the normal tire pressure. If
the following driving conditions are satisfied, initialization will
be completed in about one hour.
� Vehicle speed varies between 30 km/h (19 mph) and 80
km/h (50 mph)
� Normal road surface
When the warning light blinks twice every second while driving,
you may be unable to reset the system. In this case, set the
system again according to the above procedure.
Do not push the reset switch without adjusting the tire inflation
pressure to the specified level. Otherwise, the low tire
pressure warning light may not come on even if the tire
pressure is low, or it may come on when the tire inflation
pressure is actually normal.
If you push the reset switch while the vehicle is moving,
initialization is not performed.
If the low tire pressure warning light does not blink when you
push and hold the reset switch, have the low pressure warning
system checked at your Lexus dealer.
BRAKE PAD WEAR LIMIT INDICATORS
The brake pad wear limit indicators on your disc brakes
give a warning noise when the brake pads are worn to the
extent that replacement is required.
If you hear a squealing or scraping noise while driving, have the
brake pads checked and replaced by your Lexus dealer as
soon as possible. Expensive rotor damage can result if the
pads are not replaced when needed.
Page 511 of 651

DRIVING TIPS
490
CARGO AND LUGGAGE
Stowage precautions
When stowing cargo and luggage in or on the
vehicle, observe the following:
�Put cargo and luggage in the luggage compartment
when at all possible. Be sure all items are secured
in place.
� Be careful to keep the vehicle level. Placing the
weight as far forward as possible helps maintain
vehicle balance.
� For better fuel economy, do not carry unnecessary
weight.
CAUTION
�To prevent cargo and luggage from sliding
forward during braking, do not stack anything
in the luggage compartment higher than the
seatbacks. Keep cargo and luggage low, as
close to the floor as possible.
�Never allow anyone to ride in the luggage
compartment. It is not designed for
passengers. They should ride in their seats
with their seat belts properly fastened.
Otherwise, they are much more likely to suffer
serious bodily injury, in the event of sudden
braking or a collision.
� Do not place anything on the luggage cover.
Such items may be thrown about and possibly
injure people in the vehicle during sudden
braking or an accident.
� Do not drive with objects left on top of the
instrument panel. They may interfere with the
driver’s field of view. Or they may move
during sharp vehicle acceleration or turning,
and impair the driver’s control of the vehicle.
In an accident they may injure the vehicle
occupants.
Page 557 of 651
INTRODUCTION
536
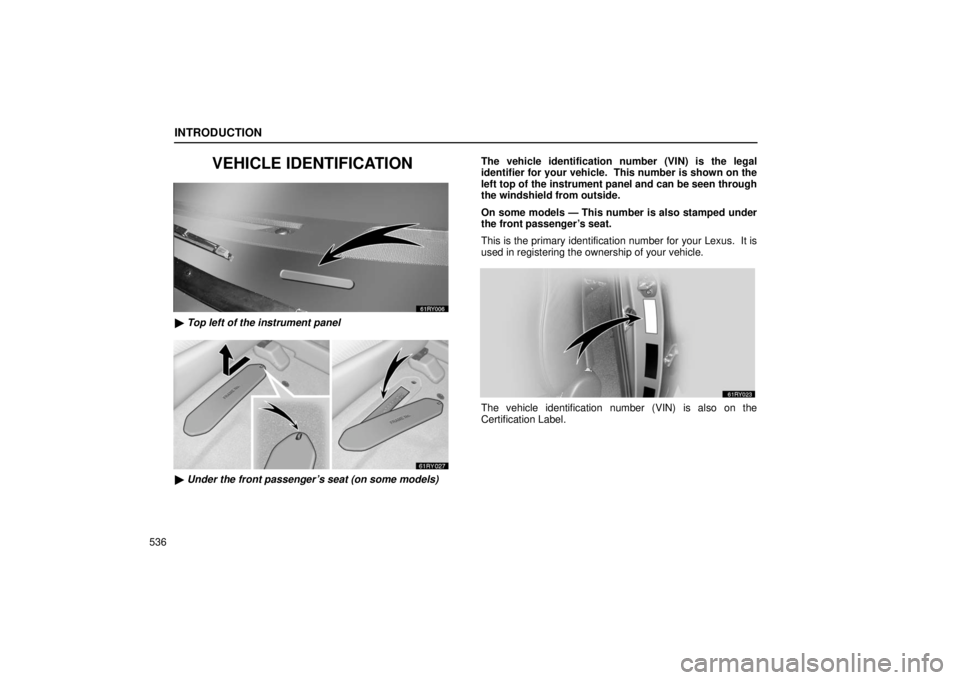
VEHICLE IDENTIFICATION
� Top left of the instrument panel
� Under the front passenger’s seat (on some models) The vehicle identification number (VIN) is the legal
identifier for your vehicle. This number is shown on the
left top of the instrument panel and can be seen through
the windshield from outside.
On some models — This number is also stamped under
the front passenger’s seat.
This is the primary identification number for your Lexus. It is
used in registering the ownership of your vehicle.
The vehicle identification number (VIN) is also on the
Certification Label.
Page 615 of 651
ELECTRICAL COMPONENTS
594
SPECIFICATIONS
— FUSE LOCATIONS
�1Engine compartment
2 3 Driver’s side instrument panel— FUSES
�
Engine compartment
(with electronically modulated air suspension)