Page 90 of 651
SECTION 1 – 3
69
INSTRUMENTS AND CONTROLS
Gauges, meters and service reminder indicators
Fuel gauge70
. . . . . . . . . . . . . . . . . . . . . . . . . . . . . . . . . . . . .\
. . . . . . . . . .
Engine coolant temperature gauge 71
. . . . . . . . . . . . . . . . . . . . . . . . . .
Tachometer 72
. . . . . . . . . . . . . . . . . . . . . . . . . . . . . . . . . . . . \
. . . . . . . . . .
Odometer and trip meter 73
. . . . . . . . . . . . . . . . . . . . . . . . . . . . . . . . . . .
Service reminder indicators and warning buzzers 74
. . . . . . . . . . . . . .
Cruise information display 87
. . . . . . . . . . . . . . . . . . . . . . . . . . . . . . . . . .
Instrument panel light control 90
. . . . . . . . . . . . . . . . . . . . . . . . . . . . . . .
Multi−display light control 91
. . . . . . . . . . . . . . . . . . . . . . . . . . . . . . . . . .
Page 109 of 651

GAUGES, METERS AND SERVICE REMINDER INDICATORS
88The following
information is displayed when you push the
“INFO” button with the ignition switch turned on.
Each time you push the “INFO” button, the display toggles
through this information.
(1) Driving time after engine start
(2) Average vehicle speed after engine start
(3) Average fuel consumption after refueling
(4) Instantaneous fuel consumption
(5) Driving distance after engine start
(6) Driving range
The displayed values in the cruise information display indicate
general driving conditions. Accuracy varies with driving habits
and road conditions.
When the ignition switch is on, the last previously used mode
displayed just before the ignition switch is off will appear. If the electrical power source has been disconnected from the
cruise information display,
the display will automatically be set
to the initial mode.
When the instrument panel lights are turned on, the brightness
of the display will be reduced.
You can adjust the brightness of the display. To adjust the
brightness, see “Multi −display light control” on page 91.
CAUTION
Do not adjust the display while the vehicle is moving.
Be sure to adjust the display only when the vehicle is
stopped.
(1) Driving time after engine start
(“E/T”)
The elapsed time after the engine starts is displayed.
When the engine is started, driving time is counted from 0:00.
Up to 11:59 (11 hours, 59 minutes) can be displayed. When the
driving time exceeds 11:59, the counter returns to 0:00.
The calculation is reset when the ignition switch is turned off.
Page 111 of 651
 Driving range(“Cruising Range miles” or “Cruising Range
km”)
The distance the vehicle can travel with the remaining fuel
is calculated and")
GAUGES, METERS AND SERVICE REMINDER INDICATORS
90
(6) Driving range(“Cruising Range miles” or “Cruising Range
km”)
The distance the vehicle can travel with the remaining fuel
is calculated and displayed based on the quantity of
remaining fuel and past fuel consumption.
The driving range display indicates the approximate distance
that you can drive until the fuel gauge reaches “E”. It is dif ferent
from the actual distance traveled.
The displayed value is updated every time the fuel equivalent
for 1 mile or 1 km is consumed.
The actual driving range varies with driving habits and road
conditions. If fuel consumption is good, the driving range will
be longer than indica ted. If fuel consumption is poor, the
driving range will be shorter than indicated.
If the low fuel level warning light comes on, refuel the vehicle
even if the display indicates that the vehicle can be driven
further.
INSTRUMENT PANEL LIGHT CONTROL
To adjust the brightness of the instrument panel lights,
turn the knob.
With the knob turned fully clockwise, the intensity of the
instrument panel lights will not be reduced even if the headlight
switch is turned on.
If the instrument panel light control knob is turned fully
counterclockwise, the foot lights will turn off.
Page 120 of 651

INTERIOR EQUIPMENT
99
Foot lights and inside door handle lights
The foot lights and inside door handle lights also come on when
the ignition switch is in the “ON” position with the selector lever
in the “P” position. When the selector lever is moved out of the
“P” position, the foot lights and inside door handle lights will be
dimmed.*
NOTE:
* The foot lights and inside door handle lights can be set to
turn off when the selector lever is moved out of the “P”
position.
Ask your Lexus dealer for details.
When you turn the engine off, the lights remain on for about 15
seconds before fading out.
When the instrument panel light control knob is turned fully
counterclockwise, the foot lights will turn off.
Center console spot lights
The center console spot lights come on when the ignition
switch is in the “ACC” or “ON” position.
Meter ring light
The meter ring light comes on when the ignition switch is in the
“ON” position.
The light also come on and remain on for about 15 seconds
before fading out when the driver’s door is opened. However,
if the driver’s door is opened when you turn the engine off, the
light will not come on.
CLOCK
The digital clock indicates the time with the ignition key at
the “ACC” or “ON” position. To reset the hour, press the
“H” button. To reset the minutes, press the “M” button.
To adjust the time to the nearest hour, press the “:00”
button.
For example, if the “:00” button is pressed when the time is
between 9:30 — 9:59 or between 10:01 — 10:29, the time will
change to 10:00.
When the instrument panel lights are turned on, the brightness
of the display will be reduced.
Page 121 of 651
INTERIOR EQUIPMENT
100You can adjust the brightness of the display. To adjust the
brightness, see “Multi
−display light control” on page 91.
If the electrical power source has been disconnected from the
clock, the time display will automatically be set to 1:00 (one
o’clock).
OUTSIDE TEMPERATURE DISPLAY
This display shows the outside temperature when the
ignition switch is on.
The displayed temperature ranges from −30�C (− 22�F) up to
50 �C (122�F). If the temperature does not appear on the
display or it shows “−−”, take your vehicle to your Lexus dealer.
When the instrument panel lights are turned on, the brightness
of the display will be reduced.
You can adjust the brightness of the display. To adjust the
brightness, see “Multi −display light control” on page 91.
Page 124 of 651

INTERIOR EQUIPMENT
103
�Main switch
To use the power outlet, push the main switch on the
instrument panel.
An indicator light will illuminate to indicate that the power outlet
is ready for use.
Push the main switch once again to turn the power outlet off.
When the power outlet is not in use, make sure that the main
switch is turned off.
NOTICE
� To prevent the battery from being discharged, do not
use the power outlet longer than necessary when the
engine is not running.
�Close the power outlet lid when the power outlet is
not in use. Inserting a foreign object other than the
appropriate plug that fits the outlet may cause
electrical failure or short circuit.
The power outlet is not designed for the following electric
appliances even though their power consumption is
under 115 VAC/100W. These appliances may not operate
properly.
�Appliances with high initial peak wattage: Cathode −ray
tube type televisions, compressor −driven refrigerators,
electric pumps, electric tools, etc.
� Measuring devices which process precise data: Medical
equipment, measuring instruments, etc.
� Other appliances requiring an extremely stable power
supply: Microcomputer −controlled electric blankets, touch
sensor lamps, etc.
Certain electrical appliances may cause radio noise.
Page 133 of 651
INTERIOR EQUIPMENT
11 2
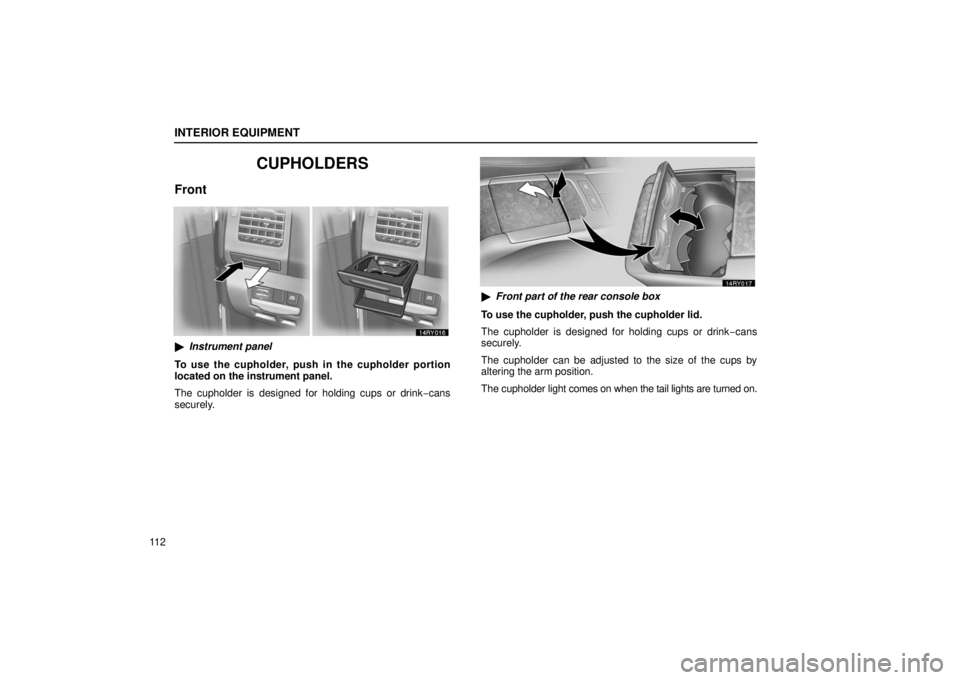
CUPHOLDERS
Front
�Instrument panel
To use the cupholder, push in the cupholder portion
located on the instrument panel.
The cupholder is designed for holding cups or drink −cans
securely.
� Front part of the rear console box
To use the cupholder, push the cupholder lid.
The cupholder is designed for holding cups or drink −cans
securely.
The cupholder can be adjusted to the size of the cups by
altering the arm position.
The cupholder light comes on when the tail lights are turned on.
Page 144 of 651
SECTION 1 – 5
123
INSTRUMENTS AND CONTROLS
Exterior equipment
Hood124
. . . . . . . . . . . . . . . . . . . . . . . . . . . . . . . . . . . . .\
. . . . . . . . . . . . . .
Fuel tank cap 125
. . . . . . . . . . . . . . . . . . . . . . . . . . . . . . . . . . . . .\
. . . . . . .
Moon roof (normal type) 128
. . . . . . . . . . . . . . . . . . . . . . . . . . . . . . . . . .
Moon roof (multi −panel type) 132
. . . . . . . . . . . . . . . . . . . . . . . . . . . . . .
Roof luggage carrier 136
. . . . . . . . . . . . . . . . . . . . . . . . . . . . . . . . . . . . .\
.