2006 INFINITI M35 service
[x] Cancel search: servicePage 1279 of 5621
BR-4
PREPARATION
Revision: 2006 January2006 M35/M45
PREPARATIONPFP:00002
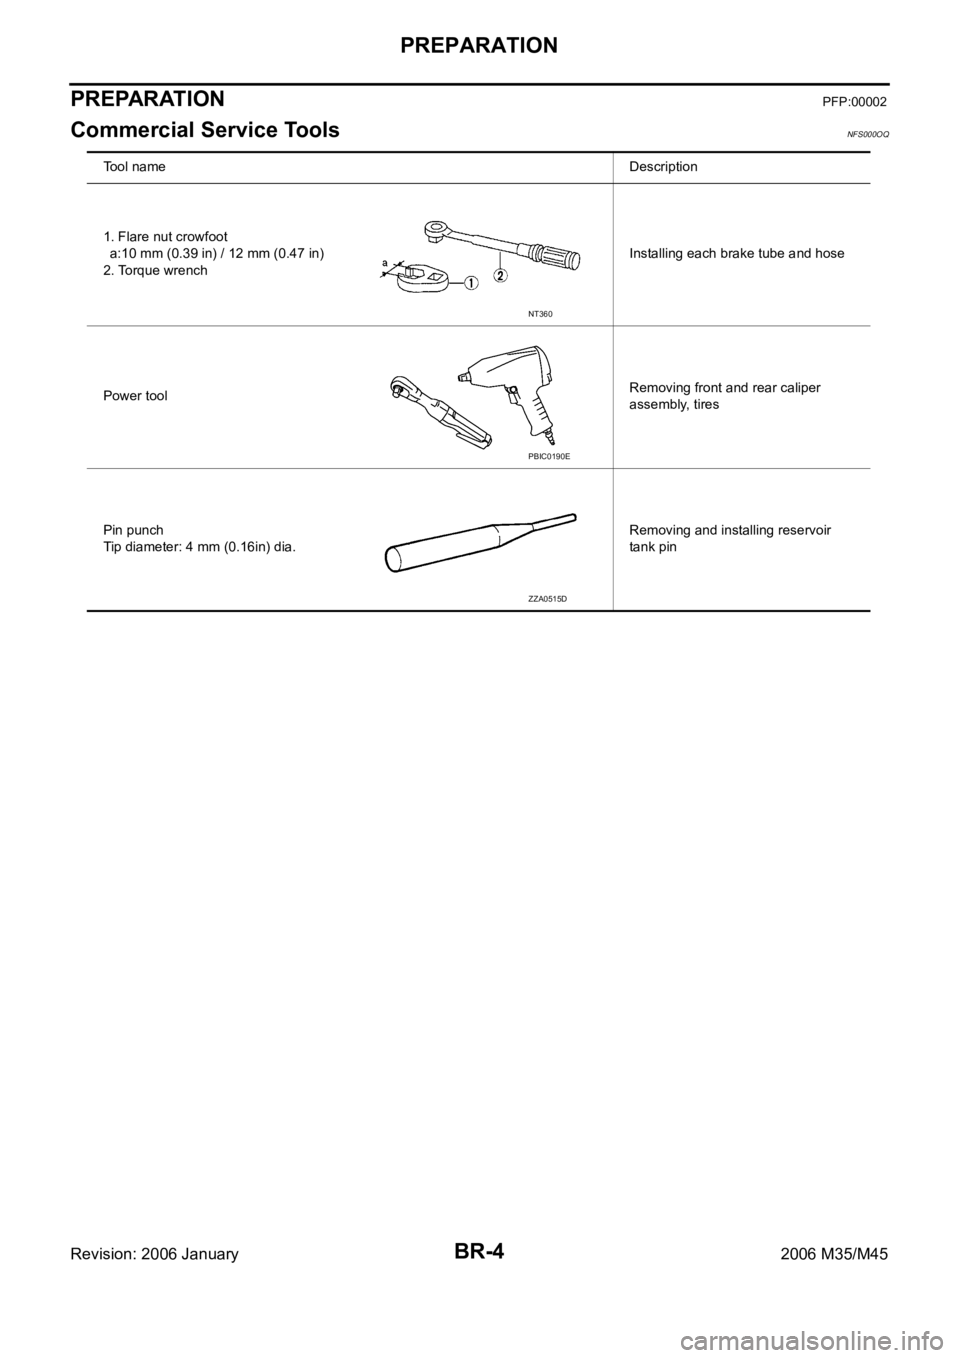
Commercial Service ToolsNFS000OQ
Tool nameDescription
1. Flare nut crowfoot
a:10 mm (0.39 in) / 12 mm (0.47 in)
2. Torque wrenchInstalling each brake tube and hose
Power toolRemoving front and rear caliper
assembly, tires
Pin punch
Tip diameter: 4 mm (0.16in) dia.Removing and installing reservoir
tank pin
NT360
PBIC0190E
ZZA0515D
Page 1291 of 5621
BR-16
BRAKE MASTER CYLINDER
Revision: 2006 January2006 M35/M45
Disassembly and AssemblyNFS000P4
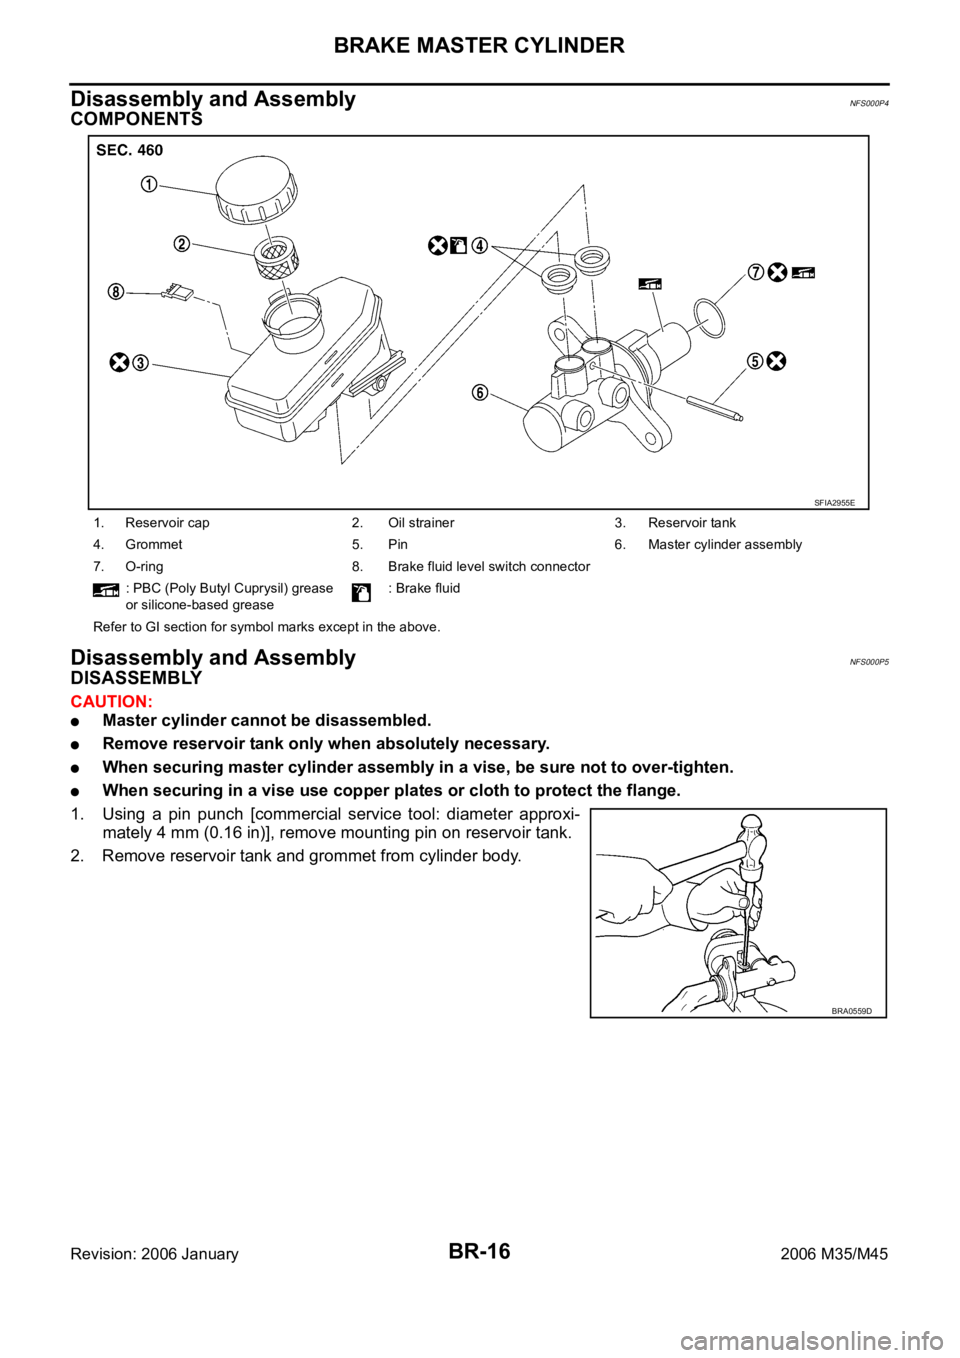
COMPONENTS
Disassembly and AssemblyNFS000P5
DISASSEMBLY
CAUTION:
Master cylinder cannot be disassembled.
Remove reservoir tank only when absolutely necessary.
When securing master cylinder assembly in a vise, be sure not to over-tighten.
When securing in a vise use copper plates or cloth to protect the flange.
1. Using a pin punch [commercial service tool: diameter approxi-
mately 4 mm (0.16 in)], remove mounting pin on reservoir tank.
2. Remove reservoir tank and grommet from cylinder body.
1. Reservoir cap 2. Oil strainer 3. Reservoir tank
4. Grommet 5. Pin 6. Master cylinder assembly
7. O-ring 8. Brake fluid level switch connector
: PBC (Poly Butyl Cuprysil) grease
or silicone-based grease: Brake fluid
Refer to GI section for symbol marks except in the above.
SFIA2955E
BRA0559D
Page 1293 of 5621
BR-18
BRAKE BOOSTER
Revision: 2006 January2006 M35/M45
BRAKE BOOSTERPFP:47200
On-Board Inspection and ServiceNFS000P6
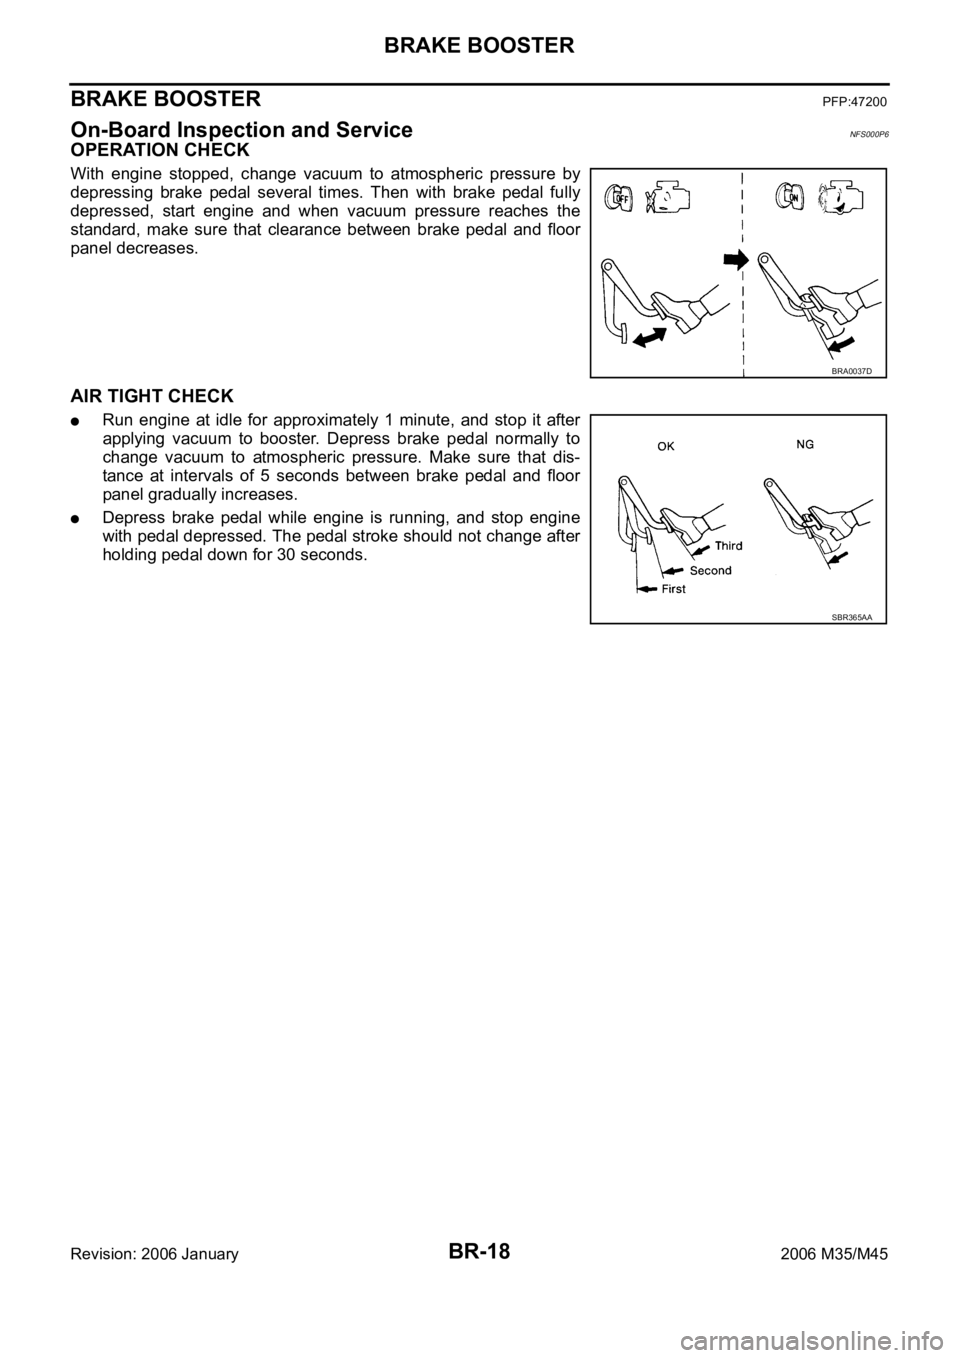
OPERATION CHECK
With engine stopped, change vacuum to atmospheric pressure by
depressing brake pedal several times. Then with brake pedal fully
depressed, start engine and when vacuum pressure reaches the
standard, make sure that clearance between brake pedal and floor
panel decreases.
AIR TIGHT CHECK
Run engine at idle for approximately 1 minute, and stop it after
applying vacuum to booster. Depress brake pedal normally to
change vacuum to atmospheric pressure. Make sure that dis-
tance at intervals of 5 seconds between brake pedal and floor
panel gradually increases.
Depress brake pedal while engine is running, and stop engine
with pedal depressed. The pedal stroke should not change after
holding pedal down for 30 seconds.
BRA0037D
SBR365AA
Page 1299 of 5621
BR-24
FRONT DISC BRAKE
Revision: 2006 January2006 M35/M45
It is not necessary to remove bolts on torque member and brake hose except for disassembly or
replacement of caliper assembly. In this case, hang cylinder body with a wire so as not to stretch
brake hose.
Do not damage piston boot.
If any shim is subject to serious corrosion, replace it with a new one.
Always replace shim and shim cover as a set when replacing brake pads.
Keep rotor free from brake fluid.
Burnish the brake pads and disc rotor mutually contacting surfaces, after refinishing or replacing
rotors, after replacing pads, or if a soft pedal occurs at very low mileage. Refer to BR-28, "
BRAKE
BURNISHING PROCEDURE" .
Removal and Installation of Brake PadNFS000PD
REMOVAL
1. Remove tires from vehicle with power tool.
2. Remove lower sliding pin bolt.
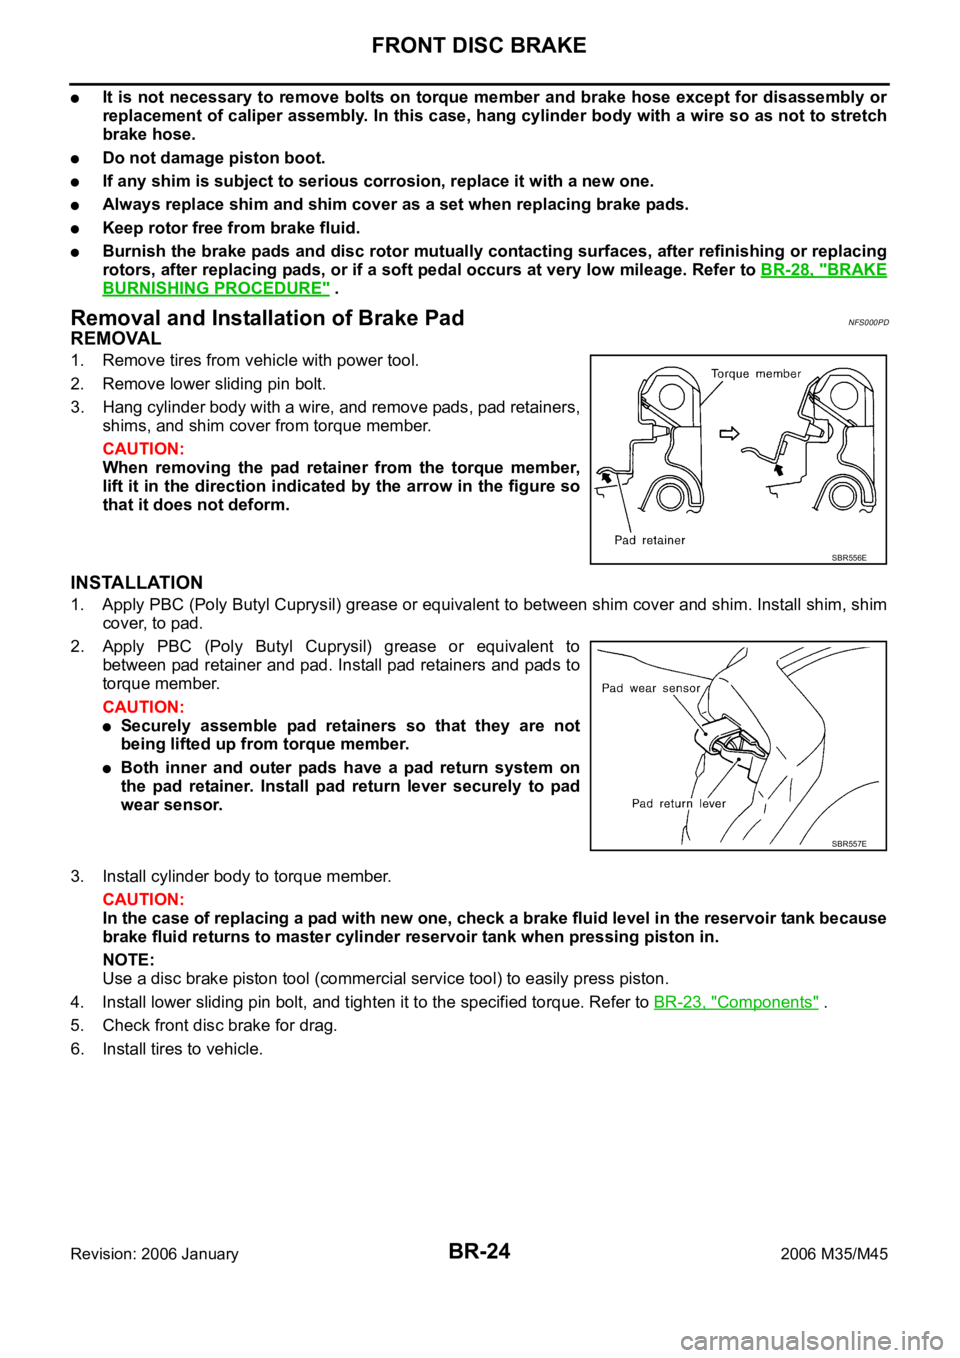
3. Hang cylinder body with a wire, and remove pads, pad retainers,
shims, and shim cover from torque member.
CAUTION:
When removing the pad retainer from the torque member,
lift it in the direction indicated by the arrow in the figure so
that it does not deform.
INSTALLATION
1. Apply PBC (Poly Butyl Cuprysil) grease or equivalent to between shim cover and shim. Install shim, shim
cover, to pad.
2. Apply PBC (Poly Butyl Cuprysil) grease or equivalent to
between pad retainer and pad. Install pad retainers and pads to
torque member.
CAUTION:
Securely assemble pad retainers so that they are not
being lifted up from torque member.
Both inner and outer pads have a pad return system on
the pad retainer. Install pad return lever securely to pad
wear sensor.
3. Install cylinder body to torque member.
CAUTION:
In the case of replacing a pad with new one, check a brake fluid level in the reservoir tank because
brake fluid returns to master cylinder reservoir tank when pressing piston in.
NOTE:
Use a disc brake piston tool (commercial service tool) to easily press piston.
4. Install lower sliding pin bolt, and tighten it to the specified torque. Refer to BR-23, "
Components" .
5. Check front disc brake for drag.
6. Install tires to vehicle.
SBR556E
SBR557E
Page 1305 of 5621
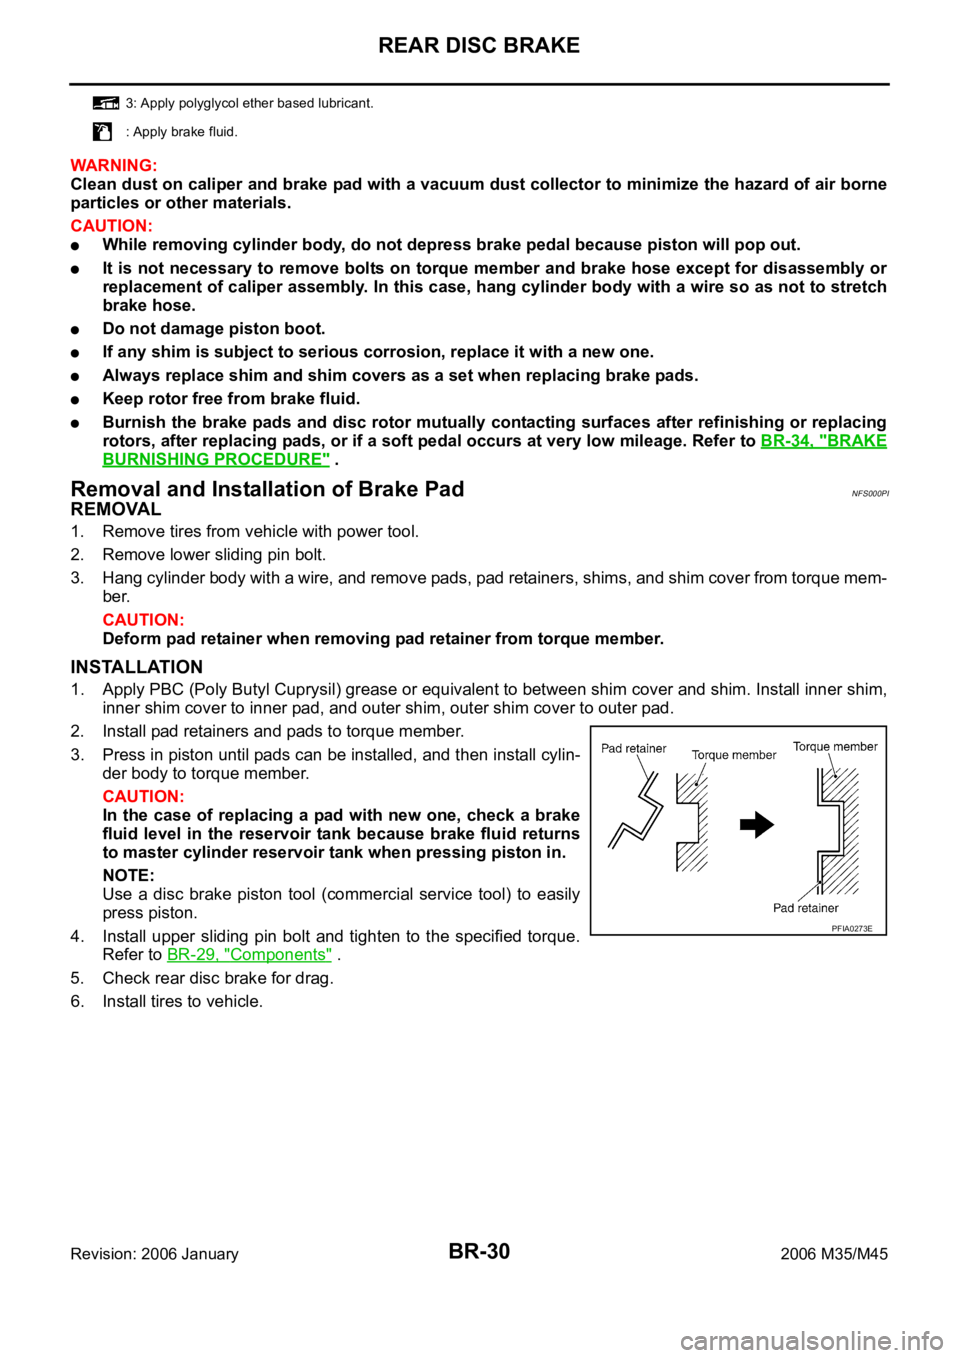
BR-30
REAR DISC BRAKE
Revision: 2006 January2006 M35/M45
WAR NING :
Clean dust on caliper and brake pad with a vacuum dust collector to minimize the hazard of air borne
particles or other materials.
CAUTION:
While removing cylinder body, do not depress brake pedal because piston will pop out.
It is not necessary to remove bolts on torque member and brake hose except for disassembly or
replacement of caliper assembly. In this case, hang cylinder body with a wire so as not to stretch
brake hose.
Do not damage piston boot.
If any shim is subject to serious corrosion, replace it with a new one.
Always replace shim and shim covers as a set when replacing brake pads.
Keep rotor free from brake fluid.
Burnish the brake pads and disc rotor mutually contacting surfaces after refinishing or replacing
rotors, after replacing pads, or if a soft pedal occurs at very low mileage. Refer to BR-34, "
BRAKE
BURNISHING PROCEDURE" .
Removal and Installation of Brake PadNFS000PI
REMOVAL
1. Remove tires from vehicle with power tool.
2. Remove lower sliding pin bolt.
3. Hang cylinder body with a wire, and remove pads, pad retainers, shims, and shim cover from torque mem-
ber.
CAUTION:
Deform pad retainer when removing pad retainer from torque member.
INSTALLATION
1. Apply PBC (Poly Butyl Cuprysil) grease or equivalent to between shim cover and shim. Install inner shim,
inner shim cover to inner pad, and outer shim, outer shim cover to outer pad.
2. Install pad retainers and pads to torque member.
3. Press in piston until pads can be installed, and then install cylin-
der body to torque member.
CAUTION:
In the case of replacing a pad with new one, check a brake
fluid level in the reservoir tank because brake fluid returns
to master cylinder reservoir tank when pressing piston in.
NOTE:
Use a disc brake piston tool (commercial service tool) to easily
press piston.
4. Install upper sliding pin bolt and tighten to the specified torque.
Refer to BR-29, "
Components" .
5. Check rear disc brake for drag.
6. Install tires to vehicle.
3: Apply polyglycol ether based lubricant.
: Apply brake fluid.
PFIA0273E
Page 1310 of 5621

SERVICE DATA AND SPECIFICATIONS (SDS)
BR-35
C
D
E
G
H
I
J
K
L
MA
B
BR
Revision: 2006 January2006 M35/M45
SERVICE DATA AND SPECIFICATIONS (SDS)PFP:00030
General SpecificationsNFS000PL
Unit: mm (in)
Brake PedalNFS000PM
Brake BoosterNFS000PN
Va c u u m t y p e
Check ValveNFS000PO
Front Disc BrakeNFS000PP
Front brake Brake model CLZ31VD, CLZ31VB
Cylinder bore diameter 45 (1.772)
2
Pad length
width thickness 132 50 11 (5.20 1.969 0.433)
Rotor outer diameter
thickness 320 28 (12.60 1.10)
Rear brake Brake model AD14VF, AD14VE
Cylinder bore diameter 42.86 (1.687)
Pad length
width thickness 83.0 31.9 8.5 (3.268 1.256 0.335)
Rotor outer diameter
thickness 308 16 (12.13 0.63)
Master cylinder Cylinder bore diameter 25.4 (1)
Control valve Valve model Electric brake force distribution
Brake boosterBooster model N255
Diaphragm diameter 255 (10)
Recommended brake fluid DOT 3
Brake pedal height (from dash lower panel top surface) 157 167 mm (6.18 6.57 in)
Depressed pedal height
[under a force of 490 N (50 kg, 110 lb) with engine running]90 mm (3.54 in) or more
Clearance between threaded end of the stop lamp switch/brake switch
and bracket 0.74 - 1.96 mm (0.0291 - 0.0772 in)
Pedal play3 - 11 mm (0.12 - 0.43 in)
Input rod installation standard dimension 125 mm (4.92 in)
Vacuum leakage
[at vacuum of – 66.7 kPa (– 500 mmHg, – 19.69 inHg)]Within 1.3 kPa (10 mmHg, 0.39 inHg) of vacuum for 15 seconds
Brake modelCLZ31VD, CLZ31VB
Brake padStandard thickness 11.0 mm (0.433 in)
Repair limit thickness 2.0 mm (0.079 in)
Disc rotorStandard thickness 28.0 mm (1.102 in)
Wear limit 26.0 mm (1.024 in)
Thickness variation (measured at 8 positions) 0.015 mm (0.0006 in)
Runout limit (with it attached to the vehicle) 0.035 mm (0.0014 in)
Page 1311 of 5621

BR-36
SERVICE DATA AND SPECIFICATIONS (SDS)
Revision: 2006 January2006 M35/M45
Rear Disc BrakeNFS000PQ
Brake modelAD14VF, AD14VE
Brake padStandard thickness 8.5 mm (0.335 in)
Repair limit thickness 2.0 mm (0.079 in)
Disc rotorStandard thickness 16.0 mm (0.631 in)
Wear limit 14.0 mm (0.551 in)
Thickness variation (measured at 8 positions) 0.015 mm (0.0006 in)
Runout limit (with it attached to the vehicle) 0.055 mm (0.0022 in)
Page 1312 of 5621

BRC-1
BRAKE CONTROL SYSTEM
F BRAKES
CONTENTS
C
D
E
G
H
I
J
K
L
M
SECTION BRC
A
B
BRC
Revision: 2006 January2006 M35/M45
BRAKE CONTROL SYSTEM
VDC/TCS/ABS
PRECAUTIONS .......................................................... 3
Precautions for Supplemental Restraint System
(SRS) “AIR BAG” and “SEAT BELT PRE-TEN-
SIONER” .................................................................. 3
Precautions for Procedures without Cowl Top Cover ..... 3
Precautions for Brake System .................................. 3
Precautions for Brake Control .................................. 4
PREPARATION ........................................................... 5
Special Service Tools ............................................... 5
Commercial Service Tools ........................................ 5
ON-VEHICLE SERVICE ............................................. 6
Adjustment of Steering Angle Sensor Neutral Posi-
tion ........................................................................... 6
SYSTEM DESCRIPTION ............................................ 7
System Diagram ....................................................... 7
Function ................................................................... 7
ABS ....................................................................... 7
EBD ....................................................................... 7
TCS ....................................................................... 7
VDC ....................................................................... 8
ECD ....................................................................... 8
Operation That Is Not "System Error" ...................... 8
ABS ....................................................................... 8
TCS ....................................................................... 8
VDC ....................................................................... 8
Fail-Safe Function .................................................... 8
ABS, EBD SYSTEM .............................................. 8
VDC / TCS ............................................................ 9
Hydraulic Circuit Diagram ........................................ 9
CAN COMMUNICATION .......................................... 10
System Description ................................................ 10
TROUBLE DIAGNOSIS .............................................11
How to Perform Trouble Diagnoses ........................ 11
BASIC CONCEPT ................................................ 11
DIAGNOSIS FLOW CHART ............................... 12
ASKING COMPLAINTS ...................................... 13
EXAMPLE OF DIAGNOSIS WORKSHEET ........ 13
Component Parts Location ..................................... 14
Schematic .............................................................. 15Wiring Diagram — VDC — ..................................... 16
CONSULT-II Functions (ABS) ................................ 22
CONSULT-II MAIN FUNCTION ........................... 22
CONSULT-II BASIC OPERATION PROCEDURE
... 22
Self-Diagnosis .....................................................
... 23
OPERATION PROCEDURE ................................ 23
ERASE MEMORY ............................................... 23
DISPLAY ITEM LIST ........................................... 24
Data Monitor ........................................................... 27
OPERATION PROCEDURE ................................ 27
DISPLAY ITEM LIST ........................................... 27
Active Test .............................................................. 30
OPERATION PROCEDURE ................................ 30
TEST ITEMS ....................................................... 31
For Fast and Accurate Diagnosis ........................... 32
PRECAUTIONS FOR DIAGNOSIS ..................... 32
Basic Inspection ..................................................... 33
BASIC INSPECTION 1: BRAKE FLUID LEVEL,
LEAK INSPECTION AND BRAKE PAD .............. 33
BASIC INSPECTION 2: LOOSENESS OF
POWER SYSTEM TERMINALS AND BATTERY ... 33
BASIC INSPECTION 3: ABS WARNING LAMP,
BRAKE WARNING LAMP, VDC OFF INDICATOR
LAMP AND SLIP INDICATOR LAMP .................. 33
Inspection 1: Wheel Sensor Circuit ........................ 34
Inspection 2: Engine System .................................. 36
Inspection 3: ABS Actuator and Electric Unit (Con-
trol Unit) .................................................................. 36
Inspection 4: ABS Actuator and Electric Unit (Con-
trol Unit) Power Supply and Ground Circuit ............ 37
Inspection 5: ABS Motor and Motor Relay Circuit ... 38
Inspection 6: Solenoid, VDC Change-Over Valve
and Actuator Relay Circuit ...................................... 40
Inspection 7: Pressure Sensor Circuit .................... 41
Inspection 8: Steering Angle Sensor Circuit ........... 41
Inspection 9: Park/Neutral Position (PNP) Switch
Circuit ..................................................................... 43
Inspection 10: Stop Lamp Switch Circuit ................ 44
Inspection 11: Yaw Rate/Side G Sensor Circuit ..... 45