2006 INFINITI M35 ECU
[x] Cancel search: ECUPage 949 of 5621

BL-10
SQUEAK AND RATTLE TROUBLE DIAGNOSIS
Revision: 2006 January2006 M35/M45
DUPLICATE THE NOISE AND TEST DRIVE
If possible, drive the vehicle with the customer until the noise is duplicated. Note any additional information on
the Diagnostic Worksheet regarding the conditions or location of the noise. This information can be used to
duplicate the same conditions when you confirm the repair.
If the noise can be duplicated easily during the test drive, to help identify the source of the noise, try to dupli-
cate the noise with the vehicle stopped by doing one or all of the following:
1) Close a door.
2) Tap or push/pull around the area where the noise appears to be coming from.
3) Rev the engine.
4) Use a floor jack to recreate vehicle “twist”.
5) At idle, apply engine load (electrical load, half-clutch on M/T model, drive position on A/T model).
6) Raise the vehicle on a hoist and hit a tire with a rubber hammer.
Drive the vehicle and attempt to duplicate the conditions the customer states exist when the noise occurs.
If it is difficult to duplicate the noise, drive the vehicle slowly on an undulating or rough road to stress the
vehicle body.
CHECK RELATED SERVICE BULLETINS
After verifying the customer concern or symptom, check ASIST for Technical Service Bulletins (TSBs) related
to that concern or symptom.
If a TSB relates to the symptom, follow the procedure to repair the noise.
LOCATE THE NOISE AND IDENTIFY THE ROOT CAUSE
1. Narrow down the noise to a general area. To help pinpoint the source of the noise, use a listening tool
(Chassis Ear: J-39570, Engine Ear and mechanics stethoscope).
2. Narrow down the noise to a more specific area and identify the cause of the noise by:
removing the components in the area that you suspect the noise is coming from.
Do not use too much force when removing clips and fasteners, otherwise clips and fastener can be broken
or lost during the repair, resulting in the creation of new noise.
tapping or pushing/pulling the component that you suspect is causing the noise.
Do not tap or push/pull the component with excessive force, otherwise the noise will be eliminated only
temporarily.
feeling for a vibration with your hand by touching the component(s) that you suspect is (are) causing the
noise.
placing a piece of paper between components that you suspect are causing the noise.
looking for loose components and contact marks.
Refer to BL-11, "
Generic Squeak and Rattle Troubleshooting" .
REPAIR THE CAUSE
If the cause is a loose component, tighten the component securely.
If the cause is insufficient clearance between components:
–separate components by repositioning or loosening and retightening the component, if possible.
–insulate components with a suitable insulator such as urethane pads, foam blocks, felt cloth tape or ure-
thane tape. A Nissan Squeak and Rattle Kit (J-43980) is available through your authorized Nissan Parts
Department.
CAUTION:
Do not use excessive force as many components are constructed of plastic and may be damaged.
NOTE:
Always check with the Parts Department for the latest parts information.
The following materials are contained in the Nissan Squeak and Rattle Kit (J-43980). Each item can be
ordered separately as needed.
URETHANE PADS [1.5 mm (0.059 in) thick]
Insulates connectors, harness, etc.
76268-9E005: 100
135 mm (3.945.31 in)/76884-71L01: 6085 mm (2.363.35 in)/76884-
71L02: 15
25 mm (0.590.98 in)
INSULATOR (Foam blocks)
Insulates components from contact. Can be used to fill space behind a panel.
73982-9E000: 45 mm (1.77 in) thick, 50
50 mm (1.971.97 in)/73982-
50Y00: 10 mm (0.39 in) thick, 50
50 mm (1.971.97 in)
Page 951 of 5621

BL-12
SQUEAK AND RATTLE TROUBLE DIAGNOSIS
Revision: 2006 January2006 M35/M45
TRUNK
Trunk noises are often caused by a loose jack or loose items put into the trunk by the owner.
In addition look for:
1. Trunk lid dumpers out of adjustment
2. Trunk lid striker out of adjustment
3. The trunk lid torsion bars knocking together
4. A loose license plate or bracket
Most of these incidents can be repaired by adjusting, securing or insulating the item(s) or component(s) caus-
ing the noise.
SUNROOF/HEADLINING
Noises in the sunroof/headlining area can often be traced to one of the following:
1. Sunroof lid, rail, linkage or seals making a rattle or light knocking noise
2. Sunvisor shaft shaking in the holder
3. Front or rear windshield touching headlining and squeaking
Again, pressing on the components to stop the noise while duplicating the conditions can isolate most of these
incidents. Repairs usually consist of insulating with felt cloth tape.
SEATS
When isolating seat noise it's important to note the position the seat is in and the load placed on the seat when
the noise is present. These conditions should be duplicated when verifying and isolating the cause of the
noise.
Cause of seat noise include:
1. Headrest rods and holder
2. A squeak between the seat pad cushion and frame
3. The rear seatback lock and bracket
These noises can be isolated by moving or pressing on the suspected components while duplicating the con-
ditions under which the noise occurs. Most of these incidents can be repaired by repositioning the component
or applying urethane tape to the contact area.
UNDERHOOD
Some interior noise may be caused by components under the hood or on the engine wall. The noise is then
transmitted into the passenger compartment.
Causes of transmitted underhood noise include:
1. Any component mounted to the engine wall
2. Components that pass through the engine wall
3. Engine wall mounts and connectors
4. Loose radiator mounting pins
5. Hood bumpers out of adjustment
6. Hood striker out of adjustment
These noises can be difficult to isolate since they cannot be reached from the interior of the vehicle. The best
method is to secure, move or insulate one component at a time and test drive the vehicle. Also, engine RPM
or load can be changed to isolate the noise. Repairs can usually be made by moving, adjusting, securing, or
insulating the component causing the noise.
Page 958 of 5621

HOOD
BL-19
C
D
E
F
G
H
J
K
L
MA
B
BL
Revision: 2006 January2006 M35/M45
5. Disconnect the hood lock cable from the hood lock, and clip it from the hood ledge.
6. Remove the mounting screws with power tool, and remove the hood opener.
7. Remove the grommet on the dash board, and pull the hood lock cable toward the passenger compart-
ment.
CAUTION:
While pulling, be careful not to damage (peeling) the outside of the hood lock cable.
INSTALLATION
1. Pull the hood lock cable through the panel hole to the engine compartment.
CAUTION:
Be careful not to bend the cable too much, keeping the
radius 100 mm (3.94 in) or more.
2. Check that the cable is not offset from the positioning grommet,
and push the grommet into the panel hole securely.
3. Apply the sealant to the grommet (at * mark) properly.
4. Install while pulling hood lock cable.
5. Install the hood lock cable securely to the lock.
6. Install hood lock assembly.
CAUTION:
After installing, hood fitting adjustment. Refer to BL-15,
"Fitting Adjustment" .
After installing, the check the hood lock control inspec-
tion Refer to BL-20, "
Hood Lock Control Inspection" .
PIIB5800E
PIIB5801E
PIIB5802E
Page 995 of 5621

BL-56
INTELLIGENT KEY SYSTEM
Revision: 2006 January2006 M35/M45
Operation Condition
Once the following condition from below is established, alert or warning will be executed.
Warning/Information functions Operation procedure
Intelligent Key system malfunctionWhen a malfunction is detected on Intelligent Key unit, “KEY” warning lamp
will illuminates.
OFF position warning For internal
Ignition switch: ACC position.
Door switch (driver side): ON (Door is open).
For externalOFF position warning (For internal) is in active mode, driver side door has
been closed.
NOTE:
OFF position (For external) active only when each of the sequence has
occurred as below: P position warning
ACC warning OFF position warn-
ing (For internal)
OFF position warning (For internal)
P position warning
Shift position: Except P position
Engine is running to stopped (Ignition switch is ON to ACC)
ACC warning
During P position warning is in active mode, shift position has changed P
position.
Ignition switch: Except OFF position.
Take away warningDoor is open to close
Ignition switch: Except OFF position.
Door switch: ON to OFF (Door is open to close).
Intelligent Key can not be detected inside the vehicle.
Door is open
Door switch: ON (Door is open)
Key ID vilification every 5 seconds when registered Intelligent Key can not
be detected inside the vehicle.
Push-ignition switch
operation
Ignition switch: Except OFF position.
Press ignition switch.
Intelligent Key can not be detected inside the vehicle.
Take away through win-
dow
Engine is running.
Key ID vilification every 30 seconds when registered Intelligent Key can not
be detected inside the vehicle.
After vehicle speed verification, the registered Intelligent Key can not be
detect inside the vehicle.
Intelligent Key is
removed from key slot
When Intelligent Key is removed from key slot, Intelligent Key can not be
detected inside the vehicle.
Door lock operation
warningRequest switch operationWhen request switch is pushed (lock operation) under the following condi-
tions.
Door switch: ON (Any door is open).
Intelligent Key is inside vehicle.
Intelligent Key button
operationWhen Intelligent Key bottom is pushed (lock operation) under the following
conditions.
Door switch: ON (Any door is open).
For 3 seconds after Intelligent Key is removed from key slot.
Key warning
Ignition switch is OFF position.
Driver side door switch: ON (Driver side door is open).
Intelligent Key is inserted in key slot.
Intelligent Key insert information
Door switch: ON to OFF (Door is open to close).
Ignition switch: OFF to ON position.
Intelligent Key is out of key slot.
Intelligent Key can not be detected inside the vehicle.
Page 1019 of 5621

BL-80
INTELLIGENT KEY SYSTEM
Revision: 2006 January2006 M35/M45
15. CHECK OUT
CHECK OUT.
>> INSPECTION END
CONSULT-II Functions (INTELLIGENT KEY)NIS001XH
CONSULT-II can display each diagnostic item using the diagnostic test modes as shown below.
CONSULT-II Inspection ProcedureNIS001XI
CAUTION:
If CONSULT-II is used with no connection CONSULT-II CONVERTER, malfunctions might be detected
in self-diagnosis depending on control unit which performs CAN Communication.
BASIC OPERATION
1. Turn ignition switch OFF.
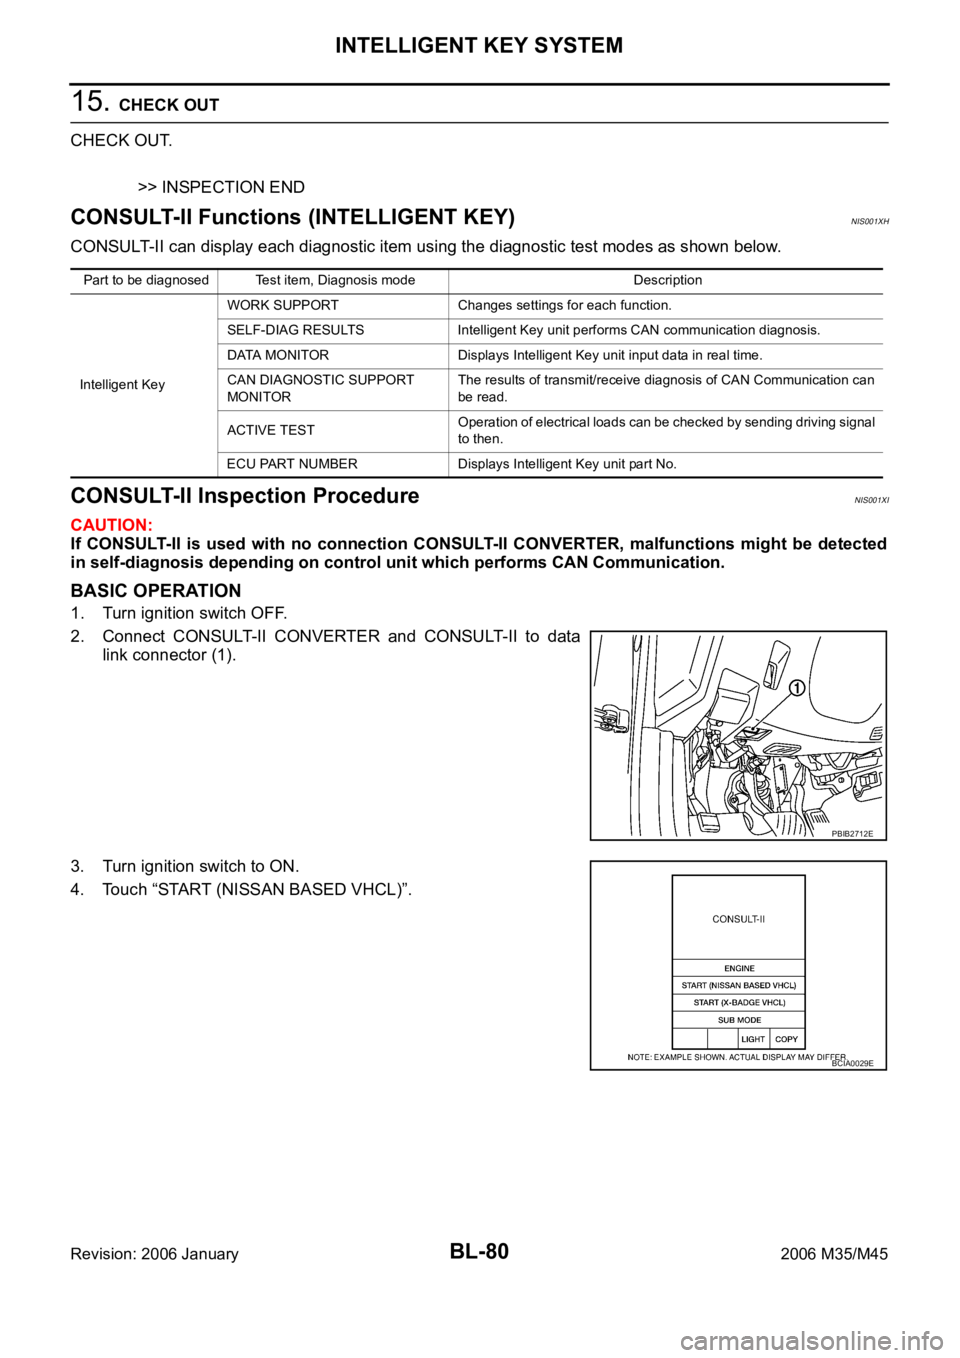
2. Connect CONSULT-II CONVERTER and CONSULT-II to data
link connector (1).
3. Turn ignition switch to ON.
4. Touch “START (NISSAN BASED VHCL)”.
Part to be diagnosed Test item, Diagnosis mode Description
Intelligent KeyWORK SUPPORT Changes settings for each function.
SELF-DIAG RESULTS Intelligent Key unit performs CAN communication diagnosis.
DATA MONITOR Displays Intelligent Key unit input data in real time.
CAN DIAGNOSTIC SUPPORT
MONITORThe results of transmit/receive diagnosis of CAN Communication can
be read.
ACTIVE TESTOperation of electrical loads can be checked by sending driving signal
to then.
ECU PART NUMBER Displays Intelligent Key unit part No.
PBIB2712E
BCIA0029E
Page 1020 of 5621

INTELLIGENT KEY SYSTEM
BL-81
C
D
E
F
G
H
J
K
L
MA
B
BL
Revision: 2006 January2006 M35/M45
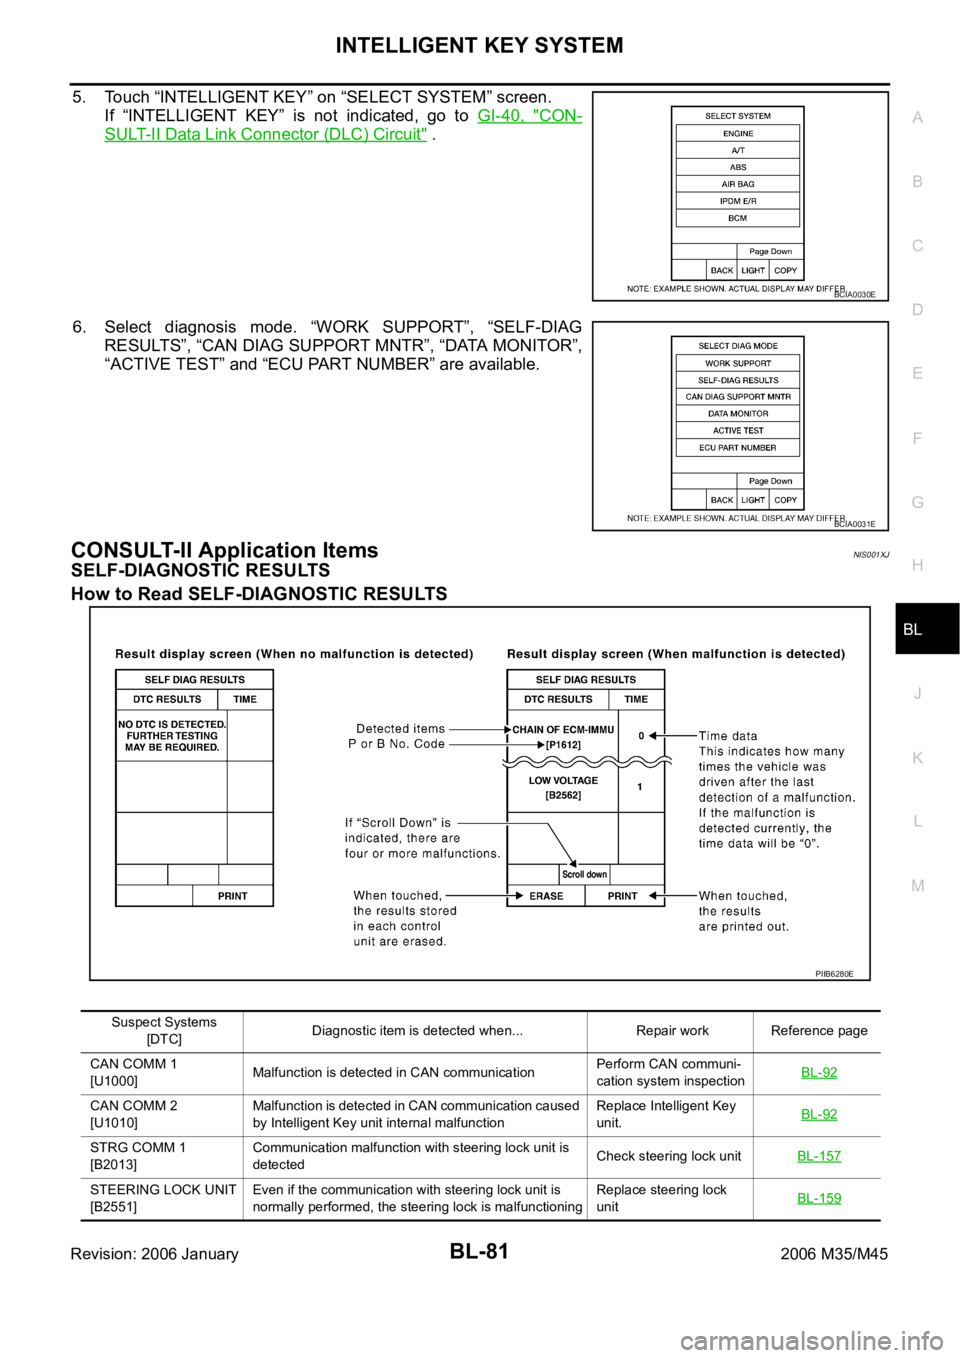
5. Touch “INTELLIGENT KEY” on “SELECT SYSTEM” screen.
If “INTELLIGENT KEY” is not indicated, go to GI-40, "
CON-
SULT-II Data Link Connector (DLC) Circuit" .
6. Select diagnosis mode. “WORK SUPPORT”, “SELF-DIAG
RESULTS”, “CAN DIAG SUPPORT MNTR”, “DATA MONITOR”,
“ACTIVE TEST” and “ECU PART NUMBER” are available.
CONSULT-II Application ItemsNIS001XJ
SELF-DIAGNOSTIC RESULTS
How to Read SELF-DIAGNOSTIC RESULTS
BCIA0030E
BCIA0031E
PIIB6280E
Suspect Systems
[DTC]Diagnostic item is detected when... Repair work Reference page
CAN COMM 1
[U1000]Malfunction is detected in CAN communicationPerform CAN communi-
cation system inspectionBL-92
CAN COMM 2
[U1010]Malfunction is detected in CAN communication caused
by Intelligent Key unit internal malfunctionReplace Intelligent Key
unit.BL-92
STRG COMM 1
[B2013]Communication malfunction with steering lock unit is
detectedCheck steering lock unitBL-157
STEERING LOCK UNIT
[B2551]Even if the communication with steering lock unit is
normally performed, the steering lock is malfunctioningReplace steering lock
unitBL-159
Page 1065 of 5621

BL-126
INTELLIGENT KEY SYSTEM
Revision: 2006 January2006 M35/M45
Intelligent Key Battery ReplacementNIS001Y6
DISASSEMBLY AND ASSEMBLY OF INTELLIGENT KEY
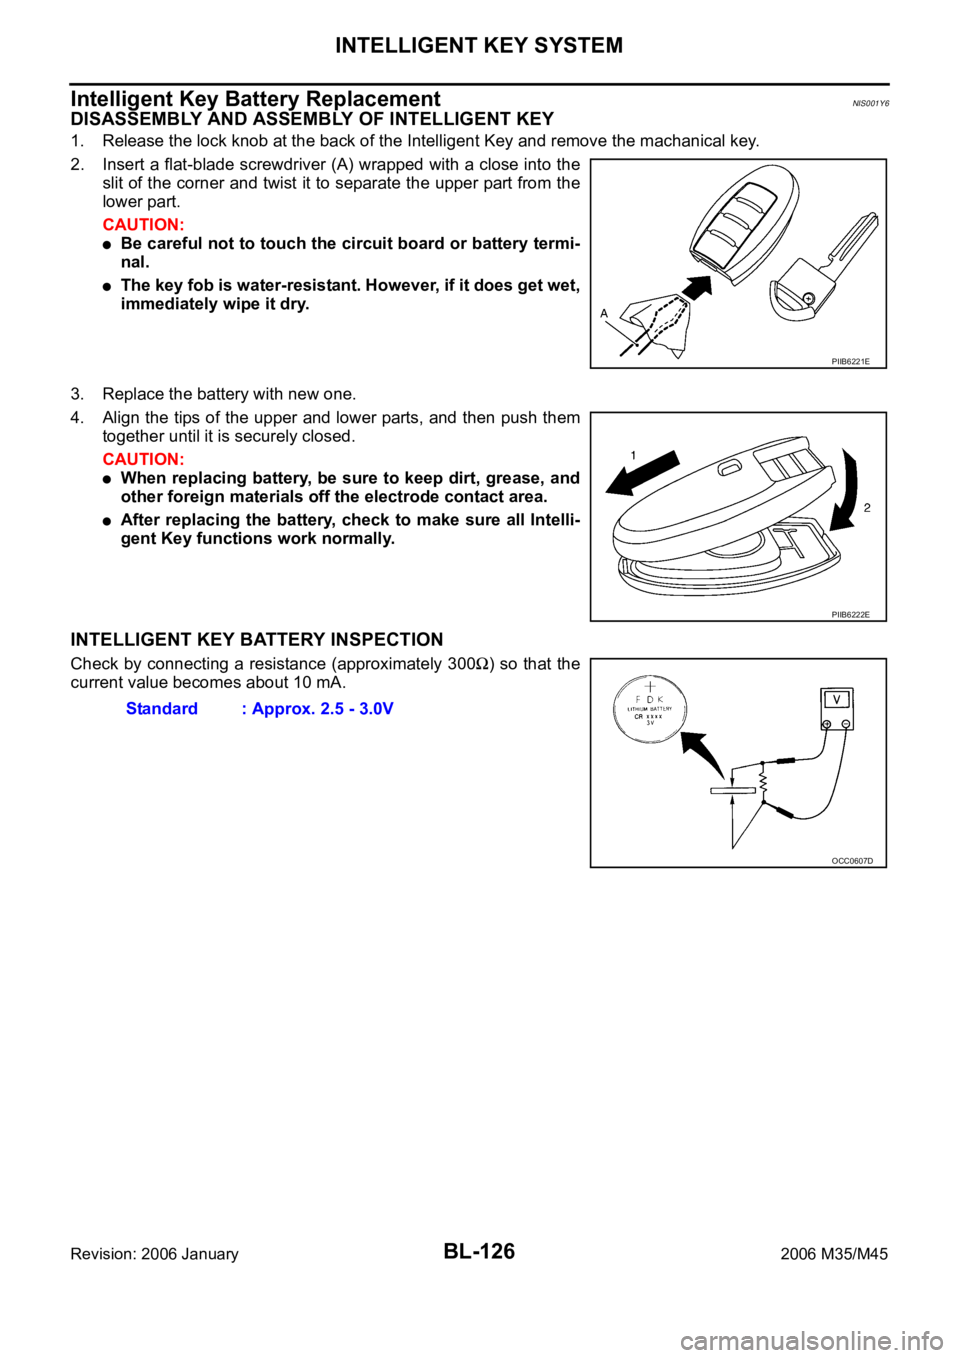
1. Release the lock knob at the back of the Intelligent Key and remove the machanical key.
2. Insert a flat-blade screwdriver (A) wrapped with a close into the
slit of the corner and twist it to separate the upper part from the
lower part.
CAUTION:
Be careful not to touch the circuit board or battery termi-
nal.
The key fob is water-resistant. However, if it does get wet,
immediately wipe it dry.
3. Replace the battery with new one.
4. Align the tips of the upper and lower parts, and then push them
together until it is securely closed.
CAUTION:
When replacing battery, be sure to keep dirt, grease, and
other foreign materials off the electrode contact area.
After replacing the battery, check to make sure all Intelli-
gent Key functions work normally.
INTELLIGENT KEY BATTERY INSPECTION
Check by connecting a resistance (approximately 300) so that the
current value becomes about 10 mA.
PIIB6221E
PIIB6222E
Standard : Approx. 2.5 - 3.0V
OCC0607D
Page 1067 of 5621

BL-128
INTELLIGENT KEY SYSTEM/ENGINE START FUNCTION
Revision: 2006 January2006 M35/M45
System DescriptionNIS001Y8
The engine start function of Intelligent Key system is a system that makes it possible to start and stop the
engine without removing the key. It verifies the electronic ID using two-way communications when press-
ing the push-button ignition switch while carrying the Intelligent Key, which operates based on the results
of electronic ID verification for Intelligent Key using two-way communications between the Intelligent Key
and the vehicle (Intelligent Key unit).
NOTE:
The driver should always carry the intelligent key at all times.
Intelligent Key has 2 IDs (for Intelligent Key and for immobilizer). It can perform the door lock/unlock oper-
ation and the push-button ignition switch operation when carrying the registered Intelligent Key.
When the Intelligent Key battery is discharged, it can be used as emergency by inserting the Intelligent
Key to the key slot. At that time, perform the immobilizer ID verification. If it is used when carrying the
Intelligent Key, perform the Intelligent Key ID verification.
If the ID is successfully verified, and when push-button ignition switch is pressed, steering lock will be
released and initiating the engine will be possible.
If the door lock/unlock operation is performed when the Intelligent Key battery is discharged, all doors
lock/unlock can be performed by operating the driver door key cylinder using the mechanical key set into
the Intelligent Key.
Intelligent Key can be registered up to 4 keys (Including the standard Intelligent Key) on request from the
owner.
NOTE:
Refer to BL-44, "INTELLIGENT KEY SYSTEM" for any functions other than engine start function of
Intelligent Key system.
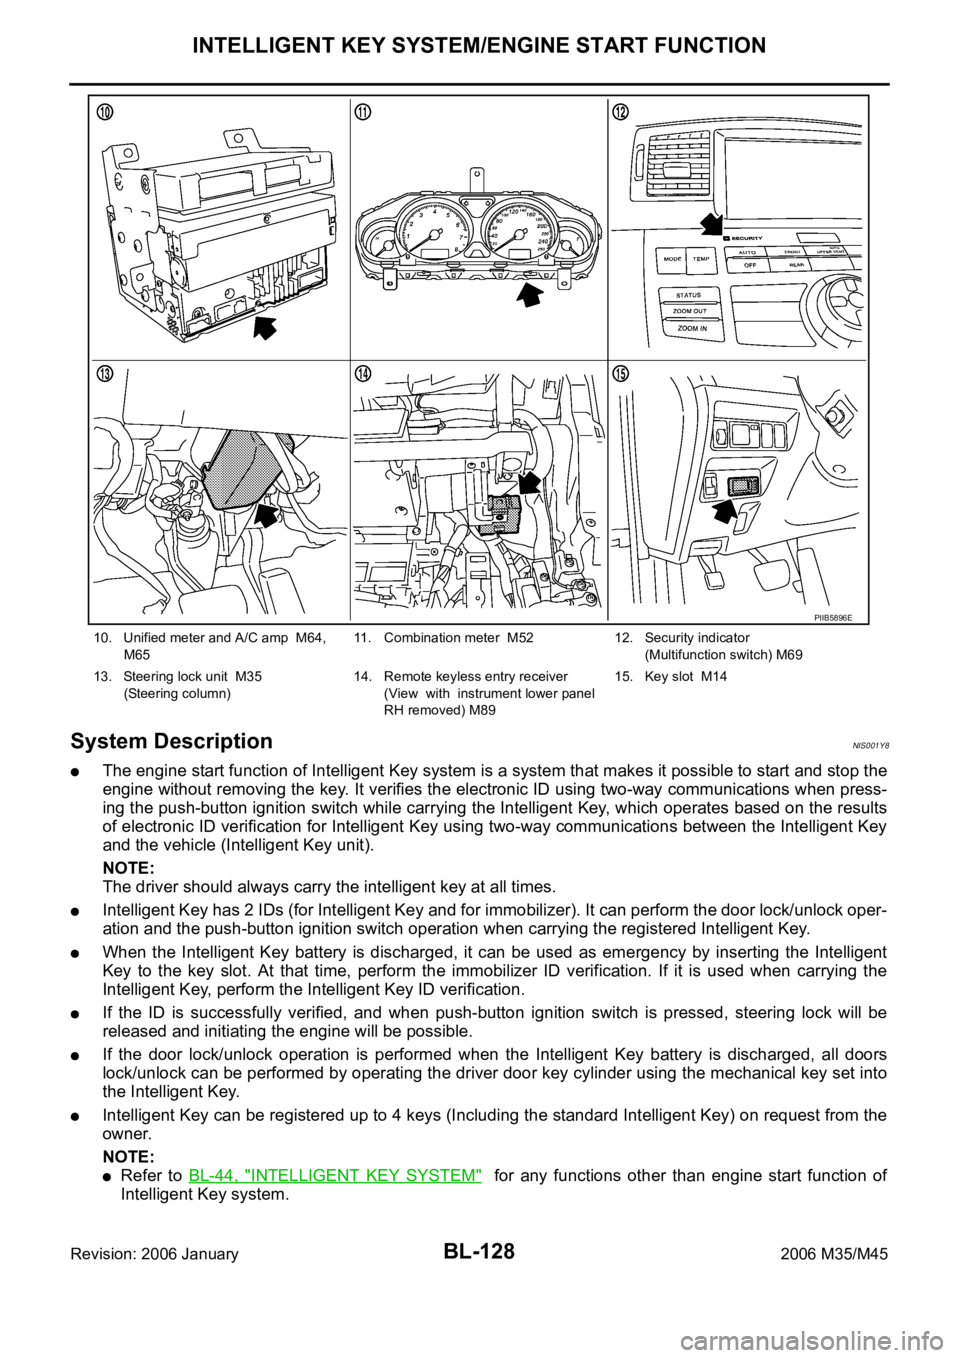
10. Unified meter and A/C amp M64,
M6511. Combination meter M52 12. Security indicator
(Multifunction switch) M69
13. Steering lock unit M35
(Steering column)14. Remote keyless entry receiver
(View with instrument lower panel
RH removed) M89 15. Key slot M14
PIIB5896E