Page 477 of 4462

AIR CONDITIONER CONTROL ATC-31
C
D E
F
G H
I
K L
M A
B
AT C
Revision: 2006 December 2006 FX35/FX45
TRANSMISSION DATA AND TRANSMISSION ORDER
Unified meter and A/C amp. data is transmitted consecutively to each of the door motors following the form
shown in figure below.
Start:
Initial compulsory signal is sent to each of the door motors.
Address:
Data sent from the unified meter and A/C amp. are selected according to data-based decisions made by the
air mix door motor, mode door motor and intake door motor.
If the addresses are identical, the opening angle data and error check signals are received by the door motor
LCUs. The LCUs then make the appropriate error decision. If the opening angle data have no error, door con-
trol begins.
If an error exists, the received data are rejected and corrected data received. Finally, door control is based
upon the corrected opening angle data.
Opening Angle:
Data that shows the indicated door opening angle of each door motor.
Error Check:
In this procedure, transmitted and received data is checked for errors. Error data are then compiled. The error
check prevents corrupted data from being used by the air mix door motor, the mode door motor and the intake
door motor. Error data can be related to the following symptoms.
�Malfunction of electrical frequency
�Poor electrical connections
�Signal leakage from transmission lines
�Signal level fluctuation
RJIA1748E
Page 565 of 4462

INTAKE SENSOR ATC-119
C
D E
F
G H
I
K L
M A
B
AT C
Revision: 2006 December 2006 FX35/FX45
INTAKE SENSORPFP:27723
Removal and InstallationNJS000EO
REMOVAL
1. Remove low-pressure pipe 2 and high-pressure pipe 3. Refer to ATC-150, "Removal and Installation of
Low-pressure Pipe 2 and High-pressure Pipe 3" .
CAUTION:
Cap or wrap the joint of the pipe with suitable material such as vinyl tape to avoid the entry of air.
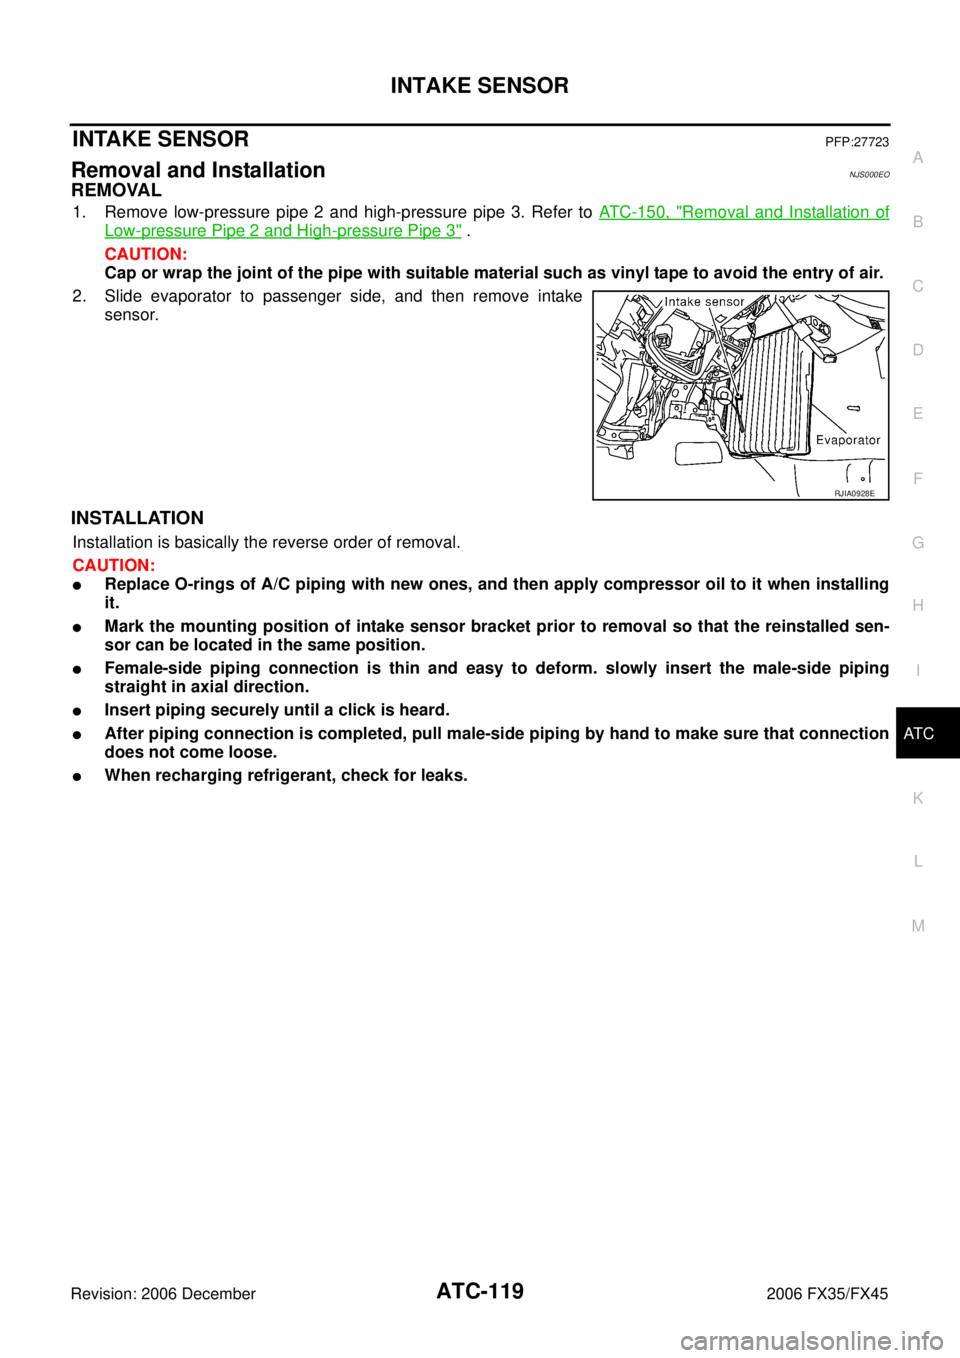
2. Slide evaporator to passenger side, and then remove intake sensor.
INSTALLATION
Installation is basically the reverse order of removal.
CAUTION:
�Replace O-rings of A/C piping with new ones, and then apply compressor oil to it when installing
it.
�Mark the mounting position of intake sensor bracket prior to removal so that the reinstalled sen-
sor can be located in the same position.
�Female-side piping connection is thin and easy to deform. slowly insert the male-side piping
straight in axial direction.
�Insert piping securely until a click is heard.
�After piping connection is completed, pull male-side piping by hand to make sure that connection
does not come loose.
�When recharging refrigerant, check for leaks.
RJIA0928E
Page 566 of 4462
ATC-120
BLOWER UNIT
Revision: 2006 December 2006 FX35/FX45
BLOWER UNITPFP:27200
Removal and InstallationNJS000EP
REMOVAL
1. Remove instrument passenger lower panel. Refer to IP-10, "INSTRUMENT PANEL ASSEMBLY" .
2. Remove mounting nut, and then remove ECM with bracket attached.
3. Disconnect intake door motor connector and blower fan motor connector.
4. Remove harness clip from blower unit.
5. Remove mounting bolt and screws from blower unit.
CAUTION:
Move blower unit rightward, and remove locating pin (1
part) and joint. Then remove blower unit downward.
6. Remove blower unit.
INSTALLATION
Installation is basically the reverse order of removal.
CAUTION:
Make sure locating pin (1 part) and joint are securely inserted.
RJIA2039E
RJIA0943E
Page 573 of 4462
HEATER & COOLING UNIT ASSEMBLY ATC-127
C
D E
F
G H
I
K L
M A
B
AT C
Revision: 2006 December 2006 FX35/FX45
�Insert piping securely until a click is heard.
�After piping connection is completed, pull male-side piping by hand to make sure that connection
does not come loose.
�When recharging refrigerant, check for leaks.
NOTE:
�When filling radiator with coolant, refer to CO-11, "Changing Engine Coolant" (VQ35DE) or CO-38,
"Changing Engine Coolant" (VK45DE).
�Recharge the refrigerant.
Heater & cooling unit assembly mounting bolt : 6.8 N·m (0.69 kg-m, 60 in-lb)
Steering member mounting nut and bolt : 12 N·m (1.2 kg-m, 9 fl-lb)
Steering column mounting nut and bolt : 16.7 N·m (1.7 kg-m, 12 fl-lb)
Page 593 of 4462

REFRIGERANT LINES ATC-147
C
D E
F
G H
I
K L
M A
B
AT C
Revision: 2006 December 2006 FX35/FX45
INSTALLATION
Installation is basically the reverse order of removal.
CAUTION:
�Replace O-rings of A/C piping with new ones, and then apply compressor oil to it when installing
it.
�Female-side piping connection is thin and easy to deform. slowly insert the male-side piping
straight in axial direction.
�Insert piping securely until a click is heard.
�After piping connection is completed, pull male-side piping by hand to make sure that connection
does not come loose.
�When recharging refrigerant, check for leaks.
Removal and Installation of High-pressure Flexible HoseNJS000F5
REMOVAL
1. Use a refrigerant collecting equipment (for HFC-134a) to discharge the refrigerant.
2. Remove air cleaner case and air duct. Refer to EM-17, "
AIR CLEANER AND AIR DUCT" (VQ35DE) or
EM-177, "
AIR CLEANER AND AIR DUCT" (VK45DE).
3. Remove high-pressure flexible hose bracket mounting bolt.
4. Disconnect one-touch joint between high-pressure flexible hose and condenser.
a. Set a disconnector (SST: 9253089912) on A/C piping.
b. Slide a disconnector upward until it clicks.
c. Slide A/C piping upward and disconnect it.
CAUTION:
Cap or wrap the joint of the pipe with suitable material such
as vinyl tape to avoid the entry of air.
5. Remove mounting nut from high-pressure flexible hose (com- pressor side), and then remove high-pressure flexible hose.
CAUTION:
Cap or wrap the joint of the pipe with suitable material such
as vinyl tape to avoid the entry of air. Low-pressure flexible hose bracket mounting bolt
: 5.5 N·m (0.56 kg-m, 49 in-lb)
RJIA2065E
RJIA2066E
SJIA0943E
Page 594 of 4462

ATC-148
REFRIGERANT LINES
Revision: 2006 December 2006 FX35/FX45
INSTALLATION
Installation is basically the reverse order of removal.
CAUTION:
�Replace O-rings of high-pressure flexible hose with new ones, and then apply compressor oil to it
when installing it.
�Female-side piping connection is thin and easy to deform. slowly insert the male-side piping
straight in axial direction.
�Insert piping securely until a click is heard.
�After piping connection is completed, pull male-side piping by hand to make sure that connection
does not come loose.
�When recharging refrigerant, check for leaks.
Removal and Installation of Low-pressure Pipe 1 (Engine Compartment)NJS000F6
REMOVAL
1. Use a refrigerant collecting equipment (for HFC-134a) to discharge the refrigerant.
2. Remove cowl top cover. Refer to EI-23, "
COWL TOP" .
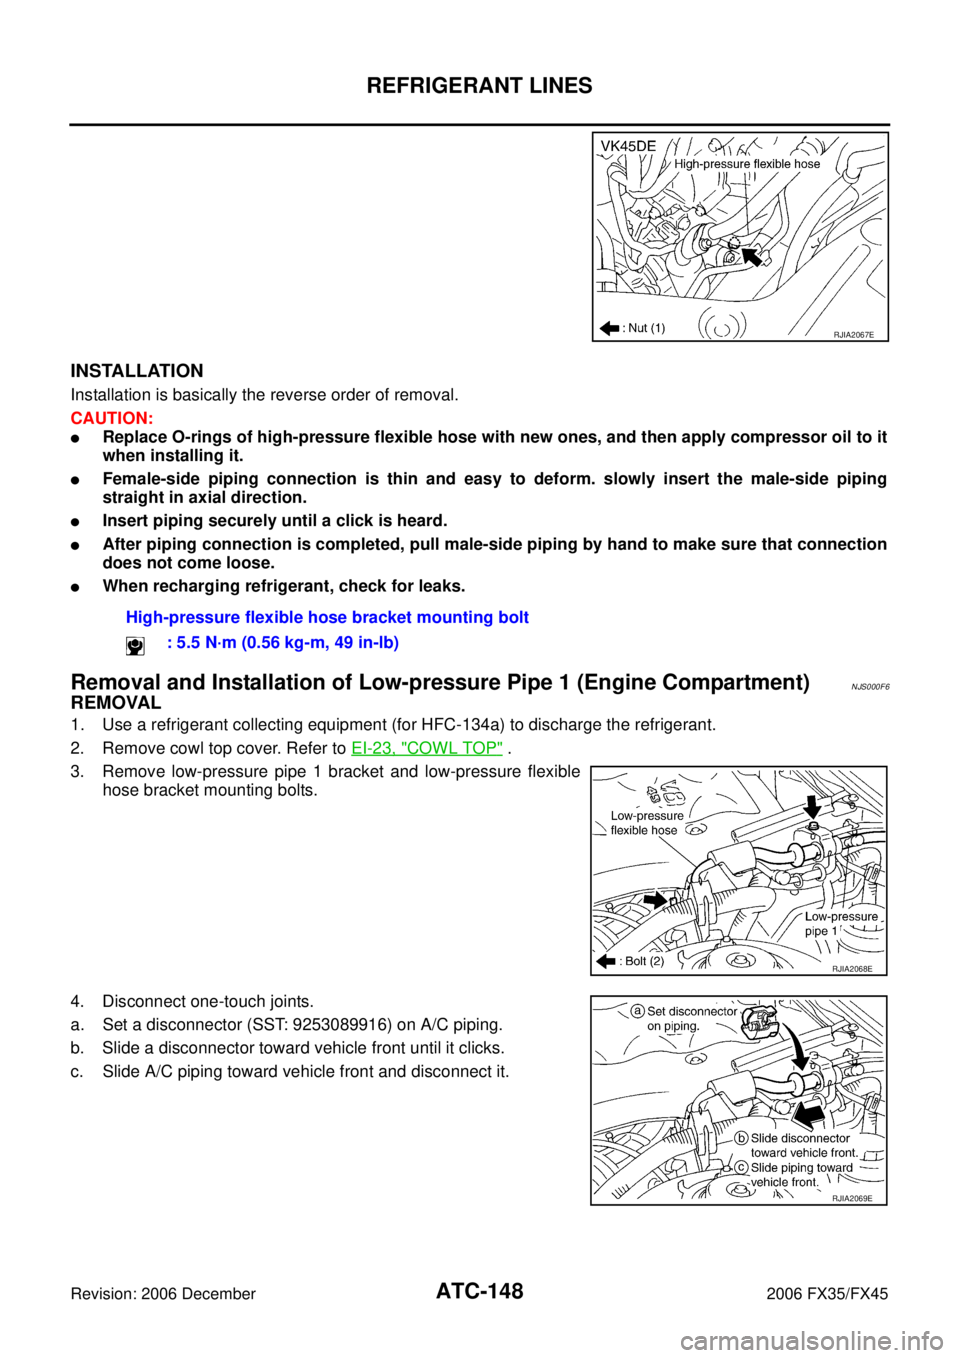
3. Remove low-pressure pipe 1 bracket and low-pressure flexible hose bracket mounting bolts.
4. Disconnect one-touch joints.
a. Set a disconnector (SST: 9253089916) on A/C piping.
b. Slide a disconnector toward vehicle front until it clicks.
c. Slide A/C piping toward vehicle front and disconnect it.
RJIA2067E
High-pressure flexible hose bracket mounting bolt
: 5.5 N·m (0.56 kg-m, 49 in-lb)
RJIA2068E
RJIA2069E
Page 595 of 4462

REFRIGERANT LINES ATC-149
C
D E
F
G H
I
K L
M A
B
AT C
Revision: 2006 December 2006 FX35/FX45
5. Remove low-pressure pipe 1. CAUTION:
Cap or wrap the joint of the pipe with suitable material such
as vinyl tape to avoid the entry of air.
INSTALLATION
Installation is basically the reverse order of removal.
CAUTION:
�Replace O-rings of low-pressure pipe 1 with new ones, and then apply compressor oil to it when
installing it.
�Female-side piping connection is thin and easy to deform. slowly insert the male-side piping
straight in axial direction.
�Insert piping securely until a click is heard.
�After piping connection is completed, pull male-side piping by hand to make sure that connection
does not come loose.
�When recharging refrigerant, check for leaks.
Removal and Installation of High-pressure Pipe 1 and 2 (Engine Compartment)NJS000F7
REMOVAL
1. Remove low-pressure pipe 1. Refer to ATC-148, "Removal and Installation of Low-pressure Pipe 1
(Engine Compartment)" .
2. Remove high-pressure flexible hose and low-pressure flexible hose. Refer to ATC-147, "
Removal and
Installation of High-pressure Flexible Hose" and ATC-146, "Removal and Installation of Low-pressure
Flexible Hose" .
3. Remove high-pressure pipe 1 and 2 from clips.
RJIA2037E
Low-pressure pipe 1 bracket and low-pressure flexible hose bracket mounting bolts
: 5.5 N·m (0.56 kg-m, 49 in-lb)
RJIA2070E
Page 596 of 4462

ATC-150
REFRIGERANT LINES
Revision: 2006 December 2006 FX35/FX45
4. Disconnect one-touch joint between condenser and high-pres- sure pipe 1.
a. Set a disconnector (SST: 9253089908) on A/C piping.
b. Slide a disconnector upward until it clicks.
c. Slide A/C piping upward and disconnect it.
CAUTION:
Cap or wrap the joint of the pipe with suitable material such
as vinyl tape to avoid the entry of air.
5. Disconnect one-touch joint between high-pressure pipe 1 and 2.
a. Set a disconnector (SST: 9253089908) on A/C piping.
b. Slide a disconnector toward vehicle rear until it clicks.
c. Slide A/C piping toward vehicle rear and disconnect it.
CAUTION:
Cap or wrap the joint of the pipe with suitable material such
as vinyl tape to avoid the entry of air.
6. Remove high-pressure pipe 1.
7. Disconnect one-touch joint between high-pressure pipe 2 and 3.
a. Set a disconnector (SST: 9253089908) on A/C piping.
b. Slide a disconnector toward vehicle front until it clicks.
c. Slide A/C piping toward vehicle front and disconnect it.
8. Remove high-pressure pipe 2. CAUTION:
Cap or wrap the joint of the pipe with suitable material such
as vinyl tape to avoid the entry of air.
INSTALLATION
Installation is basically the reverse order of removal.
CAUTION:
�Replace O-rings of high-pressure pipe with new ones, and then apply compressor oil to it when
installing it.
�Female-side piping connection is thin and easy to deform. slowly insert the male-side piping
straight in axial direction.
�Insert piping securely until a click is heard.
�After piping connection is completed, pull male-side piping by hand to make sure that connection
does not come loose.
�When recharging refrigerant, check for leaks.
Removal and Installation of Low-pressure Pipe 2 and High-pressure Pipe 3NJS000F8
REMOVAL
1. Set the temperature (passenger side) at 18 °C (60 °F), and then disconnect the battery cable from the neg-
ative terminal.
2. Use a refrigerant collecting equipment (for HFC-134a) to discharge the refrigerant.
3. Remove cowl top cover. Refer to EI-23, "
COWL TOP" .
RJIA2071E
RJIA2072E
RJIA2073E