Page 652 of 4462
AV-46
AUDIO
Revision: 2006 December 2006 FX35/FX45
Removal and Installation for BOSE Speaker Amp.NKS003BA
REMOVAL
1. Remove luggage side box assembly. Refer to EI-44, "Removal
and Installation" .
2. Remove nuts (3) with power tool, and remove BOSE speaker amp. from luggage room floor.
3. Remove nuts (2) with power tool, and remove assist bracket.
4. Remove nuts (4) with power tool, and remove bracket.
INSTALLATION
Installation is the reverse order of removal.
SKIB8776E
SKIA5809E
Page 653 of 4462
AUDIO AV-47
C
D E
F
G H
I
J
L
M A
B
AV
Revision: 2006 December 2006 FX35/FX45
Removal and Installation of Satellite Radio TunerNKS003LX
REMOVAL
1. Remove luggage side box assembly. Refer to EI-44, "Removal
and Installation" .
2. Remove nuts (A) and remove satellite radio tuner (1) from lug- gage room floor.
INSTALLATION
Installation is the reverse order of removal.
Removal and Installation of Satellite Radio AntennaNKS003LY
: Vehicle front
REMOVAL
1. Remove luggage floor trim. Refer to EI-44, "Removal and Installation" .
2. Remove assist grip (rear). Refer to EI-42, "
HEADLINING" .
3. Pull down headlining and obtain space for work between vehicle and headlining.
4. Remove nut (A), and then disconnect connector (1).
5. Remove satellite radio antenna.
INSTALLATION
Installation is the reverse order of removal.
SKIB8650E
SKIB8668E
Roof antenna mounting nut : 4.5 N·m (0.46 kg-m, 40 in-lb)
Page 659 of 4462
ANTENNA AV-53
C
D E
F
G H
I
J
L
M A
B
AV
Revision: 2006 December 2006 FX35/FX45
3. To locate a break, move probe along element. Tester needle will swing abruptly when probe passes the broken point.
Removal and Installation of Roof AntennaNKS003LV
REMOVAL
1. Remove head lining. Refer to EI-42, "HEADLINING" .
2. Remove nut and remove rod and antenna base.
3. Remove instrument panel. Refer to IP-10, "
INSTRUMENT
PANEL ASSEMBLY" .
4. Disassembly antenna feeder (upper) and antenna feeder (lower).
5. Disengaged the clips (7) to separate antenna feeder (upper) from vehicle.
6. Pull off antenna feeder (lower) from audio unit.
7. Disengaged the clips (5) to separate antenna feeder (lower) from vehicle.
INSTALLATION
Installation is the reverse order of removal.
Removal and Installation of Satellite Radio AntennaNKS003LW
Refer to AV- 4 7 , "Removal and Installation of Satellite Radio Antenna" .
SEL253I
PKIA2463E
SKIA5821E
Page 698 of 4462

AV-92
INTEGRATED DISPLAY SYSTEM
Revision: 2006 December 2006 FX35/FX45
Example of Symptoms Possible No MalfunctionNKS003JT
For system operation information, refer to Owner's Manual.
DISPLAY
Removal and Installation of DisplayNKS003LI
Refer to AV- 4 3 , "Disassembly and Assembly for Audio Unit" .
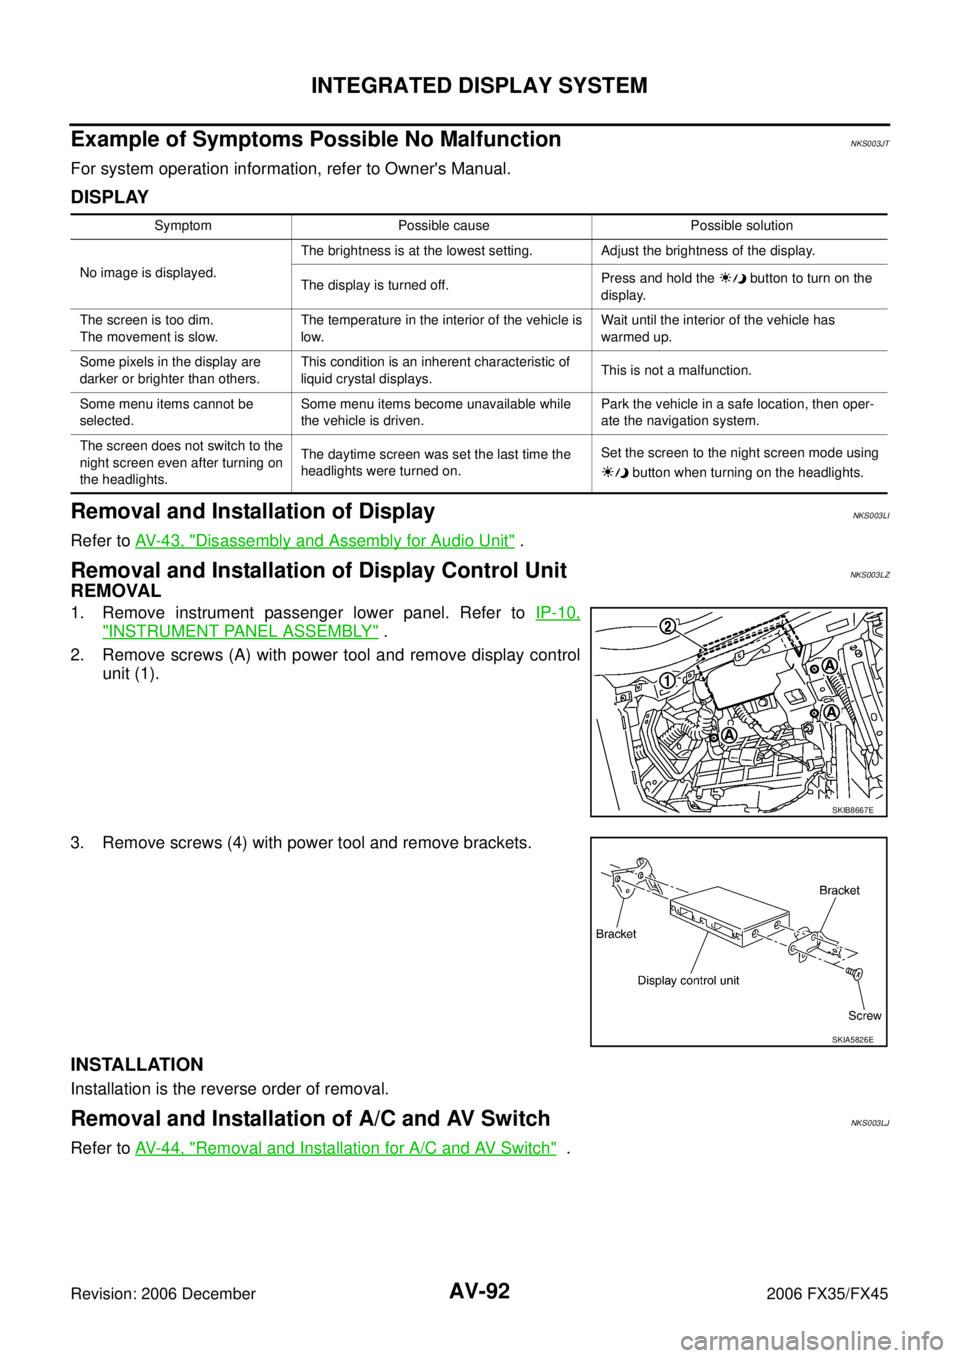
Removal and Installation of Display Control UnitNKS003LZ
REMOVAL
1. Remove instrument passenger lower panel. Refer to IP-10,
"INSTRUMENT PANEL ASSEMBLY" .
2. Remove screws (A) with power tool and remove display control unit (1).
3. Remove screws (4) with power tool and remove brackets.
INSTALLATION
Installation is the reverse order of removal.
Removal and Installation of A/C and AV SwitchNKS003LJ
Refer to AV- 4 4 , "Removal and Installation for A/C and AV Switch" .
Symptom Possible cause Possible solution
No image is displayed. The brightness is at the lowest setting. Adjust the brightness of the display.
The display is turned off. Press and hold the button to turn on the
display.
The screen is too dim.
The movement is slow. The temperature in the interior of the vehicle is
low. Wait until the interior of the vehicle has
warmed up.
Some pixels in the display are
darker or brighter than others. This condition is an inherent characteristic of
liquid crystal displays. This is not a malfunction.
Some menu items cannot be
selected. Some menu items become unavailable while
the vehicle is driven. Park the vehicle in a safe location, then oper-
ate the navigation system.
The screen does not switch to the
night screen even after turning on
the headlights. The daytime screen was set the last time the
headlights were turned on. Set the screen to the night screen mode using
button when turning on the headlights.
SKIB8667E
SKIA5826E
Page 734 of 4462

AV-128
NAVIGATION SYSTEM
Revision: 2006 December 2006 FX35/FX45
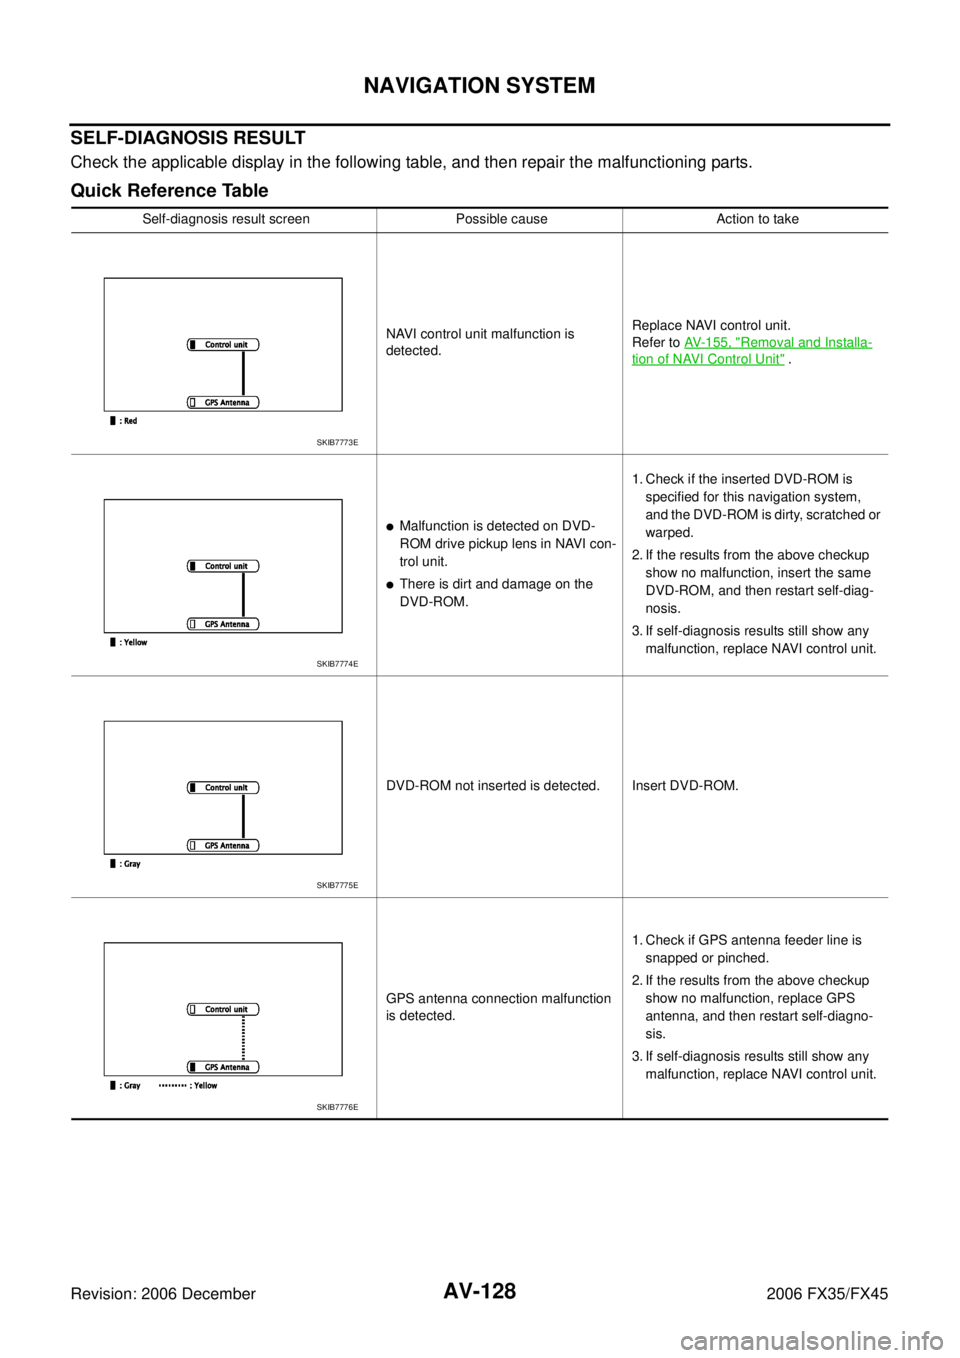
SELF-DIAGNOSIS RESULT
Check the applicable display in the following table, and then repair the malfunctioning parts.
Quick Reference Table
Self-diagnosis result screen Possible cause Action to take NAVI control unit malfunction is
detected. Replace NAVI control unit.
Refer to AV- 1 5 5 , "
Removal and Installa-
tion of NAVI Control Unit" .
�Malfunction is detected on DVD-
ROM drive pickup lens in NAVI con-
trol unit.
�There is dirt and damage on the
DVD-ROM. 1. Check if the inserted DVD-ROM is
specified for this navigation system,
and the DVD-ROM is dirty, scratched or
warped.
2. If the results from the above checkup show no malfunction, insert the same
DVD-ROM, and then restart self-diag-
nosis.
3. If self-diagnosis results still show any malfunction, replace NAVI control unit.
DVD-ROM not inserted is detected. Insert DVD-ROM.
GPS antenna connection malfunction
is detected. 1. Check if GPS antenna feeder line is
snapped or pinched.
2. If the results from the above checkup show no malfunction, replace GPS
antenna, and then restart self-diagno-
sis.
3. If self-diagnosis results still show any malfunction, replace NAVI control unit.
SKIB7773E
SKIB7774E
SKIB7775E
SKIB7776E
Page 740 of 4462

AV-134
NAVIGATION SYSTEM
Revision: 2006 December 2006 FX35/FX45
Diagnosis by Error History
�When having a difficulty on the investigation of cause due to multiple errors with a reproducible malfunc-
tion, turn ON the ignition switch from OFF mode after making a memo of the item and number of time (or
delete “Error History”). Check “Error History” again after the malfunction was reproduced, and then per-
form diagnosis focusing on the item of which number of time increased.
�DVD-ROM error history may be restored because DVD-ROM cannot be temporarily read. (Driving on
rough road etc.) Then, erase the error history. (This is not a malfunction.) Perform service in “Action to
take” if error history are repeatedly indicated again.
Error item Possible cause Action to take
GPS Antenna Error GPS antenna connection malfunction
is detected. 1. Start self-diagnosis, and make sure of
the result.
2. If any error is found, GO TO 3. If any error is not found, delete the error his-
tory and end the diagnosis. (This is not
a malfunction.)
3. Check if GPS antenna feeder line is snapped or pinched.
4. If the results from the above checkup show no malfunction, replace GPS
antenna, and then restart self-diagno-
sis.
5. If self-diagnosis results still show any malfunction, replace NAVI control unit.
FLASH-ROM Error Of Control Unit
NAVI control unit malfunction is
detected. 1. Start self-diagnosis, and make sure of
the result.
2. If any error is found, replace NAVI con- trol unit. Refer to AV-155, "
Removal
and Installation of NAVI Control Unit" .
If any error is not found, delete the error
history and end the diagnosis. (This is
not a malfunction.)
Connection Of Gyro
GPS Communication Error GPS malfunction is detected. If the symptoms such as the GPS receipt
malfunction occur, intermittent malfunc-
tion caused by strong radio interference
may be detected.
If the malfunction always occurs, replace
NAVI control unit.
GPS ROM Error
GPS RAM Error
GPS RTC Error
DVD-ROM Mechanism not Detected
�Malfunction is detected on DVD-
ROM drive pickup lens in NAVI con-
trol unit.
�There is dirt and damage on the
DVD-ROM. 1. Check if the inserted DVD-ROM is
specified for this navigation system,
and the DVD-ROM is dirty, scratched or
warped.
2. If the results from the above checkup show no malfunction, insert the same
DVD-ROM, and then restart self-diag-
nosis.
3. If self-diagnosis results still show any malfunction, replace NAVI control unit.
DVD-ROM Communication Error
DVD-ROM Mechanism Error
DVD-ROM Focus Error
DVD-ROM TOC Error
DVD-ROM Disc Error
DVD-ROM Seek Error
DVD-ROM Error Correction Error
DVD-ROM Read Error
DVD-ROM Data Transfer Error
DVD-ROM Data Error
DVD-ROM Loading / Eject Error
DVD-ROM Time-out
Page 761 of 4462
NAVIGATION SYSTEM AV-155
C
D E
F
G H
I
J
L
M A
B
AV
Revision: 2006 December 2006 FX35/FX45
Removal and Installation of NAVI Control UnitNKS003LK
REMOVAL
1. Remove passenger side seat. Refer to SE-97, "Removal and Installation" .
2. Remove clips (4), and remove NAVI control unit cover.
3. Remove screws (2) and nut (1) with power tool, and remove NAVI control unit.
4. Remove screws (4) with power tool and remove brackets.
INSTALLATION
Installation is the reverse order of removal.
Removal and Installation of GPS AntennaNKS003LL
REMOVAL
1. Remove audio unit. Refer to AV- 4 3 , "Removal and Installation of
Audio Unit" .
2. Remove screw (1) and remove GPS antenna.
INSTALLATION
Installation is the reverse order of removal.
PKIA3129E
SKIA5822E
SKIA5823E
SKIA5824E
Page 762 of 4462
AV-156
NAVIGATION SYSTEM
Revision: 2006 December 2006 FX35/FX45
Removal and Installation of A/C and AV SwitchNKS003LM
For A/C and AV switch removal and installation procedures, refer to AV- 4 4 , "Removal and Installation for A/C
and AV Switch" .
Removal and Installation of Display UnitNKS003LN
For display unit removal and installation procedures, refer to AV- 4 3 , "Disassembly and Assembly for Audio
Unit" .
Removal and Installation of Display Control UnitNKS003LO
For display control unit removal and installation procedures, refer to AV- 9 2 , "Removal and Installation of Dis-
play Control Unit"