Page 313 of 539
1
CONTROLS AND EQUIPMENT
5
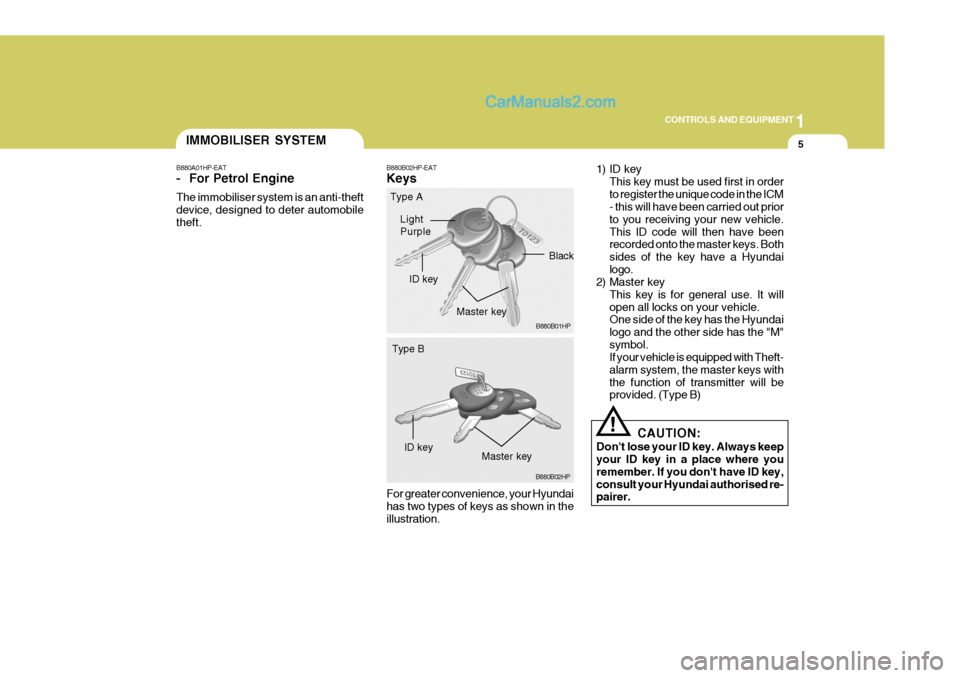
B880B02HP-EAT Keys For greater convenience, your Hyundai has two types of keys as shown in the illustration. 1) ID key
This key must be used first in order to register the unique code in the ICM - this will have been carried out prior to you receiving your new vehicle.This ID code will then have been recorded onto the master keys. Both sides of the key have a Hyundailogo.
2) Master key
This key is for general use. It willopen all locks on your vehicle. One side of the key has the Hyundai logo and the other side has the "M"symbol. If your vehicle is equipped with Theft- alarm system, the master keys withthe function of transmitter will be provided. (Type B)
CAUTION:
Don't lose your ID key. Always keepyour ID key in a place where you remember. If you don't have ID key,consult your Hyundai authorised re- pairer.IMMOBILISER SYSTEM
B880B01HP
Light Purple
ID key Master key Black
Type A
B880B02HP
ID key
Master key
Type B
!
B880A01HP-EAT
- For Petrol Engine The immobiliser system is an anti-theft device, designed to deter automobiletheft.
Page 315 of 539
1
CONTROLS AND EQUIPMENT
7
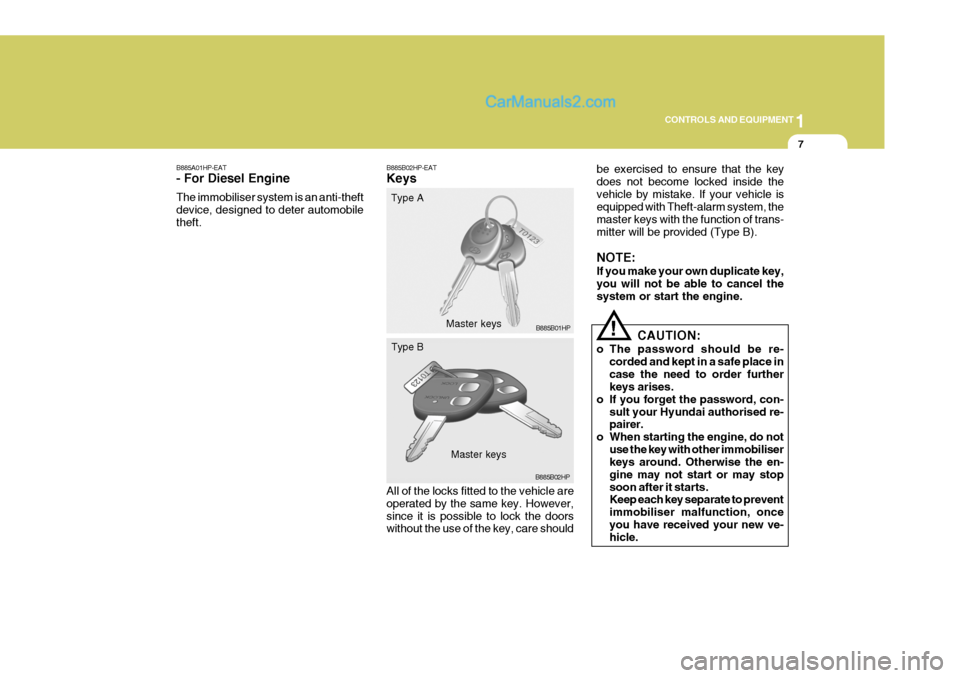
B885A01HP-EAT - For Diesel Engine The immobiliser system is an anti-theft device, designed to deter automobiletheft. B885B02HP-EAT Keys All of the locks fitted to the vehicle are operated by the same key. However,since it is possible to lock the doors without the use of the key, care shouldbe exercised to ensure that the key does not become locked inside thevehicle by mistake. If your vehicle is equipped with Theft-alarm system, the master keys with the function of trans-mitter will be provided (Type B). NOTE: If you make your own duplicate key, you will not be able to cancel thesystem or start the engine.
CAUTION:
o The password should be re- corded and kept in a safe place incase the need to order further keys arises.
o If you forget the password, con- sult your Hyundai authorised re-pairer.
o When starting the engine, do not use the key with other immobiliserkeys around. Otherwise the en- gine may not start or may stopsoon after it starts. Keep each key separate to prevent immobiliser malfunction, onceyou have received your new ve- hicle.
B885B01HP
Type A
Master keys
Master keys B885B02HP
Type B
!
Page 317 of 539
1
CONTROLS AND EQUIPMENT
9
!WARNING:
o Before you drive away, be sure that all the doors are securely closed. It is also recommendedthat the child-protector rear door locks are in the 'lock' position so that children cannot open therear doors from inside the ve- hicle accidentally.
o Before opening the door, always look for and avoid oncoming traf- fic.
o In case of an accident, the door is unlocked automatically(Not allmodels).
DOOR LOCKS
B040A02Y-EAT B040B01A-EAT
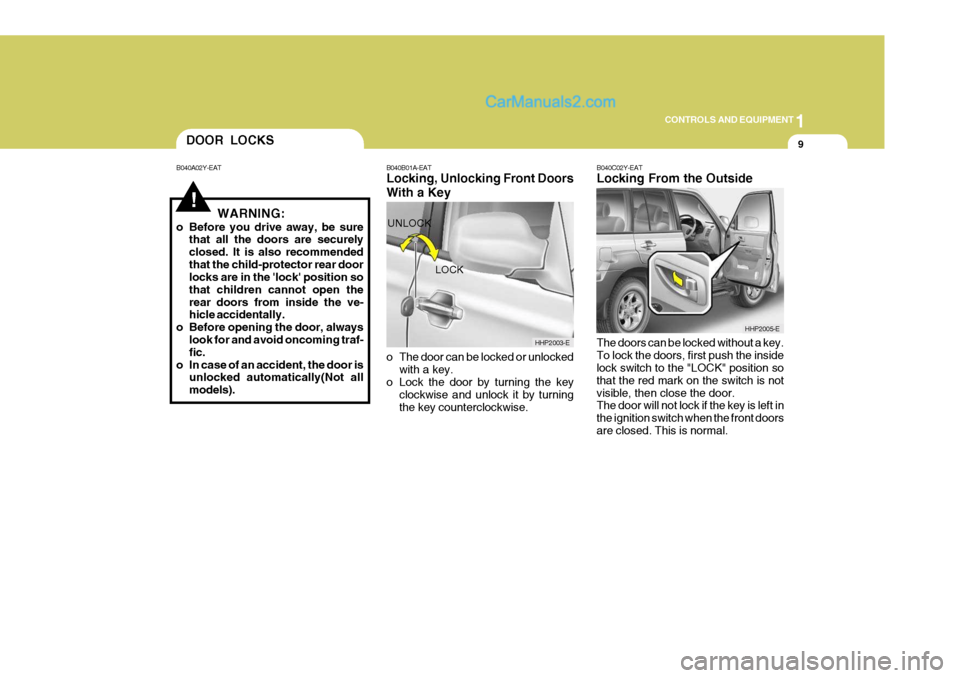
Locking, Unlocking Front Doors With a Key
o The door can be locked or unlocked
with a key.
o Lock the door by turning the key
clockwise and unlock it by turning the key counterclockwise. B040C02Y-EAT Locking From the Outside The doors can be locked without a key. To lock the doors, first push the inside lock switch to the "LOCK" position so that the red mark on the switch is notvisible, then close the door. The door will not lock if the key is left in the ignition switch when the front doorsare closed. This is normal.
LOCK
UNLOCK
HHP2003-E
HHP2005-E
Page 318 of 539
1CONTROLS AND EQUIPMENT
10
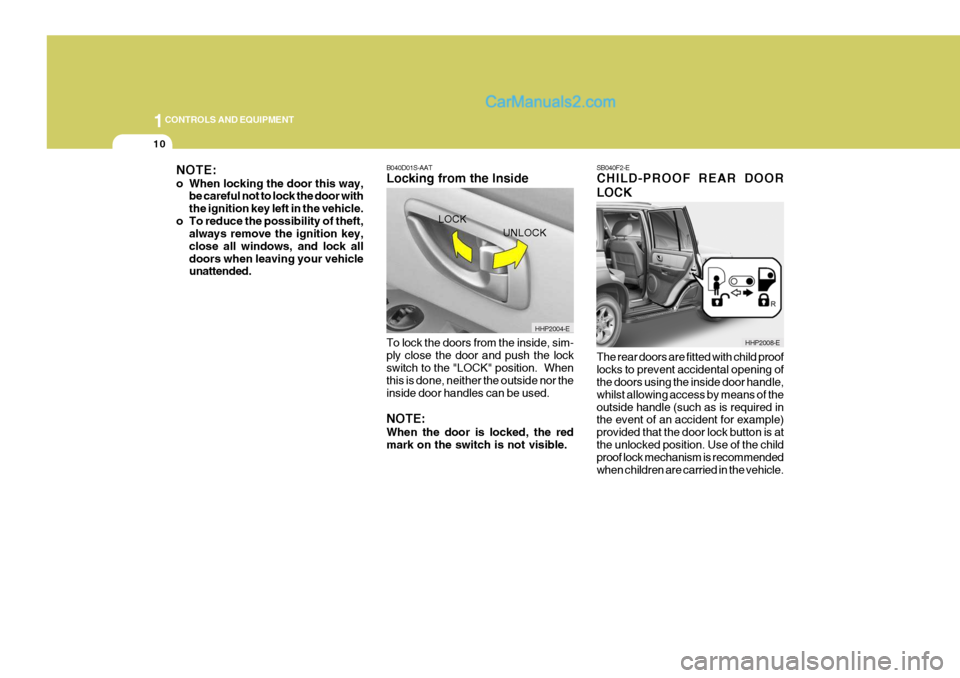
B040D01S-AAT Locking from the Inside To lock the doors from the inside, sim- ply close the door and push the lock switch to the "LOCK" position. When this is done, neither the outside nor theinside door handles can be used. NOTE: When the door is locked, the red mark on the switch is not visible.SB040F2-E CHILD-PROOF REAR DOOR LOCK The rear doors are fitted with child proof locks to prevent accidental opening of the doors using the inside door handle, whilst allowing access by means of theoutside handle (such as is required in the event of an accident for example) provided that the door lock button is atthe unlocked position. Use of the child proof lock mechanism is recommended when children are carried in the vehicle.
LOCK
UNLOCK
HHP2008-E
HHP2004-E
NOTE:
o When locking the door this way,
be careful not to lock the door with the ignition key left in the vehicle.
o To reduce the possibility of theft, always remove the ignition key,close all windows, and lock alldoors when leaving your vehicle unattended.
Page 319 of 539
1
CONTROLS AND EQUIPMENT
11
The child proof lock mechanism may be activated by opening the door andmoving the lever located by the door latch to the "
" locked position. Move
the lever to the "
" unlocked position
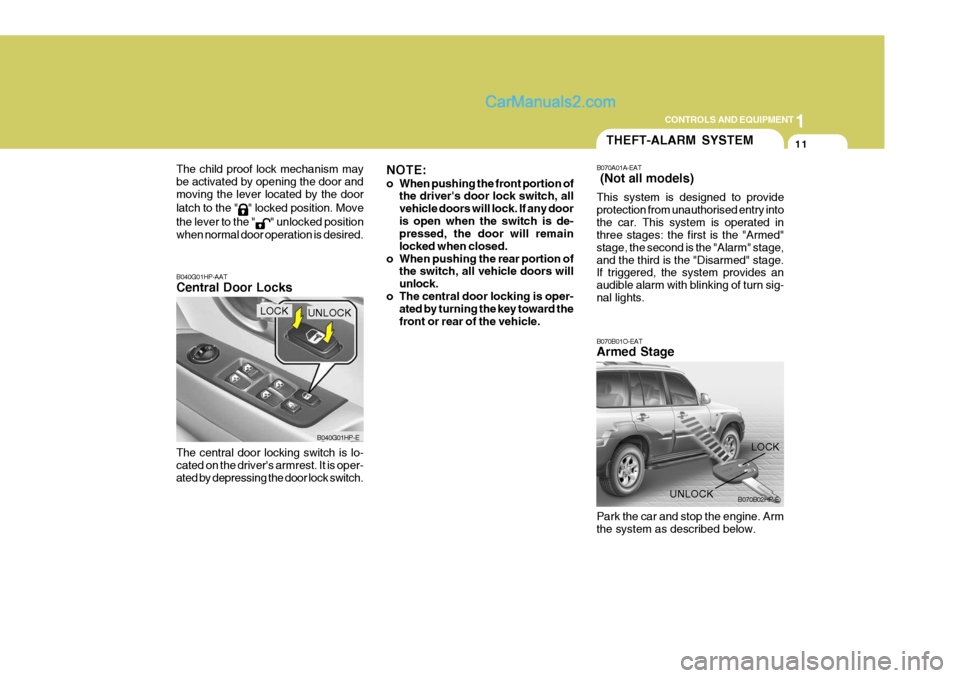
when normal door operation is desired. B040G01HP-AAT Central Door Locks The central door locking switch is lo- cated on the driver's armrest. It is oper- ated by depressing the door lock switch.
B040G01HP-E
LOCKUNLOCK NOTE:
o When pushing the front portion of
the driver's door lock switch, all vehicle doors will lock. If any dooris open when the switch is de- pressed, the door will remain locked when closed.
o When pushing the rear portion of the switch, all vehicle doors willunlock.
o The central door locking is oper- ated by turning the key toward thefront or rear of the vehicle.
THEFT-ALARM SYSTEM
B070A01A-EAT (Not all models) This system is designed to provide protection from unauthorised entry intothe car. This system is operated in three stages: the first is the "Armed" stage, the second is the "Alarm" stage,and the third is the "Disarmed" stage. If triggered, the system provides an audible alarm with blinking of turn sig-nal lights. B070B01O-EAT Armed Stage Park the car and stop the engine. Arm the system as described below.
LOCK
UNLOCK B070B02HP-E
Page 320 of 539

1CONTROLS AND EQUIPMENT
12
!
1) Remove the ignition key from the
ignition switch.
2) Make sure that the bonnet, doors and tailgate door are closed and latched.
3) Lock the doors using the transmitter of the keyless entry system.
After completion of the steps above, the turn signal lights will blink once to indicate that the system is armed. NOTE:
1) If any door, tailgate door or engine bonnet remains open, the system will not be armed.
2) If this happens, rearm the system as previously described.
CAUTION:
Do not arm the system until all pas-sengers have left the car. If the sys- tem is armed whilst a passenger(s) remains in the car, the alarm may beactivated when the remaining passenger(s) leaves the car.
!
B070C01HP-EAT Alarm Stage The alarm will be activated if any of the following occurs whilst the car is parked and the system is armed.
1) A front or rear door is opened with-
out using the transmitter.
2) The tailgate door is opened without using the transmitter.
3) The engine bonnet is opened.The siren will sound and the turn signal lights will blink continuouly for approxi- mately 27 seconds. To turn off thesystem, unlock the door or tailgate door with the transmitter. CAUTION:
Avoid trying to start the engine whilst the system is armed.
B070C01HP B070D01HP-EAT Disarmed Stage The system will be disarmed when the driver's or passenger's door is unlocked by depressing the "UNLOCK" button onthe transmitter. After completion of the step above, the turn signal lights will blink twice to indicate that the system is disarmed.
B070D01HP-1
Page 321 of 539
1
CONTROLS AND EQUIPMENT
13
!
NOTE: If any door,
tailgate door or engine
bonnet is not opened within 30 sec- onds, the system will be rearmedand all doors re-locked.
CAUTION:
Only the transmitter can disarm thearmed stage. If the transmitter doesnot disarm the system, it is neces- sary to take the following steps;
1. Unlock the door with the key, which will cause, the alarm to be acti- vated.
2. Insert the key in the ignition key cylinder and turn the ignition keyto "ON" position.
3. Wait for 30 seconds. After completion of the steps above, the system will be disarmed. B070F02A-EAT Keyless Entry System (Not all models) Locking doors
1. Close all doors.
2. Push the "LOCK" button on the trans-
mitter.
3. At the same time, all doors lock and the turn signal lights will blink once to indicate that the system is armed.
Unlocking doors
1. Push the "UNLOCK" button on the transmitter.
2. At the same time, all doors unlock and the turn signal lights will blink twice to indicate that the system isdisarmed.
NOTE: The transmitter will not work if any of following occur:
- The ignition key is in ignition switch.
- You exceed the operating distance limit (10 m). - The battery in the transmitter is
weak.
- Other vehicles or objects may be blocking the signal.
- The weather is extremely cold.
- The transmitter is close to a radio transmitter such as a radio stationor an airport which can interferewith normal operation of the trans- mitter.
When the transmitter does not work correctly, open and close the door with the ignition key. If you have a problem with the transmitter, con-tact an authorised Hyundai repairer. NOTE: Keep the transmitter away from wa- ter or any liquid. If the keyless entrysystem is inoperative due to expo- sure to water or liquids, it will not be covered by your manufacturer ve-hicle warranty.
Page 322 of 539
1CONTROLS AND EQUIPMENT
14
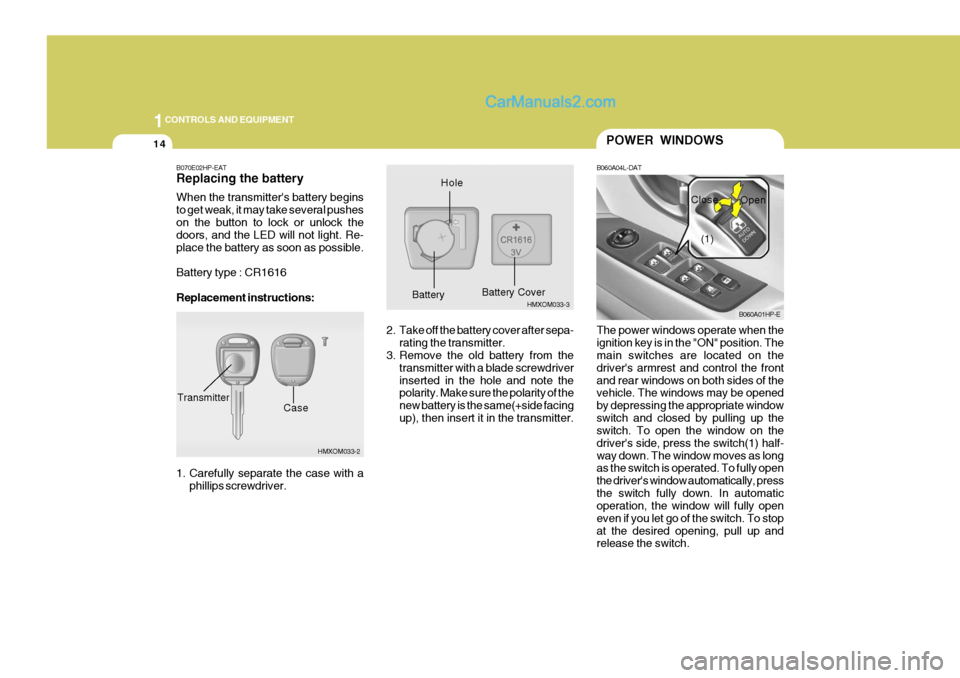
B070E02HP-EAT Replacing the battery When the transmitter's battery begins to get weak, it may take several pusheson the button to lock or unlock the doors, and the LED will not light. Re- place the battery as soon as possible. Battery type : CR1616 Replacement instructions:
1. Carefully separate the case with aphillips screwdriver.
HMXOM033-2
CaseTransmitter
HMXOM033-3
HoleBattery
Battery Cover
The power windows operate when the ignition key is in the "ON" position. The main switches are located on the driver's armrest and control the frontand rear windows on both sides of the vehicle. The windows may be opened by depressing the appropriate windowswitch and closed by pulling up the switch. To open the window on the driver's side, press the switch(1) half-way down. The window moves as long as the switch is operated. To fully open the driver's window automatically, pressthe switch fully down. In automatic operation, the window will fully open even if you let go of the switch. To stopat the desired opening, pull up and release the switch.
POWER WINDOWS
B060A04L-DAT
B060A01HP-E
(1)
Close
Open
2. Take off the battery cover after sepa- rating the transmitter.
3. Remove the old battery from the
transmitter with a blade screwdriver inserted in the hole and note the polarity. Make sure the polarity of the new battery is the same(+side facingup), then insert it in the transmitter.