Page 138 of 320

�µ�µ
�µ �µ
�µ
�µ
If you do not like the stations auto
select has stored, you can store
other f requencies on the preset bars
as previously described.
press the
A. SEL button. This restores the
presets you originally set.
Press the SOUND button repeatedly
to display the SUBWOOFER (if
equipped), BASS, TREBLE, FADER,
and BALANCE settings.
If you are
traveling far from home and can no
longer receive your preset stations,
you can use the auto select feature to
find stations in the local area.
Press the A. SEL button. ‘‘A.SEL’’
f lashes in the display, and the system
goes into scan mode f or several
seconds. It stores the f requencies of
six AM, and twelve FM stations in
the preset bars.
You will see a ‘‘0’’ displayed af ter
pressing a preset bar if auto select
cannot f ind a strong station f or every
preset bar. Eachmodeisshowninthedisplayas
it changes. Turn the VOLUME knob
to adjust the setting to your liking.
When the level reaches the center,
youwillsee‘‘ ’’inthedisplay.
The system will automatically return
the display to the selected audio
mode about 5 seconds af ter you stop
adjusting a mode.
Adjusts the
strength of sound f rom the
subwoof er speaker.
Adjusts the bass.Adjusts the treble.
Adjusts the front-to-back
strength of the sound.
Adjusts the side-to-
side strength of the sound.
To turn of f auto select,
If equipped
Playing the AM/FM Radio
Adjusting the Sound
AUTO SELECT
SUBWOOFER
BASS
TREBLE
FADER
BAL ANCE
Features
135
�����—�
���—�����y�
�������������y���
�(�����������y���
�����y
Page 139 of 320

�µ
�µ
In addition to the knobs, buttons, and
bars on the radio control panel, you
can operate some of the radio
controls on the navigation system
screen. To adjust the sound, push the
AUDIO button, then enter the sound
grid by touching the SOUND icon on
the display.
While you are listening to the radio,
you can change to another band by
pressing the AUDIO button next to
the navigation system screen, and
then touching the desired band icon
(FM1, FM2, or AM).
AUTO SELECT, SCAN, and SOUND
are adjustable f rom the navigation
screen. For an explanation of these
f unctions, see pages and .
Touch the A.
SEL icon to activate the auto select
f unction. You will see A.SEL f lashing
the display.
Touch the SCAN icon to
activate the scan function. You will
see SCAN in the display. Touch the
icon again to deactivate it. 134 135
On vehicles with navigation system
Operating the Radio on the
Navigation System Screen
AUTO SELECT
SCANA djust ing t he Sound
Playing the AM/FM Radio
136
AUDIO BUTTON
�����—�
���—�����y�
�������������y���
�(�����������y���
���
�y
Page 140 of 320
�µ�µ
�µ�´
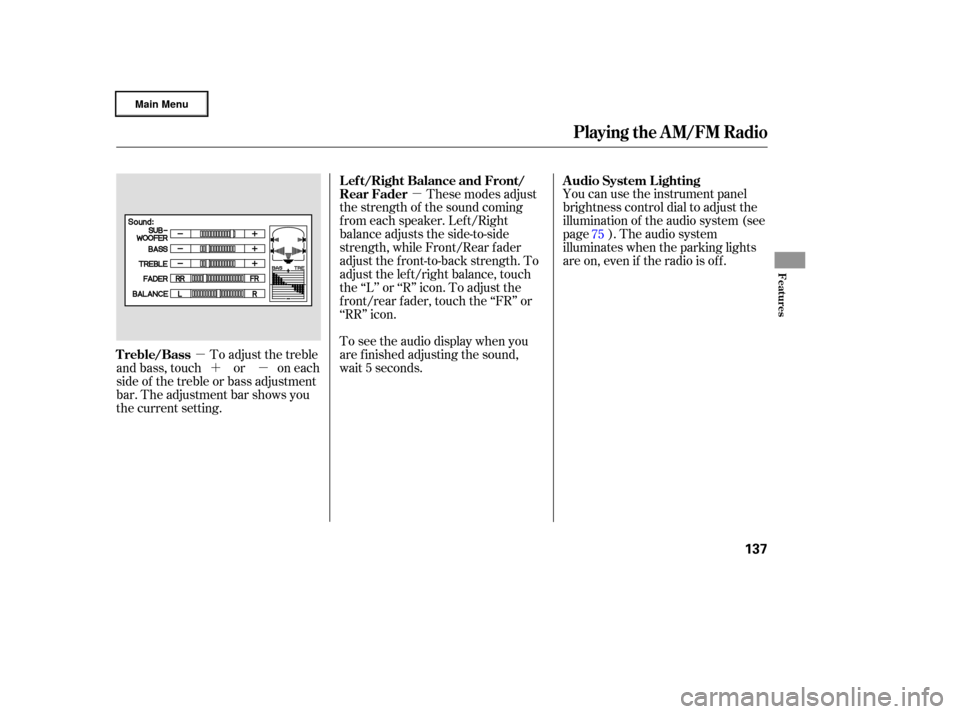
To adjust the treble
and bass, touch or on each
side of the treble or bass adjustment
bar. The adjustment bar shows you
the current setting. You can use the instrument panel
brightness control dial to adjust the
illumination of the audio system (see
page ). The audio system
illuminates when the parking lights
are on, even if the radio is of f .
These modes adjust
the strength of the sound coming
f rom each speaker. Lef t/Right
balance adjusts the side-to-side
strength, while Front/Rear f ader
adjust the f ront-to-back strength. To
adjust the left/right balance, touch
the ‘‘L’’ or ‘‘R’’ icon. To adjust the
front/rear fader, touch the ‘‘FR’’ or
‘‘RR’’ icon.
To see the audio display when you
are f inished adjusting the sound,
wait 5 seconds. 75
A udio System L ighting
Treble/Bass L ef t/Right Balance and Front/
Rear Fader
Playing the AM/FM Radio
Features
137
�����—�
���—�����y�
���������
���y���
�(�����������y���
�����y
Page 141 of 320

The radio can receive the complete
AM and FM bands.
Those bands cover these f requen-
cies:
AM band: 530 to 1,710 kilohertz
FM band: 87.7 to 107.9 megahertz
Radio stations on the AM band are
assigned f requencies at least 10
kilohertz apart (530, 540, 550).
Stations on the FM band are
assigned f requencies at least 0.2
megahertz apart (87.9, 88.1, 88.3).
Stations must use these exact
f requencies. It is f airly common f or
stations to round-of f the f requency in
their advertising, so your radio could
display a f requency of 100.9 even
though the announcer may identif y
the station as ‘‘FM101.’’Driving very near the transmitter of
a station that is broadcasting on a
f requency close to the f requency of
the station you are listening to can
also af f ect your radio’s reception.
You may temporarily hear both
stations,orhearonlythestationyou
are close to.
How well the radio receives stations
is dependent on many f actors, such
as the distance from the station’s
transmitter, nearby large objects,
atmospheric conditions, and even
items stored on the roof rack.
A radio station’s signal gets weaker
as you get f arther away f rom its
transmitter. If you are listening to an
AM station, you will notice the sound
volume becoming weaker and the
stationdriftinginandout.If youare
listening to an FM station, you will
see the stereo indicator f lickering of f
and on as the signal weakens.
Eventually, the stereo indicator will
go of f and the sound will f ade
completely as you get out of range of
the station’s signal.
Radio Frequencies Radio Reception
A M/FM Radio Reception
138
�����—�
���—�����y�
�������������y���
�(�����������y���
�����y
Page 143 of 320
Playing the XMSatellite Radio
140
POWER BUTTONTUNE BAR
VOLUME
KNOB
DISPLAY/MODE BUTTON
PRESET BARS
SCAN BUTTON
CATEGORY BAR POWER BUTTON
VOLUME
KNOB
CATEGORY BAR DISPLAY/MODE BUTTON
PRESET BARS TUNE BARSCAN
BUTTON
XM RADIO BUTTON
XM RADIO BUTTON
U.S. RTL model without navigation systemU.S. RTL model with navigation system
�����—�
���—�����y�
�������������y���
�(�����������y���
�����y
Page 144 of 320
,
CATEGORY, NAME (artist name),
and TITLE (music title).
Your audio system is capable of
receiving XM
Satellite Radio
anywhere in the")
�µOn the audio display, you will see the
selected CHANNEL (number),
CATEGORY, NAME (artist name),
and TITLE (music title).
Your audio system is capable of
receiving XM
Satellite Radio
anywhere in the United States,
except Hawaii and Alaska.
You may experience periods when
XM Radio does not transmit the
artist’s name and song title
inf ormation. If this happens, there is
nothing wrong with your system.
XM
is a registered trademark of
XM Satellite Radio, Inc.
XM radio receives signals f rom two
satellites to produce clear, high-
quality digital reception. It of f ers
many channels in several categories.
Along with a large selection of
dif f erent types of music, XM radio
allows you to view channel and
category selections in the display.
The navigation system screen also
shows all XM inf ormation when the
AUDIO button is pressed.
To listen to XM radio, turn the
ignition switch to ACCESSORY (I)
or ON (II). Push the PWR button to
turn on the audio system, and press the ‘‘XM’’ button. Adjust the volume
by turning the volume knob. The last
channel you listened to will show in
the display.
You can also change to the XM radio
while you are listening to an FM
station, AM station, CD, etc., by
touching the XM1 or XM2 icon on
the audio display (navigation system
screen).
To switch between
channel mode and category mode,
press and hold the DISP/MODE
button until the mode changes.
In channel mode, you can select all
of the available channels. In category
mode, such as Jazz, Rock, Classical,
etc., you can select all of the
channels within that category.
Each time you press and release the
DISP/MODE button, the display
changes in the f ollowing sequence:
Channel name, channel number,
category, artist name, and music title.
CONT INUED
U.S. RTL model only
Playing the XMSatellite Radio
Operating the XM Radio MODE
Features
141
On vehicles with navigation system
�����—�
���—�����y�
�����������
�y���
�(�����������y���
�����y
Page 145 of 320

�µ�µ
�µ �µ
Press the TUNE bar to
change channel selections. Press f or higher numbered channels
and f or lower numbered
channels. In the category mode, you
can only select channels within that
category.
Press either side of the CATEGORY
bar ( or ) to select another
category.
The scan f unction gives
you a sampling of all channels while
in the channel mode. In the category
mode, only the channels within that
category are scanned. To activate
scan, press the SCAN button or
touch the SCAN icon on the screen.
The system plays each channel in
numerical order f or a f ew seconds,
then selects the next channel. When
you hear a channel you want to
continue listening to, press the
button or touch the icon again. Youcanstoreupto12
preset channels using each side of
the preset bar or preset icons on the
screen. Each side of the bar stores
one channel f rom the XM1 band and
one channel f rom the XM2 band. Pick a preset number (icon) you
want f or that channel. Press and
hold the bar (icon) until you hear a
beep.
Repeat steps 2 and 3 to store the
f irst six channels.
Once a channel is stored, press and
release the proper side of the preset
bar (icon) to tune to it.
To store a channel:
Press the XM button. Either XM1
or XM2 will show in the display.
UsetheTUNE,SEEK,orSCAN
function to tune to a desired
channel. Press the XM button again or
touch the other XM icon (XM1 or
XM2) on the audio display. Store
the next six channels using steps 2
and 3.
In the category mode, only channels
within that category can be selected.
In the channel mode, all channels
can be selected. 1.
2. 3.
4.
5.
Playing the XMSatellite Radio
TUNE
SEEK /SK IP (CA T EGORY)
SCANPreset
142
�����—�
���—�����y�
�������������y���
�(�����������y���
�����y
Page 146 of 320
�µ�µ
�µ
�µ
�µ
�µ
CONT INUED
The encryption
code is being
updated. Wait
until the
encryption code is
f ully updated.
Channels 0 and 1
should still work
normally. The signal is
currently too
weak. Move the
vehicle to an area
away from tall
buildings, and
with an
unobstructed view
of the southern
horizon.
The selected channel
number does not exist or
isnotpartofyour
subscription, or this
channel has no artist or
title information at this
time.
The channel
currently selected is
no longer
broadcasting. XM is loading the
audio or program
inf ormation.
There is a problem
with the XM
antenna. Please
consult your dealer.
Playing the XMSatellite Radio
XM Radio Display Messages
‘‘UPDA T ING’’ ‘‘NO SIGNA L ’’
‘‘----’’
‘‘OFF A IR’’ ‘‘L OA DING’’
‘‘A NT ENNA ’’
Features
143
�����—�
���—�����y�
���������
���y���
�(�����������y���
�����y