Page 86 of 316
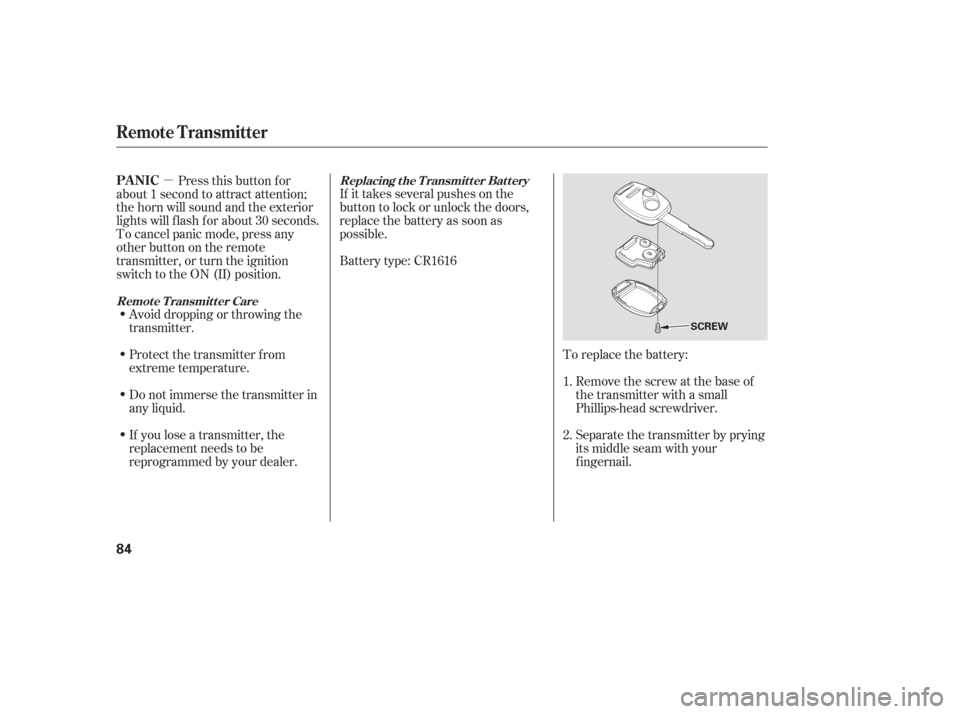
�µTo replace the battery:Remove the screw at the base of
the transmitter with a small
Phillips-head screwdriver.
Separate the transmitter by prying
its middle seam with your
f ingernail.
Battery type: CR1616 If it takes several pushes on the
button to lock or unlock the doors,
replace the battery as soon as
possible.
Pressthisbuttonfor
about 1 second to attract attention;
thehornwillsoundandtheexterior
lights will f lash f or about 30 seconds.
To cancel panic mode, press any
other button on the remote
transmitter, or turn the ignition
switch to the ON (II) position.
Avoid dropping or throwing the
transmitter.
If you lose a transmitter, the
replacement needs to be
reprogrammed by your dealer. Do not immerse the transmitter in
any liquid. Protect the transmitter from
extreme temperature. 1.
2.Replacing the Transmitter Battery
Remote Transmitter CarePA NIC
Remote Transmitter
84
SCREW
Page 88 of 316
In HI, the heater turns of f when the
seat gets warm, and turns back on
after the seat temperature drops.
In LO, the heater runs continuously.
It does not cycle with temperature
changes.
Follow these precautions whenever
you use the seat heaters:Use the HI setting only to heat the
seats quickly, because it draws
large amounts of current f rom the
battery.
If the engine is lef t idling f or an
extended period, do not use the
seat heaters even on the LO
setting. It can weaken the battery,
causing hard starting.
Both f ront seats are equipped with
seat heaters. The passenger seat
only has heaters in the seat bottom
because of the side airbag system.
The ignition switch must be in the
ON (II) position to use the heaters.
Push the top of the switch, HI, to
rapidly heat up the seat. Af ter the
seat reaches a comfortable
temperature, select LO by pushing
the bottom of the switch. This will
keep the seat warm.If equipped
Seat Heaters
86
SEAT HEATER BUTTONS
SEAT HEATER BUTTONS
Page 89 of 316

�µ
To change the lumbar support, move
the lever on the right side of the
seat-back forward or backward.
Keep moving the lever f orward or
backward until you f ind a suitable
position.
The controls f or the adjustable
driver’s power seat are on the
outside edge of the seat bottom. You
can adjust the power seat with the
ignition switch in any position. Make
all seat adjustments bef ore you start
driving.
Moving the long horizontal switch
adjusts the seat bottom in several
directions. The seat bottom adjusts
in the direction you move the switch.
The short vertical switch adjusts the
seat back angle.
Adjusts the seat-back
angle f orward or
backward. Raises or lowers the
seat. Moves the f ront of the
seat up or down and
the rear of the seat up
or down. Moves the seat
f orward and backward.
See pages f or important saf etyinf ormation and warnings about how toproperly position seats and seat-backs. 13 14
On EX and EX-L models
On EX and EX-L models
Driver’s L umbar Support
Power Seat A djustment
Seats
Instruments and Controls
87
Page 91 of 316

To change the angle of the seats in
the second row seat-backs, pull up
the handle on the seat-back. Moving
the short vertical switch f orward or
backward adjusts the seat back in
those directions.The left and right halves can be
f olded separately.
Push the whole seat backwards until
f ully latches. Make sure the seat is
locked and secured bef ore driving.
If you are f olding the lef t half of
the seat, use the ignition key to
release the center seat belt from
thedetachableanchor(seepage
).
Lower the head restraint f ully.
Pull up the handle on the outside
of the seat-back.
Fold the seat-back forward.
Reverse this procedure to return the
seat to its upright position. Make
sure the seat is locked and secured
bef ore driving. To get into the third row seats, pull
up the lever on the outside of the
passenger’s side second row seat-
back. The seat-back will tilt f orward,
and the seat will slide f orward.
To adjust the seats forward and
backward, pull up on the lever under
the seat cushion. Af ter moving the
seat, make sure it is locked into
position. 2.
3. 1.
4.
18
A djusting the Second Row Seats Folding the Second Row Seats T hird Seat A ccess
Seats
Instruments and Controls
89
SECOND
ROW SEAT
RELEASE LEVER
Page 92 of 316

Remove the head restraints by
pushing the release buttons and
pulling the restraints out.
Store the head restraints under
the cargo area floor. Insert the
shafts into the holes in the sides of
the storage compartment.Use the ignition key to release the
seat belt from the detachable
anchor (see page ).
Unlock the seat-back by pulling
the handle. Push the seat-back
forward.
Make sure you clip the small latch
plate of each outer shoulder belt to
the seat belt webbing whenever the
third seat is f olded.
Pull the handle on the back of the
seat, move the seat-back to the
desired position and release the
handle. Let the seat-back latch into
the new position. Make sure all items in the cargo area
are secured. Loose items can f ly
f orward and cause injury if you have
to brake hard (See
on page ). Reinstall the head restraints,
reconnect the seat belts, and make
sure the seats are secured bef ore
driving. Reverse this procedure to return the
seat to its upright position.
1.
2. 3.
4.
18
193
A djusting the T hird Row Seat Folding the T hird Row Seat
Carrying Cargo
Seats
90
THIRD ROW
SEATHANDLE
Page 95 of 316
The outside mirrors are heated to
remove fog and frost. With the
ignition switch in the ON (II)
position, turn on the heaters by
pressing the button. The indicator in
the button comes on as a reminder.
Press the button again to turn the
heaters off.
Turn the ignition switch to the ON
(II) position. Push the appropriate edge of the
adjustment switch to move the
mirrorright,left,up,ordown.
When you f inish, move the
selector switch to the center (off)
position. This turns of f the
adjustment switch to keep your
settings.
Move the selector switch to L
(driver’s side) or R (passenger’s
side).
1.
2. 3.
4.
PowerMirrorHeaters
(If equipped)
Adjusting the Power Mirrors
Mirrors
Instruments and Controls
93
HEATED MIRROR BUTTON
ADJUSTMENT SWITCH SELECTOR SWITCH
Page 96 of 316
 position to raise or lower any
window. To open a window, push the
switchdownandholdit.Releasethe
switch when you want the window to
stop. Pull back on the s")
�µ
Turn the ignition switch to the ON
(II) position to raise or lower any
window. To open a window, push the
switchdownandholdit.Releasethe
switch when you want the window to
stop. Pull back on the switch and
hold it to close the window.
The windows will operate f or up to
10 minutes af ter you turn of f the
ignition switch. Opening either f ront
door cancels this f unction. To open or close the driver’s window
partially, push down or pull back on
the window switch lightly and hold it.
The window will stop when you
release the switch.
The passenger windows cannot be
raised or lowered if the MAIN switch
is OFF. Keep the MAIN switch off
whenyouhavechildreninthe
vehicle so they do not injure
themselves by operating the
windows unintentionally.
To open the driver’s
window, push the window switch
f irmly down, then release it. To stop
the window f rom going all the way
down, pull back on the window
switch brief ly.
To close the driver’s window f ully,
pull back the window switch f irmly,
then release it. To stop the window
f rom going all the way up, push
down on the window switch brief ly.
Power Windows
AUTO
94
DRIVER’S WINDOW
SWITCH MAIN SWITCH
Closing a power window on
someone’s hands or fingers can
cause serious injury.
Make sure your passengers are
away from the windows before
closing them.
Page 98 of 316

The moonroof has two positions: it
can be tilted up in the back f or
ventilation, or it can be slid back into
the roof . Use the switch under the
lef t dashboard vent to operate the
moonroof . The ignition switch must
be in the ON (II) position.To tilt up the back of the moonroof ,
press and hold the center button
. To close the moonroof , press
and hold the upper button . To
open the moonroof , press and hold
the lower button . Release the
button when the moonroof gets to
the desired position. Make sure
everyone’s hands are away f rom the
moonroof bef ore opening or closing
it. The moonroof has a key-of f delay
f unction. You can still open and close
the moonroof f or up to 10 minutes
after you turn off the ignition switch.
The key-of f delay f unction cancels as
soon as you open either f ront door.
You must then turn the ignition
switch to the ON (II) position to
operate the moonroof .
If equipped
Moonroof
96
CLOSE BUTTON
OPEN BUTTON
TILT-UP
BUTTON
Opening or closing the
moonroof on someone’s hands
or fingers can cause serious
injury.
Make sure all hands and fingers
are clear of the moonroof
before opening or closing it. If you try to open the moonroof in
below-f reezing temperatures, or when
it is covered with snow or ice, you can
damage the moonroof panel or motor.


position, turn on the heaters by
pressing the button. The indicator in
the button comes on as a reminder")