Page 278 of 420

Your vehicle has a parking sensor
system. The system lets you know
theapproximatedistancebetween
your vehicle and most obstacles
while you are parking. When the
system is on and your vehicle is
nearinganobstacle,youwillhear
beeping and see parking messages in
the multi-information display.To activate the system, push the
button on the dashboard with the
ignition in the ON (II) position. The
indicator in the button comes on
when the system is on. To turn the
system of f , push the button again.The system has two front corner
sensors, two rear corner sensors,
and a rear center sensor.
The rear center sensor works only
when the shif t lever is in Reverse (R),
and the vehicle speed is less than 5
mph (8 km/h).
The corner sensors work only when
the shif t lever is in any position other
than P and the vehicle speed is less
than 5 mph (8 km/h).
All obstacles may not always be
sensed. Even when the system is on,
you should look f or obstacles near
yourvehicletomakesureitissafeto
park.
On Touring models
Parking Sensor System
Features
277
PARKING SENSOR SYSTEM BUTTON
MULTI-INFORMATION DISPLAY
Page 286 of 420

Bef ore ref ueling, make sure the rear
sliding door on the driver’s side is
closed.Park with the driver’s side closest
to the service station pump.
Stop f illing the tank af ter the f uel
nozzle automatically clicks of f . Do
not try to ‘‘top off’’ the tank. Leave
some room f or the f uel to expand
with temperature changes.
even
though the tank is not full, there may
be a problem with your vehicle’s f uel
vapor recovery system. The system
helps keep f uel vapors f rom going
into the atmosphere. Consult your
dealer.
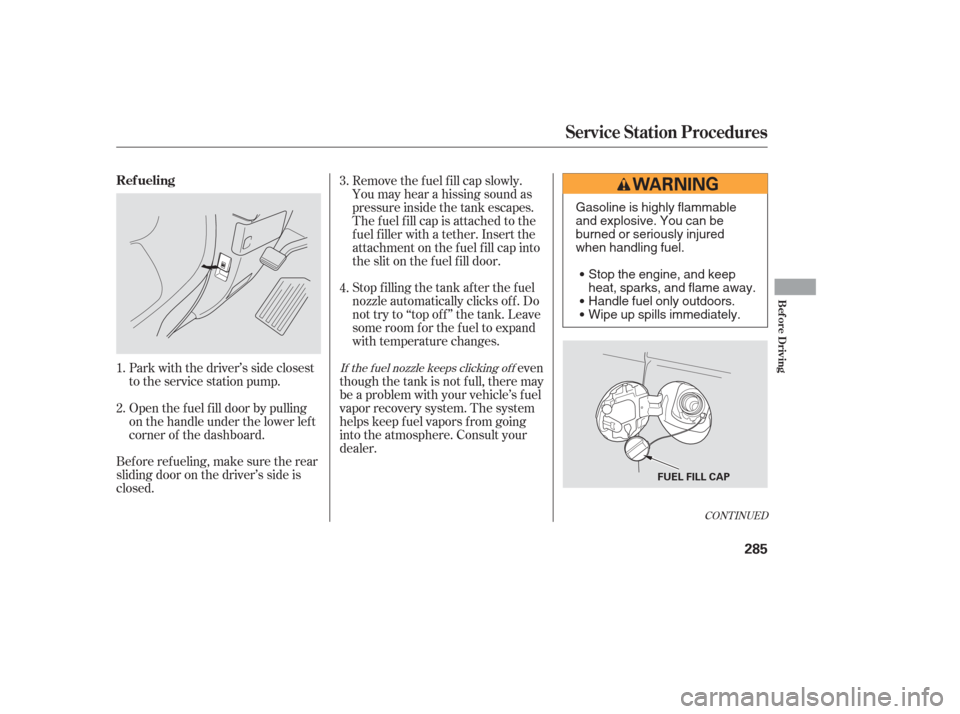
Open the f uel f ill door by pulling
on the handle under the lower lef t
corner of the dashboard. Remove the f uel f ill cap slowly.
You may hear a hissing sound as
pressure inside the tank escapes.
The fuel fill cap is attached to the
f uel f iller with a tether. Insert the
attachment on the f uel f ill cap into
the slit on the f uel f ill door.
1.
2. 3.
4.
CONT INUED
If the f uel nozzle keeps clicking of f
Ref ueling
Service Station Procedures
Bef ore Driving
285
FUEL FILL CAP
Gasoline is highly flammable
and explosive. You can be
burned or seriously injured
when handling fuel.
Stop the engine, and keep
heat, sparks, and flame away.
Handle fuel only outdoors.
Wipe up spills immediately.
Page 287 of 420
Park the vehicle, and set the
parking brake. Pull the hood
release handle located under the
lower lef t corner of the dashboard.
The hood will pop up slightly.Put your f ingers under the f ront
edge of the hood. The hood latch
handle is above the ‘‘H’’ logo. Pull
this handle until it releases the
hood, then lif t the hood.
If the hood latch handle moves stif f ly,
or you can open the hood without
lifting the handle, the mechanism
should be cleaned and lubricated.
Screw the fuel fill cap back on
until it clicks at least once. If you
do not properly tighten the cap,
the malf unction indicator lamp
maycomeon(seepage ).You
will also see a ‘‘CHECK FUEL
CAP’’ message on the odometer/
trip meter display (LX, EX and
EX-L models) or ‘‘TIGHTEN
FUEL CAP’’ message on the multi-
inf ormation display (Touring
models).
Push the f uel f ill door closed until
it latches.
1.
5.
6.
2.
378
Service Station Procedures
Opening and Closing the Hood
286
HOOD RELEASE HANDLE
LATCH
Page 382 of 420
The vehicle’s f uses are contained in
f our f use boxes (three, if the vehicle
does not have a rear entertainment
system).To open the passenger’s f use box,
pull the right edge of the cover.
Theinteriorfuseboxesarelocated
under the dashboard on the driver’s
and passenger’s side. The primary under-hood f use box is
on the passenger’s side. To open it,
pushthetabsasshown.
The secondary under-hood f use box
is behind the primary f use box.
Fuses
T aking Care of t he Unexpect ed
381
DRIVER’S SIDE INTERIOR
PASSENGER’S SIDE
INTERIORPRIMARY UNDER-HOOD FUSE BOX
SECONDARY UNDER-HOOD FUSE BOX
Page 391 of 420
Your vehicle has several identif ying
numbers in various places.
The vehicle identif ication number
(VIN) is the 17-digit number your
dealer uses to register your vehicle
f or warranty purposes. It is also
necessary f or licensing and insuring
your vehicle. The easiest place to
find the VIN is on a plate fastened to
the top of the dashboard. You can
seeitbylookingthroughthe
windshield on the driver’s side. It is
also on the certification label
attached to the driver’s doorjamb,
and is stamped on the engine
compartment bulkhead. The VIN is
also provided in bar code on the
certif ication label.
Identif ication Numbers
390
VEHICLE IDENTIFICATION NUMBERCERTIFICATION LABEL
Page 394 of 420

�µ
�Î
�Î
�Î
�µ
�µ �µ
�µ
�µ
�µ
�µ
�µ
�µ
�µ
�µ
�µ
�µ
�µ
�µ
�µ
�µ
�µ
�µ
�Î
�Î
�Î
Specif ications
Technical Inf ormation
393
Alignment
Tires Fuses
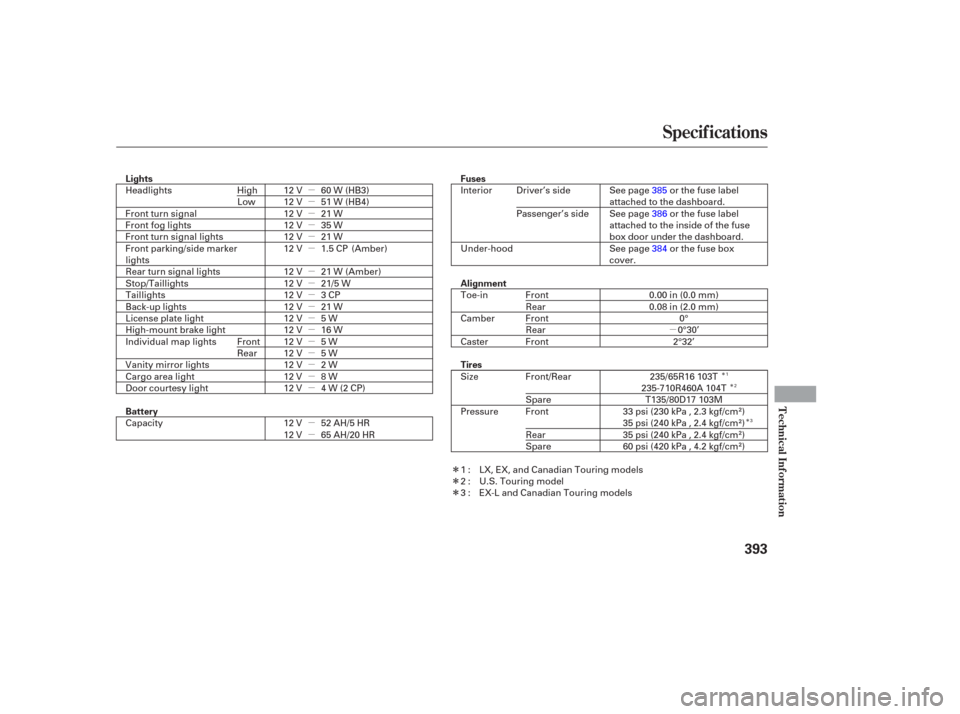
Battery Lights 60 W (HB3)
12 V
12 V
21 W 51 W (HB4)
21 W
12 V 12 V
Toe-in
Camber
Caster 0.00 in (0.0 mm)
0.08 in (2.0 mm)
0°
0°30’
2°32’
Size
Pressure 235/65R16 103T
235-710R460A 104T T135/80D17 103M
33 psi (230 kPa , 2.3 kgf/cm
)
12 V 35 W
60 psi (420 kPa , 4.2 kgf/cm
)
35 psi (240 kPa , 2.4 kgf/cm)
35 psi (240 kPa , 2.4 kgf/cm)
12 V 12 V
12 V 12 V 12 V
21 W 21/5 W 21 W
12 V
12 V
12 V 2 W 12 V
12 V 1.5 CP
3CP
5W
16 W
5W
5W Interior
Under-hood
Capacity 12 V 12 V65 AH/20 HR
52 AH/5 HR
12 V
12 V
8W
4W(2CP)
Headlights
Front turn signal
Front fog lights
Front turn signal lights
Front parking/side marker
lights
Rear turn signal lights
Stop/Taillights
Taillights
Back-up lights
License plate light
High-mount brake light
Individual map lights
Vanity mirror lights
Cargo area light
Door courtesy light See page385or the fuse label
attached to the dashboard.
See page386or the fuse label
attached to the inside of the fuse
box door under the dashboard.
See page384or the fuse box
cover.
Front
Rear
Front
Rear
Front
U.S. Touring model Front/Rear
Spare
Front
Rear
Spare
(Amber)
(Amber) Driver’s side
Passenger’s side
1:
2:
3: LX, EX, and Canadian Touring models
Front
Rear High
Low
EX-L and Canadian Touring models
12
3
Page 411 of 420

�Î
................
DANGER, Explanation of .ii
...................................
Dashboard .4,60
..............
Daytime Running Lights .129
Daytime Running Lights
.......................................
Indicator .69
.................................
Dead Battery .373
............
Def ects, Reporting Saf ety .406
..............
Def ogger, Rear Window .130
..............
Def rosting the Windows .196
....................................
Dimensions .392
.............
Dimming the Headlights .126
................................
Cancel Button .271
............................
Capacities Chart .392
.............
Carbon Monoxide Hazard .56
..........................
Cargo Area Light .189
.................................
Cargo Hooks .295
....................
Cargo, How to Carry .292
......................................
Cargo Net .295
..............
CAUTION, Explanation of .ii
.........................................
CD Care .226
...................................
CD Changer .220
.......
CD Changer Error Message .227
.......................................
CD Player .217
...............................
Center Pocket .185
...................................
Center Tray .175
........................
Certif ication Label .390
.................................
Chains, Tires .357
Changing Oil ........................................
How to .335
......................................
When to .321
....................
Changing a Flat Tire .366
...
Charging System Indicator .63,377
............
Checklist, Bef ore Driving .298
................
Childproof Door Locks .142 .....................................
Child Saf ety .36
..............................
Booster Seats .53
...................................
Child Seats .43
.....
Important Saf ety Reminders .40
..........................................
Inf ants .41
..........................
Larger Children .52
.........................................
LATCH .45
......................
Risks with Airbags .37
.............................
Small Children .42
.........................................
Tethers .50
........
Where Should A Child Sit? .37
.......................................
Child Seats .43
......
LATCH Anchorage System . 45
..........
Tether Anchorage Points . 50
Cleaning ...................................
Seat Belts .349
...............
Climate Control System . 197
..............................................
Clock .232
.....................
Code, Audio System .234
........................
CO in the Exhaust .398
............
Cold Weather, Starting in . 299
......................
Compact Spare Tire .365
...............
Consumer Inf ormation . 404
.............
Controls, Instruments and . 59
....................
Conversation Mirror .178 Coolant
........................................
Adding .337
....................................
Checking .288
.........................
Proper Solution .337
...................
Temperature Gauge . 71
Crankcase Emissions Control ........................................
System .398
................
Cruise Control Indicator . 69
............
Cruise Control Operation . 269
...................................
Cup Holders .175
.............
Customer Service Of f ice . 404
Index
C
D
II