Page 242 of 319

Remove the dipstick and check
the f luid level. It should be
between the upper and lower
marks.
If the level is below the lower
mark, add f luid into the dipstick
hole to bring it to the upper mark.
Pour the f luid slowly and caref ully
so you do not spill any. Clean up
any spill immediately; it could
damage components in the engine
compartment.
Always use Honda ATF-Z1
(automatic transmission f luid). If
it’s not available, you may use a
DEXRON
III automatic
transmission f luid as a temporary
replacement. However, continued
use can affect the shift quality.
Have the transmission f lushed and
ref illed with Honda ATF-Z1 as
soon as it is convenient. Insert the dipstick all the way back
into the transmission securely as
shown in the illustration.
Make sure the notch fits in the
dipstick guide and the dipstick is
down all the way.
If you are not sure how to add f luid,
contact your dealer.
Check the f luid level with the engine
at normal operating temperature.Park the vehicle on level ground.
Shut of f the engine.
Remove the dipstick (yellow loop)
f rom the transmission, and wipe it
with a clean cloth.
5. 4. 6.
1.
2.
6-cylinder models
T ransmission Fluid
Automatic Transmission
240
DIPSTICK
�����—�����—�����y�
�������������y���
�(���%�������y���������y
Page 243 of 319

Insert the dipstick all the way back
into the transmission securely as
shown in the illustration.
Remove the dipstick and check
the f luid level. It should be
between the upper and lower
marks.
If the level is below the lower
mark, add f luid into the dipstick
hole to bring it to the upper mark.
Pour the f luid slowly and caref ully
so you do not spill any. Clean up
any spill immediately; it could
damage components in the engine
compartment.
Always use Honda ATF-Z1
(automatic transmission f luid). If
it’s not available, you may use a
DEXRON
III automatic
transmission f luid as a temporary
replacement. However, continued
use can af f ect the shif t quality.
Have the transmission f lushed and
ref illed with Honda ATF-Z1 as
soon as it is convenient. Make sure the notch fits in the
dipstick guide and the dipstick is
down all the way.
If you are not sure how to add f luid,
contact your dealer.
Insert the dipstick all the way into
the transmission securely as
shown in the illustration.
Make sure the notch in the rubber
cap f its in the dipstick guide and
that you push the dipstick in all
the way.
3. 4.
5.
6.
T ransmission Fluid
Maint enance
241
UPPER MARK
LOWER MARK
�����—�����—�����y�
�������������y���
�(���%�������y���������y
Page 244 of 319

Check the f luid level with the
transmission at normal operating
temperature and the vehicle
sitting on level ground. Remove
the transmission f iller bolt, and
caref ully f eel inside the bolt hole
with your f inger.Check the f luid level with the
transmission at normal operating
temperature and the vehicle sitting
on level ground.
The f luid level should be up to the
edge of the bolt hole. If it is not, add
Honda Manual Transmission Fluid
(MTF) until it starts to run out of the
hole. Reinstall the f iller bolt, and
tighten it securely.
If Honda MTF is not available, you
may use an SAE 10W-30 or 10W-40
viscosity motor oil with the API
Certif ication seal that says ‘‘FOR
GASOLINE ENGINES’’ as a
temporary replacement. However,
motor oil does not contain the proper
additives, and continued use can
cause stiffer shifting. Replace as
soon as it is convenient.
If you are not sure how to check and
add f luid, contact your dealer. Remove the check bolt and look f or
transmission f luid coming out of the
bolt hole. If a small amount of f luid
drips out of the bolt hole, reinstall
the check bolt.
On 4-cylinder models On EX-V6 model
T ransmission Fluid
Manual TransmissionManual Transmission
242
FILLER BOLT
Correct level CHECK BOLT
WASHER
DRAIN BOLT
�����—�����—�����y�
�������������y���
�(���%�������y���������y
Page 249 of 319
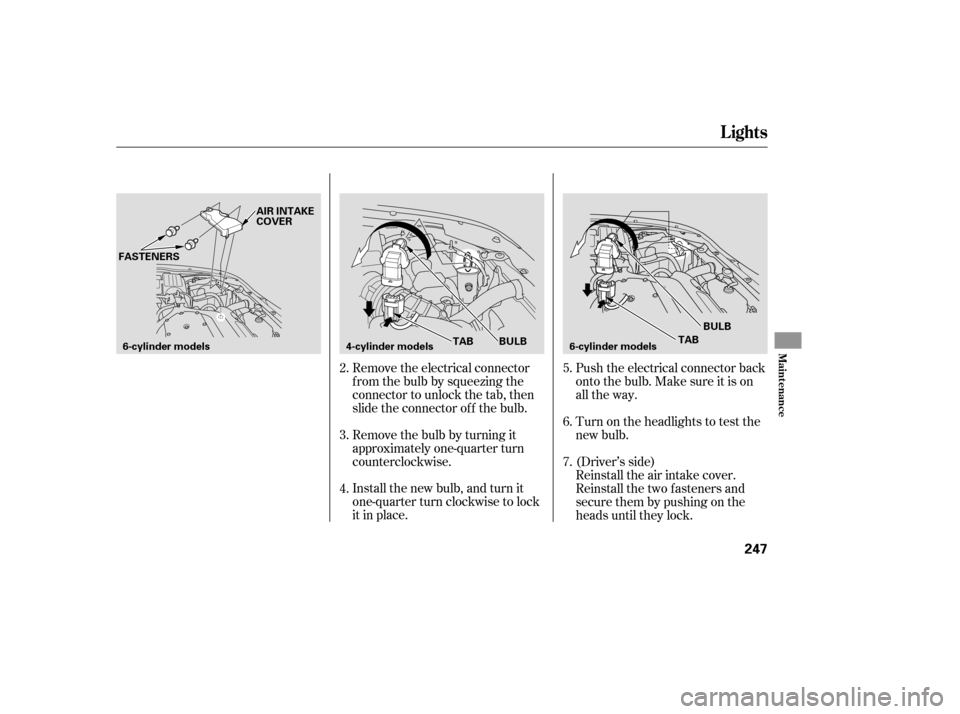
Remove the electrical connector
f rom the bulb by squeezing the
connector to unlock the tab, then
slide the connector of f the bulb.
Remove the bulb by turning it
approximately one-quarter turn
counterclockwise.
Install the new bulb, and turn it
one-quarter turn clockwise to lock
it in place.Reinstall the air intake cover.
Reinstall the two fasteners and
secure them by pushing on the
heads until they lock. (Driver’s side) Turn on the headlights to test the
new bulb. Push the electrical connector back
onto the bulb. Make sure it is on
all the way.
3. 2.
4. 5.
6.
7.
Lights
Maint enance
247
6-cylinder models
FASTENERS
4-cylinder models 6-cylinder modelsTAB BULB
TABBULB
AIR INTAKE
COVER
�����—�����—�����y�
�������������y���
�(���%�������y���������y
Page 251 of 319
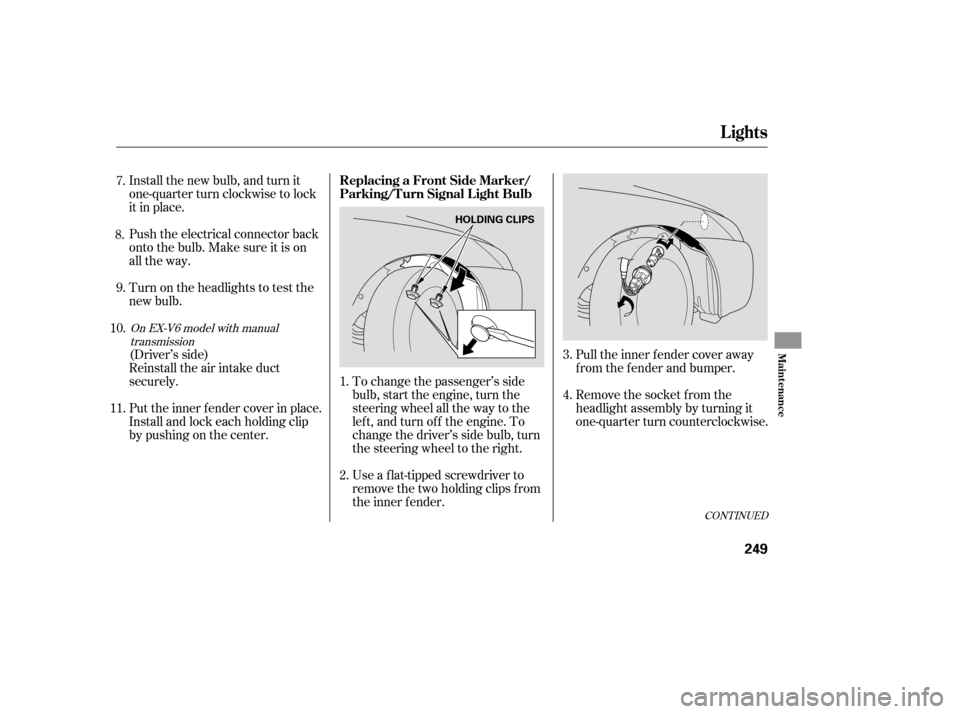
Pull the inner f ender cover away
f rom the f ender and bumper.
Remove the socket from the
headlight assembly by turning it
one-quarter turn counterclockwise.
Install the new bulb, and turn it
one-quarter turn clockwise to lock
it in place.
Push the electrical connector back
onto the bulb. Make sure it is on
all the way.
Turn on the headlights to test the
new bulb.
Reinstall the air intake duct
securely. (Driver’s side)
Put the inner f ender cover in place.
Install and lock each holding clip
bypushingonthecenter.
To change the passenger’s side
bulb, start the engine, turn the
steering wheel all the way to the
lef t, and turn of f the engine. To
change the driver’s side bulb, turn
the steering wheel to the right.
Use a f lat-tipped screwdriver to
remove the two holding clips f rom
the inner f ender.
1.
3.
2. 4.
9. 7.
8.
11. 10.
CONT INUED
On EX-V6 model with manual transmission
Replacing a Front Side Marker/
Parking/Turn Signal Light Bulb
Lights
Maint enance
249
HOLDING CLIPS
�����—�����—�����y�
�����������
�y���
�(���%�������y���������y
Page 261 of 319

�´
Tires marked ‘‘M S’’ or ‘‘All
Season’’ on the sidewall have an all-
weather tread design suitable for
most winter driving conditions.
For the best perf ormance in snowy
or icy conditions, you should install
snow tires or tire chains. They may
be required by local laws under
certain conditions.
If you mount snow tires on your
vehicle, make sure they are radial
tires of the same size and load range
as original tires. Mount snow tires on
all f our wheels. The traction
provided by snow tires on dry roads
maybelowerthanyouroriginaltires.
Check with the tire dealer f or
maximum speed recommendations. Mount tire chains on your tires when
required by driving conditions or
local laws. Install them only on the
f ront tires.
Because your vehicle has limited tire
clearance, Honda strongly
recommends using the chains listed
below, made by Security Chain
Company (SCC).
Thesechainsaretheonlyonesthat
have been approved by Honda f or
use on your vehicle. Since Honda
cannot test all chains, you must be
personally responsible f or proper
selection, installation, and use of tire
chains.
The chains listed here are available
at many auto supply stores. For a
complete list of stores, visit the SCC
website at www.scc-chain.com.
When installing chains, f ollow the
manuf acturer’s instructions, and
mount them as tightly as you can.
Drive slowly with chains installed.
Cable-types: CH2412T Link-type: SCC Quick Grip QG1134
Cable-types: SCC Radial Chain
CH2311T or SCC SC Cable SC1030
CONT INUED
LX EX and EX-L
LX-V6 and EX-V6
Tires
Winter Driving
Snow T ires T ire ChainsMaint enance
259
�����—�����—�����y�
�������������y���
�(���%�������y���������y
Page 271 of 319
CONT INUED
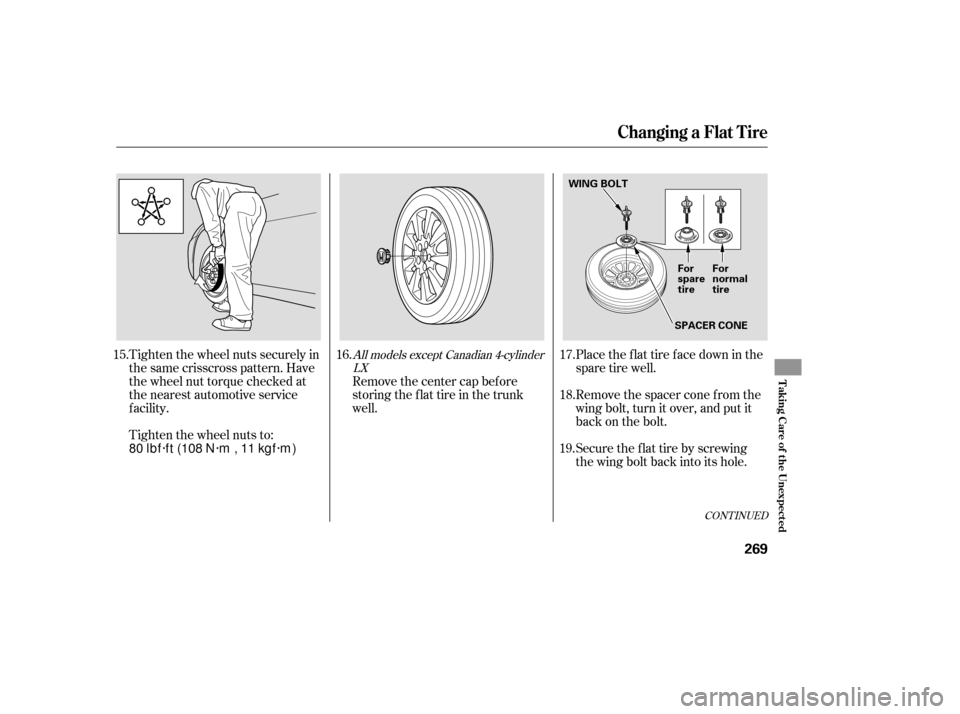
Place the flat tire face down in the
spare tire well.
Remove the spacer cone f rom the
wing bolt, turn it over, and put it
back on the bolt.
Securetheflattirebyscrewing
the wing bolt back into its hole.
Tighten the wheel nuts securely in
the same crisscross pattern. Have
the wheel nut torque checked at
the nearest automotive service
f acility.
Tighten the wheel nuts to:
Remove the center cap before
storing the f lat tire in the trunk
well.
15. 16. 17.
18.
19.All models except Canadian 4-cylinder LX
Changing a Flat Tire
T aking Care of t he Unexpect ed
269
WING BOLT
SPACER CONEFor
spare
tire
For
normal
tire
80 lbf·ft (108 N·m , 11 kgf·m)
�����—�����—�����y�
������
��
���y���
�(���%�������y���������y
Page 272 of 319

Store the jack in its holder. Turn
the jack’s end bracket to lock it in
place. Replace the cover. Store the
tools.
Store the wheel cover or center
cap in the trunk. Make sure it does
not get scratched or damaged.
Lower the trunk floor, then close
the trunk lid. Di
agnosing why the engine won’t
start falls into two areas, depending
on what you hear when you turn the
ignition switch to the START (III)
position: Wh
en you turn the ignition switch to
the START (III) position, you do not
hear the normal noise of the engine
trying to start. You may hear a
clicking sound or series of clicks, or
nothing at all.
Check these things:
You
hear nothing, or almost
nothing. The engine’s starter
motor does not operate at all, or
operates very slowly.
You can hear the starter motor
operating normally, or the starter
motor sounds like it is spinning
faster than normal, but the engine
does not start up and run.
Turn the ignition switch to the ON
(II) position. Turn on the
headlights, and check their
brightness. If the headlights are
very dim or do not come on at all,
the battery is discharged. See on page .
Check the transmission interlock.
If you have a manual transmission,
the clutch pedal must be pushed
all the way to the f loor or the
starter will not operate. With an
automatic transmission, it must be
in Park or neutral.
20.
21. 22.
272
If the Engine Won’t Start
Nothing Happens or the Starter
Motor Operates Very Slowly
Jump Starting
Changing a Flat Tire, If the Engine Won’t Start
270
Loose items can fly around the
interior in a crash and could
seriously injure the occupants.
Store the wheel, jack, and tools
securely before driving.
�����—�����—�����y�
������
������y���
�(���%�������y���������y