Page 45 of 319
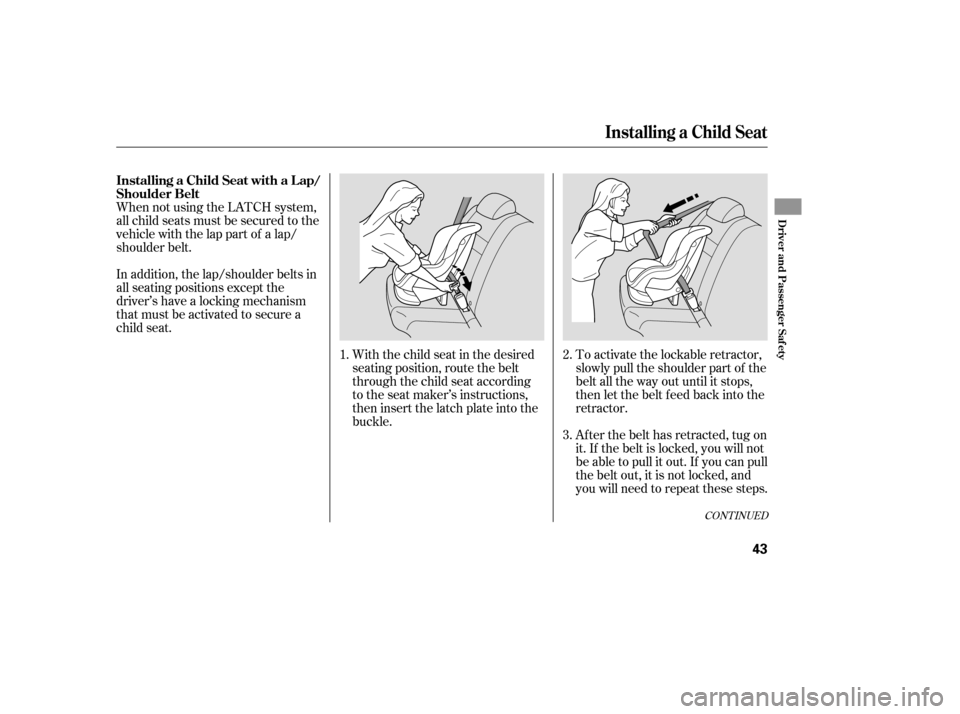
When not using the LATCH system,
all child seats must be secured to the
vehicle with the lap part of a lap/
shoulder belt.With the child seat in the desired
seating position, route the belt
through the child seat according
to the seat maker’s instructions,
then insert the latch plate into the
buckle.To activate the lockable retractor,
slowly pull the shoulder part of the
belt all the way out until it stops,
then let the belt f eed back into the
retractor.
Af ter the belt has retracted, tug on
it. If the belt is locked, you will not
be able to pull it out. If you can pull
thebeltout,itisnotlocked,and
you will need to repeat these steps.
In addition, the lap/shoulder belts in
all seating positions except the
driver’s have a locking mechanism
that must be activated to secure a
child seat.
1. 2.
3.
CONT INUED
Installing a Child Seat with a L ap/
Shoulder Belt
Installing a Child Seat
Driver and Passenger Saf ety
43
�����—�����—�����y�
���������
���y���
�(���%�������y���������y
Page 46 of 319
To deactivate the locking
mechanism and remove a child seat,
unlatch the buckle, unroute the seat
belt, and let the belt f ully retract.
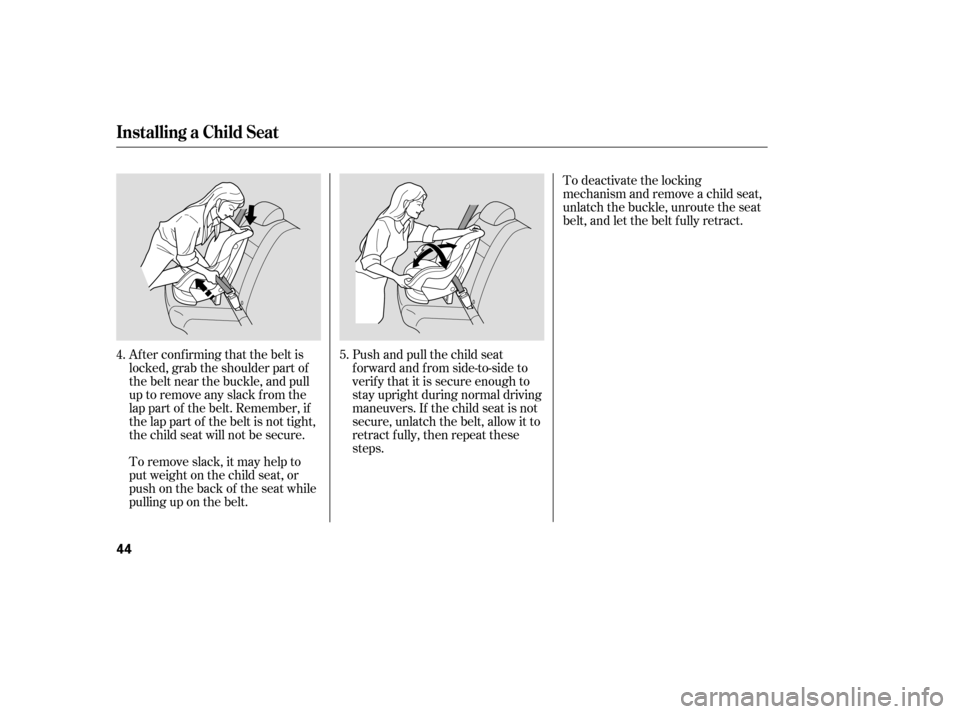
Push and pull the child seat
f orward and f rom side-to-side to
verify that it is secure enough to
stay upright during normal driving
maneuvers. If the child seat is not
secure, unlatch the belt, allow it to
retract f ully, then repeat these
steps.
Af ter conf irming that the belt is
locked, grab the shoulder part of
the belt near the buckle, and pull
up to remove any slack from the
lap part of the belt. Remember, if
the lap part of the belt is not tight,
the child seat will not be secure.
To remove slack, it may help to
putweightonthechildseat,or
push on the back of the seat while
pulling up on the belt. 5.
4.
Installing a Child Seat
44
�����—�����—�����y�
�������������y���
�(���%�������y���������y
Page 47 of 319
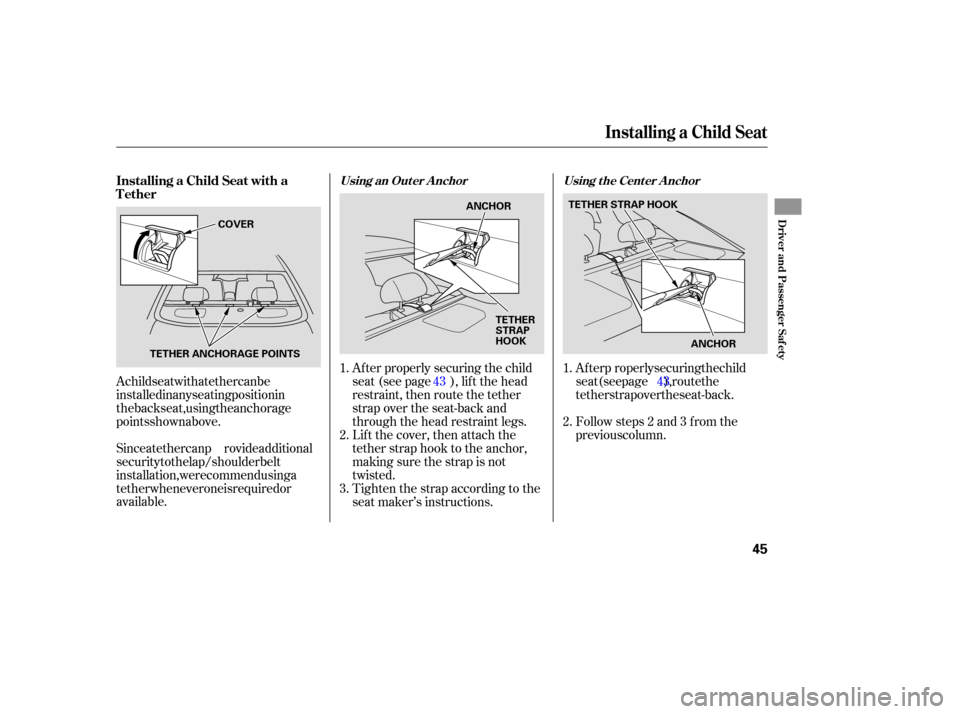
A child seat with a tether can be
installed in any seating position in
the back seat, using the anchorage
points shown above.
Since a tether can provide additional
security to the lap/shoulder belt
installation, we recommend using a
te ther whenever one is required or
available. After p
roperly securing the child
seat (see page ), route the
tether strap over the seat-back.
Followsteps2and3fromthe
previous column.
After
properly securing the child
seat (see page ), lift the head
restraint, then route the tether
strap over the seat-back and
through the head restraint legs.
Lift the cover, then attach the
tether strap hook to the anchor,
making sure the strap is not
twisted.
Tighten the strap according to the
seat maker’s instructions.
1.
2.
3.
1.
2.
43 43
Installing a Child Seat with a
Tether
Using t he Cent er A nchor
Using an Out er A nchor
Installing a Child Seat
Driver and Passenger Saf ety
45
ANCHOR
TETHER
STRAP
HOOK TETHER STRAP HOOK
ANCHOR
TETHER ANCHORAGE POINTS COVER
�����—�����—�����y�
�������������y���
�(���%�������y���������y
Page 50 of 319

If you decide that a child can safely
ride up front, be sure to:
Carefully read the owner’s manual,
and make sure you understand all
seat belt instructions and all safety
info rmation.
Move the vehicle seat to the rear-
most position.
Have the child sit up straight, back
against the seat, and feet on or
near the floor.
Supervise the child. Even mature
children sometimes need to be
reminded to fasten the seat belts
or sit properly.
To
safely ride in front, a child must
be able to follow the rules, including
sitting properly, and wearing the seat
belt properly throughout a ride.
Of
course, children vary widel y. And
while age may be one indicator of
when a child can safely ride in front,
there are other important factors you
should consider.
The
National Highway Traffic Safety
Administration and Transport
Canada recommend that all children
age 12 and under be properly
restrained in a back seat.
If the passenger’s front airbag
inflates in a moderate to severe
frontal collision, the airbag can cause
serious injuries to a child who is
unrestrained, improperly restrained,
sitting too close to the airbag, or out
of position.
A side airbag also poses risks. If any
part of a larger child’s body is in the
path of a deploying side airbag, the
child could receive possibly serious
injuries. Physically, a child must be large
enough f or the lap/shoulder belt to
properly f it (see pages and ). If
the seat belt does not f it properly,
with or without the child sitting on a
booster seat, the child should not sit
in f ront.
Check that the child’s seat belt is
properly positioned and secured.
14 46
Maturity
Physical Size
When Can a L arger Child Sit in
Front
Protecting L arger Children
48
�����—�����—�����y�
���������
���y���
�(���%�������y�������
�y
Page 57 of 319
�Î
�Î
�ΠIf equipped.
:
U.S. models
Instrument Panel
Instru m ent sand Cont ro ls
55
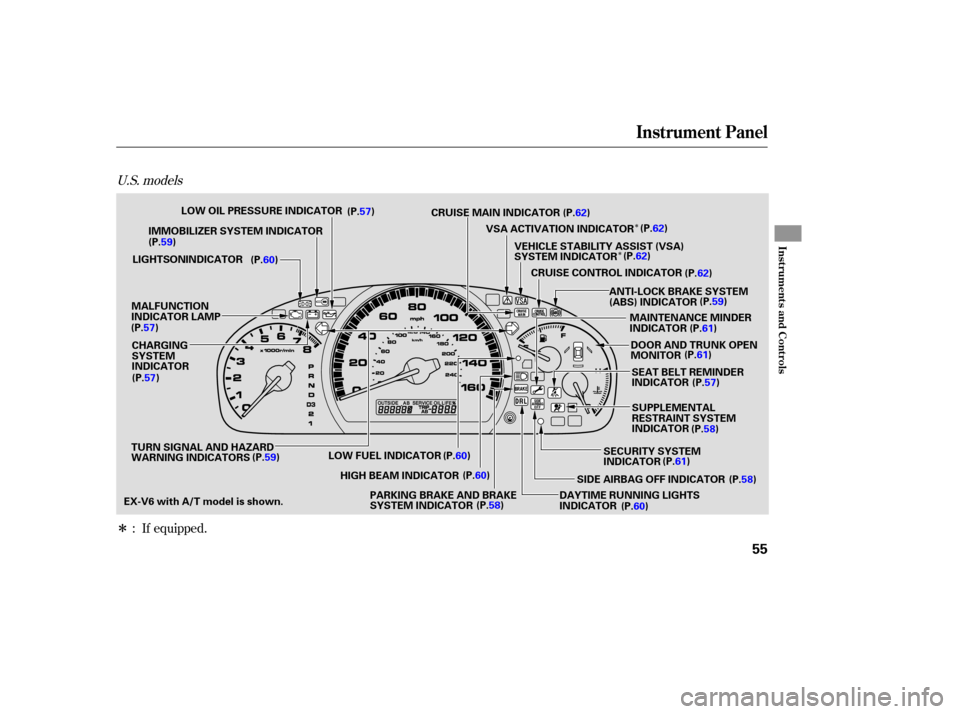
LOW OIL PRESSURE INDICATOR
CRUISE MAIN INDICATOR
VSA ACTIVATION INDICATOR
VEHICLE STABILITY ASSIST (VSA)
SYSTEM INDICATOR
CRUISE CONTROL INDICATOR
ANTI-LOCK BRAKE SYSTEM
(ABS) INDICATOR
DOOR AND TRUNK OPEN
MONITOR
SEAT BELT REMINDER
INDICATOR
SIDE AIRBAG OFF INDICATOR
DAYTIME RUNNING LIGHTS
INDICATOR
LOW
FUEL INDICATOR
HIGH BEAM INDICATOR
PARKING BRAKE AND BRAKE
SYSTEM INDICATOR
TURN
SIGNAL AND HAZARD
WARNING INDICATORS
IMMOBILIZER
SYSTEM INDICATOR
MALFUNCTION
INDICATOR LAMP
CHARGING
SYSTEM
INDICATOR
SECURITY SYSTEM
INDICATOR
(P.57)
(P.59)
LIGHTS ON INDICATOR (P.60)
(P.57) (P.57)
(P.59) (P.60)
(P.60)
(P.58) (P.60)(P.58)
(P.61)
SUPPLEMENTAL
RESTRAINT
SYSTEM
INDICATOR (P.58)(P.57)
(P.61)
MAINTENANCE
MINDER
INDICATOR (P.61)(P.59)
(P.62)
(P.62) (P.62)
(P.62)
EX-V6 with A/T model is shown.
�����—�����—�����y�
�������������y���
�(���%�������y���������y
Page 58 of 319
�Î�Î
�Î
If equipped.
:
Canadian models
Instrument Panel
56
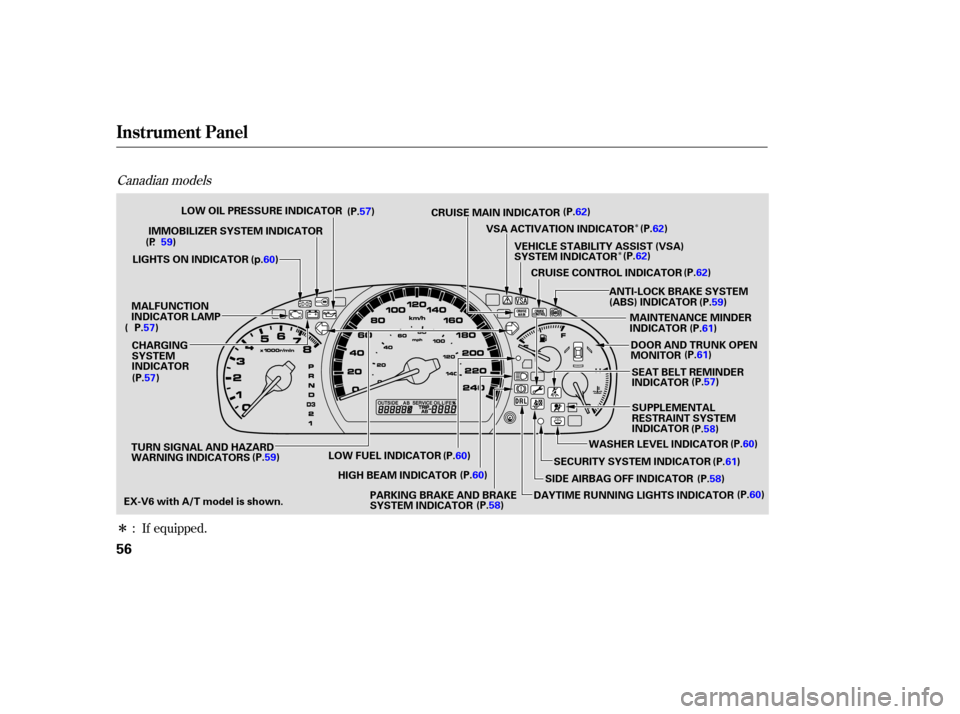
LOW OIL PRESSURE INDICATOR
CRUISE MAIN INDICATOR
VEHICLE STABILITY ASSIST (VSA)
SYSTEM INDICATOR
CRUISE CONTROL INDICATOR
ANTI-LOCK BRAKE SYSTEM
(ABS) INDICATOR
SEAT BELT REMINDER
INDICATOR
SUPPLEMENTAL
RESTRAINT SYSTEM
INDICATOR
SIDE AIRBAG OFF INDICATOR
LOW
FUEL INDICATOR
HIGH BEAM INDICATOR
PARKING BRAKE AND BRAKE
SYSTEM INDICATOR
TURN
SIGNAL AND HAZARD
WARNING INDICATORS
IMMOBILIZER
SYSTEM INDICATOR
MALFUNCTION
INDICATOR LAMP
CHARGING
SYSTEM
INDICATOR (P.57)
(P . 59)
LIGHTS ON INDICATOR
(p.60 )
( P.57)
(P.57)
(P.59) (P.60)
(P.60)
(P.58) (P.62)
VSA ACTIVATION INDICATOR (P.62)
(P.62) (P.62)
(P.59)
MAINTENANCE MINDER
INDICATOR (P.61)
DOOR AND TRUNK OPEN
MONITOR (P.61)
(P.57)
(P.58)
SECURITY SYSTEM INDICATOR
WASHER
LEVEL INDICATOR (P.60)
(P.61)
DAYTIME RUNNING LIGHTS INDICATOR (P.60)
(P.58)
EX-V6 with A/T model is shown.
�����—�����—�����y�
�������������y���
�(���%�������y���������y
Page 63 of 319
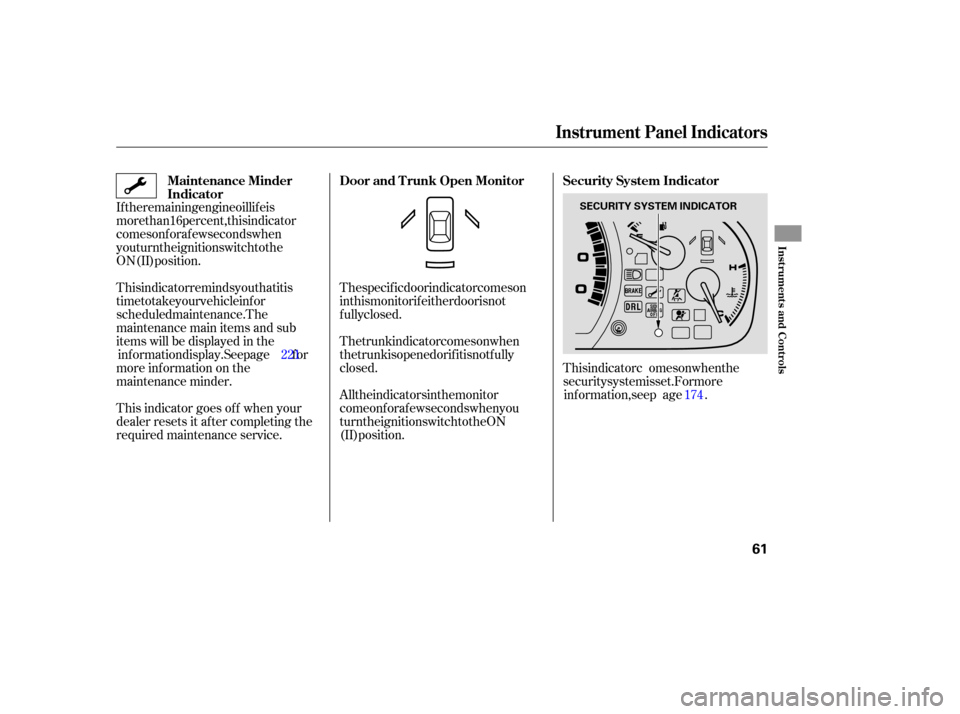
This indicator comes on when the
security system is set. For more info rmation, see p age .
The specific door indicator comes on
in this monitor if either door is not
fully closed.
The trunk indicator comes on when
the trunk is opened or if it is not fully
closed.
All the indicators in the monitor
come on for a few seconds when you
turn the ignition switch to the ON
(II) position.
If the remaining engine oil life is
more than 16 percent, this indicator
comes on for a few seconds when
you turn the ignition switch to the
ON (II) position.
This indicator reminds you that it is
time to take your vehicle in for
scheduled maintenance. The
maintenance
main items and sub
items will be displayed in the
information display. See page for
more inf ormation on the
maintenance minder.
This indicator goes of f when your
dealer resets it after completing the
required maintenance service. 174
221 Security System Indicator
Maintenance Minder
Indicator Door and T runk Open Monitor
Instrument Panel Indicators
Inst rument s and Cont rols
61
SECURITY SYSTEM INDICATOR
�����—�����—�����y�
�������������y���
�(���%�������y���������y
Page 75 of 319
Make any steering wheel adjustment
bef ore you start driving.Push the lever under the steering
column all the way down.
Move the steering wheel up or
downandinorouttothedesired
position. Make sure you can see
the instrument panel gauges and
the indicators.Push the lever up to lock the
steering wheel in that position.
Make sure you have securely
locked the steering wheel in place
by trying to move it up, down, in,
and out.
1.
2. 3.
4.
Steering Wheel A djustment
Inst rument s and Cont rols
73
Adjusting the steering wheel
position while driving may
cause you to lose control of the
vehicle and be seriously injured
inacrash.
Adjust the steering wheel only
when the vehicle is stopped.
�����—�����—�����y�
�������������y���
�(���%�������y���������y