Page 25 of 128
 temperature drop can cause a corresponding
drop of 1 psi (7 kPa) in inflation pressure. Check your tire p")
When weather temperature changes occur, tire inflation pressures also
change. A 10° F (6° C) temperature drop can cause a corresponding
drop of 1 psi (7 kPa) in inflation pressure. Check your tire pressures
frequently and adjust them to the proper pressure which can be found
on the tire label or certification label.
If you are checking tire pressure when the tire is hot, (i.e. driven more
than 1 mile [1.6 km]), never “bleed” or reduce air pressure. The tires are
hot from driving and it is normal for pressures to increase above
recommended cold pressures. A hot tire at or below recommended cold
inflation pressure could be significantly under-inflated.
To check the pressure in your tire(s):
1. Make sure the tires are cool, meaning they are not hot from driving
even a mile.
Note:If you have to drive a distance to get air for your tire(s), check
and record the tire pressure first and add the appropriate air pressure
when you get to the pump. It is normal for tires to heat up and the air
pressure inside to go up as you drive. Never “bleed” or reduce air
pressure when tires are hot.
2. Remove the cap from the valve on one tire, then firmly press the tire
gauge onto the valve and measure the pressure with the tire gauge.
3. Add enough air to reach the recommended air pressure
Note:If you overfill the tire, release air by pushing on the metal stem in
the center of the valve. Then recheck the pressure with your tire gauge.
4. Replace the valve cap.
5. Repeat this procedure for each tire, including the spare.
Note:Some spare tires require higher inflation pressure than the other
tires. Check the tire label for the recommended spare tire pressure. See
the completed vehicle’s owners guide for location of tire label.
6. Visually inspect the tires to make sure there are no nails or other
objects embedded that could poke a hole in the tire and cause an air
leak.
7. Check the sidewalls to make sure there are no gouges, cuts or bulges.
2006 Motorhome(mot)
Supplement
USA_English(fus)
Tires, Wheels and Loading
25
Page 26 of 128
:
This type of tire utilizes steel cords in the sidewalls. As such, they
cannot be treated like normal light truck tires. Tir")
Tire inflation information
All tires with Steel Carcass Plies (if equipped):
This type of tire utilizes steel cords in the sidewalls. As such, they
cannot be treated like normal light truck tires. Tire service, including
adjusting tire pressure, must be performed by personnel trained,
supervised and equipped according to Federal Occupational Safety and
Health Administration (OSHA) regulations. For example, during any
procedure involving tire inflation, the technician or individual must
utilize a remote inflation device, and ensure that all persons are clear of
the trajectory area.
WARNINGAn inflated tire and rim can be very dangerous if
improperly used, serviced or maintained. To avoid serious injury,
never attempt to re-inflate a tire which has been run flat or seriously
under-inflated without first removing the tire from the wheel assembly
for inspection. Do not attempt to add air to tires or replace tires or
wheels without first taking precautions to protect persons and
property.
TIRE REPLACEMENT REQUIREMENTS
Your vehicle is equipped with tires designed to provide a safe ride and
handling capability.
2006 Motorhome(mot)
Supplement
USA_English(fus)
Tires, Wheels and Loading
26
Page 27 of 128
 as those originally provided by Ford. Use of any tire or
whee")
Only use replacement tires and wheels that are the same size
and type (such as P-metric versus LT-metric or all-season versus
all-terrain) as those originally provided by Ford. Use of any tire or
wheel not recommended by Ford can affect the safety and
performance of your vehicle, which could result in an increased risk of
loss of vehicle control, vehicle rollover, personal injury and death.
Additionally the use of non-recommended tires and wheels could cause
steering, suspension, axle or transfer case/power transfer unit failure. If
you have questions regarding tire replacement, see an authorized Ford
or Lincoln Mercury dealer.
Make sure all tires and wheels on the vehicle are of the same size, type,
tread design, brand, load-carrying capacity and speed rating because it
can affect the safety and performance of your vehicle, which could result
in an increased risk of loss of vehicle control, vehicle rollover, personal
injury and death.
Important:Remember to replace the spare tire when you replace the
road tires on your vehicle. Even if it has never been used, the spare tire
should be replaced because tires degrade over time.
Important:Remember to replace the wheel air valves when the road
tires are replaced on your vehicle.
CHANGING A FLAT TIRE
If you get a flat tire while driving:
•do not brake heavily.
•gradually decrease the vehicle’s speed.
•hold the steering wheel firmly.
•slowly move to a safe place on the side of the road.
The use of tire sealants may damage your tires.
Tire change procedure
Preparing to change the tire
To help prevent the vehicle from moving when you change a tire,
be sure the parking brake is set, then block (in both directions)
the wheel that is diagonally opposite (other side and end of the
vehicle) to the tire being changed.
2006 Motorhome(mot)
Supplement
USA_English(fus)
Tires, Wheels and Loading
27
Page 28 of 128
1. Park on a level surface.
2. Activate the warning flashers.
3. Place the gearshift in P (Park).
4. Apply the parking brake and turn
engine OFF.
5. Block the wheel that is diagonally
opposite the tire you are changing.
The parking brake is on the
transmission. Therefore, the vehicle
will not be prevented from moving
when a rear wheel is lifted, even if
the parking brake is applied. Be sure to block both directions of the
wheel that is diagonally opposite to the wheel that is being lifted.
If the vehicle slips off the jack, you or someone else could be
seriously injured.
6. Remove the spare tire and jack from the storage location.
7. Loosen the wheel nut by pulling up on the handle of the lug nut
wrench about one-half turn (counterclockwise). Do not remove the
wheel lug nuts until you raise the tire off the ground.
2006 Motorhome(mot)
Supplement
USA_English(fus)
Tires, Wheels and Loading
28
Page 29 of 128
Replacing the tire
To lessen the risk of personal injury, do not put any part of your
body under the vehicle while changing a tire. Do not start the
engine when your vehicle is on the jack. The jack is only meant for
changing the tire.
8. Position the jack to raise the front or rear wheel.
•Never use the front or rear
differential as a jacking point.
Rear axle jacking points:
Front axle jacking points:
Place the jack under the front axle.
9. Raise the vehicle until the wheel is completely off the ground.
10. Remove the lug nuts with the lug nut wrench.
11. Replace the flat tire with the spare tire.
2006 Motorhome(mot)
Supplement
USA_English(fus)
Tires, Wheels and Loading
29
Page 30 of 128
12. Use the lug nut wrench to screw
the lug nut snugly against the
wheel.
13. Lower the vehicle.
Never use wheels or lug
nuts different than the
original equipment as this could
damage the wheel or mounting
system. This damage could allow
the wheels to come off while the
vehicle is being driven.
14. Remove the jack and fully
tighten the lug nuts in the order
shown. Refer toWheel lug nut
torque specificationslater in this
chapter for the proper lug nut
torque specification.
8–lug nut torque sequence
10–lug nut torque sequence
15. Replace any wheel trim.
16. Stow the jack, handle and lug wrench.
17. Unblock the wheels.
2006 Motorhome(mot)
Supplement
USA_English(fus)
Tires, Wheels and Loading
30
Page 31 of 128
, and again at 500 miles
(800 km) of new vehic")
WHEEL LUG NUT TORQUE SPECIFICATIONS
On vehicles equipped with dual rear wheels, retighten the wheel lug nuts
to the specified torque at 100 miles (160 km), and again at 500 miles
(800 km) of new vehicle operation and after any wheel disturbance (tire
rotation, changing a flat tire, wheel removal, etc.).
Bolt size Wheel lug nut torque*
lb.ft. N•m
M14 x 1.5 170 230
M22 x 1.5 515 700
* Torque specifications are for nut and bolt threads free of dirt and
rust. Use only Ford recommended replacement fasteners.
On all two-piece flat wheel nuts,
apply one drop of motor oil between
the flat washer and the nut. Do not
apply motor oil to the wheel nut
threads or the wheel stud threads.
When a wheel is installed,
always remove any
corrosion, dirt or foreign materials
present on the mounting surfaces
of the wheel or the surface of the
front disc brake hub and rotor
that contacts the wheel. Installing
wheels without correct
metal-to-metal contact at the
wheel mounting surfaces can
cause the wheel nuts to loosen
and the wheel to come off while
the vehicle is in motion, resulting
in loss of control.
INFORMATION CONTAINED ON THE TIRE SIDEWALL
Federal law requires tire manufacturers to place standardized
information on the sidewall of all tires. This information identifies and
describes the fundamental characteristics of the tire and also provides a
U.S. DOT Tire Identification Number for safety standard certification and
in case of a recall.
2006 Motorhome(mot)
Supplement
USA_English(fus)
Tires, Wheels and Loading
31
Page 32 of 128

Information on “P” type tires
P215/65R15 95H is an example of a
tire size, load index and speed
rating. The definitions of these
items are listed below. (Note that
the tire size, load index and speed
rating for your vehicle may be
different from this example.)
1.P:
Indicates a tire, designated by
the Tire and Rim Association (T&RA),
that may be used for service on cars,
SUVs, minivans and light trucks.
Note:If your tire size does not
begin with a letter this may mean it
is designated by either ETRTO
(European Tire and Rim Technical
Organization) or JATMA (Japan Tire Manufacturing Association).
2.215:Indicates the nominal width of the tire in millimeters from
sidewall edge to sidewall edge. In general, the larger the number, the
wider the tire.
3.65:Indicates the aspect ratio which gives the tire’s ratio of height to
width.
4.R:Indicates a “radial” type tire.
5.15:Indicates the wheel or rim diameter in inches. If you change your
wheel size, you will have to purchase new tires to match the new wheel
diameter.
6.95:Indicates the tire’s load index. It is an index that relates to how
much weight a tire can carry. You may find this information in your
Owner’s Guide.If not, contact a local tire dealer.
Note:You may not find this information on all tires because it is not
required by federal law.
7.H:Indicates the tire’s speed rating. The speed rating denotes the
speed at which a tire is designed to be driven for extended periods of
time under a standard condition of load and inflation pressure. The tires
on your vehicle may operate at different conditions for load and inflation
pressure. These speed ratings may need to be adjusted for the difference
in conditions. The ratings range from 81 mph (130 km/h) to 186 mph
(299 km/h). These ratings are listed in the following chart.
Note:You may not find this information on all tires because it is not
required by federal law.
2006 Motorhome(mot)
Supplement
USA_English(fus)
Tires, Wheels and Loading
32
 1
1 2
2 3
3 4
4 5
5 6
6 7
7 8
8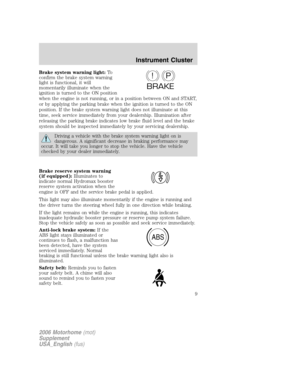 9
9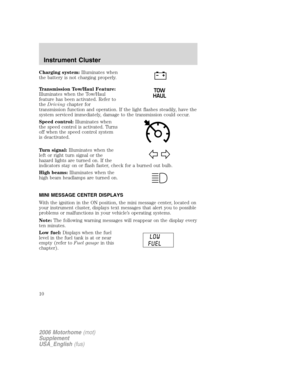 10
10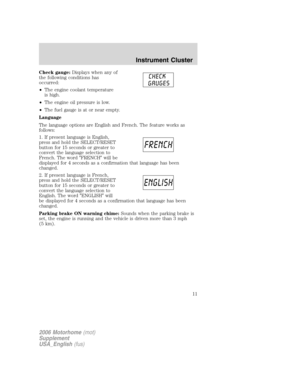 11
11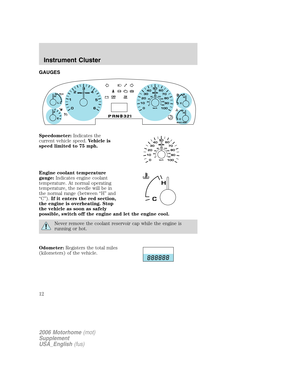 12
12 13
13 14
14 15
15 16
16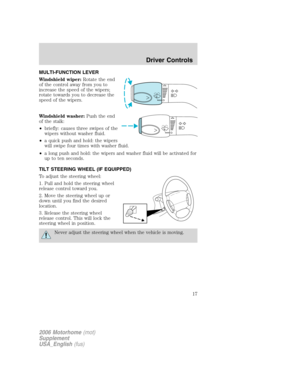 17
17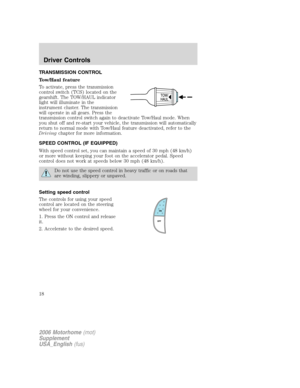 18
18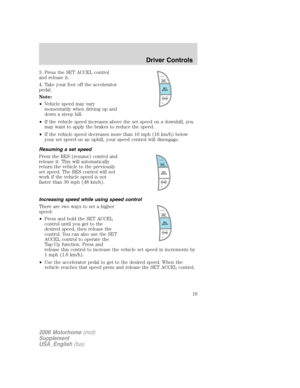 19
19 20
20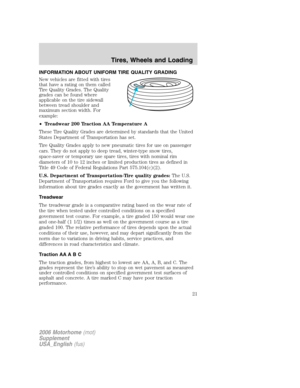 21
21 22
22 23
23 24
24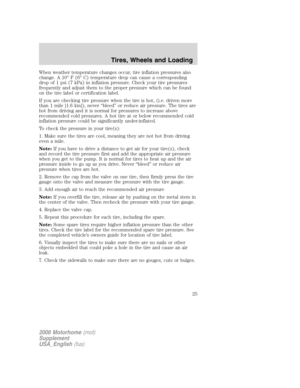 25
25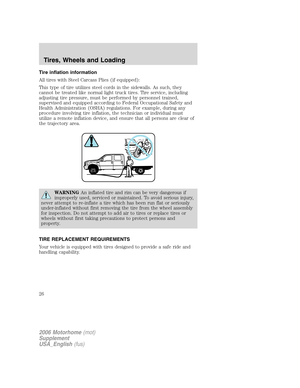 26
26 27
27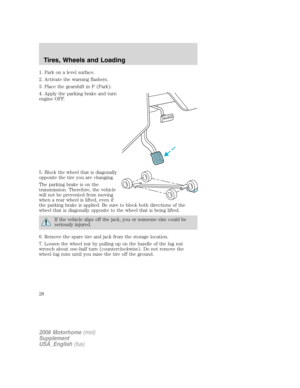 28
28 29
29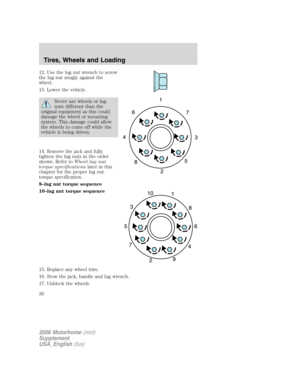 30
30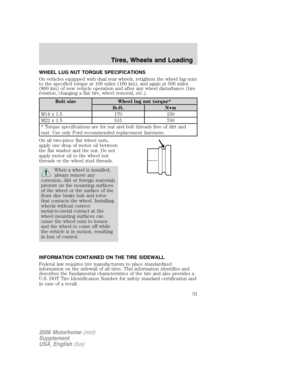 31
31 32
32 33
33 34
34 35
35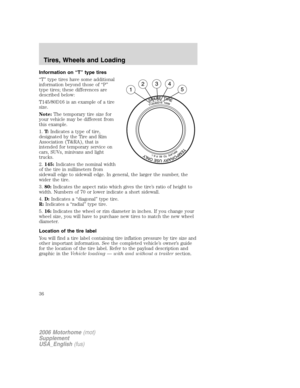 36
36 37
37 38
38 39
39 40
40 41
41 42
42 43
43 44
44 45
45 46
46 47
47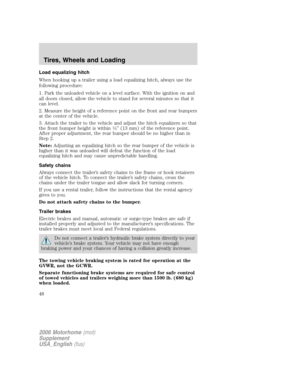 48
48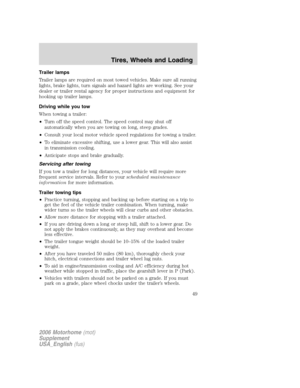 49
49 50
50 51
51 52
52 53
53 54
54 55
55 56
56 57
57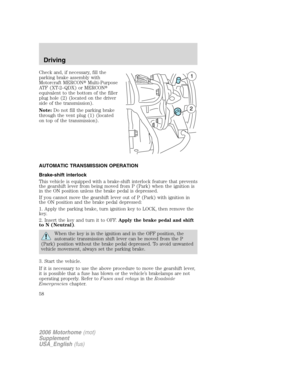 58
58 59
59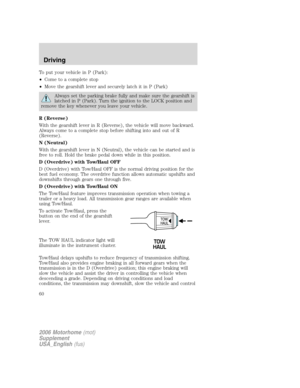 60
60 61
61 62
62 63
63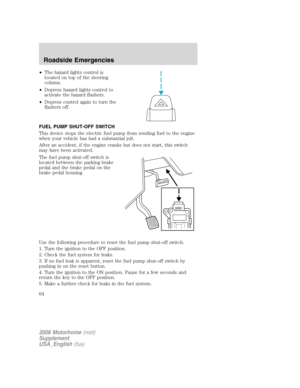 64
64 65
65 66
66 67
67 68
68 69
69 70
70 71
71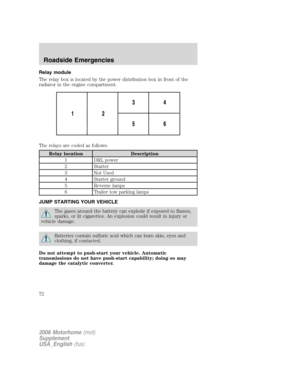 72
72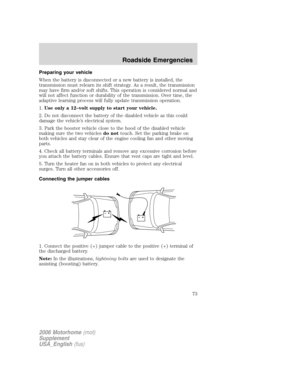 73
73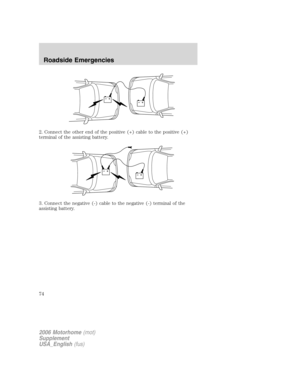 74
74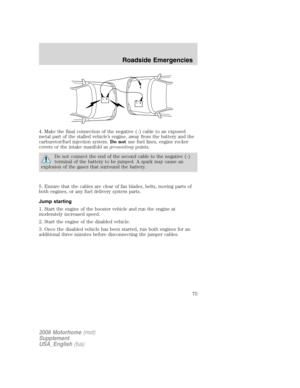 75
75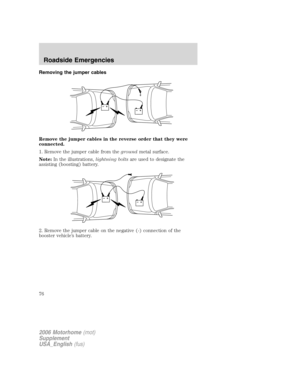 76
76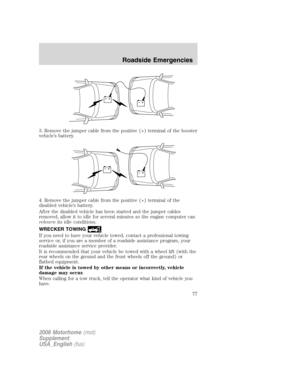 77
77 78
78 79
79 80
80 81
81 82
82 83
83 84
84 85
85 86
86 87
87 88
88 89
89 90
90 91
91 92
92 93
93 94
94 95
95 96
96 97
97 98
98 99
99 100
100 101
101 102
102 103
103 104
104 105
105 106
106 107
107 108
108 109
109 110
110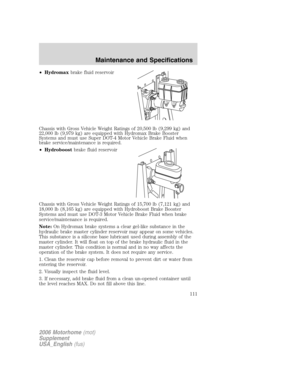 111
111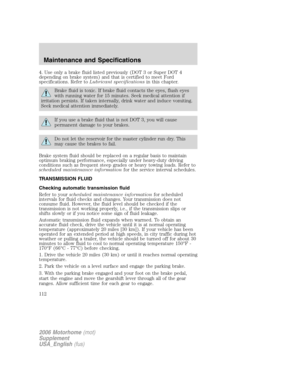 112
112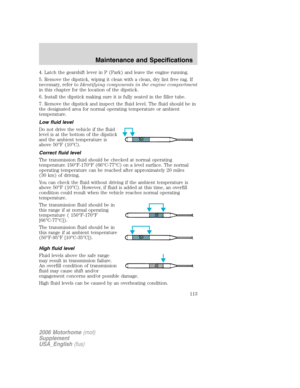 113
113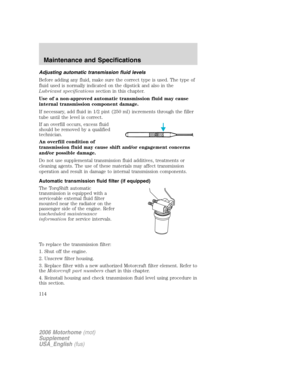 114
114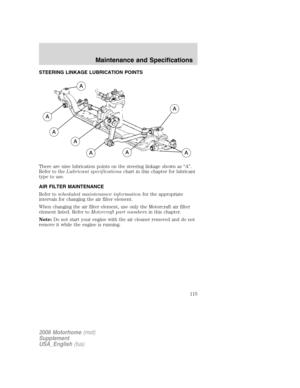 115
115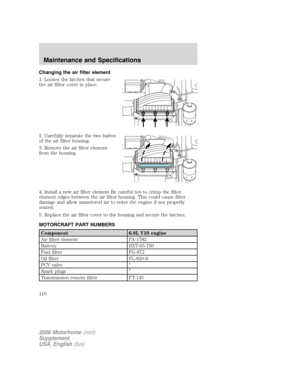 116
116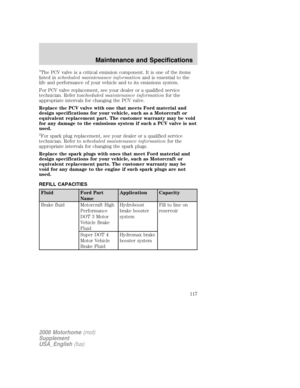 117
117 118
118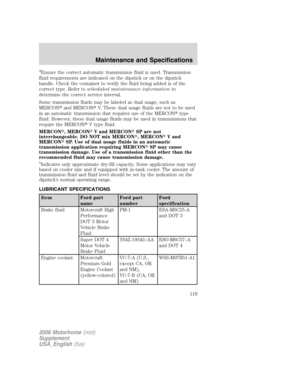 119
119 120
120 121
121 122
122 123
123 124
124 125
125 126
126 127
127.
4. Apply the parking brake and turn
engine OFF.
5. Block the wheel that is diagonally
opposite the tir")

