2006 CHEVROLET CORVETTE lock
[x] Cancel search: lockPage 130 of 426
Lowering the Power Convertible Top
1. Park on a level surface. The vehicle must be
running or in ACC. Shift an automatic transmission
into PARK (P) and set the parking brake. Shift a
manual transmission into NEUTRAL, and set
the parking brake.
2. Make sure the trunk is closed and the rear trunk
partition in the rear storage area is in the fastened
upright position, and that no objects are forward
of the divider. See “Rear Trunk Partition” under
Rear Storage Area on page 2-52.
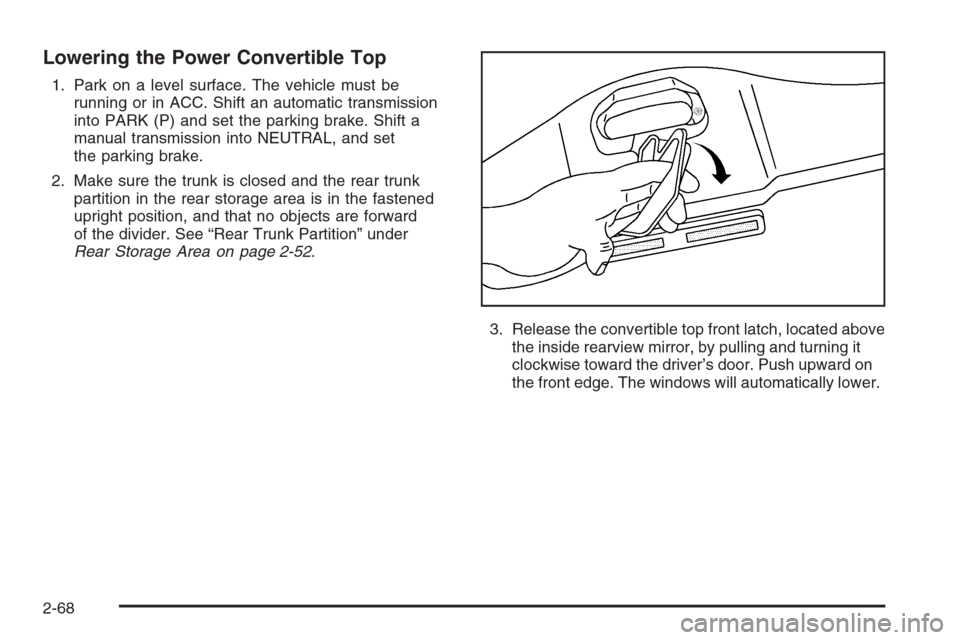
3. Release the convertible top front latch, located above
the inside rearview mirror, by pulling and turning it
clockwise toward the driver’s door. Push upward on
the front edge. The windows will automatically lower.
2-68
Page 132 of 426
4. After the convertible top is completely raised,
release the power convertible top button.
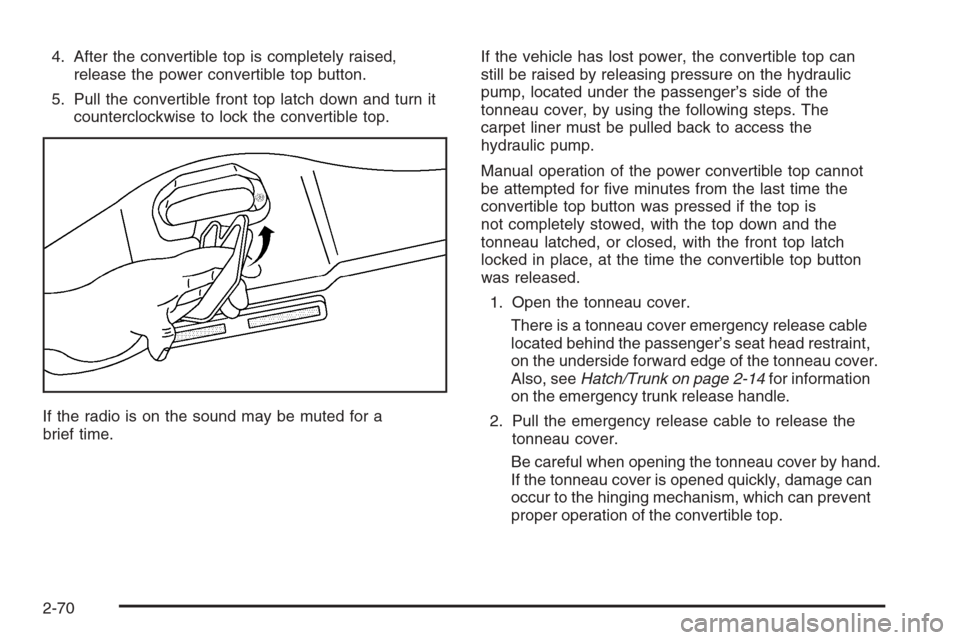
5. Pull the convertible front top latch down and turn it
counterclockwise to lock the convertible top.
If the radio is on the sound may be muted for a
brief time.If the vehicle has lost power, the convertible top can
still be raised by releasing pressure on the hydraulic
pump, located under the passenger’s side of the
tonneau cover, by using the following steps. The
carpet liner must be pulled back to access the
hydraulic pump.
Manual operation of the power convertible top cannot
be attempted for �ve minutes from the last time the
convertible top button was pressed if the top is
not completely stowed, with the top down and the
tonneau latched, or closed, with the front top latch
locked in place, at the time the convertible top button
was released.
1. Open the tonneau cover.
There is a tonneau cover emergency release cable
located behind the passenger’s seat head restraint,
on the underside forward edge of the tonneau cover.
Also, seeHatch/Trunk on page 2-14for information
on the emergency trunk release handle.
2. Pull the emergency release cable to release the
tonneau cover.
Be careful when opening the tonneau cover by hand.
If the tonneau cover is opened quickly, damage can
occur to the hinging mechanism, which can prevent
proper operation of the convertible top.
2-70
Page 133 of 426
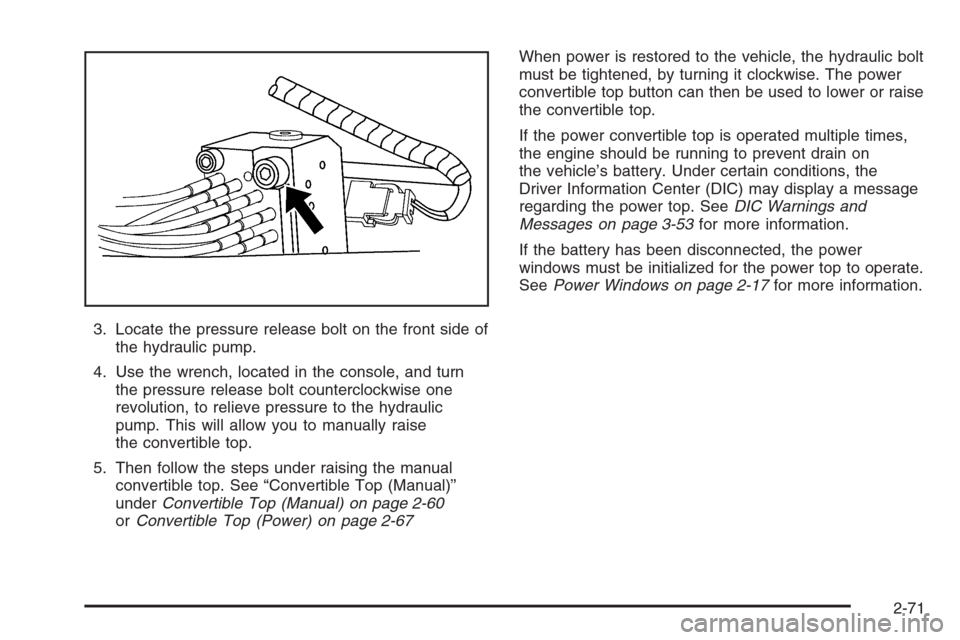
3. Locate the pressure release bolt on the front side of
the hydraulic pump.
4. Use the wrench, located in the console, and turn
the pressure release bolt counterclockwise one
revolution, to relieve pressure to the hydraulic
pump. This will allow you to manually raise
the convertible top.
5. Then follow the steps under raising the manual
convertible top. See “Convertible Top (Manual)”
underConvertible Top (Manual) on page 2-60
orConvertible Top (Power) on page 2-67When power is restored to the vehicle, the hydraulic bolt
must be tightened, by turning it clockwise. The power
convertible top button can then be used to lower or raise
the convertible top.
If the power convertible top is operated multiple times,
the engine should be running to prevent drain on
the vehicle’s battery. Under certain conditions, the
Driver Information Center (DIC) may display a message
regarding the power top. SeeDIC Warnings and
Messages on page 3-53for more information.
If the battery has been disconnected, the power
windows must be initialized for the power top to operate.
SeePower Windows on page 2-17for more information.
2-71
Page 136 of 426
Easy Exit Seat
Two personalized exit positions can also be programmed
to allow for an easy exit or entry into the vehicle. The
controls for this memory function are located on the
driver’s door.
B(Easy Exit Seat):This button is used to program
and recall the desired driver’s seat exit position.
To program an exit position, use the following steps:
1. Recall the desired driving position by pressing
button 1 or 2.
The seat will move to the programmed memory
position.
2. Position the seat and the telescopic steering
column position to a comfortable exit position.
3. Press and hold the exit button until two beeps
sound.
Your exit position is now programmed.
A second exit position can be programmed by repeating
the above steps and pressing the other memory button.To recall an exit position, do one of the following:
If you have an automatic transmission vehicle,
press and release the exit button while the vehicle
is in PARK (P).
One beep will sound and the exit position for the
currently identi�ed driver will be recalled.
If you have a manual transmission vehicle, press
and release the exit button. The parking brake
needs to be set to recall the memory position.
One beep will sound and the exit position for the
currently identi�ed driver will be recalled.
If your vehicle has the Auto Exit Recall feature and it is
turned on in the DIC, automatic seat and telescopic
steering column movement to the exit position will
occur when you use the keyless access transmitter to
unlock your vehicle or when you turn the engine off and
open the driver’s door. See “Auto Exit Recall” under
DIC Vehicle Personalization on page 3-68for more
information.
2-74
Page 137 of 426

Instrument Panel Overview...............................3-4
Hazard Warning Flashers................................3-6
Other Warning Devices...................................3-6
Horn .............................................................3-6
Tilt Wheel.....................................................3-6
Turn Signal/Multifunction Lever.........................3-8
Turn and Lane-Change Signals (Auto Signal).....3-8
Headlamp High/Low-Beam Changer..................3-9
Flash-to-Pass.................................................3-9
Windshield Wipers..........................................3-9
Windshield Washer.......................................3-10
Cruise Control..............................................3-11
Exterior Lamps.............................................3-15
Wiper Activated Headlamps............................3-16
Headlamps on Reminder................................3-16
Daytime Running Lamps (DRL).......................3-16
Fog Lamps ..................................................3-17
Twilight Sentinel
®..........................................3-18
Exterior Lighting Battery Saver........................3-19
Instrument Panel Brightness...........................3-19
Courtesy Lamps...........................................3-19
Entry/Exit Lighting.........................................3-19
Reading Lamps............................................3-20
Battery Run-Down Protection..........................3-20
Head-Up Display (HUD).................................3-20
Accessory Power Outlet(s).............................3-24
Ashtray(s) and Cigarette Lighter......................3-25Climate Controls............................................3-25
Dual Automatic Climate Control System...........3-25
Outlet Adjustment.........................................3-30
Passenger Compartment Air Filter...................3-31
Warning Lights, Gages, and Indicators............3-32
Instrument Panel Cluster................................3-33
Speedometer and Odometer...........................3-34
Tachometer.................................................3-34
Safety Belt Reminder Light.............................3-34
Airbag Readiness Light..................................3-34
Passenger Airbag Status Indicator...................3-35
Voltmeter Gage............................................3-37
One-to-Four Shift Light
(Manual Transmission)...............................3-38
Brake System Warning Light..........................3-38
Anti-Lock Brake System Warning Light.............3-39
Traction Control System (TCS) Warning Light . . .3-40
Active Handling System Light.........................3-40
Engine Coolant Temperature Gage..................3-41
Tire Pressure Light.......................................3-42
Malfunction Indicator Lamp.............................3-42
Engine Oil Pressure Gage.............................3-45
Security Light...............................................3-46
Fog Lamp Light............................................3-46
Lights On Reminder......................................3-46
Highbeam On Light.......................................3-46
Fuel Gage...................................................3-47
Section 3 Instrument Panel
3-1
Page 141 of 426

The main components of your instrument panel are the following:
A. Air Outlet. SeeOutlet Adjustment on page 3-30.
B. Head-Up Display Controls (If Equipped). SeeHead-Up
Display (HUD) on page 3-20.
C. Turn Signal/Multifunction Lever. SeeTurn
Signal/Multifunction Lever on page 3-8. Cruise Control.
SeeCruise Control on page 3-11. Fog Lamps. See
Fog Lamps on page 3-17. Headlamp Controls.
SeeExterior Lamps on page 3-15.
D. Manual Shift Paddles (If Equipped). SeeAutomatic
Transmission Operation on page 2-26.
E. Driver Information Center (DIC). SeeDriver
Information Center (DIC) on page 3-48.
F. Instrument Panel Cluster. SeeInstrument Panel
Cluster on page 3-33.
G. Windshield Wiper/Washer Lever. SeeWindshield
Wipers on page 3-9andWindshield Washer on
page 3-10.
H. Driver Information Center (DIC) Controls. SeeDIC
Controls and Displays on page 3-48.
I. Center Air Outlets. SeeOutlet Adjustment on page 3-30.
J. Hazard Warning Flasher Button. SeeHazard Warning
Flashers on page 3-6.
K. Audio System. SeeAudio System(s) on page 3-77.
L. Climate Controls. SeeDual Automatic Climate Control
System on page 3-25.
M. Fuel Door Release Button. SeeFilling the Tank on
page 5-7. Hatch/Trunk Release Button. See “Hatch/
Trunk Lid Release” underHatch/Trunk on page 2-14.N. Instrument Panel Brightness Control. SeeInstrument
Panel Brightness on page 3-19.
O. Power Folding Top Switch (If Equipped). See
Convertible Top (Manual) on page 2-60orConvertible
Top (Power) on page 2-67.
P. Tilt Wheel Lever. SeeTilt Wheel on page 3-6.
Q. Telescopic Wheel Button (If Equipped). SeeTilt Wheel
on page 3-6.
R. Ignition Switch. SeeIgnition Positions on page 2-22.
S. Heated Seat Controls (If Equipped). SeeHeated Seats
on page 1-4.
T. Shift Lever (Automatic Shown). SeeAutomatic
Transmission Operation on page 2-26orManual
Transmission Operation on page 2-30.
U. Active Handling Button. SeeActive Handling System on
page 4-10.
V. Accessory Power Outlet. SeeAccessory Power
Outlet(s) on page 3-24.
W. Center Console Cupholder. SeeCupholder(s) on
page 2-51.
X. Ashtray and Cigarette Lighter. SeeAshtray(s) and
Cigarette Lighter on page 3-25.
Y. Parking Brake. SeeParking Brake on page 2-33.
Z. Glove Box. SeeGlove Box on page 2-51.
AA. Instrument Panel Fuse Block. SeeInstrument Panel
Fuse Block on page 5-94.
3-5
Page 143 of 426
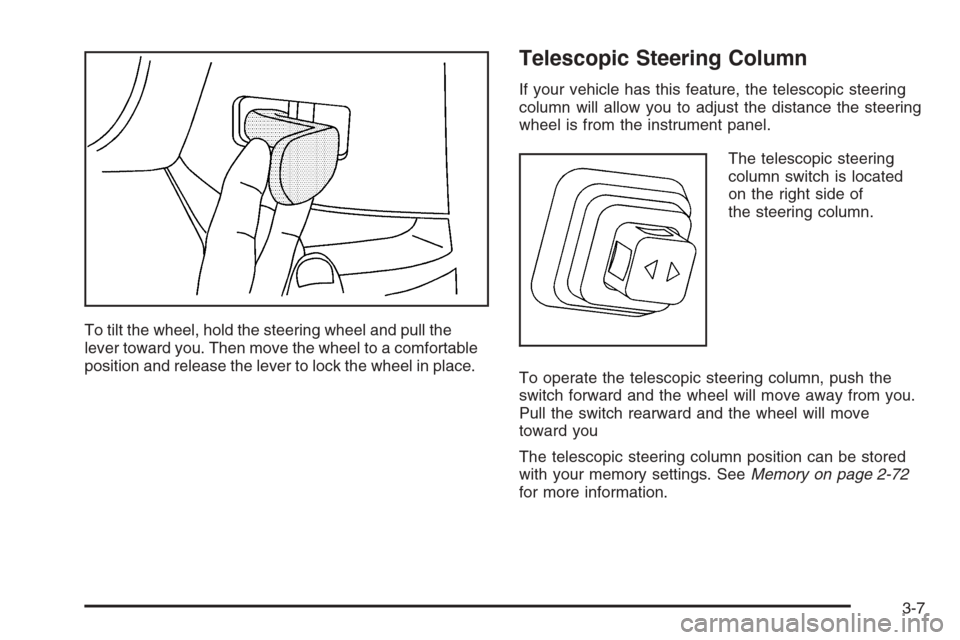
To tilt the wheel, hold the steering wheel and pull the
lever toward you. Then move the wheel to a comfortable
position and release the lever to lock the wheel in place.
Telescopic Steering Column
If your vehicle has this feature, the telescopic steering
column will allow you to adjust the distance the steering
wheel is from the instrument panel.
The telescopic steering
column switch is located
on the right side of
the steering column.
To operate the telescopic steering column, push the
switch forward and the wheel will move away from you.
Pull the switch rearward and the wheel will move
toward you
The telescopic steering column position can be stored
with your memory settings. SeeMemory on page 2-72
for more information.
3-7
Page 146 of 426
9(Off):Move the lever to this position to turn off the
windshield wipers.
8(Mist):Move the lever all the way down to mist
and release for a single wiping cycle. The windshield
wipers will stop after one wipe. If you want more wipes,
hold the band on mist longer.
Heavy snow or ice can overload the wipers. If this
occurs, a circuit breaker will stop the wipers until the
motor cools. So, be sure to clear any ice and snow from
the windshield wiper blades before using them. If the
wiper blades are frozen to the windshield, carefully
loosen them or warm the windshield before turning
the wipers on. If your blades do become worn or
damaged, get new blades or blade inserts.
Windshield Washer
The lever on the right side of the steering column also
controls the windshield washer. There is a button at the
end of the lever. To spray washer �uid on the windshield,
press the button and hold it. The washer will spray until
you release the button. The wipers will continue to clear
the window for about six seconds after the button is
released and then stop or return to your preset speed.
{CAUTION:
In freezing weather, do not use your washer
until the windshield is warmed. Otherwise the
washer �uid can form ice on the windshield,
blocking your vision.
If the �uid in the windshield washer �uid reservoir is
low, the message CHECK WASHER FLUID will appear
on the Driver Information Center (DIC) display. It will
take 15 seconds after the bottle is re�lled for this
message to turn off. For information on the correct
washer �uid to use, seeWindshield Washer Fluid on
page 5-41andRecommended Fluids and Lubricants on
page 6-12.
3-10