2006 BMW 650I COUPE change time
[x] Cancel search: change timePage 104 of 236
Controls
103Reference
At a glance
Driving tips
Communications
Navigation
Entertainment
Mobility
Maximum cooling
Maximally cooled air is obtained as
quickly as possible from an outside
temperature above 327/06 and
with the engine running.
The automatic climate control changes over to
the lowest temperature and switches into the
recirculated-air mode. The maximum air quan-
tity only flows out of the vents for the upper
body. It is therefore necessary for these vents to
be open for maximum cooling.
AUC Automatic recirculated-air
control/recirculated-air mode
You can respond to unpleasant
odors or pollutants in the immedi-
ate environment by temporarily
suspending the supply of outside air. The sys-
tem then recirculates the air currently within the
vehicle. In AUC mode, a sensor detects pollut-
ants in the outside air and controls the shut-off
automatically.
Press the button repeatedly to run through the
following control sequence:
>LED off: outside air flows into the vehicle
continuously.
>Right LED on, AUC mode: the system
detects pollutants in the outside air and
responds by blocking the supply of outside
air when required.
>Left LED on, recirculated-air mode: the
supply of outside air into the vehicle is shut
off continuously.
If condensation starts to form on the
inside window surfaces during operation
in the recirculated-air mode, you should switch
it off while also increasing the air volume as
required.
The recirculated-air mode should not be used
over a longer period of time, as the air quality
inside the vehicle deteriorates continuously.<
Residual heat
The heat stored in the engine is
used to heat the passenger com-
partment, e.g. while stopped at a
school to pick up a child.
The function can be switched on when the fol-
lowing conditions are met:
>up to 15 minutes after switching off the
engine
>engine at operating temperature
>sufficient battery voltage
>outside temperature below 777/256
The LED lights up when the function is
switched on.
With the ignition switch at radio readiness or
higher the interior temperature, the air volume
and the air distribution can be set.
Switching off automatic climate control
The air volume, the heater and the
cooling function are all switched
off.
You can restart the automatic cli-
mate control by pressing any of its buttons
except the REST button.
Ventilation
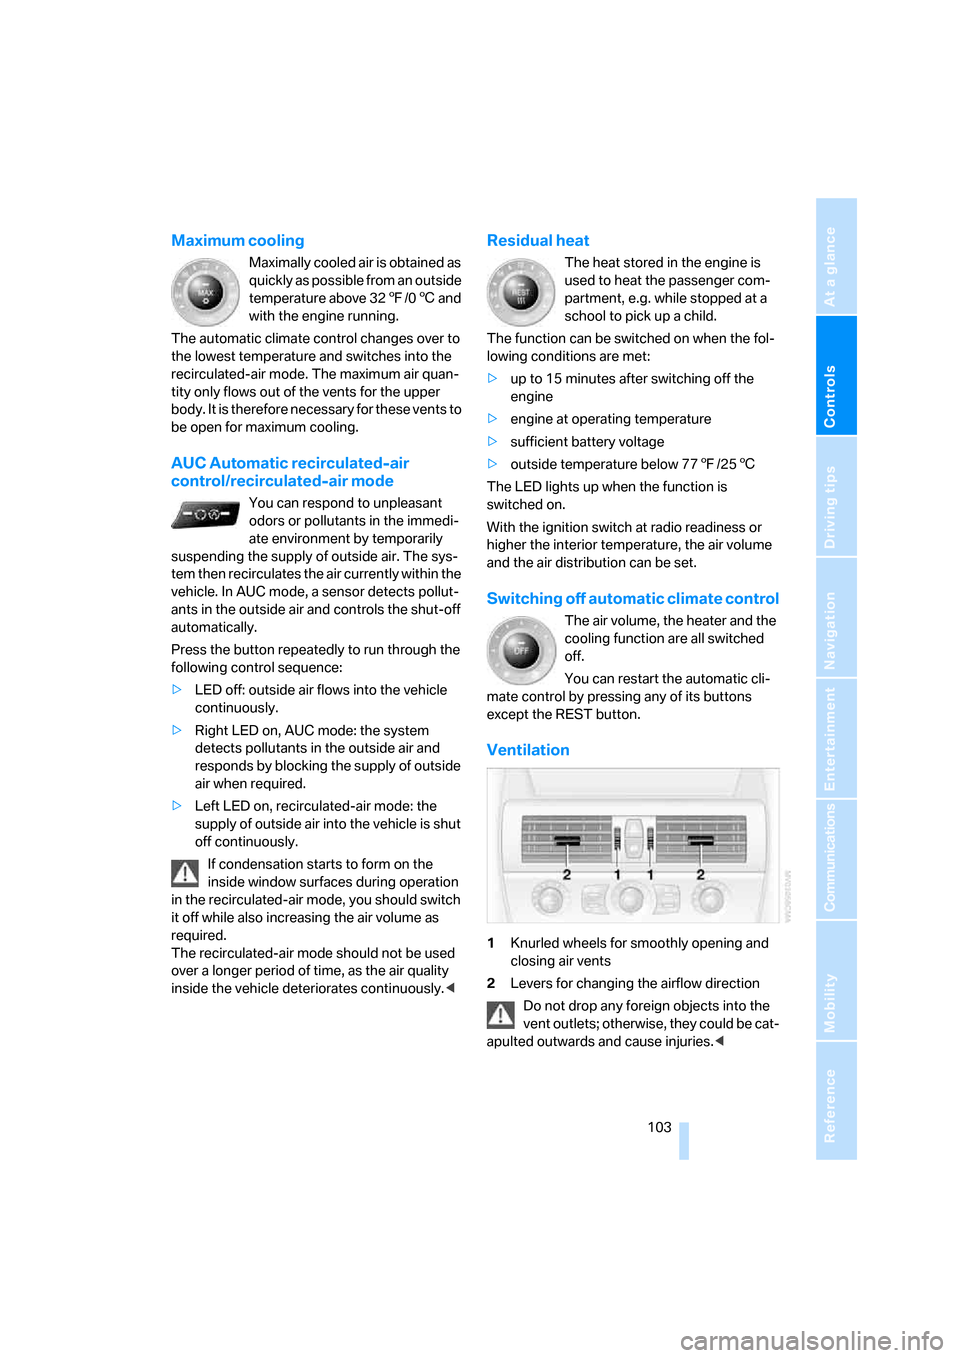
1Knurled wheels for smoothly opening and
closing air vents
2Levers for changing the airflow direction
Do not drop any foreign objects into the
vent outlets; otherwise, they could be cat-
apulted outwards and cause injuries.<
Page 123 of 236
Destination entry
122 3.Change to the second field from the top if
necessary. Turn the controller until "Enter
address" is selected and press the control-
ler.
The system also assists you with the following
features:
>If you do not enter a street, the system will
guide you to the downtown area of a town or
city.
>You can skip the entry of country and town/
city if the current entries are being retained
for your new destination.
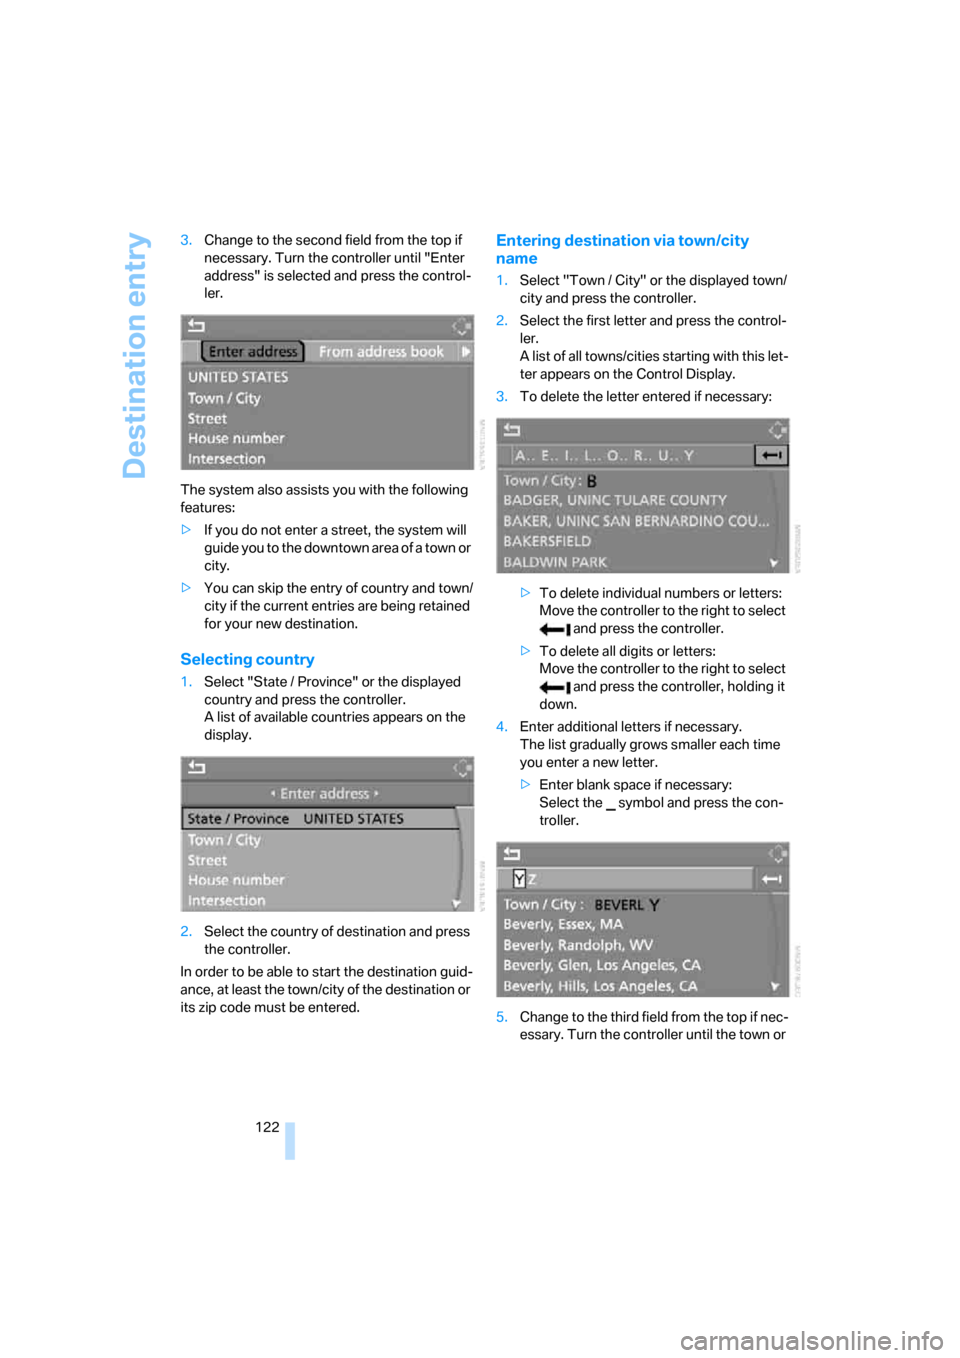
Selecting country
1.Select "State / Province" or the displayed
country and press the controller.
A list of available countries appears on the
display.
2.Select the country of destination and press
the controller.
In order to be able to start the destination guid-
ance, at least the town/city of the destination or
its zip code must be entered.
Entering destination via town/city
name
1.Select "Town / City" or the displayed town/
city and press the controller.
2.Select the first letter and press the control-
ler.
A list of all towns/cities starting with this let-
ter appears on the Control Display.
3.To delete the letter entered if necessary:
>To delete individual numbers or letters:
Move the controller to the right to select
and press the controller.
>To delete all digits or letters:
Move the controller to the right to select
and press the controller, holding it
down.
4.Enter additional letters if necessary.
The list gradually grows smaller each time
you enter a new letter.
>Enter blank space if necessary:
Select the symbol and press the con-
troller.
5.Change to the third field from the top if nec-
essary. Turn the controller until the town or
Page 125 of 236
Destination entry
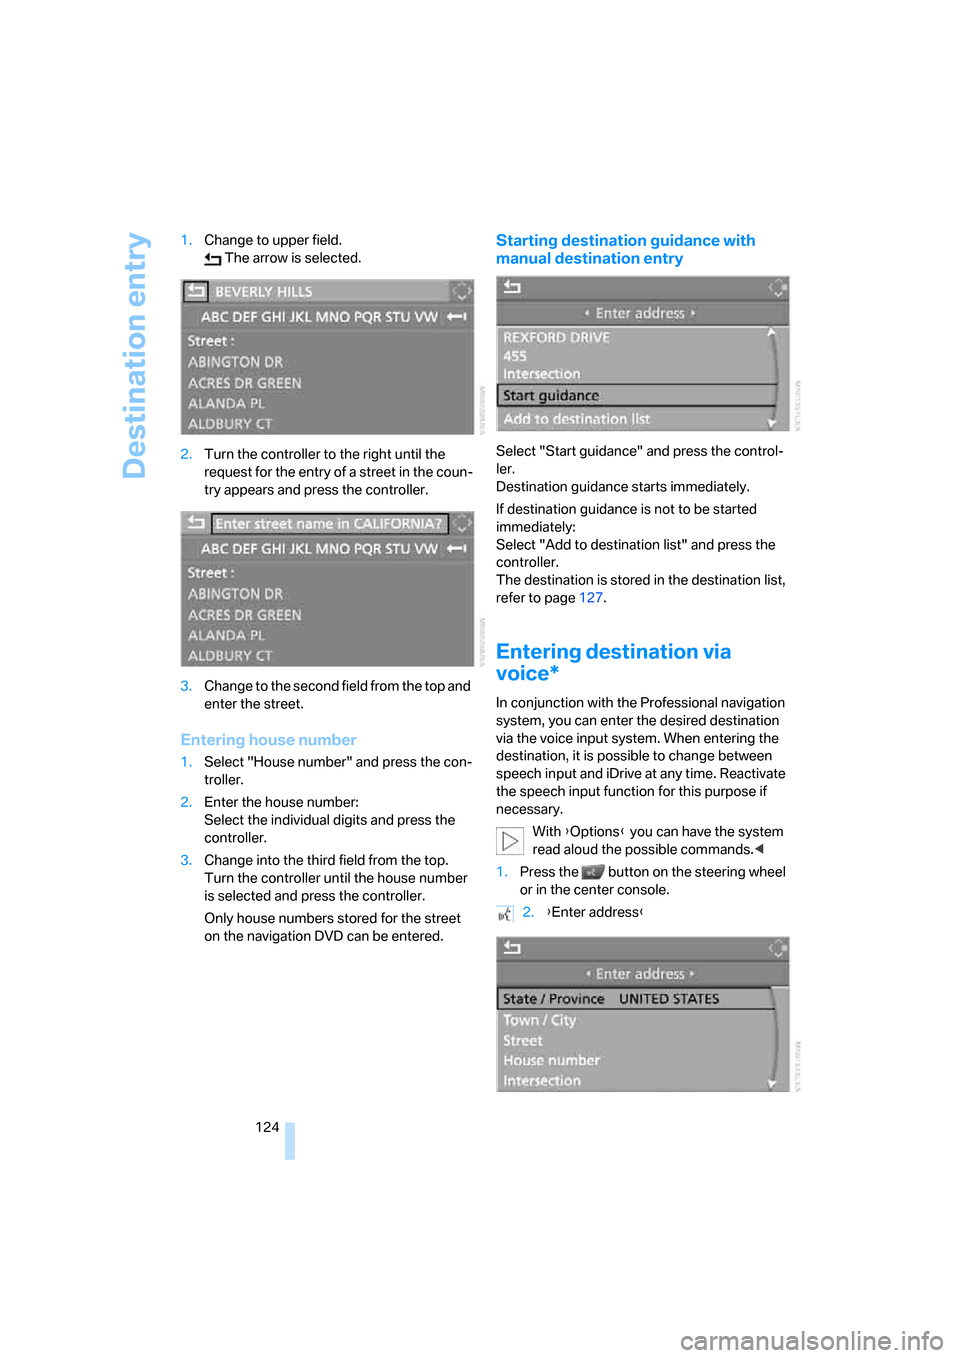
124 1.Change to upper field.
The arrow is selected.
2.Turn the controller to the right until the
request for the entry of a street in the coun-
try appears and press the controller.
3.Change to the second field from the top and
enter the street.
Entering house number
1.Select "House number" and press the con-
troller.
2.Enter the house number:
Select the individual digits and press the
controller.
3.Change into the third field from the top.
Turn the controller until the house number
is selected and press the controller.
Only house numbers stored for the street
on the navigation DVD can be entered.
Starting destination guidance with
manual destination entry
Select "Start guidance" and press the control-
ler.
Destination guidance starts immediately.
If destination guidance is not to be started
immediately:
Select "Add to destination list" and press the
controller.
The destination is stored in the destination list,
refer to page127.
Entering destination via
voice*
In conjunction with the Professional navigation
system, you can enter the desired destination
via the voice input system. When entering the
destination, it is possible to change between
speech input and iDrive at any time. Reactivate
the speech input function for this purpose if
necessary.
With {Options} you can have the system
read aloud the possible commands.<
1.Press the button on the steering wheel
or in the center console.
2.{Enter address}
Page 133 of 236

Destination guidance
132
Destination guidance
Starting destination
guidance
iDrive, for principle details, refer to page16.
1.Change to upper field if necessary. Turn the
controller until "Navigation" is selected and
press the controller.
2.Turn the controller until the destination is
selected from the destination list and press
the controller or enter a new destination,
refer to page121.
3.Select "Start guidance" and press the con-
troller.
After the route has been calculated, destination
guidance is indicated by arrows or a map dis-
play on the Control Display.
The destination guidance can also be started in
the arrow or map display:
Select the symbol and press the controller.
During destination guidance, you can operate
other equipment via iDrive at any time. You are
notified well in advance of a necessary change
of direction by spoken instructions and the dis-
play of the direction arrows.
Terminating/continuing
destination guidance
In the arrow display or map view
Select the symbol and press the controller.
In the destination list
This symbol marks the current destination.
1.Select the current destination and press the
controller.
2.Select "Start guidance" and press the con-
troller.
If the destination was not reached before the
end of the last trip, upon restarting you will see
Page 134 of 236
Navigation
Driving tips
133Reference
At a glance
Controls
Communications
Entertainment
Mobility
the question:
"Continue guidance to destination?".
The destination guidance starts automatically
after a short time.
To start destination guidance immediately:
Select "Yes" and press the controller.
Route display
You have the option of displaying various views
of the route during destination guidance.
From another menu, you can switch
directly to the screen last displayed, refer
to Comfort opening of menu items on
page18.<
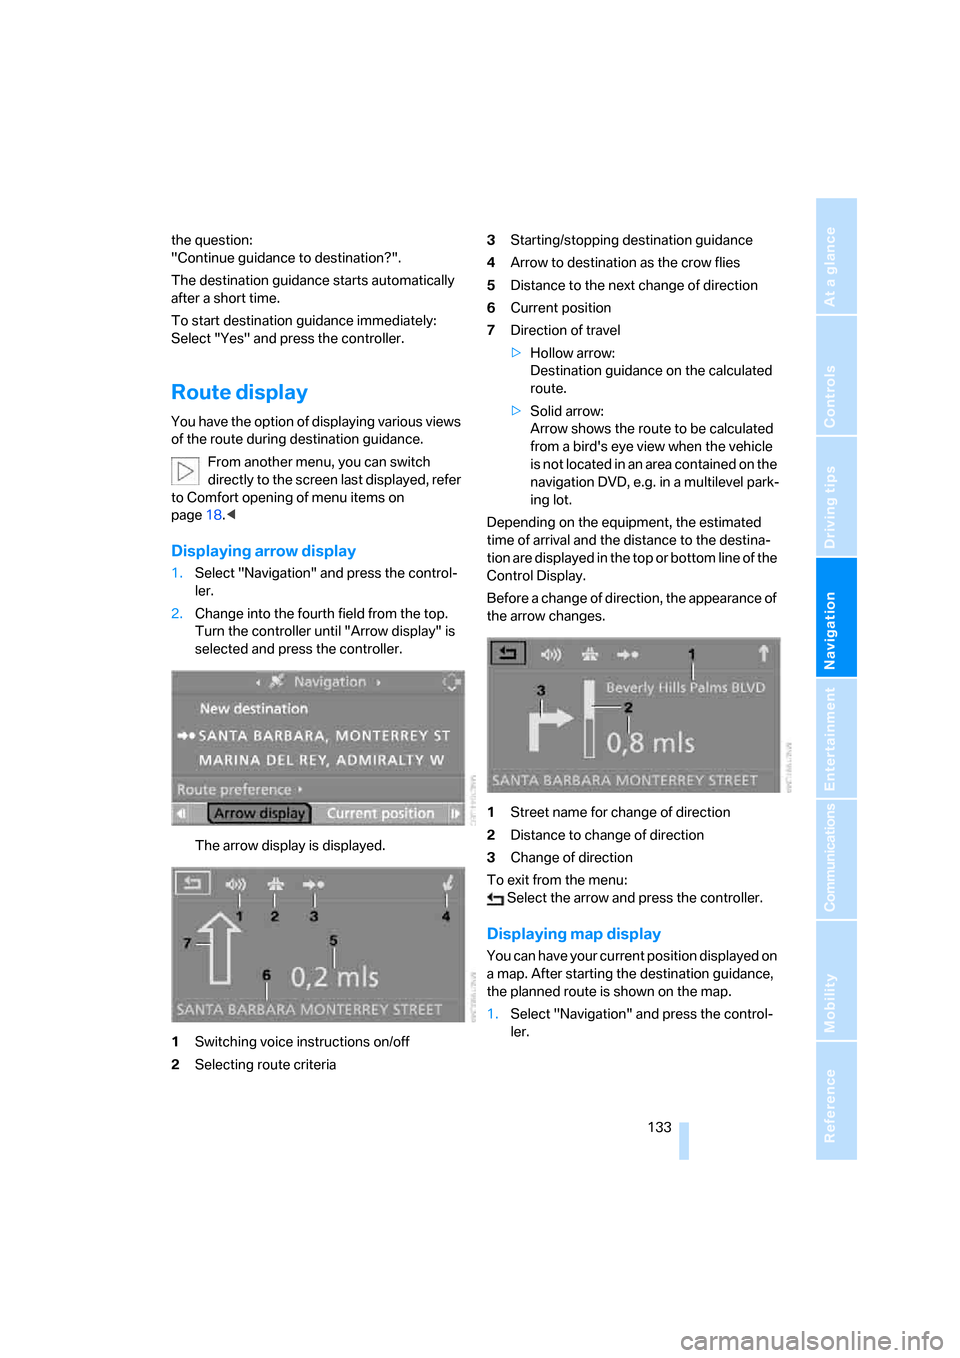
Displaying arrow display
1.Select "Navigation" and press the control-
ler.
2.Change into the fourth field from the top.
Turn the controller until "Arrow display" is
selected and press the controller.
The arrow display is displayed.
1Switching voice instructions on/off
2Selecting route criteria3Starting/stopping destination guidance
4Arrow to destination as the crow flies
5Distance to the next change of direction
6Current position
7Direction of travel
>Hollow arrow:
Destination guidance on the calculated
route.
>Solid arrow:
Arrow shows the route to be calculated
from a bird's eye view when the vehicle
is not located in an area contained on the
navigation DVD, e.g. in a multilevel park-
ing lot.
Depending on the equipment, the estimated
time of arrival and the distance to the destina-
tion are displayed in the top or bottom line of the
Control Display.
Before a change of direction, the appearance of
the arrow changes.
1Street name for change of direction
2Distance to change of direction
3Change of direction
To exit from the menu:
Select the arrow and press the controller.
Displaying map display
You can have your current position displayed on
a map. After starting the destination guidance,
the planned route is shown on the map.
1.Select "Navigation" and press the control-
ler.
Page 135 of 236
Destination guidance
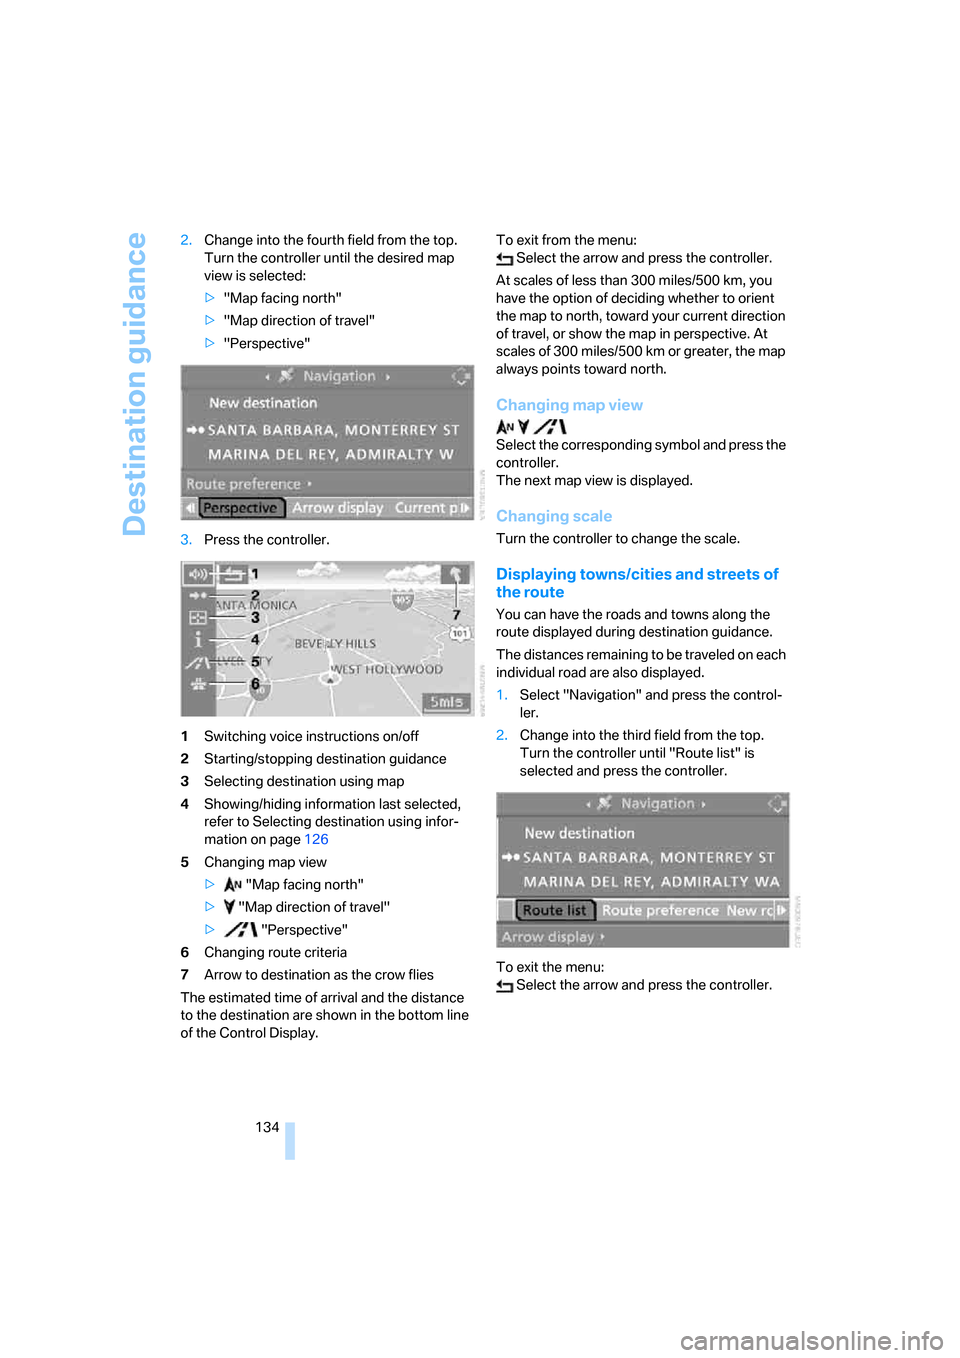
134 2.Change into the fourth field from the top.
Turn the controller until the desired map
view is selected:
>"Map facing north"
>"Map direction of travel"
>"Perspective"
3.Press the controller.
1Switching voice instructions on/off
2Starting/stopping destination guidance
3Selecting destination using map
4Showing/hiding information last selected,
refer to Selecting destination using infor-
mation on page126
5Changing map view
> "Map facing north"
> "Map direction of travel"
> "Perspective"
6Changing route criteria
7Arrow to destination as the crow flies
The estimated time of arrival and the distance
to the destination are shown in the bottom line
of the Control Display.To exit from the menu:
Select the arrow and press the controller.
At scales of less than 300 miles/500 km, you
have the option of deciding whether to orient
the map to north, toward your current direction
of travel, or show the map in perspective. At
scales of 300 miles/500 km or greater, the map
always points toward north.
Changing map view
Select the corresponding symbol and press the
controller.
The next map view is displayed.
Changing scale
Turn the controller to change the scale.
Displaying towns/cities and streets of
the route
You can have the roads and towns along the
route displayed during destination guidance.
The distances remaining to be traveled on each
individual road are also displayed.
1.Select "Navigation" and press the control-
ler.
2.Change into the third field from the top.
Turn the controller until "Route list" is
selected and press the controller.
To exit the menu:
Select the arrow and press the controller.
Page 136 of 236

Navigation
Driving tips
135Reference
At a glance
Controls
Communications
Entertainment
Mobility
Destination guidance
through voice instructions
Switching voice instructions on/off
Voice instructions can be switched on or off
during the destination guidance in the arrow or
map view:
1.In the map view:
Move the controller to the left to change the
field.
2.In the arrow and map display:
Turn the controller until the symbol is
selected and press the controller.
To switch the voice instructions on/off at any
time:
1.Open start menu.
2.Press the controller to open the menu.
3.Turn the controller until "Display settings"
is selected and press the controller.
4.Change to upper field if necessary. Turn the
controller until "Languages" is selected and
press the controller.5.Turn the controller until "Navigation voice
instructions on" is selected and press the
controller.
The voice instructions are switched on.
The setting is stored for the remote control cur-
rently in use
*.
Repeating and canceling voice
instructions
With the programmable buttons on the steering
wheel you can also make the following settings,
refer to page54:
>To repeat the voice instruction:
Press the button.
>To switch voice instructions on/off:
Maintain pressure on the button for several
seconds.
Setting volume of voice instructions
The volume can only be adjusted during a voice
instruction.
1.Repeat the last voice instruction, if required.
2.Turn the knob during the voice instruction
to select the desired volume.
This volume is independent of the volume of the
audio sources.
Page 147 of 236
Radio
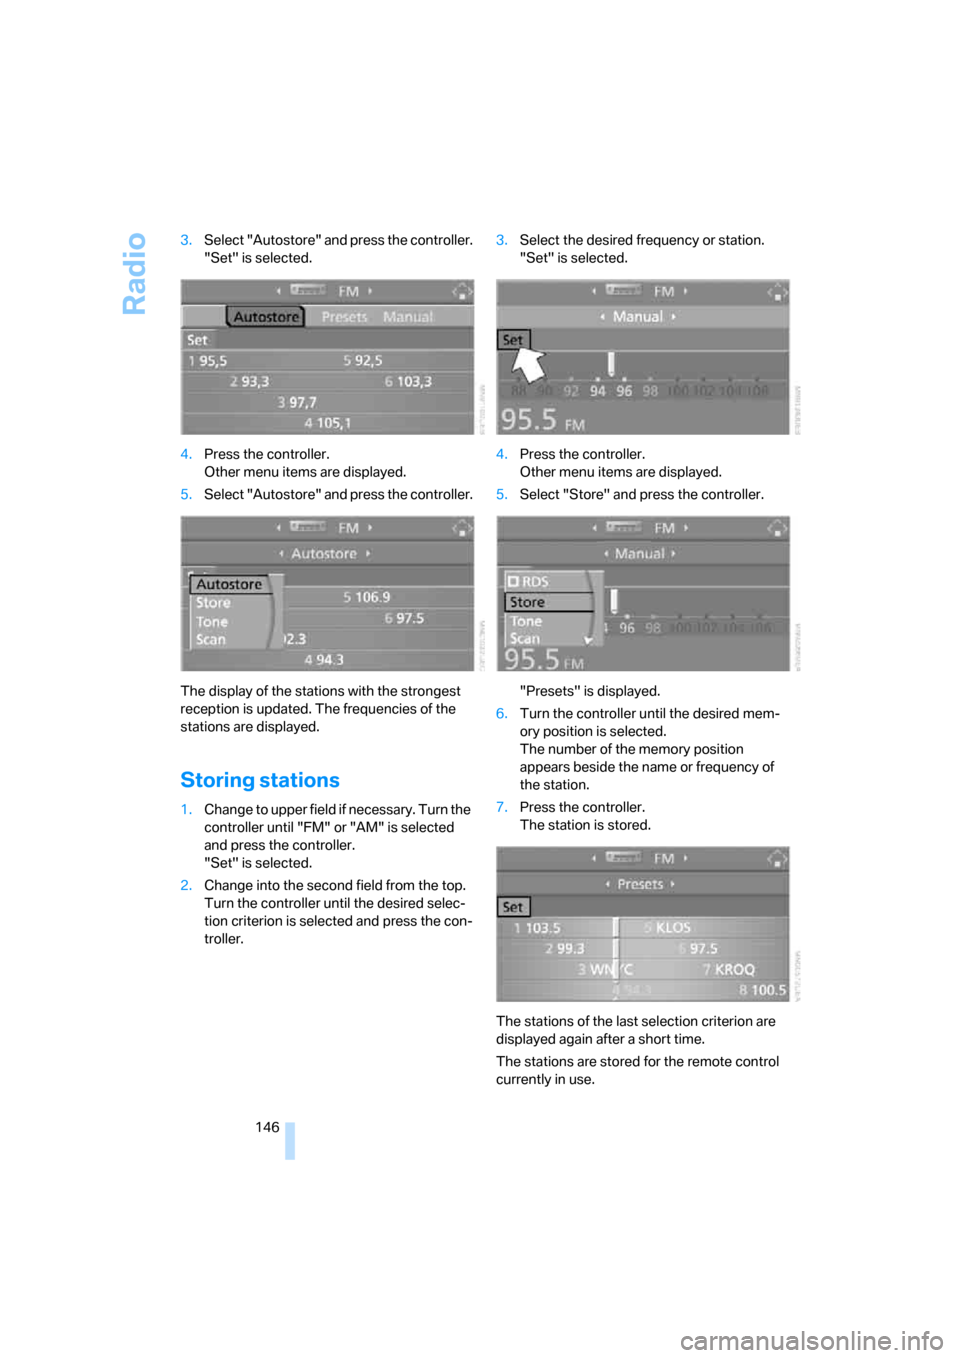
146 3.Select "Autostore" and press the controller.
"Set" is selected.
4.Press the controller.
Other menu items are displayed.
5.Select "Autostore" and press the controller.
The display of the stations with the strongest
reception is updated. The frequencies of the
stations are displayed.
Storing stations
1.Change to upper field if necessary. Turn the
controller until "FM" or "AM" is selected
and press the controller.
"Set" is selected.
2.Change into the second field from the top.
Turn the controller until the desired selec-
tion criterion is selected and press the con-
troller.3.Select the desired frequency or station.
"Set" is selected.
4.Press the controller.
Other menu items are displayed.
5.Select "Store" and press the controller.
"Presets" is displayed.
6.Turn the controller until the desired mem-
ory position is selected.
The number of the memory position
appears beside the name or frequency of
the station.
7.Press the controller.
The station is stored.
The stations of the last selection criterion are
displayed again after a short time.
The stations are stored for the remote control
currently in use.